2013 FORD ESCAPE instrument panel
[x] Cancel search: instrument panelPage 217 of 423

GENERAL INFORMATION
Have your vehicle serviced regularly to help
maintain its roadworthiness and resale
value. There is a large network of Ford
authorized dealers that are there to help
you with their professional servicing
expertise. We believe that their specially
trained technicians are best qualified to
service your vehicle properly and expertly.
They are supported by a wide range of
highly specialized tools developed
specifically for servicing your vehicle.
To help you service your vehicle, we
provide scheduled maintenance
information which makes tracking routine
service easy. See Scheduled
Maintenance (page 396).
If your vehicle requires professional service,
your authorized dealer can provide the
necessary parts and service. Check your
Warranty Guide to find out which parts and
services are covered.
Use only recommended fuels, lubricants,
fluids and service parts conforming to
specifications. Motorcraft® parts are
designed and built to provide the best
performance in your vehicle.
Precautions
•Do not work on a hot engine.
• Make sure that nothing gets caught in
moving parts.
• Do not work on a vehicle with the
engine running in an enclosed space,
unless you are sure you have enough
ventilation.
• Keep all open flames and other burning
material (such as cigarettes) away
from the battery and all fuel related
parts. Working with the Engine Off
1. Set the parking brake and shift to P
(Park).
2. Turn off the engine and remove the key
(if equipped).
3. Block the wheels.
Working with the Engine On
WARNING
To reduce the risk of vehicle damage
and/or personal burn injuries, do not
start your engine with the air cleaner
removed and do not remove it while the
engine is running.
1. Set the parking brake and shift to P (Park).
2. Block the wheels
OPENING AND CLOSING THE
HOOD
1. Inside the vehicle, pull the hood release
handle located under the instrument
panel.
217
Maintenance
E142457
Page 235 of 423

BULB SPECIFICATION CHARTReplacement bulbs are specified in the
chart below. Headlamp bulbs must be
marked with an authorized
“D.O.T.” for
North America to ensure lamp
performance, light brightness and pattern
and safe visibility. The correct bulbs will
not damage the lamp assembly or void the
lamp assembly warranty and will provide
quality bulb burn time.
Trade number
Function
9005LL
Headlamps high beam (Halogen)
H1
* Headlamps high beam (HID)
H11LL
Headlamp low beam (Halogen)
D3S
* Headlamp low beam (HID)
168
Sidemarker - front
WY5W
Park lamp - front (HI Series)
194
Park lamp - front (Low Series)
WY21W
Turn lamp - front (HI Series)
W21W
Turn lamp - front (Low Series)
H10 (9145)
Fog lamps
3157K
Tail/brake lamp
T20
Turn lamp - rear
921
Backup lamp
W5W
License plate lamp
LED
* High-mount brake lamp
LED
* Interior lamps
* To replace these lamps - see your authorized dealer.
To replace all instrument panel lights - see your authorized dealer
235
Maintenance
Page 239 of 423

•If grease or tar is present on the
material, spot-clean the area first with
Motorcraft® Spot and Stain Remover.
In Canada, use Motorcraftt
Multi-Purpose Cleaner.
• If a ring forms on the fabric after spot
cleaning, clean the entire area
immediately (but do not oversaturate)
or the ring will set.
• Do not use household cleaning
products or glass cleaners, which can
stain and discolor the fabric and affect
the flame retardant abilities of the seat
materials.
CLEANING THE INSTRUMENT
PANEL AND INSTRUMENT
CLUSTER LENS
WARNING
Do not use chemical solvents or
strong detergents when cleaning the
steering wheel or instrument panel
to avoid contamination of the airbag
system.
Clean the instrument panel and cluster
lens with a clean, damp, white cotton
cloth, then use a clean and dry white
cotton cloth to dry these areas.
• Avoid cleaners or polishes that increase
the gloss of the upper portion of the
instrument panel. The dull finish in this
area helps protect the driver from
undesirable windshield reflection.
• Be certain to wash or wipe your hands
clean if you have been in contact with
certain products such as insect
repellent and suntan lotion in order to
avoid possible damage to the interior
painted surfaces. •
Do not use household or glass cleaners
as these may damage the finish of the
instrument panel, interior trim and
cluster lens.
• Do not allow air fresheners and hand
sanitizers to spill on interior surfaces.
If a spill occurs, wipe off immediately.
Damage may not be covered by your
warranty.
If a staining liquid like coffee/juice has
been spilled on the instrument panel or on
interior trim surfaces, clean as follows:
1. Wipe up spilled liquid using a clean, white, cotton cloth.
2. Wipe the surface with a damp, clean, white cotton cloth. For more thorough
cleaning, use a mild soap and water
solution. If the spot cannot be
completely cleaned by this method,
the area may be cleaned using a
commercially available cleaning
product designed for automotive
interiors.
3. If necessary, apply more soap and water solution or cleaning product to
a clean, white, cotton cloth and press
the cloth onto the soiled area–allow
this to set at room temperature for 30
minutes.
4. Remove the soaked cloth, and if it is not soiled badly, use this cloth to clean
the area by using a rubbing motion for
60 seconds.
5. Following this, wipe area dry with a clean, white, cotton cloth.
CLEANING LEATHER SEATS (IF
EQUIPPED)
• Remove dust and loose dirt with a
vacuum cleaner.
• Clean spills and stains as quickly as
possible.
239
Vehicle Care
Page 269 of 423

VEHICLE IDENTIFICATION
NUMBER
The vehicle identification number is
located on the driver side instrument panel.
Please note that in the graphic, XXXX is
representative of your vehicle identification
number.
The Vehicle Identification Number contains
the following information:
World manufacturer identifier
A
Brake system, Gross Vehicle
Weight Rating, Restraint Devices
and their locations
B
Make, vehicle line, series, body
type
C
Engine type
D
Check digit
E
Model year
F
Assembly plant
G
Production sequence number
H
269
Capacities and Specifications
E142476
E142477
Page 346 of 423

SD Card Slot and USB Port
SD Card
Note:Your SD card slot is spring-loaded.
To remove the SD card, press the card in
and the system ejects it. Do not attempt to
pull the card to remove it as this could cause
damage.
The card slot can also be used for your
navigation system (if equipped). See
Navigation (page 371).
The SD card slot is located either in the
center console or behind a small access
door in the instrument panel. To access
and play music from your device, press the
lower left corner of the touchscreen.
SD logo is a trademark of SD-3C, LLC. USB Port
The USB ports are located either in the
center console or behind a small access
door in the instrument panel. To access
and play music from your device, press the
lower left corner of the touchscreen.
This feature allows you to plug in media
playing devices, memory sticks, flash drives
or thumb drives, and also charge devices
if they support this feature.
Playing Music from Your Device
Insert your device and select the
USB or SD Card tab once the
system recognizes it. You can
choose from the following options:
346
MyFord Touch®
E142619
E142620
E142621
E142611
Page 351 of 423

A/V Inputs
Note:For safety reasons, connecting or
adjusting the settings on your portable
music player should not be attempted while
the vehicle is moving. Also, the portable
music player should be stored in a secure
location, such as the center console or the
glove box, when the vehicle is in motion. The
audio extension cable must be long enough
to allow the portable music player to be
safely stored while the vehicle is in motion.
Your A/V inputs allow you to connect an
auxiliary audio/video source (e.g. game
systems or personal camcorders) by
connecting RCA cords (not included) to
these input jacks. The jacks are yellow, red
and white and are located either in the
center console or behind a small access
door in the instrument panel.
You can also use the A/V inputs as an
auxiliary input jack (AIJ) to play music from
your portable music player over your
vehicle's speakers. Plug in your one-eighth
inch (3.5 millimeter) RCA adapter into the
two left A/V input jacks (red and white).
Press the lower left corner of the
touchscreen, then select the A/V Inputs
tab. To use the auxiliary input jack feature,
make sure that your portable music player
is designed to be used with headphones
and that it is fully charged. You also need
an audio extension cable with stereo male
one-eighth inch (3.5 millimeter)
connectors at one end and a RCA jack at
the other.
1. Begin with the vehicle parked and the
radio and portable device are turned
off.
2. Attach one end of the audio extension
cable to the headphone output of your
player and the other end into the
adaptor in one of the two left A/V input
jacks (white or red) inside the center
console.
3. Press the lower left corner on the touchscreen. Select either a tuned
station from the FM tab or the CD tab
(if there is a CD already loaded into the
system.) Adjust the volume to a
comfortable listening level.
4. Turn the portable music player on and adjust the volume to one-half.
5. Press the lower left corner on the touchscreen. Select the A/V Input tab.
(You should hear audio from your
portable music player although it may
be low.)
6. Adjust the sound on your portable music player until it reaches the level
of the FM station or CD by switching
back and forth between the controls.
In order to playback video from your iPod®
or iPhone®, (if compatible), you MUST
have a special combination USB/RCA
composite video cable (available for
purchase from Apple® ). When the cable
is connected to your iPod® or iPhone®,
plug the other end into both the RCA jacks
and the USB port.
351
MyFord Touch®
E142622
Page 368 of 423

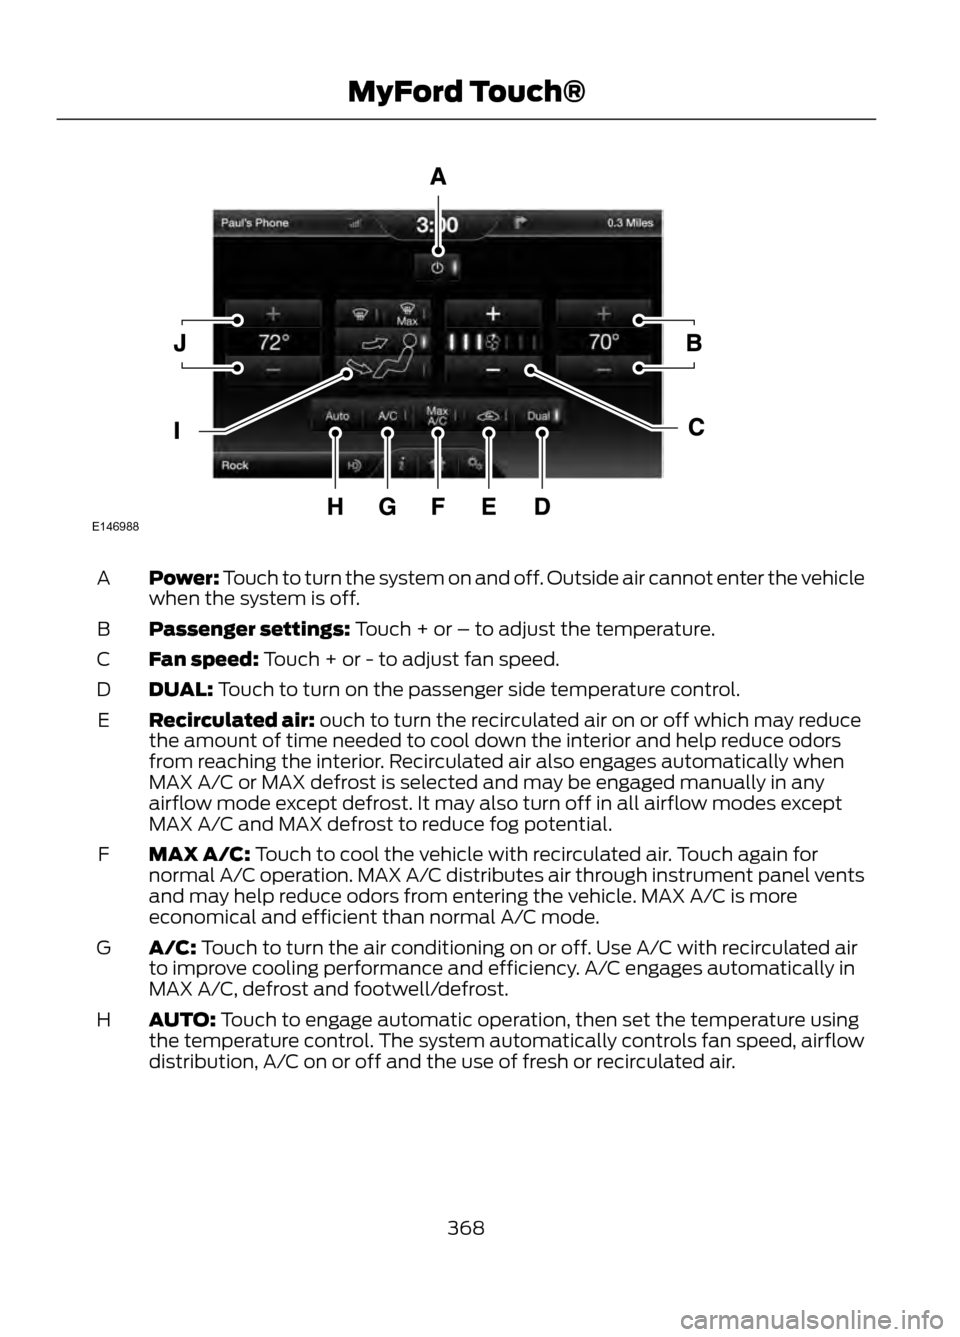
Power: Touch to turn the system on and off. Outside air cannot enter the vehicle
when the system is off.
A
Passenger settings: Touch + or – to adjust the temperature.
B
Fan speed: Touch + or - to adjust fan speed.
C
DUAL: Touch to turn on the passenger side temperature control.
D
Recirculated air: ouch to turn the recirculated air on or off which may reduce
the amount of time needed to cool down the interior and help reduce odors
from reaching the interior. Recirculated air also engages automatically when
MAX A/C or MAX defrost is selected and may be engaged manually in any
airflow mode except defrost. It may also turn off in all airflow modes except
MAX A/C and MAX defrost to reduce fog potential.
E
MAX A/C: Touch to cool the vehicle with recirculated air. Touch again for
normal A/C operation. MAX A/C distributes air through instrument panel vents
and may help reduce odors from entering the vehicle. MAX A/C is more
economical and efficient than normal A/C mode.
F
A/C: Touch to turn the air conditioning on or off. Use A/C with recirculated air
to improve cooling performance and efficiency. A/C engages automatically in
MAX A/C, defrost and footwell/defrost.
G
AUTO: Touch to engage automatic operation, then set the temperature using
the temperature control. The system automatically controls fan speed, airflow
distribution, A/C on or off and the use of fresh or recirculated air.
H
368
MyFord Touch®
E146988
Page 369 of 423

Manual airflow distribution controls:Footwell/Defrost: Distributes air
through the windshield defroster vents, demister vents, footwell vents and rear
seat floor vents, and provides outside air to reduce window fogging.Panel:
Distributes air through the instrument panel vents. Panel/Floor: Distributes
air through the instrument panel vents, demister vents, floor vents and rear seat
floor vents. Floor: Distributes air through the demister vents, floor vents and
I
rear seat floor vents. Defrost: Touch to clear the windshield of fog and thin ice.
Touch again to return to the previous airflow selection. When on, defrost provides
outside air to reduce window fogging and distributes air through the windshield
defroster vents and demister vents. MAX Defrost: Distributes outside air
through the windshield air vents. Air conditioning is automatically selected. The
fan is set to the highest speed and the temperature to HI. When the air
distribution is set in this position, you are unable to select recirculated air or
manually adjust the fan speed and temperature control.
Driver settings: Touch + or – adjust the temperature.
J
Climate Control Voice Commands
Press the voice button on the
steering wheel controls. When
prompted, say any of the
following commands:
Climate Control Commands
"Climate automatic"
"Climate my temperature" "Climate off""Climate on"
"Climate temperature <15.5-29.5> degrees" "Climate temperature <60-85> degrees" "Help"
There are additional climate control
commands but in order to access them,
you have to say "Climate" first. When the
system is ready to listen, you may say any
of the following commands:
369
MyFord Touch®
E142599