2013 FORD ESCAPE weight
[x] Cancel search: weightPage 58 of 423

Three warning chimes will sound once as
the liftgate begins to power close. Five
short chimes indicate a problem with the
open or close request, caused by:
•the ignition is on and the transmission
is not in P (Park);
• or the battery voltage is below the
minimum operating voltage;
• or the vehicle speed is at or above 3
mph (5 km/h).
If the liftgate falls to the closed direction
after the liftgate has stopped in the open
position, four short warning chimes
indicate excessive weight on the gate or a
possible gas strut failure. See your
authorized dealer if you still have the issue
after the load is removed.
Opening and Closing the Liftgate
WARNING
Make sure all persons are clear of the
power liftgate area before using the
power liftgate control.
Note: Be careful when opening or closing
the liftgate in a garage or other enclosed
area to avoid damaging the liftgate.
Note: Do not leave the liftgate open while
driving. This could damage the liftgate and
its components.
To open or close from the
instrument panel: Press the
instrument panel button.
To open or close with the
remote control: Press the
remote control button twice
within three seconds.
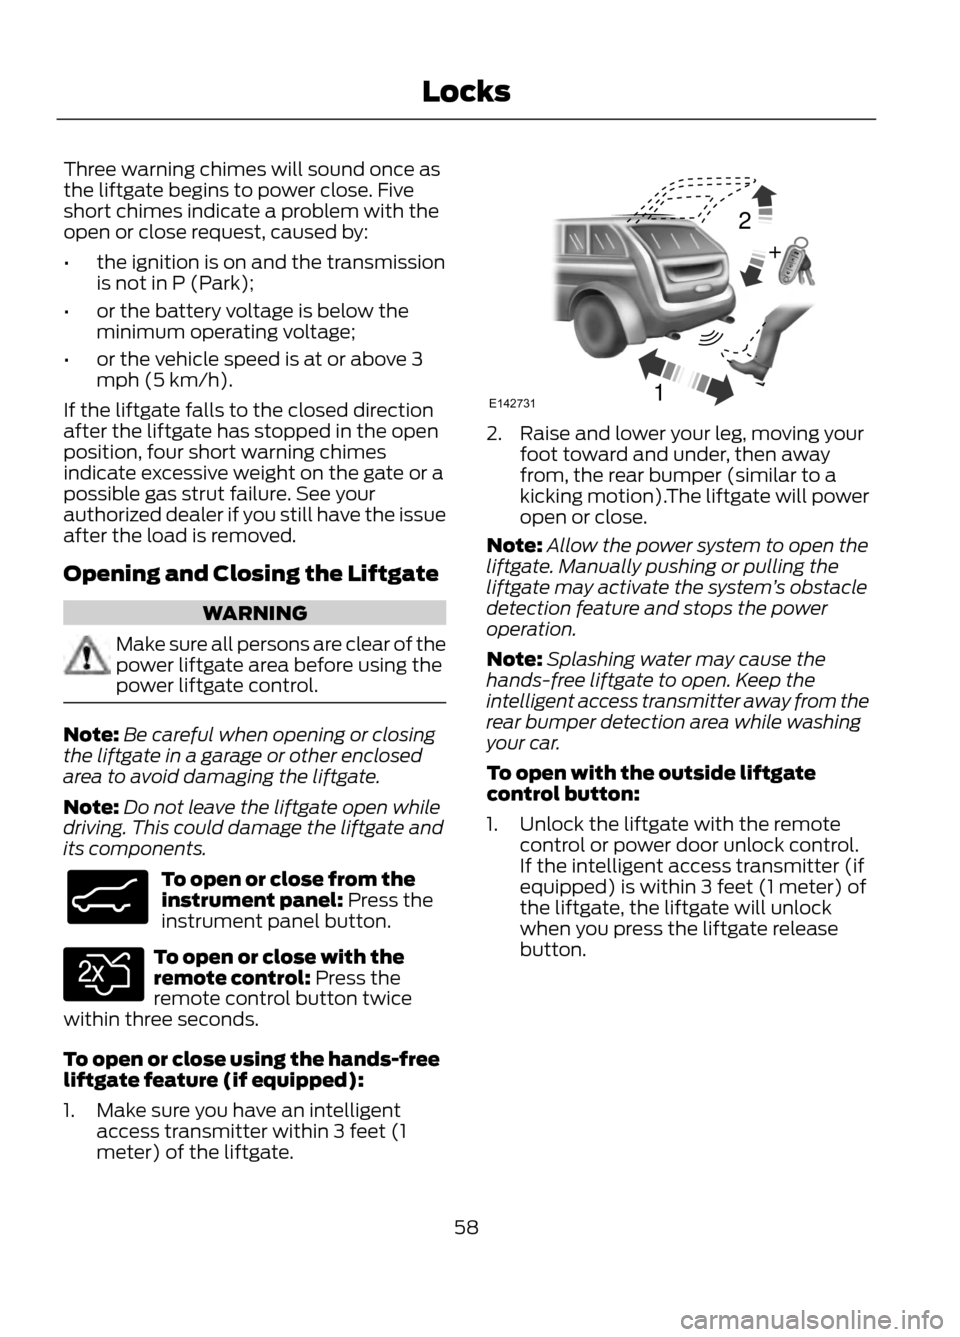
To open or close using the hands-free
liftgate feature (if equipped):
1. Make sure you have an intelligent access transmitter within 3 feet (1
meter) of the liftgate.
2. Raise and lower your leg, moving yourfoot toward and under, then away
from, the rear bumper (similar to a
kicking motion).The liftgate will power
open or close.
Note: Allow the power system to open the
liftgate. Manually pushing or pulling the
liftgate may activate the system ’s obstacle
detection feature and stops the power
operation.
Note: Splashing water may cause the
hands-free liftgate to open. Keep the
intelligent access transmitter away from the
rear bumper detection area while washing
your car.
To open with the outside liftgate
control button:
1. Unlock the liftgate with the remote control or power door unlock control.
If the intelligent access transmitter (if
equipped) is within 3 feet (1 meter) of
the liftgate, the liftgate will unlock
when you press the liftgate release
button.
58
Locks
E138633
E138630
12
+E142731
Page 121 of 423

SITTING IN THE CORRECT
POSITION
WARNINGS
Sitting improperly, out of position or
with the seatback reclined too far
can take weight off the seat cushion
and affect the decision of the passenger
sensing system, resulting in serious injury
or death in the event of a collision. Always
sit upright against your seatback, with your
feet on the floor.
Do not recline the seatback as this
can cause the occupant to slide
under the safety belt, resulting in
serious injury in the event of a collision.
Do not place objects higher than the
seatback to reduce the risk of serious
injury in the event of a collision or
during heavy braking.
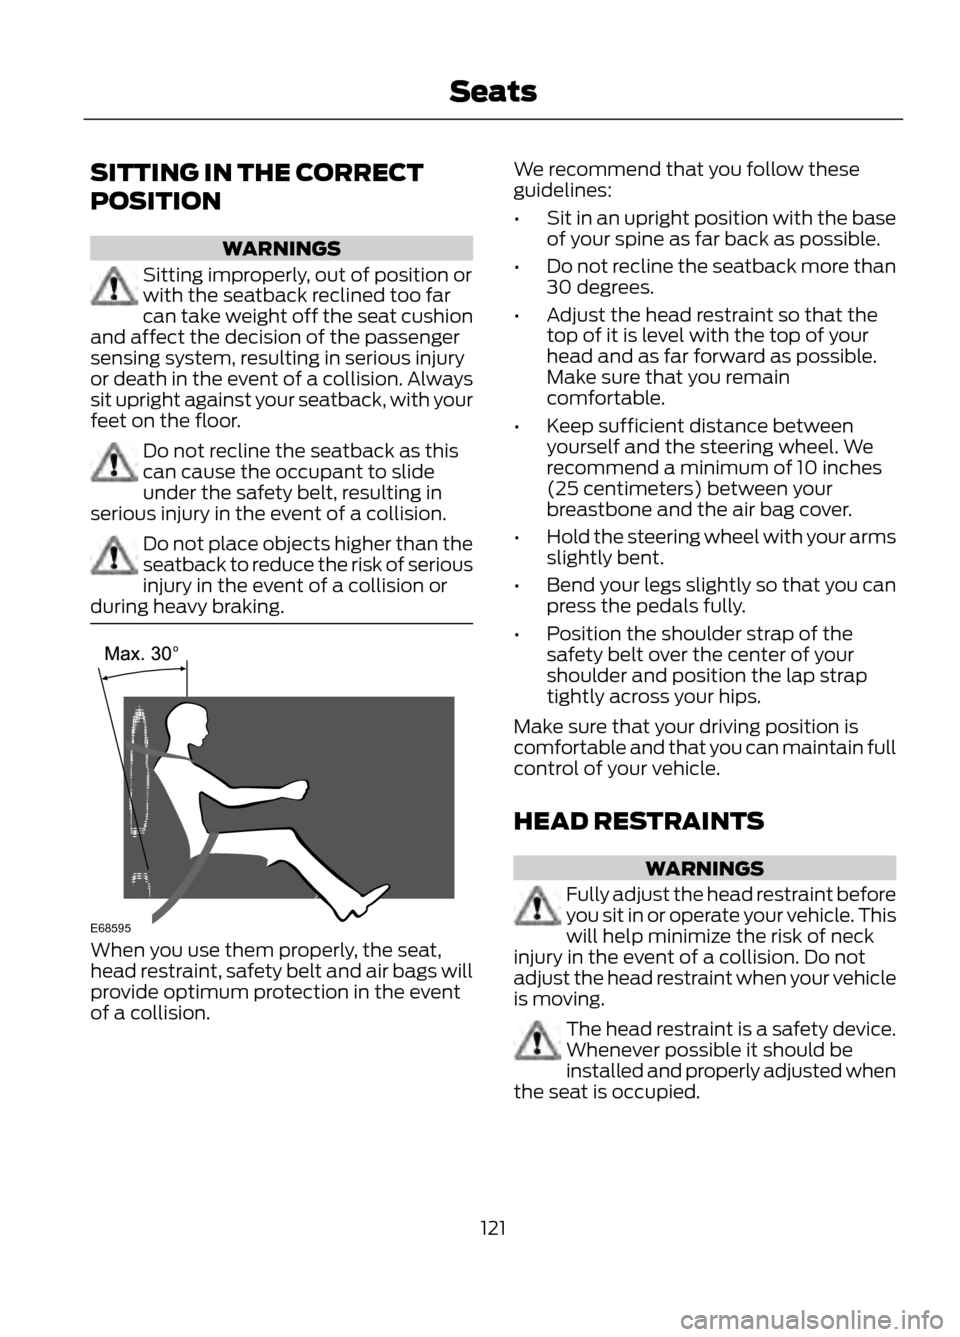
When you use them properly, the seat,
head restraint, safety belt and air bags will
provide optimum protection in the event
of a collision. We recommend that you follow these
guidelines:
•
Sit in an upright position with the base
of your spine as far back as possible.
• Do not recline the seatback more than
30 degrees.
• Adjust the head restraint so that the
top of it is level with the top of your
head and as far forward as possible.
Make sure that you remain
comfortable.
• Keep sufficient distance between
yourself and the steering wheel. We
recommend a minimum of 10 inches
(25 centimeters) between your
breastbone and the air bag cover.
• Hold the steering wheel with your arms
slightly bent.
• Bend your legs slightly so that you can
press the pedals fully.
• Position the shoulder strap of the
safety belt over the center of your
shoulder and position the lap strap
tightly across your hips.
Make sure that your driving position is
comfortable and that you can maintain full
control of your vehicle.
HEAD RESTRAINTS
WARNINGS
Fully adjust the head restraint before
you sit in or operate your vehicle. This
will help minimize the risk of neck
injury in the event of a collision. Do not
adjust the head restraint when your vehicle
is moving.
The head restraint is a safety device.
Whenever possible it should be
installed and properly adjusted when
the seat is occupied.
121
Seats
E68595
Page 179 of 423

1.Remove the crossbar thumbwheels at
both sides of the front crossbar by
turning them counterclockwise.
Note: A small screwdriver or similar tool
can be used to loosen the thumbwheel.
Apply to the fastener head on the top of the
thumbwheel or insert the shaft between the
two paddles of the thumbwheel and rotate
it loose.
2. Remove the crossbar by sliding the ends off of the shoulder bolts in the
side rails.
3. Move the crossbar to the new side rail position and slide the crossbar onto
the shoulder bolt at that position.
4. Replace and tighten the thumbwheels
at both sides of the crossbar by turning
them clockwise until tight. A small
screwdriver or similar tool can be used
to tighten if necessary.
Make sure to check that the thumbwheels
are tight each time load is added or
removed from the roof rack, and
periodically while traveling. Make sure that
the load is secure before traveling. LOAD LIMIT
Vehicle loading - with and without
a trailer
This section will guide you in the proper
loading of your vehicle, trailer or both, to
keep your loaded vehicle weight within its
design rating capability, with or without a
trailer. Properly loading your vehicle will
provide maximum return of vehicle design
performance. Before loading your vehicle,
familiarize yourself with the following
terms for determining your vehicle
’s weight
ratings, with or without a trailer, from the
vehicle ’s Tire Label or Safety Compliance
Certification Label:
Base Curb Weight - is the weight of the
vehicle including a full tank of fuel and all
standard equipment. It does not include
passengers, cargo, or optional equipment.
Vehicle Curb Weight - is the weight of
your new vehicle when you picked it up
from your authorized dealer plus any
aftermarket equipment.
179
Load Carrying
E142513
Page 180 of 423

Payload - is the combined weight of cargo
and passengers that the vehicle is carrying.
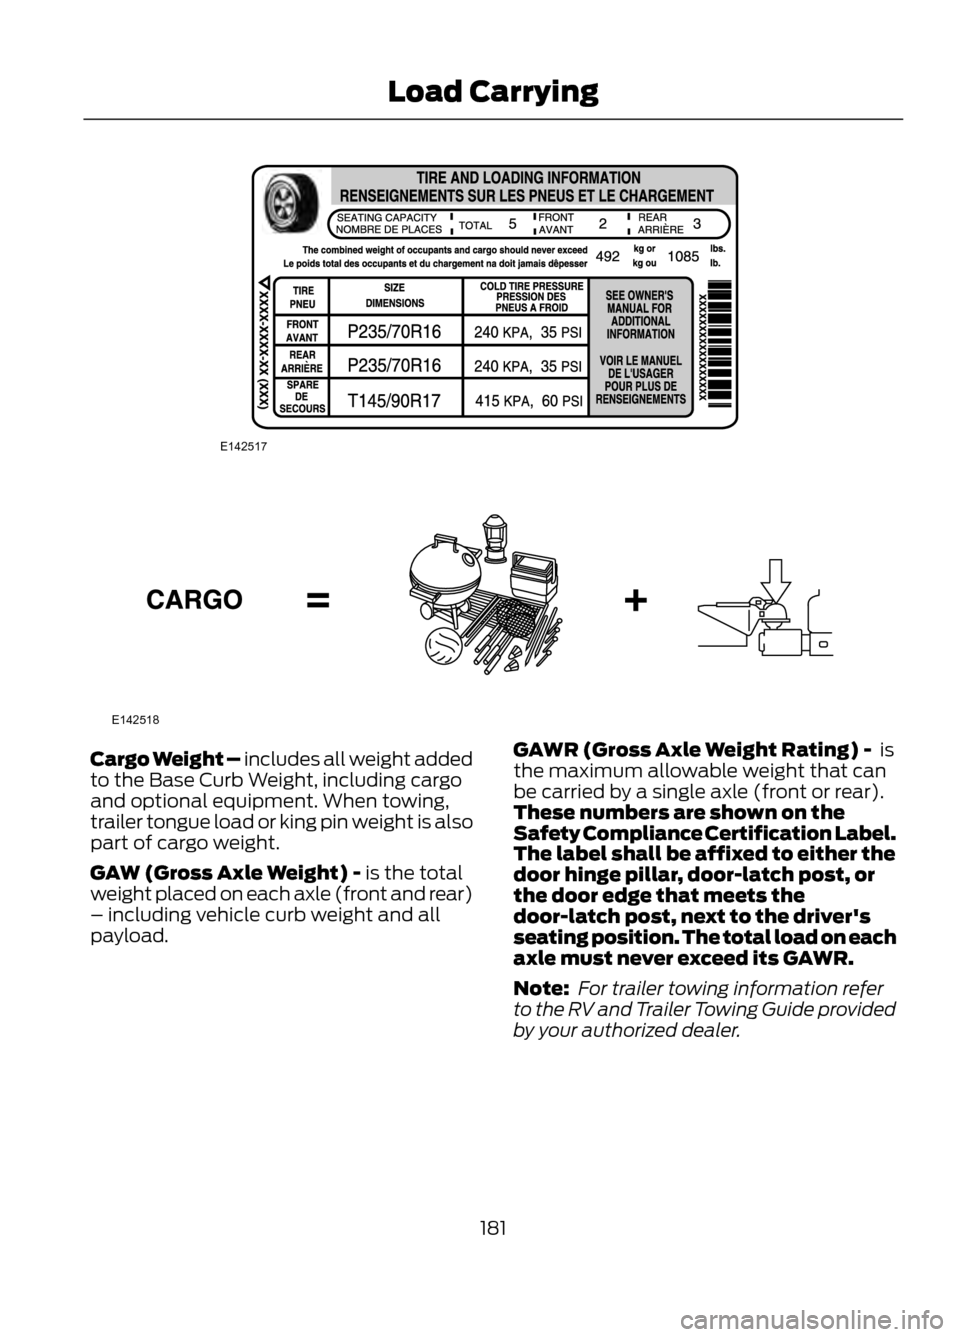
The maximum payload for your vehicle can
be found on the Tire Label on the B-Pillar
or the edge of the driver’s door (vehicles
exported outside the US and Canada may
not have a Tire Label). Look for “THE
COMBINED WEIGHT OF OCCUPANTS
AND CARGO SHOULD NEVER EXCEED
XXX kg OR XXX lb. ” for maximum
payload. The payload listed on the Tire
Label is the maximum payload for the
vehicle as built by the assembly plant. If
any aftermarket or authorized-dealer
installed equipment has been installed on
the vehicle, the weight of the equipment
must be subtracted from the payload
listed on the Tire Label in order to
determine the new payload.WARNING
The appropriate loading capacity of
your vehicle can be limited either by
volume capacity (how much space
is available) or by payload capacity (how
much weight the vehicle should carry).
Once you have reached the maximum
payload of your vehicle, do not add more
cargo, even if there is space available.
Overloading or improperly loading your
vehicle can contribute to loss of vehicle
control and vehicle rollover.
Example only:
180
Load Carrying
E142516
Page 181 of 423

Cargo Weight – includes all weight added
to the Base Curb Weight, including cargo
and optional equipment. When towing,
trailer tongue load or king pin weight is also
part of cargo weight.
GAW (Gross Axle Weight) - is the total
weight placed on each axle (front and rear)
– including vehicle curb weight and all
payload.GAWR (Gross Axle Weight Rating) - is
the maximum allowable weight that can
be carried by a single axle (front or rear).
These numbers are shown on the
Safety Compliance Certification Label.
The label shall be affixed to either the
door hinge pillar, door-latch post, or
the door edge that meets the
door-latch post, next to the driver's
seating position. The total load on each
axle must never exceed its GAWR.
Note:
For trailer towing information refer
to the RV and Trailer Towing Guide provided
by your authorized dealer.
181
Load Carrying
E142517
E142518
Page 182 of 423

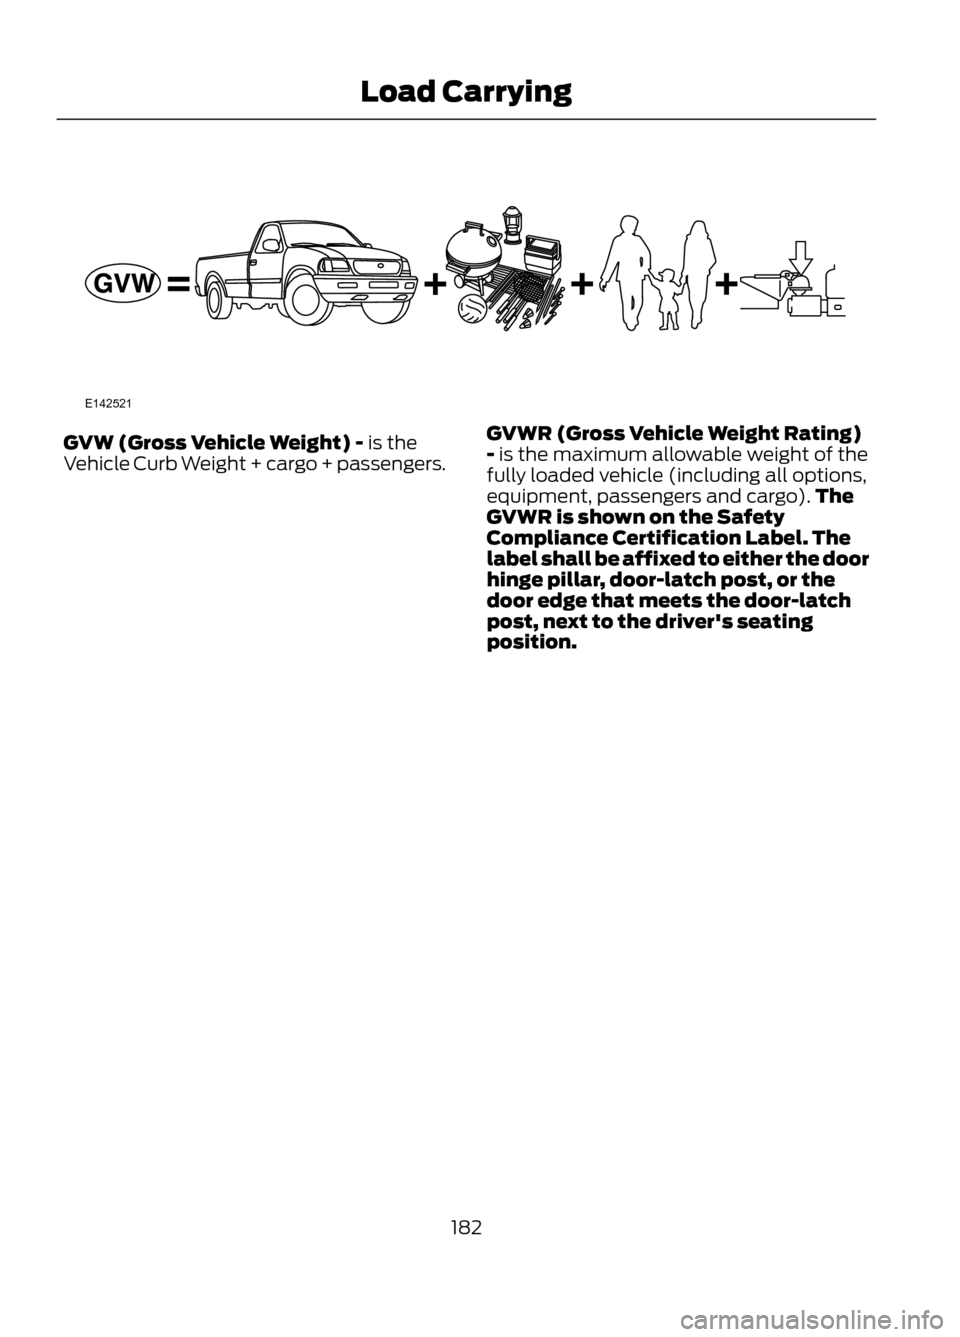
GVW (Gross Vehicle Weight) - is the
Vehicle Curb Weight + cargo + passengers.GVWR (Gross Vehicle Weight Rating)
- is the maximum allowable weight of the
fully loaded vehicle (including all options,
equipment, passengers and cargo).
The
GVWR is shown on the Safety
Compliance Certification Label. The
label shall be affixed to either the door
hinge pillar, door-latch post, or the
door edge that meets the door-latch
post, next to the driver's seating
position.
182
Load Carrying
E142521
Page 184 of 423

WARNING
Exceeding the Safety Compliance
Certification Label vehicle weight
rating limits could result in
substandard vehicle handling or
performance, engine, transmission and/or
structural damage, serious damage to the
vehicle, loss of control and personal injury.
GCW (Gross Combined Weight) - is the
weight of the loaded vehicle (GVW) plus
the weight of the fully loaded trailer
GCWR (Gross Combined Weight
Rating) -is the maximum allowable
weight of the vehicle and the loaded trailer
-including all cargo and passengers - that
the vehicle can handle without risking
damage. (Important: The towing vehicle ’s
braking system is rated for operation at
GVWR, not at GCWR.) Separate functional
brakes should be used for safe control of
towed vehicles and for trailers where the
GCW of the towing vehicle plus the trailer
exceed the GVWR of the towing vehicle.
The GCW must never exceed the GCWR.
Maximum Loaded Trailer Weight - is the
highest possible weight of a fully loaded
trailer the vehicle can tow. It assumes a
vehicle with only mandatory options, no
cargo (internal or external), a tongue load
of 10– 15% (conventional trailer) or king
pin weight of 15– 25% (fifth wheel trailer),
and driver only (150 lb. [68 kg]). Consult
your authorized dealer (or the RV and
Trailer Towing Guide provided by your
authorized dealer) for more detailed
information. Tongue Load or Fifth Wheel King Pin
Weight - refers to the amount of the
weight that a trailer pushes down on a
trailer hitch.
Examples: For a 5000 lb. (2268 kg)
conventional trailer, multiply 5000 by 0.10
and 0.15 to obtain a proper tongue load
range of 500 to 750 lb. (227 to 340 kg).
For an 11500 lb. (5216 kg) fifth wheel
trailer, multiply by 0.15 and 0.25 to obtain
a proper king pin load range of 1725 to 2875
lb. (782 to 1304 kg).
WARNINGS
Do not exceed the GVWR or the
GAWR specified on the Safety
Compliance Certification Label.
Do not use replacement tires with
lower load carrying capacities than
the original tires because they may
lower the vehicle ’s GVWR and GAWR
limitations. Replacement tires with a higher
limit than the original tires do not increase
the GVWR and GAWR limitations.
Exceeding any vehicle weight rating
limitation could result in serious
damage to the vehicle and/or
personal injury.
184
Load Carrying
E142526
Page 185 of 423

Steps for determining the correct load
limit:
1. Locate the statement "The combinedweight of occupants and cargo should
never exceed XXX kg or XXX lb." on
your vehicle ’s placard.
2. Determine the combined weight of the
driver and passengers that will be riding
in your vehicle.
3. Subtract the combined weight of the driver and passengers from XXX kg or
XXX lb.
4. The resulting figure equals the available amount of cargo and luggage
load capacity. For example, if the “XXX”
amount equals 1,400 lb. and there will
be five 150 lb. passengers in your
vehicle, the amount of available cargo
and luggage load capacity is 650 lb.
(1400-750 (5 x 150) = 650 lb.). In
metric units (635-340 (5 x 68) = 295
kg.)
5. Determine the combined weight of luggage and cargo being loaded on the
vehicle. That weight may not safely
exceed the available cargo and luggage
load capacity calculated in Step 4.
6. If your vehicle will be towing a trailer, load from your trailer will be transferred
to your vehicle. Consult this manual to
determine how this reduces the
available cargo and luggage load
capacity of your vehicle.
185
Load Carrying