2013 FORD B MAX manual transmission
[x] Cancel search: manual transmissionPage 4 of 298

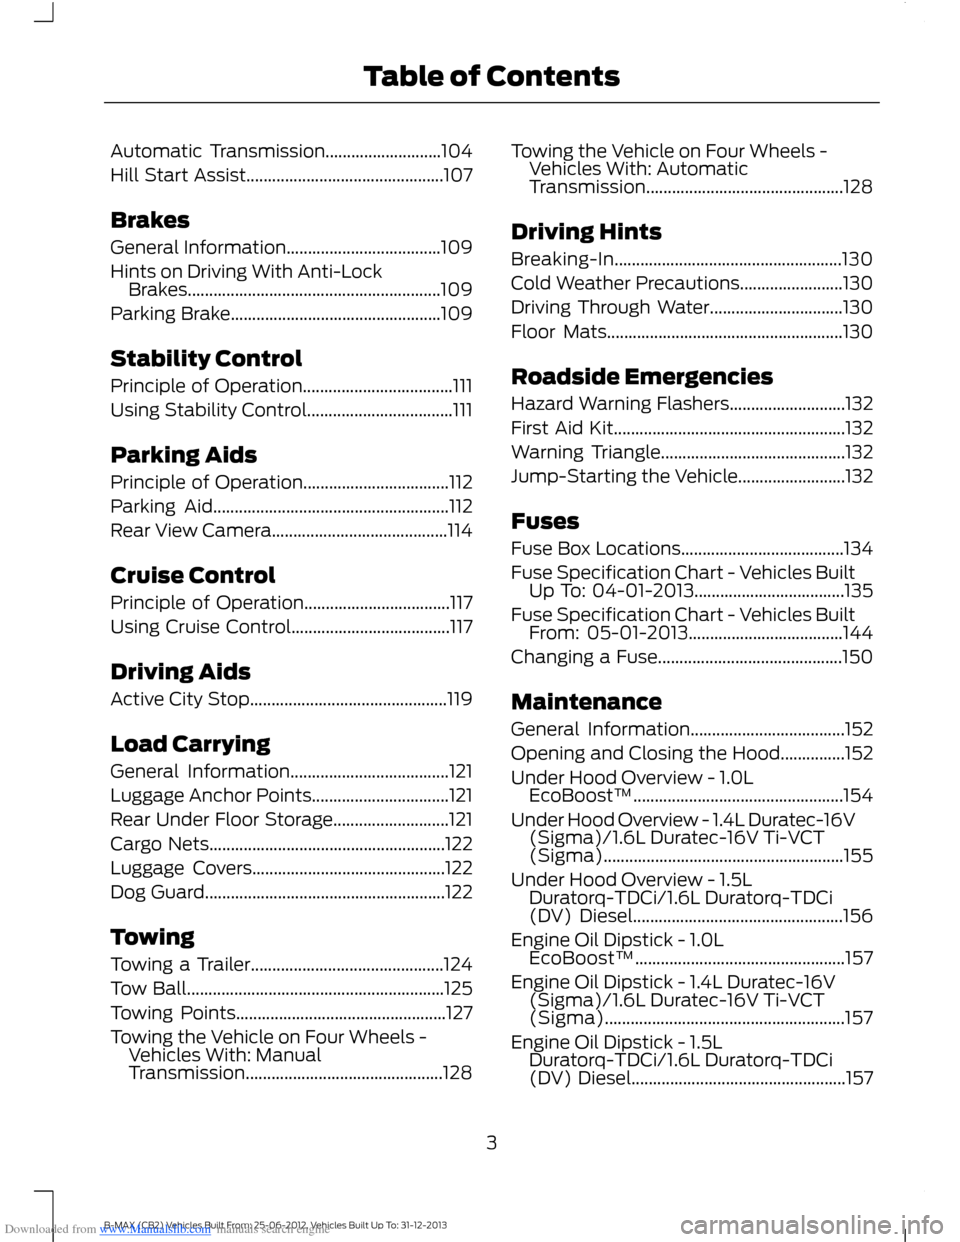
Downloaded from www.Manualslib.com manuals search engine Interior Lamps..................................................51
Windows and Mirrors
Power Windows..............................................53
Exterior Mirrors................................................54
Interior Mirror...................................................55
Childminder Mirror.........................................56
Global Opening and Closing......................56
Instrument Cluster
Gauges...............................................................58
Warning Lamps and Indicators................58
Audible Warnings and Indicators..............61
Information Displays
General Information......................................63
Clock...................................................................66
Trip Computer.................................................66
Personalized Settings...................................67
Information Messages..................................67
Climate Control
Principle of Operation...................................75
Air Vents.............................................................75
Manual Climate Control..............................76
Automatic Climate Control.........................77
Hints on Controlling the InteriorClimate...........................................................79
Heated Windows and Mirrors....................82
Seats
Sitting in the Correct Position...................83
Head Restraints..............................................83
Manual Seats..................................................85
Rear Seats........................................................86
Heated Seats...................................................87
Front Seat Armrest........................................87
Auxiliary Power Points
Auxiliary Power Points.................................88
Cigar Lighter.....................................................88
Storage Compartments
Cup Holders.....................................................89
Glasses Holder................................................89
Starting and Stopping theEngine
General Information.....................................90
Ignition Switch................................................90
Keyless Starting.............................................90
Steering Wheel Lock - Vehicles Without:Keyless Entry and Push ButtonStart/Push Button Start..........................92
Steering Wheel Lock - Vehicles With:Keyless Entry and Push ButtonStart/Push Button Start..........................92
Starting a Gasoline Engine.........................93
Starting a Diesel Engine..............................94
Diesel Particulate Filter...............................94
Switching Off the Engine............................95
Unique Driving Character-istics
Auto-Start-Stop.............................................96
Fuel and Refueling
Safety Precautions........................................98
Fuel Quality - Gasoline................................99
Fuel Quality - Diesel.....................................99
Running Out of Fuel......................................99
Catalytic Converter.....................................100
Refueling...........................................................101
Fuel Consumption.......................................102
Technical Specifications............................103
Transmission
Manual Transmission.................................104
2B-MAX (CB2) Vehicles Built From: 25-06-2012, Vehicles Built Up To: 31-12-2013Table of Contents
Page 5 of 298

Downloaded from www.Manualslib.com manuals search engine Automatic Transmission...........................104
Hill Start Assist..............................................107
Brakes
General Information....................................109
Hints on Driving With Anti-LockBrakes...........................................................109
Parking Brake.................................................109
Stability Control
Principle of Operation...................................111
Using Stability Control..................................111
Parking Aids
Principle of Operation..................................112
Parking Aid.......................................................112
Rear View Camera.........................................114
Cruise Control
Principle of Operation..................................117
Using Cruise Control.....................................117
Driving Aids
Active City Stop..............................................119
Load Carrying
General Information.....................................121
Luggage Anchor Points................................121
Rear Under Floor Storage...........................121
Cargo Nets.......................................................122
Luggage Covers.............................................122
Dog Guard........................................................122
Towing
Towing a Trailer.............................................124
Tow Ball............................................................125
Towing Points.................................................127
Towing the Vehicle on Four Wheels -Vehicles With: ManualTransmission..............................................128
Towing the Vehicle on Four Wheels -Vehicles With: AutomaticTransmission..............................................128
Driving Hints
Breaking-In.....................................................130
Cold Weather Precautions........................130
Driving Through Water...............................130
Floor Mats.......................................................130
Roadside Emergencies
Hazard Warning Flashers...........................132
First Aid Kit......................................................132
Warning Triangle...........................................132
Jump-Starting the Vehicle.........................132
Fuses
Fuse Box Locations......................................134
Fuse Specification Chart - Vehicles BuiltUp To: 04-01-2013...................................135
Fuse Specification Chart - Vehicles BuiltFrom: 05-01-2013....................................144
Changing a Fuse...........................................150
Maintenance
General Information....................................152
Opening and Closing the Hood...............152
Under Hood Overview - 1.0LEcoBoost™.................................................154
Under Hood Overview - 1.4L Duratec-16V(Sigma)/1.6L Duratec-16V Ti-VCT(Sigma)........................................................155
Under Hood Overview - 1.5LDuratorq-TDCi/1.6L Duratorq-TDCi(DV) Diesel.................................................156
Engine Oil Dipstick - 1.0LEcoBoost™.................................................157
Engine Oil Dipstick - 1.4L Duratec-16V(Sigma)/1.6L Duratec-16V Ti-VCT(Sigma)........................................................157
Engine Oil Dipstick - 1.5LDuratorq-TDCi/1.6L Duratorq-TDCi(DV) Diesel..................................................157
3B-MAX (CB2) Vehicles Built From: 25-06-2012, Vehicles Built Up To: 31-12-2013Table of Contents
Page 12 of 298

Downloaded from www.Manualslib.com manuals search engine Vehicle Interior Overview
See Transmission (page 104).A
See Locking and Unlocking (page 34).B
See Power Windows (page 53). See Exterior Mirrors (page 54).C
See Head Restraints (page 83).D
See Fastening the Safety Belts (page 21).E
See Rear Seats (page 86).F
See Manual Seats (page 85).G
See Parking Brake (page 109).H
See Opening and Closing the Hood (page 152).I
10B-MAX (CB2) Vehicles Built From: 25-06-2012, Vehicles Built Up To: 31-12-2013At a Glance
Page 28 of 298

Downloaded from www.Manualslib.com manuals search engine GENERAL INFORMATION ON
RADIO FREQUENCIES
Note:Changes or modifications notexpressly approved by the party responsiblefor compliance could void the user’sauthority to operate the equipment.
The typical operating range for yourtransmitter is approximately 33 ft (10 m).
A decrease in operating range could becaused by:
•weather conditions
•nearby radio towers
•structures around your vehicle
•other vehicles parked next to yourvehicle.
The radio frequency used by your remotecontrol can also be used by other shortdistance radio transmissions (e.g. amateurradios, medical equipment, wirelessheadphones, remote controls and alarmsystems). If the frequencies are jammed,you will not be able to use your remotecontrol. You can lock and unlock the doorswith the key.
Note:Make sure your vehicle is lockedbefore leaving it unattended.
Note:If you are in range, the remote controlwill operate if you press any buttonunintentionally.
REMOTE CONTROL
You can program a maximum of eightremote controls to your vehicle. Thisincludes any that were supplied with yourvehicle. The remote controls must remaininside your vehicle during the programmingprocedure. Fasten the front safety beltsand close all doors to make sure thatconflicting chimes do not sound duringprogramming.
Programming a New RemoteControl
1.Turn the ignition key from position 0 toposition II four times within sixseconds.
2.Turn the ignition to position 0. A tonesounds to indicate that it is nowpossible to program a remote control.
3.Press any button on a new remotecontrol within 10 seconds. A tone willsound as confirmation.
4.Repeat step three within 10 secondsfor each new remote control. Do notremove the key from the ignition whenpressing the button on the remotecontrol.
5.Switch the ignition back on (positionII) or wait for 10 seconds withoutprogramming another remote controlto end the key programming. Only theremote controls which you have justprogrammed are now able to lock andunlock your vehicle.
Reprogramming the UnlockingFunction
Note:When you press the unlock buttoneither all the doors are unlocked or only thedriver’s door and the liftgate are unlocked.Pressing the unlock button again unlocksall the doors.
Press and hold the unlock and lock buttonson the remote control simultaneously forat least four seconds with the ignition off.The direction indicators will flash twice toconfirm the change.
To return to the original unlocking function,repeat the process.
26B-MAX (CB2) Vehicles Built From: 25-06-2012, Vehicles Built Up To: 31-12-2013Keys and Remote Controls
Page 51 of 298

Downloaded from www.Manualslib.com manuals search engine INSTRUMENT LIGHTING
DIMMER
Press it repeatedly or press it and hold ituntil the desired level is reached.
Note:If you disconnect the battery or itloses charge the instrument lighting willreturn to its brightest setting.
HEADLAMP EXIT DELAY
After you switch the ignition off, you canswitch the headlamps on by pulling thedirection indicator lever toward you. Youwill hear a short tone. The headlamps willswitch off automatically after threeminutes with any door open or 30 secondsafter the last door has been closed. Youcan cancel this feature by pulling thedirection indicator toward you again orswitching the ignition on.
DAYTIME RUNNING LAMPS
WARNING
Always remember to switch yourheadlamps on in low light situationsor during inclement weather. Thesystem does not turn on the tail lamps andmay not provide adequate lighting duringthese conditions. Failure to switch theheadlamps on under these conditions mayresult in a collision.
The system switches the headlamps on inlow light situations.
To switch the system on:
1.Switch the ignition on.
2.Turn the lighting control to the off,autolamp or parking lamp position.
3.Make sure the transmission selectorlever is not in position P.
FRONT FOG LAMPS
Press the control to switch the fog lampson or off.
You can switch the fog lamps on when thelighting control is in any position exceptoff.
49B-MAX (CB2) Vehicles Built From: 25-06-2012, Vehicles Built Up To: 31-12-2013Lighting
Page 63 of 298

Downloaded from www.Manualslib.com manuals search engine Oil Pressure Warning Lamp
WARNING
Do not resume your journey if itilluminates despite the level beingcorrect. Have the system checked byan authorized dealer immediately.
If it illuminates when you aredriving, this indicates amalfunction. Stop your vehicleas soon as it is safe to do so and switch theengine off. Check the engine oil level. SeeEngine Oil Check (page 157).
Power Steering Warning Lamp
If it illuminates when you aredriving, this indicates amalfunction. You will continueto have full steering but will need to exertgreater force on the steering wheel. Havethe system checked by an authorizeddealer as soon as possible.
Rear Fog Lamp Indicator
It will illuminate when you switchthe rear fog lamps on.
Safety Belt Minder Warning Lamp
It will illuminate when a safetybelt is not fastened. See SafetyBelt Minder (page 22).
Shift Indicator
It will illuminate to inform youthat shifting to a higher gear maygive better fuel economy andlower CO2 emissions. It will notilluminate during periods of highacceleration, when you brake orpress the clutch pedal.
Stability Control Indicator
While driving, it flashes when thesystem is operating. After youswitch the ignition on, if it doesnot illuminate or illuminates continuouslywhile driving, this indicates a malfunction.During a malfunction, the system switchesoff. Have the system checked by anauthorized dealer as soon as possible.
If you switch the electronic stabilityprogram off, the warning lamp willilluminate. The lamp will go out when youswitch the system back on or when youswitch the ignition off.
AUDIBLE WARNINGS AND
INDICATORS
Automatic Transmission
Sounds when you open the driver's doorand do not move the transmission selectorlever to position P.
Key Outside Car
Vehicles With Keyless System
Sounds when you close the door, theengine is running and the system does notdetect a passive key inside your vehicle.
Headlamps On
Sounds when you remove the key from theignition and open the driver's door and youhave left the headlamps or parking lampson.
Low Fuel
A warning chime will sound when theremaining fuel is less than approximately1.3 gallons (6 liters). The distance to emptydisplayed may vary depending on drivingstyle and road conditions.
61B-MAX (CB2) Vehicles Built From: 25-06-2012, Vehicles Built Up To: 31-12-2013Instrument Cluster
Page 75 of 298

Downloaded from www.Manualslib.com manuals search engine Transmission
ActionMessageindicatorMessage
Have your vehicle checked by anauthorized dealer as soon as possible.redTransmission malfunctionService now
The transmission is overheating andneeds to cool. Stop your vehicle assoon as it is safe to do so. Move thetransmission selector lever to positionN or P and apply the parking brake.Switch off the ignition until the trans-mission has cooled and the messagedisappears from the display.
redTransmission overtemp.Stop safely
See Automatic Transmission (page104). See Starting and Stopping theEngine (page 90).-Vehicle not in ParkSelect P
See Automatic Transmission (page104). See Starting and Stopping theEngine (page 90).-To start select N or P
See Starting and Stopping theEngine (page 90).-To start press brake
See Automatic Transmission (page104). See Starting and Stopping theEngine (page 90).-To start select N
See Automatic Transmission (page104). See Starting and Stopping theEngine (page 90).-Door open apply brake
Stability Control
ActionMessageindicatorMessage
Have your vehicle checked by anauthorized dealer as soon as possible.amberABS malfunctionService now
Have your vehicle checked by anauthorized dealer as soon as possible.-ESP malfunctionNext service
See Using Stability Control (page111).-ESP off
73B-MAX (CB2) Vehicles Built From: 25-06-2012, Vehicles Built Up To: 31-12-2013Information Displays
Page 83 of 298

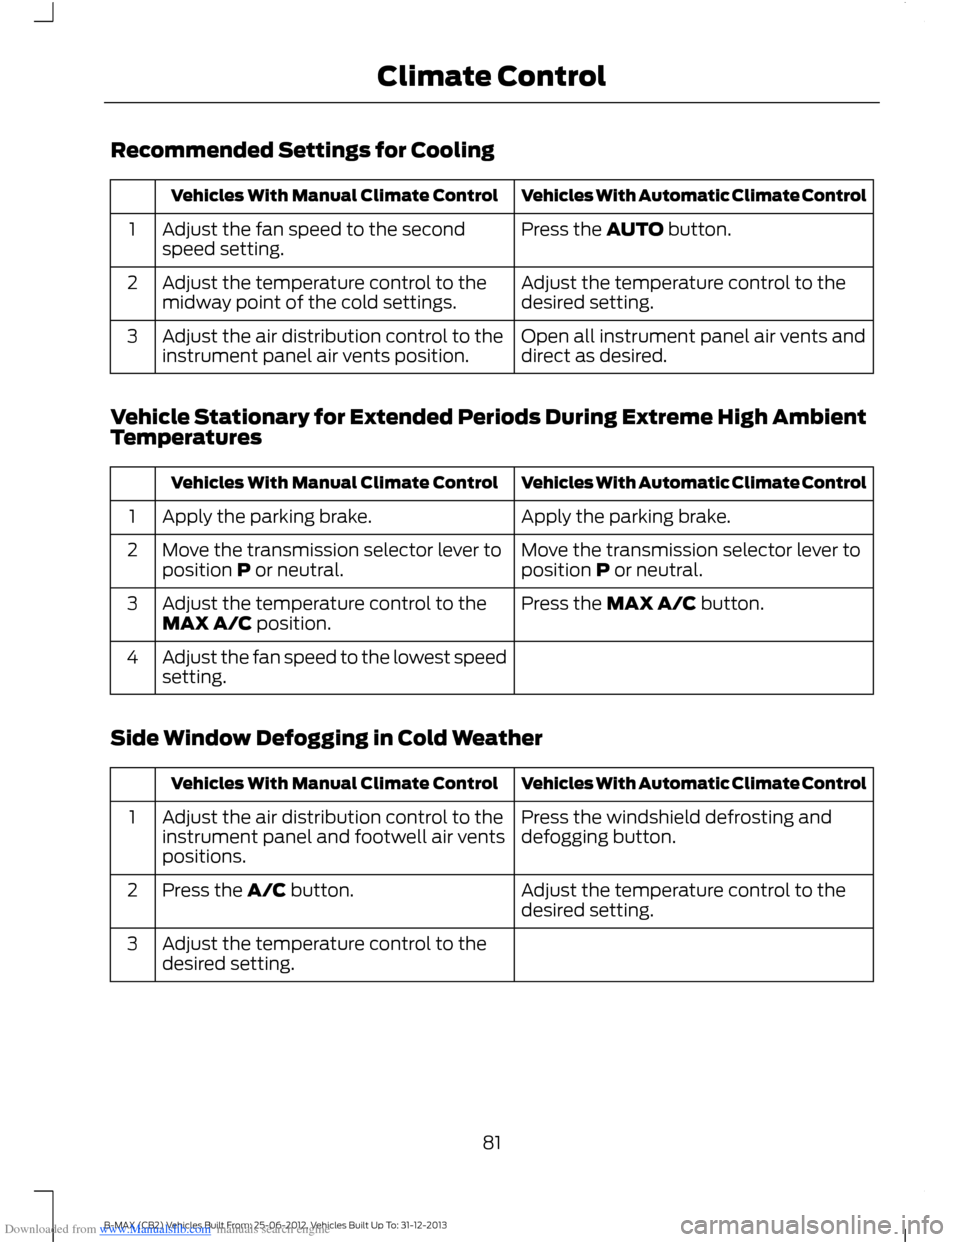
Downloaded from www.Manualslib.com manuals search engine Recommended Settings for Cooling
Vehicles With Automatic Climate ControlVehicles With Manual Climate Control
Press the AUTO button.Adjust the fan speed to the secondspeed setting.1
Adjust the temperature control to thedesired setting.Adjust the temperature control to themidway point of the cold settings.2
Open all instrument panel air vents anddirect as desired.Adjust the air distribution control to theinstrument panel air vents position.3
Vehicle Stationary for Extended Periods During Extreme High AmbientTemperatures
Vehicles With Automatic Climate ControlVehicles With Manual Climate Control
Apply the parking brake.Apply the parking brake.1
Move the transmission selector lever toposition P or neutral.Move the transmission selector lever toposition P or neutral.2
Press the MAX A/C button.Adjust the temperature control to theMAX A/C position.3
Adjust the fan speed to the lowest speedsetting.4
Side Window Defogging in Cold Weather
Vehicles With Automatic Climate ControlVehicles With Manual Climate Control
Press the windshield defrosting anddefogging button.Adjust the air distribution control to theinstrument panel and footwell air ventspositions.
1
Adjust the temperature control to thedesired setting.Press the A/C button.2
Adjust the temperature control to thedesired setting.3
81B-MAX (CB2) Vehicles Built From: 25-06-2012, Vehicles Built Up To: 31-12-2013Climate Control