2013 FORD B MAX warning
[x] Cancel search: warningPage 127 of 298

Downloaded from www.Manualslib.com manuals search engine Note:Not all vehicles are suitable orapproved to have tow bars fitted. See anauthorized dealer for further information.
Trailer Lighting
The electrical system on your vehicle is notsuitable for towing trailers with LED lamps.
TOW BALL
WARNINGS
When not in use, always transportthe tow ball arm securely fastenedin the luggage compartment.
Take special care when fitting thetow ball arm as the safety of yourvehicle and the trailer depends onthis.
Do not use any tools for mounting ordismounting the tow ball arm.
Do not modify the trailer coupling.
Do not disassemble or repair the towball arm.
A 13-pin trailer socket and the tow ball armseat are provided under the rear bumper.Turn the trailer socket down through 90degrees until it engages in the end position.
Unlocking the Tow Ball ArmMechanism
1.Remove the protecting cap.
2.Insert the key and turn it clockwise tounlock.
3.Hold the tow ball arm. Pull thehandwheel out and turn it clockwiseuntil it clicks.
Note:The red mark on the handwheel mustalign with the green mark on the tow ball.
4.Release the handwheel. The tow ballarm is unlocked.
Inserting the Tow Ball Arm
WARNING
The tow ball arm may only beinserted when completely unlocked.
125B-MAX (CB2) Vehicles Built From: 25-06-2012, Vehicles Built Up To: 31-12-2013Towing
Page 128 of 298

Downloaded from www.Manualslib.com manuals search engine Note:Pull out the plug.
1.Insert the tow ball arm vertically andpress it upwards until it engages.
Note:Do not hold your hand near thehandwheel.
Note:The green mark on the handwheelmust align with the green mark on the towball.
2.Turn the key counterclockwise andremove the key to lock the tow ball.
3.Pull the protecting cap from the keybow and press it onto the lock.
Driving With a Trailer
WARNING
If any of the below conditions cannotbe met, do not use the tow bar andhave it checked by an authorizeddealer.
Before starting your journey, make surethat the tow ball arm is correctly locked.Check that:
•the green marks are aligned
•the handwheel (A) is correctly fitted tothe tow ball arm
•you have removed the key (B)
•the tow ball arm is securely positioned.
Removing the Tow Ball Arm
126B-MAX (CB2) Vehicles Built From: 25-06-2012, Vehicles Built Up To: 31-12-2013Towing
Page 129 of 298

Downloaded from www.Manualslib.com manuals search engine Note:Unhitch the trailer.
1.Remove the protecting cap. Press thecap into the key bow. Insert the key andunlock.
2.Hold the tow ball arm. Pull thehandwheel out, turn it clockwiseagainst the stop.
3.Remove the tow ball arm.
4.Release the handwheel.
When unlocked in this way, the tow ballarm can be reinserted at any time.
Driving Without a Trailer
WARNING
Never unlock the tow ball arm withthe trailer attached.
Remove the tow ball arm. Insert the pluginto its seat (1).
Maintenance
WARNING
Remove the tow ball arm andprotect the seat with the plug beforesteam cleaning your vehicle.
Keep the system clean. Periodicallylubricate bearings, sliding surfaces, andlocking balls with resin-free grease or oiland the lock with graphite.
In case of loss, replacement keys areavailable from the manufacturer by statingthe number on the lock cylinder.
TOWING POINTS
WARNING
The towing eye has a left-handthread. Turn it counterclockwise toinstall it. Make sure that the towingeye is fully tightened.
Front Towing Eye
Space is provided in the spare wheel well.
You must carry the towing eye in yourvehicle at all times.
Remove the cover and install the towingeye.
127B-MAX (CB2) Vehicles Built From: 25-06-2012, Vehicles Built Up To: 31-12-2013Towing
Page 130 of 298

Downloaded from www.Manualslib.com manuals search engine Rear Towing Hook
Note: If your vehicle has a tow bar, use thisto tow other vehicles.
TOWING THE VEHICLE ON
FOUR WHEELS - VEHICLES
WITH: MANUAL
TRANSMISSION
WARNINGS
You must switch the ignition on whenyour vehicle is being towed. Failureto follow this warning could seriouslyincrease the risk of injury or death.
The brake and steering assistancewill not operate unless the engine isrunning. Press the brake pedal harderand allow for increased stopping distancesand heavier steering. Failure to take caremay lead to a crash or personal injury.
Too much tension on a tow ropecould cause damage to your vehicleor the vehicle that is towing.
When towing your vehicle you mustselect neutral. Failure to follow thiswarning could damage thetransmission and may lead to a crash orinjury.
Drive off slowly and smoothly withoutjerking the vehicle that is being towed.
You must only use the towing eye that wasdelivered with your vehicle. See TowingPoints (page 127).
Tow ropes or rigid towing bars must beplaced on the same side. For example; righthand rear towing point to right hand fronttowing point.
You must use a tow rope or rigid towingbar that is of the correct strength for theweight of the towing vehicle and thevehicle that is being towed.
Note:Using a rigid towing bar is the safestway to tow a vehicle.
The weight of the vehicle that is beingtowed must not exceed the weight of thetowing vehicle.
Do not exceed 30 mph (50 km/h). SeeTowing the Vehicle on Four Wheels(page 128).
TOWING THE VEHICLE ON
FOUR WHEELS - VEHICLES
WITH: AUTOMATIC
TRANSMISSION
WARNINGS
You must switch the ignition on whenyour vehicle is being towed. Failureto follow this warning could seriouslyincrease the risk of injury or death.
You must make sure thetransmission selector lever is placedin position N. Failure to follow thiswarning could damage the transmissionand may lead to a crash or injury.
128B-MAX (CB2) Vehicles Built From: 25-06-2012, Vehicles Built Up To: 31-12-2013Towing
Page 131 of 298

Downloaded from www.Manualslib.com manuals search engine WARNINGS
The brake and steering assistancewill not operate unless the engine isrunning. Press the brake pedal harderand allow for increased stopping distancesand heavier steering. Failure to take caremay lead to a crash or personal injury.
Too much tension on a tow ropecould cause damage to your vehicleor the vehicle that is towing.
Emergency Towing
If your vehicle is disabled without accessto wheel dollies, a car-hauling trailer, or aflatbed transport vehicle it can beflat-towed with all wheels on the ground.
You may do this under the followingconditions:
•Your vehicle is facing forward so thatit is towed in a forward direction.
•The transmission selector lever isplaced in position N. If the transmissiongear shift lever cannot be moved toposition N, it may need to beoverridden. See AutomaticTransmission (page 104).
•Maximum speed is 35 mph (56 km/h).
•Maximum distance is 50 miles (80kilometers).
Drive off slowly and smoothly withoutjerking the vehicle that is being towed.
You must only use the towing eye that wasdelivered with your vehicle. See TowingPoints (page 127).
Tow ropes or rigid towing bars must beplaced on the same side. For example; righthand rear towing point to right hand fronttowing point.
You must use a tow rope or rigid towingbar that is of the correct strength for theweight of the towing vehicle and thevehicle that is being towed.
Note:Using a rigid towing bar is the safestway to tow a vehicle.
The weight of the vehicle that is beingtowed must not exceed the weight of thetowing vehicle.
129B-MAX (CB2) Vehicles Built From: 25-06-2012, Vehicles Built Up To: 31-12-2013Towing
Page 132 of 298

Downloaded from www.Manualslib.com manuals search engine BREAKING-IN
Tires
WARNING
New tires need to be run-in forapproximately 300 miles (500kilometers). During this time, youmay experience different drivingcharacteristics.
Brakes and Clutch
WARNING
Avoid heavy use of the brakes andclutch if possible for the first 100miles (150 kilometers) in town andfor the first 1000 miles (1500 kilometers)on freeways.
Engine
WARNING
Avoid driving too fast during the first1000 miles (1500 kilometers). Varyyour speed frequently and changeup through the gears early. Do not laborthe engine.
COLD WEATHER
PRECAUTIONS
The functional operation of somecomponents and systems can be affectedat temperatures below -13°F (-25°C).
DRIVING THROUGH WATER
WARNINGS
Drive through water in an emergencyonly and not as part of normaldriving.
WARNINGS
Engine damage can occur if waterenters the air filter.
In an emergency, you can drive your vehiclethrough water to a maximum depth of 8inches (200 millimeters) and at amaximum speed of 6 mph (10 km/h). Youmust take extra care when driving throughflowing water.
When driving in water, maintain a lowspeed and do not stop your vehicle. Afterdriving through water and as soon as it issafe to do so:
•Depress the brake pedal lightly tocheck that the brakes are functioningcorrectly.
•Check that the horn works.
•Check that your vehicle's lamps arefully operational.
•Check the power assistanceof the steering system.
FLOOR MATS
130B-MAX (CB2) Vehicles Built From: 25-06-2012, Vehicles Built Up To: 31-12-2013Driving Hints
Page 133 of 298

Downloaded from www.Manualslib.com manuals search engine WARNINGS
Always use floor mats that aredesigned to fit the foot well of yourvehicle, leaving the pedal areaunobstructed, and which can be firmlysecured to retention posts so that theycannot slip out of position and interferewith the pedals or impair safe operation ofyour vehicle in other ways.
Incorrectly fitted floor mats cancause the accelerator pedal tobecome stuck in the open position.This can cause loss of vehicle control.
Always correctly install the floormats to the retention posts so thatthey cannot slip out of position orobstruct pedal operation.
Do not place unsecured floor matsor any other covering in the foot well.
Do not place additional floor matsor any other covering on top of theoriginal floor mats. This will reducethe pedal clearance and interfere with thepedal operation.
Do not allow objects to fall orbecome trapped under the pedals ofyour vehicle. This can cause loss ofvehicle control.
Carry out regular inspections to makesure the floor mats are secure.
To install the floor mats, position the floormat eyelet over the retention post andpress down to lock in position.
Remove in reverse order.
131B-MAX (CB2) Vehicles Built From: 25-06-2012, Vehicles Built Up To: 31-12-2013Driving Hints
Page 134 of 298

Downloaded from www.Manualslib.com manuals search engine HAZARD WARNING FLASHERS
The hazard warning button is located onthe instrument panel. Use it when yourvehicle is creating a safety hazard for othermotorists.
Press the button to turn on the hazardwarning function, and the front and reardirection indicators will flash.
Press the button again to turn them off.
Note:If used when the engine is notrunning, the battery will lose charge. Theremay be insufficient power to restart yourengine.
Note:Depending on applicable laws andregulations in the country for which yourvehicle was originally built, the hazardwarning flashers may flash if you brakeheavily.
FIRST AID KIT
Space is provided in the luggagecompartment.
WARNING TRIANGLE
Space is provided in the luggagecompartment.
JUMP-STARTING THE VEHICLE
WARNINGS
Do not use fuel lines, engine rockercovers or the intake manifold asgrounding points.
Connect batteries with only the samenominal voltage.
WARNINGS
Always use booster cables withinsulated clamps and adequate sizecable.
Note:Do not disconnect the battery fromyour vehicle’s electrical system.
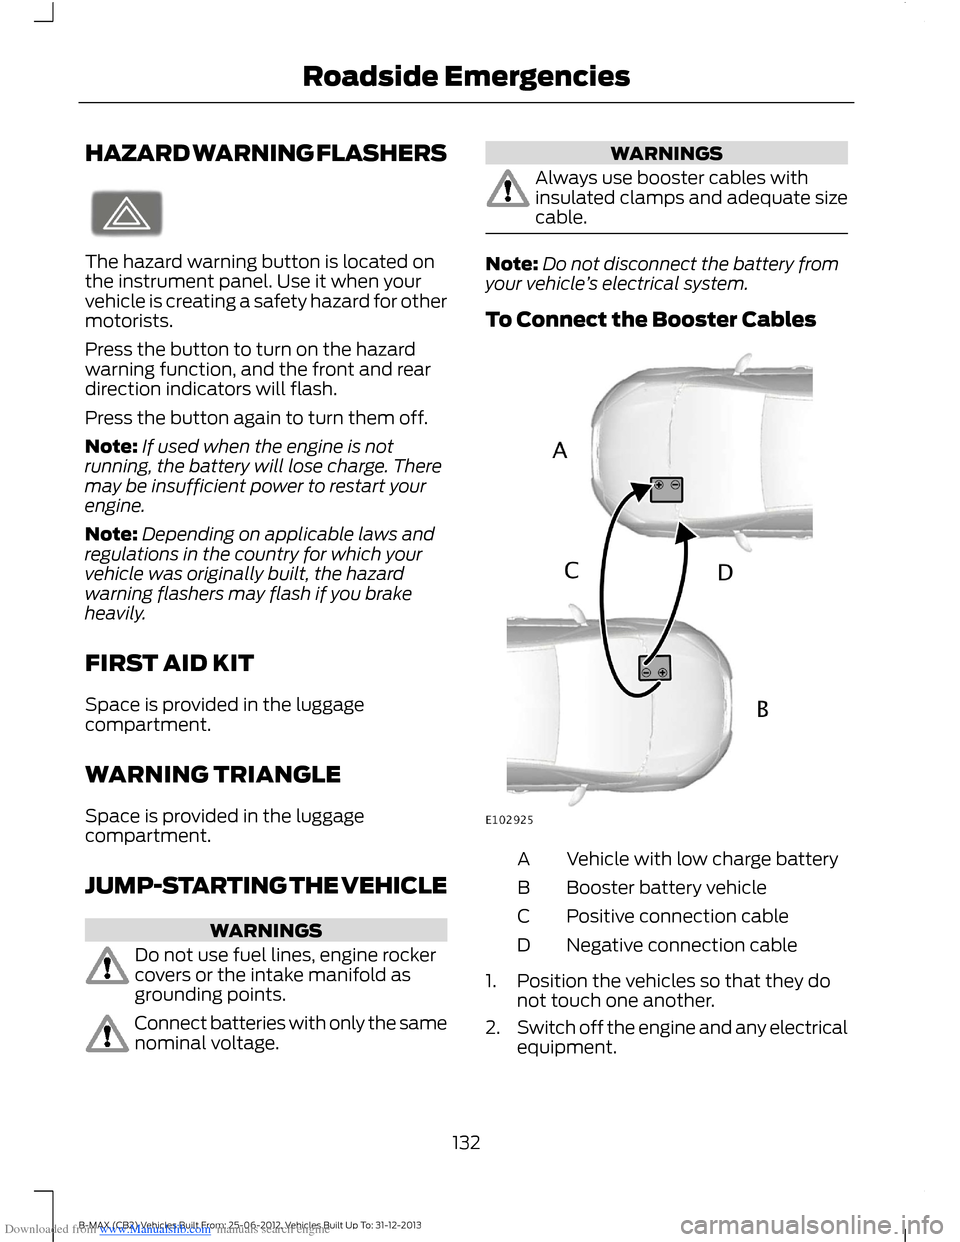
To Connect the Booster Cables
Vehicle with low charge batteryA
Booster battery vehicleB
Positive connection cableC
Negative connection cableD
1.Position the vehicles so that they donot touch one another.
2.Switch off the engine and any electricalequipment.
132B-MAX (CB2) Vehicles Built From: 25-06-2012, Vehicles Built Up To: 31-12-2013Roadside Emergencies