2013 FIAT FREEMONT key
[x] Cancel search: keyPage 117 of 352

LIFTGATE
The liftgate can be unlocked or locked with the Re-
mote Keyless Entry (RKE) transmitter, the Keyless
EnterNGo™ (Passive Entry) or by activating the
power door lock switch located on either front door
trim panel.
For further information on Keyless EnterNGo™
(Passive Entry), refer to “Keyless EnterNGo™” in
“Starting And Driving”.
NOTE:The liftgate cannot be unlocked or locked
with the manual door lock plungers on the door trim
panels or the door lock cylinder on the driver's door.
To open the unlocked liftgate, squeeze the handle and
pull the liftgate toward you. Gas props will raise and
support the liftgate in the open position. (fig. 91)
NOTE: Because the gas pressure drops with tem-
perature, it may be necessary to assist the props when
opening the liftgate in cold weather.
WARNING!
Dr
iving with the liftgate open can
allow poisonous exhaust gases into your
vehicle. These fumes could injure you and your
passengers. Keep the liftgate closed when you are
operating the vehicle.
If you are required to drive with the liftgate
open, make sure that all windows are closed, and
the blower switch on the climate control is set at
high speed. Do not use the recirculation mode.
(fig. 91) Liftgate Release
111
KNOWING
YOUR
VEHICLE
SAFETY
S
TARTING
AND
DRIVING
WARNING
LIGHTS
AND
MESSAGES
IN AN
EMERGENCY
SERVICING
AND
CARETECHNICAL
SPECIFICATIONSCONTENTS
Page 144 of 352

The vehicle is close to the obstacle when the warning
display shows one flashing arc and sounds a continuous
tone. The following chart shows the warning alert
operation when the system is detecting an obstacle:
WARNING ALERTS
Rear Distance (cm) Greater than
200 cm 200-100 cm 100-65 cm 65-30 cm Less than
30 cm
Audible Alert Chime None Single 1/2-
Second Tone Slow
FastContinuous
Arcs None3 Solid
(Continuous) 3 Slow
Flashing 2 Slow
Flashing 1 Slow
Flashing
ENABLING AND DISABLING PARKSENSE
®
ParkSense
®
can be enabled and disabled using the
Uconnect Touch™ System. The available choices are:
Off, Sound Only, or Sound and Display. Refer to
“Uconnect Touch™ Settings” for further information.
When the ParkSense
®soft-key is pressed to disable
the system, the EVIC will display the “PARK ASSIST SYSTEM OFF” message for approximately five seconds.
Refer to “Electronic Vehicle Information Center
(EVIC)” for further information. When the shift lever is
moved to REVERSE and the system is disabled, the
EVIC will display the “PARK ASSIST SYSTEM OFF”
message for as long as the vehicle is in REVERSE at or
below 11 km/h.
(fig. 105)
Continuous Tone
138
KNOWING YOUR
VEHICLE
SAFETY
S
TARTING AND
DRIVING
WARNING LIGHTSAND
MESSAGES
IN AN
EMERGENCY
SERVICING AND
CARETECHNICAL
SPECIFICATIONSCONTENTS
Page 145 of 352

SERVICE THE PARKSENSE
®REAR PARK
ASSIST SYSTEM
When the ParkSense
®
Rear Park Assist system is
malfunctioning, the Electronic Vehicle Information
Center (EVIC) will actuate a single chime, once per
ignition cycle, and it will display the “CLEAN PARK
ASSIST”, “SERVICE PARK ASSIST” or “SERVICE PARK
ASSIST SYSTEM” message. Refer to “Electronic Vehicle
Information Center (EVIC)” for further information.
When the shift lever is moved to REVERSE and the
system has detected a fault condition, the EVIC will
display the “CLEAN PARK ASSIST”, “SERVICE PARK
ASSIST” or “SERVICE PARK ASSIST SYSTEM” mes-
sage for as long as the vehicle is in REVERSE. Under this
condition, ParkSense
®will not operate.
If “CLEAN PARK ASSIST” appears in the Electronic
Vehicle Information Center (EVIC) make sure the
outer surface and the underside of the rear fascia/
bumper is clean and clear of snow, ice, mud, dirt or
other obstruction and then cycle the ignition. If the
message continues to appear see an authorized dealer.
If “SERVICE PARK ASSIST SYSTEM” or “SERVICE
PARK ASSIST SYSTEM” appears in the EVIC, see your
authorized dealer.
CLEANING THE PARKSENSE
®SYSTEM
Clean the ParkSense
®
sensors with water, car wash
soap and a soft cloth. Do not use rough or hard cloths. Do not scratch or poke the sensors. Otherwise, you
could damage the sensors.
PARKSENSE
®SYSTEM USAGE
PRECAUTIONS
NOTE:
Ensure that the rear bumper is free of snow, ice,
mud, dirt and debris to keep the ParkSense
®system
operating properly.
Jackhammers, large trucks, and other vibrations could affect the performance of ParkSense®.
When you turn ParkSense
®off, the EVIC will display
“PARK ASSIST SYSTEM OFF.” Furthermore, once
you turn ParkSense
®off, it remains off until you turn
it on again, even if you cycle the ignition key.
When you move the shift lever to the REVERSE position and ParkSense®is turned off, the EVIC will
display the “PARK ASSIST SYSTEM OFF” message
for as long as the vehicle is in REVERSE.
Clean the ParkSense
®sensors regularly, taking care
not to scratch or damage them. The sensors must
not be covered with ice, snow, slush, mud, dirt or
debris. Failure to do so can result in the system not
working properly. The ParkSense
®system might not
detect an obstacle behind the fascia/bumper, or it
139
KNOWING
YOUR
VEHICLE
SAFETY
STARTING
AND
DRIVING
WARNING
LIGHTS
AND
MESSAGES
IN AN
EMERGENCY
SERVICING
AND
CARETECHNICAL
SPECIFICATIONSCONTENTS
Page 148 of 352

WARNING!
Drivers must be careful when backing up
e
ven when using the ParkView
®
Rear
Back Up Camera. Always check carefully behind
your vehicle, and be sure to check for pedestri-
ans, animals, other vehicles, obstructions, or blind
spots before backing up. You are responsible for
the safety of your surroundings and must con-
tinue to pay attention while backing up. Failure
to do so can result in serious injury or death.
To avoid vehicle damage, ParkView
®
should only be used as a parking aid.The
ParkView
®camera is unable to view ev-
ery obstacle or object in your drive path.
To avoid vehicle damage, the vehicle must be
driven slowly when using ParkView
®to be able to
stop in time when an obstacle is seen. It is recom-
mended that the driver look frequently over his/
her shoulder when using ParkView®. NOTE:
If snow, ice, mud, or any foreign substance
builds up on the camera lens, clean the lens, rinse with
water, and dry with a soft cloth. Do not cover the lens.
TURNING PARKVIEW
®ON OR OFF —
WITH TOUCH SCREEN RADIO
1. Turn the Radio on.
2. Press the “More” soft-key.
3. Press the “Settings” soft-key.
4. Press the “Safety & Driving Assistance” soft-key.
5. Press the check box soft key next to “Parkview
®
Backup Camera” to enable/disable.
142
KNOWING YOUR
VEHICLE
SAFETY
S
TARTING AND
DRIVING
WARNING LIGHTSAND
MESSAGES
IN AN
EMERGENCY
SERVICING AND
CARETECHNICAL
SPECIFICATIONSCONTENTS
Page 161 of 352

wear over time through normal use, are specifically not
covered (replacement foam is available for a nominal
charge). UNWIRED TECHNOLOGY IS NOT LIABLE
FOR ANY INJURIES OR DAMAGES TO PERSONS
OR PROPERTY RESULTING FROM THE USE OF, OR
ANY FAILURE OR DEFECT IN, THE PRODUCT,
NOR IS UNWIRED LIABLE FOR ANY GENERAL,
SPECIAL, DIRECT, INDIRECT, INCIDENTAL, CON-
SEQUENTIAL, EXEMPLARY, PUNITIVE OR OTHER
DAMAGES OF ANY KIND OR NATURE WHATSO-
EVER. Some states and jurisdictions may not allow the
exclusion or limitation of incidental or consequential
damages, so the above limitation may not apply to you.
This warranty gives you specific legal rights. You may
also have other rights, which vary from jurisdiction to
jurisdiction.
What Will Unwired
®Do?Unwired
®, at its option,
will repair or replace any defective Product. Unwired
®
reserves the right to replace any discontinued Product
with a comparable model. THIS WARRANTY IS THE
SOLE WARRANTY FOR THIS PRODUCT, SETS
FORTH YOUR EXCLUSIVE REMEDY REGARDING
DEFECTIVE PRODUCTS, AND IS IN LIEU OF ALL
OTHER WARRANTIES (EXPRESS OR IMPLIED), IN-
CLUDING ANY WARRANTY OR MERCHANTABIL-
ITY OR FITNESS FOR A PARTICULAR PURPOSE. Video Screen Operation
Displaying Video
The video screen has two different operating modes, a
video mode (when displaying video such as DVD video,
Aux video, etc.) and an information mode. Because the
VES™ is a dual channel system, Information Mode is
displayed in a split screen format. When in Information
Mode, the left side of the screen is referred to as
Channel 1 and the right side of the screen is referred to
as Channel 2.
Only Channel 1 displays video images. When in video
mode the image is displayed on the full screen, however
Channel 2’s functionality is still available. A popup
banner at the bottom of the screen is displayed mo-
mentarily over the video image. While in video mode
and Channel 2 is selected on the remote control
selector switch, the first remote control key press will
activate the popup banner indicating Channel 2’s sta-
tus. While the banner is still visible, any subsequent
remote control key press for Channel 2 shall initiate
the requested remote control command. (fig. 110)
In a two-screen system, the video for Channel 1 is
displayed on the first rear seat screen and the video for
Channel 2 is displayed on the second rear seat screen.
Information Mode is displayed in split screen, the left
side of the screen (Channel 1) shows the status/mode
of the first rear seat screen and the right side of the
155
KNOWING
YOUR
VEHICLE
SAFETY
S
TARTING
AND
DRIVING
WARNING
LIGHTS
AND
MESSAGES
IN AN
EMERGENCY
SERVICING
AND
CARETECHNICAL
SPECIFICATIONSCONTENTS
Page 164 of 352

audio for Channel 1 has been muted using the
remote control’s MUTE button.
3. Channel 2 Audio Only/Mute — Audio: Only in a single screen system: The audio only icon is dis-
played on Channel 2 when Channel 1 is in a video
mode. Mute: when the Mute icon is displayed, the
audio for Channel 2 has been muted using the
remote control’s MUTE button.
4. Channel 2 Mode — Displays the current source for Channel 2.
5. Channel 2 ENTER Button Action — When the ENTER button on the remote control is pressed
with the "INPUT FILE #" button visible on the
screen, the screen shows a numeric entry keypad
which allows you to enter a specific track number
on data discs and HDD (see Numeric Keypad Menu
section of this manual). Also, Enter Button Action –
“INPUT TRK #” to enter a specific track number on
audio discs.
6. Remote Locked Out — When the icon is displayed, the remote control functions are disabled.
7. Clock — Displays the time.
8. Channel 1 Shared Status — When the icon is displayed, the audio for Channel 1 is also shared
with the radio and playing through the cabin speak-
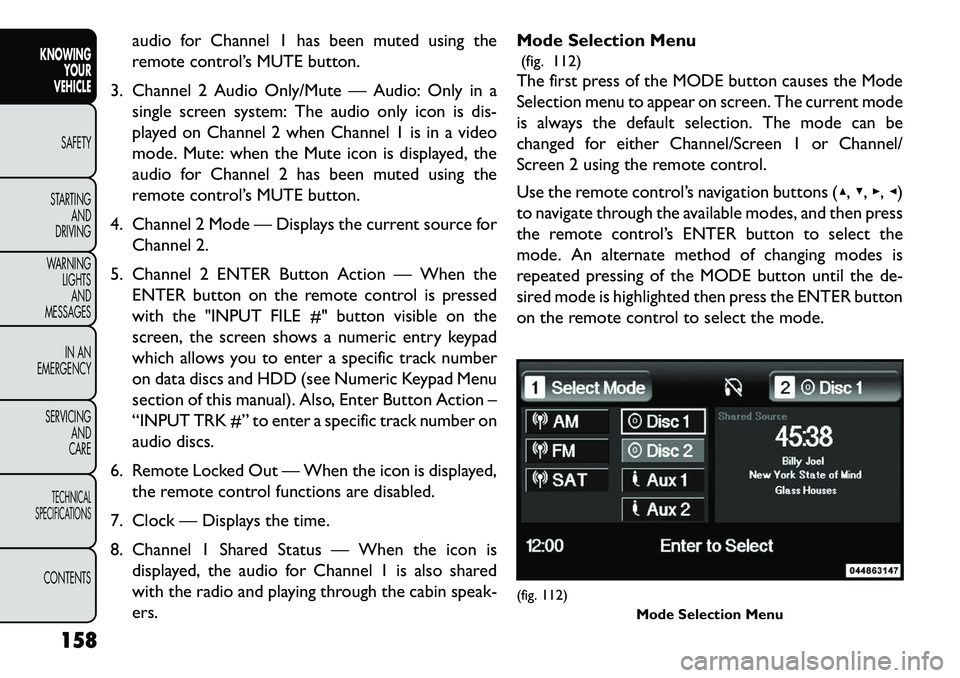
ers. Mode Selection Menu
(fig. 112)
The first press of the MODE button causes the Mode
Selection menu to appear on screen. The current mode
is always the default selection. The mode can be
changed for either Channel/Screen 1 or Channel/
Screen 2 using the remote control.
Use the remote control’s navigation buttons (▴, ▾,▸,◂)
to navigate through the available modes, and then press
the remote control’s ENTER button to select the
mode. An alternate method of changing modes is
repeated pressing of the MODE button until the de-
sired mode is highlighted then press the ENTER button
on the remote control to select the mode.
(fig. 112) Mode Selection Menu
158
KNOWING YOUR
VEHICLE
SAFETY
S
TARTING AND
DRIVING
WARNING LIGHTSAND
MESSAGES
IN AN
EMERGENCY
SERVICING AND
CARETECHNICAL
SPECIFICATIONSCONTENTS
Page 165 of 352

In a single screen system, when a video mode (such as
DVD-video, Aux video, etc.) is active and Channel/
Screen 1 is selected using the remote control selector
switch, the first press of the remote control’s MODE
button causes the Mode Selection menu to appear.
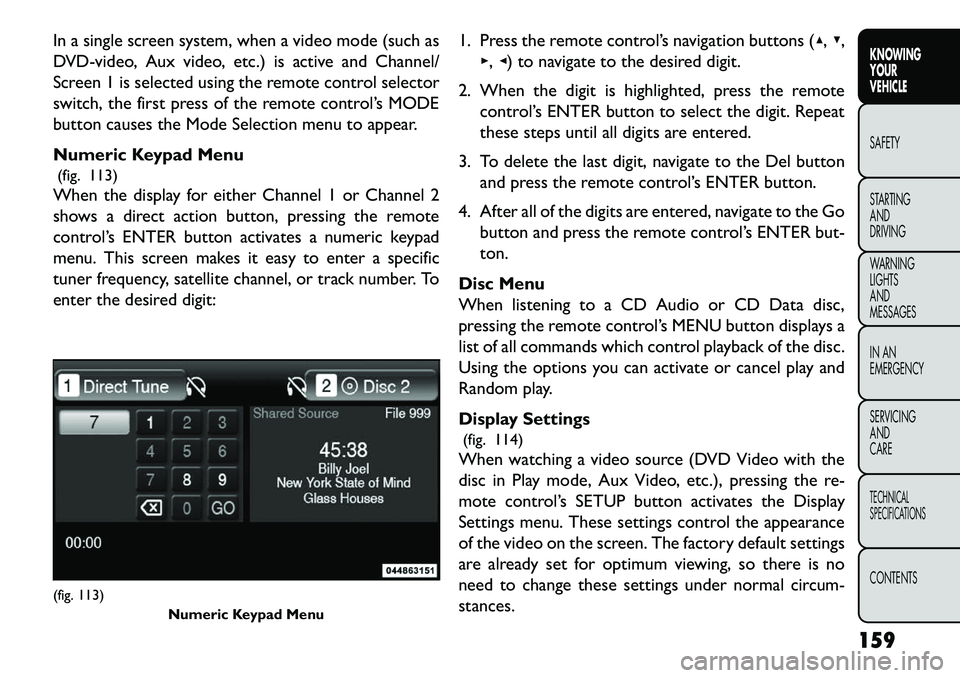
Numeric Keypad Menu(fig. 113)
When the display for either Channel 1 or Channel 2
shows a direct action button, pressing the remote
control’s ENTER button activates a numeric keypad
menu. This screen makes it easy to enter a specific
tuner frequency, satellite channel, or track number. To
enter the desired digit: 1. Press the remote control’s navigation buttons (▴,
▾,
▸, ◂) to navigate to the desired digit.
2. When the digit is highlighted, press the remote control’s ENTER button to select the digit. Repeat
these steps until all digits are entered.
3. To delete the last digit, navigate to the Del button and press the remote control’s ENTER button.
4. After all of the digits are entered, navigate to the Go button and press the remote control’s ENTER but-
ton.
Disc Menu
When listening to a CD Audio or CD Data disc,
pressing the remote control’s MENU button displays a
list of all commands which control playback of the disc.
Using the options you can activate or cancel play and
Random play.
Display Settings (fig. 114)
When watching a video source (DVD Video with the
disc in Play mode, Aux Video, etc.), pressing the re-
mote control’s SETUP button activates the Display
Settings menu. These settings control the appearance
of the video on the screen. The factory default settings
are already set for optimum viewing, so there is no
need to change these settings under normal circum-
stances.(fig. 113) Numeric Keypad Menu
159
KNOWING
YOUR
VEHICLE
SAFETY
S
TARTING
AND
DRIVING
WARNING
LIGHTS
AND
MESSAGES
IN AN
EMERGENCY
SERVICING
AND
CARETECHNICAL
SPECIFICATIONSCONTENTS
Page 169 of 352

RADIO OPERATION AND MOBILE
PHONES
Under certain conditions, the mobile phone being on in
your vehicle can cause erratic or noisy performance
from your radio. This condition may be lessened or
eliminated by relocating the mobile phone antenna.
This condition is not harmful to the radio. If your radio
performance does not satisfactorily “clear” by the
repositioning of the antenna, it is recommended that
the radio volume be turned down or off during mobile
phone operation.ADDING FUEL
FUEL FILLER CAP (GAS CAP) (for
versions/markets, where provided)
The gas cap is located behind the fuel filler door on the
left side of the vehicle. If the gas cap is lost or damaged,
be sure the replacement cap has been designed for use
with this vehicle.
(fig. 116)
Locking Fuel Filler Cap (for versions/markets,
where provided)
Your vehicle may be equipped with a locking fuel cap.
Use the standard blade key to lock/unlock this fuel cap.
(fig. 116) Fuel Filler Cap (Gas Cap)
163
KNOWING
YOUR
VEHICLE
SAFETY
S
TARTING
AND
DRIVING
WARNING
LIGHTS
AND
MESSAGES
IN AN
EMERGENCY
SERVICING
AND
CARETECHNICAL
SPECIFICATIONSCONTENTS