Bend the crossbar supports at each end, taking care to
keep hand clear of pivoting joint. Slide the thumb screw
down.
Stowed Position
Deployed Position
3
UNDERSTANDING THE FEATURES OF YOUR VEHICLE 297
Once the crossbars are set into position, tighten the
thumb screws completely.Stowing the Crossbars
Reverse the procedure to stow the crossbars, again,
taking care to keep hand clear of pivoting joint. Crossbars
are identical and can be stowed in either rail nest. Once
the crossbars are stowed, tighten the thumb screws
completely.
NOTE:Load should always be secured to crossbars first,
with rail tie down loops used as additional securing
points if needed. Tie loops are intended as supplemen-
tary tie down points only. Do not use ratcheting mecha-
nisms with the tie loops.
Tightening Crossbar
3
UNDERSTANDING THE FEATURES OF YOUR VEHICLE 299
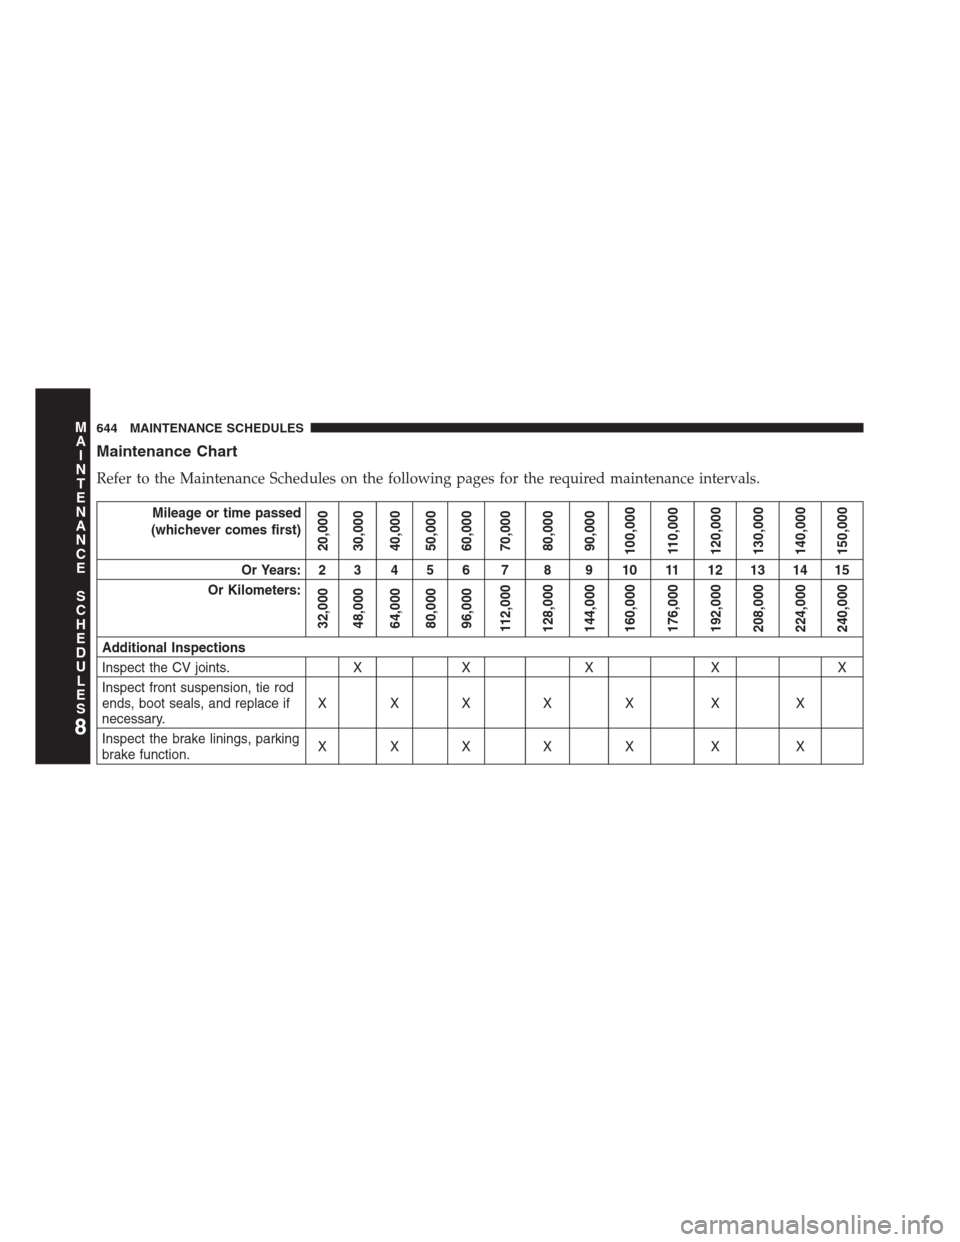
Maintenance Chart
Refer to the Maintenance Schedules on the following pages for the required maintenance intervals.
Mileage or time passed
(whichever comes first)
20,000
30,000
40,000
50,000
60,000
70,000
80,000
90,000
100,000
110,000
120,000
130,000
140,000
150,000
Or Years: 2 3 4 5 6 7 8 9 10 11 12 13 14 15
Or Kilometers:
32,000
48,000
64,000
80,000
96,000
112,000
128,000
144,000
160,000
176,000
192,000
208,000
224,000
240,000
Additional Inspections
Inspect the CV joints. X X X X X
Inspect front suspension, tie rod
ends, boot seals, and replace if
necessary.XXX X X X X
Inspect the brake linings, parking
brake function.XXX X X X X
8
M
A
I
N
T
E
N
A
N
C
E
S
C
H
E
D
U
L
E
S644 MAINTENANCE SCHEDULES