Page 468 of 683
Key Ignition Park Interlock
This vehicle is equipped with a Key Ignition Park Inter-
lock which requires the shift lever to be placed in PARK
before the ignition switch can be turned to the LOCK/
OFF position. The key fob can only be removed from the
ignition when the ignition is in the LOCK/OFF position,
and the shift lever is locked in PARK whenever the
ignition switch is in the LOCK/OFF position.
NOTE:If a malfunction occurs, the system will trap the
key fob in the ignition switch to warn you that this safety
feature is inoperable. The engine can be started and
stopped but the key fob cannot be removed until you
obtain service.
Brake/Transmission Shift Interlock System
This vehicle is equipped with a Brake Transmission Shift
Interlock System (BTSI) that holds the transmission
shifter in PARK unless the brakes are applied. To shift the
transmission out of PARK, the engine must be running
and the brake pedal must be pressed.
In 8-speed vehicles, the brake pedal must also be pressed
to shift from NEUTRAL into DRIVE or REVERSE when
the vehicle is stopped or moving at low speeds.
Fuel Economy (ECON) Mode
The Fuel Economy (ECON) mode can improve the vehi-
cle’s overall fuel economy during normal driving condi-
tions. Press the “econ” switch in the center stack of the
instrument panel and a green light will indicate the
ECON mode is engaged.
466 STARTING AND OPERATING
Page 484 of 683
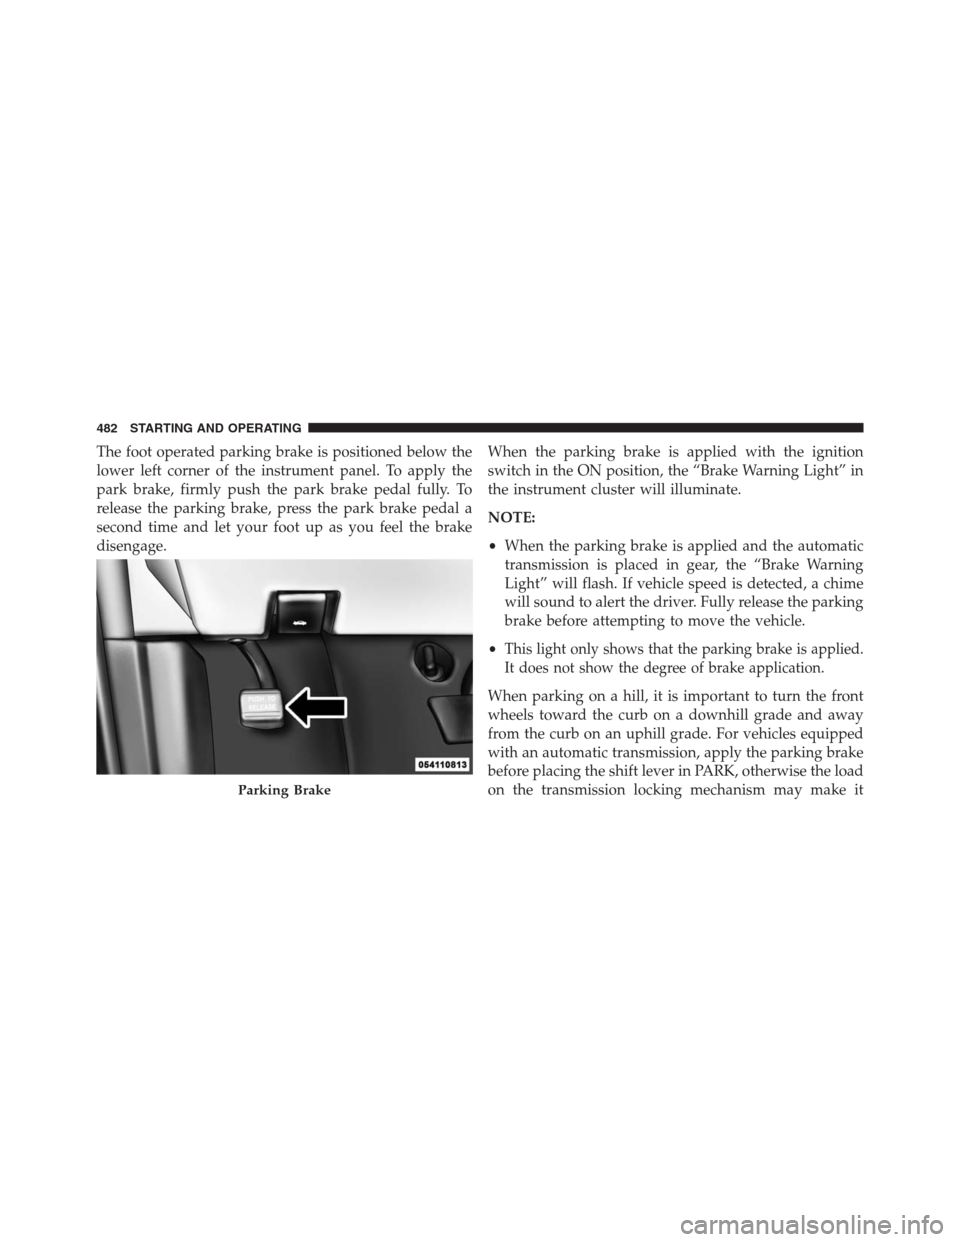
The foot operated parking brake is positioned below the
lower left corner of the instrument panel. To apply the
park brake, firmly push the park brake pedal fully. To
release the parking brake, press the park brake pedal a
second time and let your foot up as you feel the brake
disengage.When the parking brake is applied with the ignition
switch in the ON position, the “Brake Warning Light” in
the instrument cluster will illuminate.
NOTE:
•When the parking brake is applied and the automatic
transmission is placed in gear, the “Brake Warning
Light” will flash. If vehicle speed is detected, a chime
will sound to alert the driver. Fully release the parking
brake before attempting to move the vehicle.
•
This light only shows that the parking brake is applied.
It does not show the degree of brake application.
When parking on a hill, it is important to turn the front
wheels toward the curb on a downhill grade and away
from the curb on an uphill grade. For vehicles equipped
with an automatic transmission, apply the parking brake
before placing the shift lever in PARK, otherwise the load
on the transmission locking mechanism may make it
Parking Brake
482 STARTING AND OPERATING
Page 496 of 683
Disabling/Enabling HSA
If you wish to turn on or off the HSA system, it can be done
using the Customer Programmable Features in the Elec-
tronic Vehicle Information Center (EVIC). Refer to “Elec-
tronic Vehicle Information Center (EVIC)” in “Understand-
ing Your Instrument Panel” for further information.
For vehicles not equipped with the EVIC, perform the
following steps:
NOTE:You must complete Steps 1 through 8 within
90 seconds.
1. Center the steering wheel (front wheels pointing
straight forward).
2. Shift the transmission into NEUTRAL.
3. Apply the parking brake.
4. Start the engine.5. Release the clutch pedal (if equipped).
6. Rotate the steering wheel one-half turn to the left.
7.
Press the “ESC Off” switch (located in the lower switch
bank below the climate controls) four times within
20 seconds. The “ESC Activation/Malfunction Indicator
Light” should turn on and turn off two times.
8. Rotate the steering wheel back to center and then an
additional half-turn to the right.
9. Turn the ignition switch to the OFF position and then
back to the ON position. If the sequence was com-
pleted properly, the “ESC Activation/Malfunction In-
dicator Light” will blink several times to confirm HSA
is disabled.
10. Repeat these steps if you want to return this feature
to it’s previous setting.
494 STARTING AND OPERATING
Page 497 of 683
Towing With HSA
HSA will provide assistance when starting on a grade
when pulling a trailer.
WARNING!
•If you use a trailer brake controller with your
trailer, your trailer brakes may be activated and
deactivated with the brake switch. If so, when the
brake pedal is released, there may not be enough
brake pressure to hold the vehicle and trailer on a
hill and this could cause a collision with another
vehicle or object behind you. In order to avoid
rolling down the hill while resuming acceleration,
manually activate the trailer brake prior to releas-
ing the brake pedal. Always remember the driver is
responsible for braking the vehicle.
(Continued)
WARNING!(Continued)
•HSA is not a parking brake. If you stop the vehicle
on a hill without putting the transmission in PARK
and using the parking brake, it will roll down the
hill and could cause a collision with another ve-
hicle or object. Always remember to use the park-
ing brake while parking on a hill, and that the
driver is responsible for braking the vehicle.
HSA Off
If you wish to turn off the HSA system, it can be done
using the Customer Programmable Features in the Elec-
tronic Vehicle Information Center (EVIC). Refer to “Elec-
tronic Vehicle Information Center (EVIC)” in “Under-
standing Your Instrument Panel” for further information.
5
STARTING AND OPERATING 495
Page 540 of 683

WARNING!
•Never have any smoking materials lit in or near the
vehicle when the gas cap is removed or the tank is
being filled.
•Never add fuel when the engine is running. This is
in violation of most state and federal fire regula-
tions and may cause the MIL to turn on.
•A fire may result if gasoline is pumped into a
portable container that is inside of a vehicle. You
could be burned. Always place gas containers on
the ground while filling.
NOTE:
•When the fuel nozzle “clicks” or shuts off, the fuel tank
is full.
•Tighten the fuel filler cap until you hear a “clicking”
sound. This is an indication that the fuel filler cap is
properly tightened.•If the gas cap is not tightened properly, the MIL may
come on. Be sure the gas cap is tightened every time
the vehicle is refueled.
Loose Fuel Filler Cap Message
If the vehicle diagnostic system determines that the fuel
filler cap is loose, improperly installed, or damaged, a
“gASCAP” message will display in the odometer or a
“CHECK GASCAP” message will be displayed in the
Electronic Vehicle Information Center (EVIC). Refer to
“Electronic Vehicle Information Center” in “Understanding
Your Instrument Panel” for further information. Tighten
the fuel filler cap until a “clicking” sound is heard. This is
an indication that the fuel filler cap is properly tightened.
Refer to “Onboard Diagnostic System” in “Maintaining
Your Vehicle” for further information.
If the problem continues, the message will appear the
next time the vehicle is started. See your authorized
dealer as soon as possible.
538 STARTING AND OPERATING
Page 562 of 683
HAZARD WARNING FLASHERS
The Hazard Warning flasher switch is located in the
lower center area of the instrument panel.
Press the switch to turn on the Hazard Warning
flasher. When the switch is activated, all direc-
tional turn signals will flash on and off to warn oncoming
traffic of an emergency. Press the switch a second time to
turn off the Hazard Warning flashers.
This is an emergency warning system and it should not
be used when the vehicle is in motion. Use it when your
vehicle is disabled and it is creating a safety hazard for
other motorists.
When you must leave the vehicle to seek assistance, the
Hazard Warning flashers will continue to operate even
though the ignition is placed in the OFF position.
NOTE:With extended use the Hazard Warning flashers
may wear down your battery.
IF YOUR ENGINE OVERHEATS
In any of the following situations, you can reduce the
potential for overheating by taking the appropriate action.
•On the highways — slow down.
•In city traffic — while stopped, place the transmission
in NEUTRAL, but do not increase engine idle speed.
NOTE:There are steps that you can take to slow down
an impending overheat condition:
•If your air conditioner (A/C) is on, turn it off. The A/C
system adds heat to the engine cooling system and
turning the A/C off can help remove this heat.
•
You can also turn the temperature control to maximum
heat, the mode control to floor and the blower control to
high. This allows the heater core to act as a supplement to
the radiator and aids in removing heat from the engine
cooling system.
560 WHAT TO DO IN EMERGENCIES
Page 587 of 683
SHIFT LEVER OVERRIDE
If a malfunction occurs and the shift lever cannot be
moved out of the PARK position, you can use the
following procedure to temporarily move the shift lever:
1. Turn the engine OFF.
2. Firmly apply the parking brake.
3. Using a small screwdriver or similar tool, remove the
shift lever override access cover (located near the top
right of the shift lever in the instrument panel).
4. Press and maintain firm pressure on the brake pedal.
5.
Insert the screwdriver or similar tool into the access hole,
and push and hold the override release lever forward.
6. Move the shift lever to the NEUTRAL position.
7. The vehicle may then be started in NEUTRAL.
8. Reinstall the shift lever override access cover.
Shift Lever Override Access Cover6
WHAT TO DO IN EMERGENCIES 585
Page 592 of 683
▫Appearance Care And Protection From
Corrosion...........................619
▫Cleaning The Instrument Panel Cupholders . .625
�FUSES..............................626
▫Totally Integrated Power Module..........626
�VEHICLE STORAGE....................633
�REPLACEMENT BULBS.................634
�BULB REPLACEMENT..................635
▫Headlamps.........................635
▫Front Park/Turn Signal Lamps............635▫Fog Lamps..........................636
▫Rear Tail, Stop, Turn Signal, Side Marker
And Backup Lamps...................636
▫Center High-Mounted Stop Lamp (CHMSL) . .637
▫License Lamp........................637
�FLUID CAPACITIES....................638
�FLUIDS, LUBRICANTS AND
GENUINE PARTS......................639
▫Engine.............................639
▫Chassis............................640
590 MAINTAINING YOUR VEHICLE