Page 184 of 683
– “Delete” (to delete the recording)
•“Play Memos” (to play previously recorded memos) —
During the playback you may press the Voice Com-
mand
button to stop playing memos. You pro-
ceed by saying one of the following commands:
– “Repeat” (to repeat a memo)
– “Next” (to play the next memo)
– “Previous” (to play the previous memo)
– “Delete” (to delete a memo)
•“Delete All” (to delete all memos)
Setup
To switch to system setup, you may say one of the
following:
•“Change to setup”
•“Switch to system setup”•“Change to setup”
•“Main menu setup” or
•“Switch to setup”
In this mode, you may say the following commands:
•“Language English”
•“Language French”
•“Language Spanish”
•“Tutorial”
•“Voice Training”
NOTE:Keep in mind that you have to press the Voice
Commandbutton first and wait for the beep
before speaking the “Barge In” commands.
182 UNDERSTANDING THE FEATURES OF YOUR VEHICLE
Page 185 of 683
Voice Training
For users experiencing difficulty with the system recog-
nizing their voice commands or numbers the Uconnect®
Voice “Voice Training” feature may be used.
1. Press the Voice Command
button, say “System
Setup” and once you are in that menu then say “Voice
Training.” This will train your own voice to the system
and will improve recognition.
2. Repeat the words and phrases when prompted by
Uconnect® Voice. For best results, the “Voice Training”
session should be completed when the vehicle is
parked, engine running, all windows closed, and the
blower fan switched off. This procedure may be re-
peated with a new user. The system will adapt to the
last trained voice only.
SEATS
Seats are a part of the Occupant Restraint System of the
vehicle.
WARNING!
•It is dangerous to ride in a cargo area, inside or
outside of a vehicle. In a collision, people riding in
these areas are more likely to be seriously injured
or killed.
•Do not allow people to ride in any area of your
vehicle that is not equipped with seats and seat
belts. In a collision, people riding in these areas are
more likely to be seriously injured or killed.
•Be sure everyone in your vehicle is in a seat and
using a seat belt properly.3
UNDERSTANDING THE FEATURES OF YOUR VEHICLE 183
Page 212 of 683
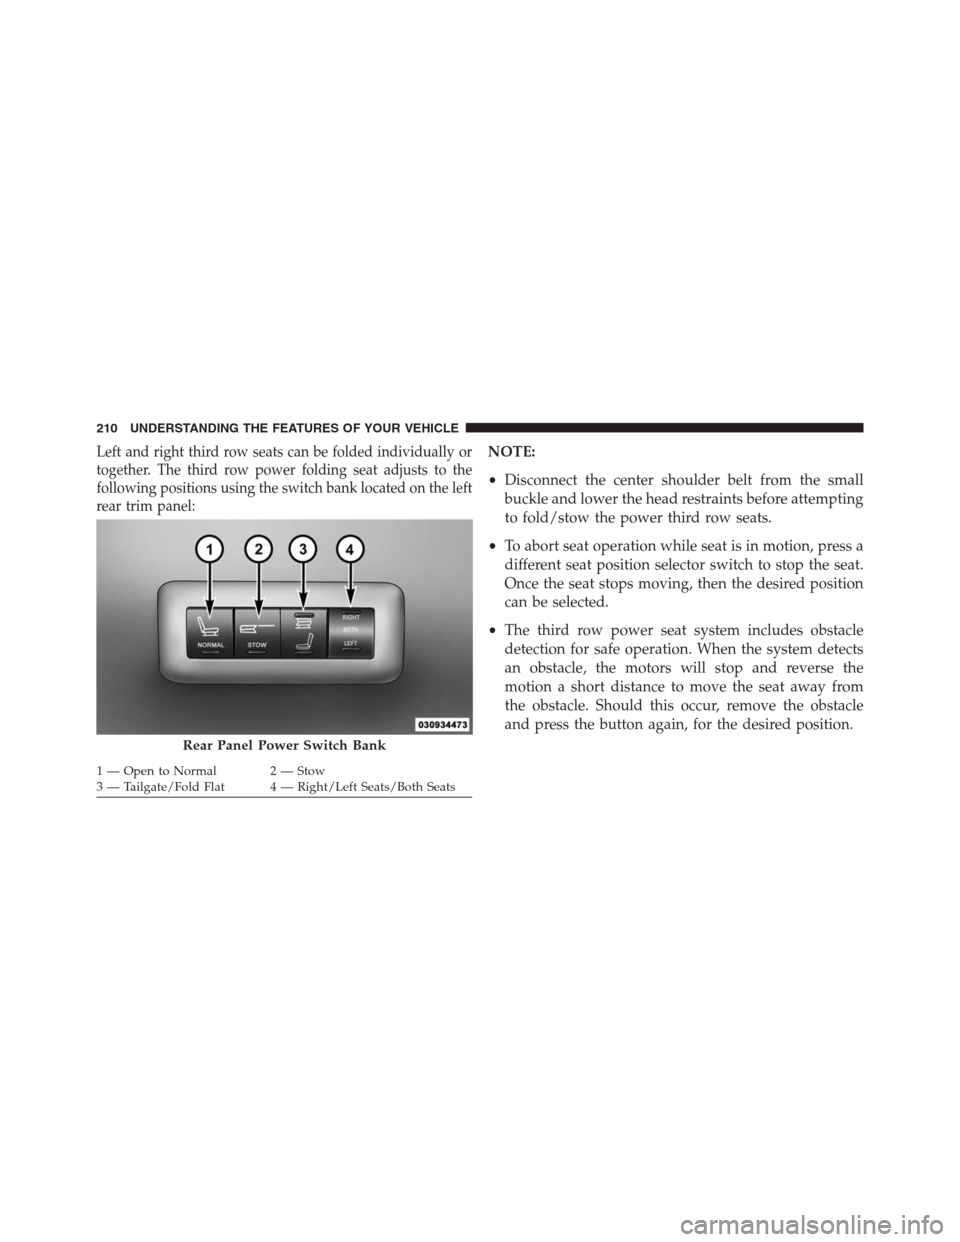
Left and right third row seats can be folded individually or
together. The third row power folding seat adjusts to the
following positions using the switch bank located on the left
rear trim panel:NOTE:
•Disconnect the center shoulder belt from the small
buckle and lower the head restraints before attempting
to fold/stow the power third row seats.
•To abort seat operation while seat is in motion, press a
different seat position selector switch to stop the seat.
Once the seat stops moving, then the desired position
can be selected.
•The third row power seat system includes obstacle
detection for safe operation. When the system detects
an obstacle, the motors will stop and reverse the
motion a short distance to move the seat away from
the obstacle. Should this occur, remove the obstacle
and press the button again, for the desired position.
Rear Panel Power Switch Bank
1 — Open to Normal 2 — Stow
3 — Tailgate/Fold Flat 4 — Right/Left Seats/Both Seats 210 UNDERSTANDING THE FEATURES OF YOUR VEHICLE
Page 225 of 683
Headlights On With Wipers — If Equipped
When your headlights are in the AUTO mode and the
engine is running, the headlights will automatically turn
on when the wiper system is also turned on. Headlights
on when windshield wipers are on may be found on
vehicles equipped with an automatic headlight system.
Refer to “Electronic Vehicle Information Center (EVIC)/
Customer-Programmable Features” in “Understanding
Your Instrument Panel” for further information.
Headlight Delay — If Equipped
This feature provides the safety of headlight illumination
for up to 90 seconds after exiting your vehicle.
To activate the delay feature, turn OFF the ignition switch
while the headlights are still on. Then turn off the
headlights within 45 seconds. The 90 second delay inter-
val begins when headlight switch is turned off. If theheadlights or parking lights are turned back on or the
ignition switch is turned ON, the delay will be cancelled.
When exiting the vehicle the driver can choose to have
the headlights remain on for 30, 60 or 90 seconds or not
remain on. To change the timer setting, see your autho-
rized dealer.
The headlight delay time is programmable on vehicles
equipped with an EVIC. Refer to “Electronic Vehicle Infor-
mation Center (EVIC)/Customer-Programmable Features”
in “Understanding Your Instrument Panel” for further
information.
If the headlights are turned off before the ignition, they
will turn off in the normal manner.
NOTE:The headlights must be turned off within 45 sec-
onds of turning the ignition OFF to activate this feature.
3
UNDERSTANDING THE FEATURES OF YOUR VEHICLE 223
Page 227 of 683
Dimmer Controls
The dimmer switch is located next to the headlight switch.
With the parking lights or headlights on, rotating the
dimmer control upward will increase the brightness of
the instrument panel lights.
Interior Lighting On
Rotate the left dimmer control completely upward to the
second detent (extreme top position) to turn on the
interior lights. The interior lights will remain on when the
dimmer control is in this position.
Interior lights are also turned on when a door or liftgate
is opened, the Remote Keyless Entry (RKE) transmitter is
activated, or when the dimmer control is moved to the
extreme top.
The interior lights will automatically turn off in approxi-
mately 10 minutes for the first activation and 90 seconds
every activation thereafter until the engine is started, if
one of the following occur:
•A door, sliding door or the liftgate is left open
•Any overhead reading light is left on
Dimmer Control
3
UNDERSTANDING THE FEATURES OF YOUR VEHICLE 225
Page 231 of 683
WINDSHIELD WIPER AND WASHERS
The wipers and washers are operated by a switch within
the multifunction lever. Rotate the end of the multifunc-
tion lever to select the desired wiper speed.NOTE:Always remove any buildup of snow that pre-
vents the windshield wiper blades from returning to the
off position. If the windshield wiper switch is turned off
and the blades cannot return to the off position, damage
to the wiper motor may occur.
WARNING!
Sudden loss of visibility through the windshield
could lead to a collision. You might not see other
vehicles or other obstacles. To avoid sudden icing of
the windshield during freezing weather, warm the
windshield with the defroster before and during
windshield washer use.
Washer And Wiper Controls
3
UNDERSTANDING THE FEATURES OF YOUR VEHICLE 229
Page 232 of 683
Intermittent Wiper System
Use the intermittent wiper when weather conditions
make a single wiping cycle with a variable pause be-
tween cycles desirable. Rotate the end of the multifunc-
tion lever to the first detent position, and then turn the
end of the lever to select the desired delay interval. There
are five delay settings, which allow you to regulate the
wipe interval from a minimum of one cycle every second
to a maximum of approximately 36 seconds between
cycles. The delay intervals will double in duration when
the vehicle speed is 10 mph (16 km/h) or less.
Windshield Wiper Operation
Rotate the end of the lever upward, to the first detent past
the intermittent settings for low-speed wiper operation.
Rotate the end of the lever upward to the second detent past
the intermittent settings for high-speed wiper operation.
Windshield Washers
To use the Washer, push on the end of the lever to the
second detent and hold while spray is desired. If the lever
is pushed while on the intermittent setting, the wipers
will turn on and operate for several wipe cycles after the
lever is released, and then resume the intermittent inter-
val previously selected. If the lever is pushed while the
wipers are in the off position, the wipers will operate
several wipe cycles, then turn off.
Mist Feature
Press the end of the multifunction lever inward (toward
the steering column) to the first detent and release for a
single wiping cycle.
NOTE:The mist feature does not activate the washer
pump; therefore, no washer fluid will be sprayed on the
windshield. The wash function must be used in order to
spray the windshield with washer fluid.
230 UNDERSTANDING THE FEATURES OF YOUR VEHICLE
Page 233 of 683
Rear Wiper And Washer
Rotating the rotary ring to the first detent activates the
rear intermittent wipers. To activate the washers, rotate
the rotary ring fully forward and the washers will spray
until the ring is released, and then resume the intermit-
tent interval.
NOTE:Rear window wipers function in the intermittent
wiper speed only.
Rain Sensing Wipers — If Equipped
This feature senses moisture on the windshield and
automatically activates the wipers for the driver. This
feature is especially useful for road splash or overspray
from the windshield washers of the vehicle ahead. Rotate
the end of the multifunction lever to one of the five
intermittent wiper sensitivity settings to activate this
feature.The sensitivity of the system is adjustable from the
multifunction lever. Wiper sensitivity position 3 has been
calibrated for best overall wiping sensitivity. If the opera-
tor desires more wiping sensitivity, they may select
sensitivity positions 4 or 5. If the operator desires less
wiping sensitivity, they may select sensitivity positions 2
or 1. Place the multifunction lever in the OFF position
when not using the system.
NOTE:
•The Rain Sensing feature will not operate when the
wiper speed is in the low or high position.
•
The Rain Sensing feature may not function properly
when ice or dried saltwater is present on the windshield.
•Use of Rain-X® or products containing wax or silicone
may reduce rain sensor performance.
•The Rain Sensing feature can be turned on and off
through the EVIC (if equipped). Refer to “Electronic
3
UNDERSTANDING THE FEATURES OF YOUR VEHICLE 231