Page 302 of 520

CAUTION!
To prevent damage to the starter, wait 10 to 15
seconds before trying again.
After Starting
The idle speed is controlled automatically and it will
decrease as the engine warms up.
ENGINE BLOCK HEATER – IF EQUIPPED
The engine block heater warms the engine, and permits
quicker starts in cold weather. Connect the cord to a
standard 110-115 Volt AC electrical outlet with a
grounded, three-wire extension cord.
The engine block heater must be plugged in at least one
hour to have an adequate warming effect on the engine.
The engine block heater cord is routed under the hood on
the driver side of the vehicle. It has a removable cap thatis located on the driver side of the Integrated Power
Module.
WARNING!
Remember to disconnect the engine block heater
cord before driving. Damage to the 110-115 Volt
electrical cord could cause electrocution.
MANUAL TRANSMISSION — IF EQUIPPED
Six-Speed Manual Transmission
WARNING!
You or others could be injured if you leave the
vehicle unattended without having the parking
brake fully applied. The parking brake should al-
ways be applied when the driver is not in the vehicle,
especially on an incline.
300 STARTING AND OPERATING
Page 310 of 520

Gear Ranges
DO NOT race the engine when shifting from PARK or
NEUTRAL into another gear range.
NOTE:
•After selecting any gear range, wait a moment to allow
the selected gear to engage before accelerating. This is
especially important when the engine is cold.
• If there is a need to restart the engine, be sure to cycle
the ignition to the OFF position before restarting.
Transmission gear engagement may be delayed after
restarting the engine if the key is not cycled to the OFF
position first.
PARK
This range supplements the parking brake by locking the
transmission. The engine can be started in this range.
Never attempt to use PARK while the vehicle is in
motion. Apply the parking brake when leaving the
vehicle in this range.
When parking on a level surface, you may shift the
transmission into PARK first, and then apply the parking
brake.
When parking on a hill, apply the parking brake before
shifting the transmission to PARK, otherwise the load on
the transmission locking mechanism may make it diffi-
cult to move the shift lever out of PARK. As an added
precaution, turn the front wheels toward the curb on a
downhill grade and away from the curb on an uphill
grade.
308 STARTING AND OPERATING
Page 313 of 520

The following indicators should be used to ensure that
you have engaged the transmission into the PARK posi-
tion:
•When shifting into PARK, firmly move the shift lever
all the way forward and to the left until it stops and is
fully seated.
• Look at the transmission gear position display and
verify that it indicates the PARK position.
• With brake pedal released, verify that the shift lever
will not move out of PARK.
REVERSE
This range is for moving the vehicle backward. Shift into
REVERSE only after the vehicle has come to a complete
stop.
NEUTRAL
Use this range when the vehicle is standing for prolonged
periods with the engine running. The engine may be
started in this range. Apply the parking brake and shift
the transmission into PARK if you must leave the vehicle.
WARNING!
Do not coast in NEUTRAL and never turn off the
ignition to coast down a hill. These are unsafe
practices that limit your response to changing traffic
or road conditions. You might lose control of the
vehicle and have a collision.5
STARTING AND OPERATING 311
Page 329 of 520

•Getting water inside your vehicle’s engine can
cause it to lock up and stall out, and cause serious
internal damage to the engine. Such damage is not
covered by the New Vehicl")
CAUTION!(Continued)
•Getting water inside your vehicle’s engine can
cause it to lock up and stall out, and cause serious
internal damage to the engine. Such damage is not
covered by the New Vehicle Limited Warranty.
WARNING!
• Driving through standing water limits your vehi-
cle’s traction capabilities. Do not exceed 5 mph
(8 km/h) when driving through standing water.
• Driving through standing water limits your vehi-
cle’s braking capabilities, which increases stopping
distances. Therefore, after driving through stand-
ing water, drive slowly and lightly press on the
brake pedal several times to dry the brakes.
(Continued)
WARNING! (Continued)
•Getting water inside your vehicle’s engine can
cause it to lock up and stall out, and leave you
stranded.
• Failure to follow these warnings may result in
injuries that are serious or fatal to you, your pas-
sengers, and others around you.
POWER STEERING
The standard power steering system will give you good
vehicle response and increased ease of maneuverability
in tight spaces. The system will provide mechanical
steering capability if power assist is lost.
If for some reason the power assist is interrupted, it will
still be possible to steer your vehicle. Under these condi-
tions, you will observe a substantial increase in steering
effort, especially at very low vehicle speeds and during
parking maneuvers.
5
STARTING AND OPERATING 327
Page 340 of 520
, with a loaded vehicle, or while pulling a trailer,
when the system will not activate and slight rolling
may occur. This could caus")
WARNING!
There may be situations on minor hills (i.e., less than
8%), with a loaded vehicle, or while pulling a trailer,
when the system will not activate and slight rolling
may occur. This could cause a collision with another
vehicle or object. Always remember the driver is
responsible for braking the vehicle.
Disabling/Enabling HSA
If you wish to turn on or off the HSA system, it can be
done using the Customer Programmable Features in the
Electronic Vehicle Information Center (EVIC). Refer to
“Electronic Vehicle Information Center (EVIC)” in “Un-
derstanding Your Instrument Panel” for further informa-
tion.For vehicles not equipped with the EVIC, perform the
following steps:
NOTE:
You must complete Steps 1 through 8 within 90
seconds.
1. Center the steering wheel (front wheels pointing straight forward).
2. Shift the transmission into NEUTRAL.
3. Apply the parking brake.
4. Start the engine.
5. Release the clutch pedal (if equipped).
6. Rotate the steering wheel one-half turn to the left.
7.
Press the “ESC Off” switch (located in the lower switch
bank below the climate controls) four times within 20
seconds. The “ESC Activation/Malfunction Indicator
Light” should turn on and turn off two times.
338 STARTING AND OPERATING
Page 349 of 520
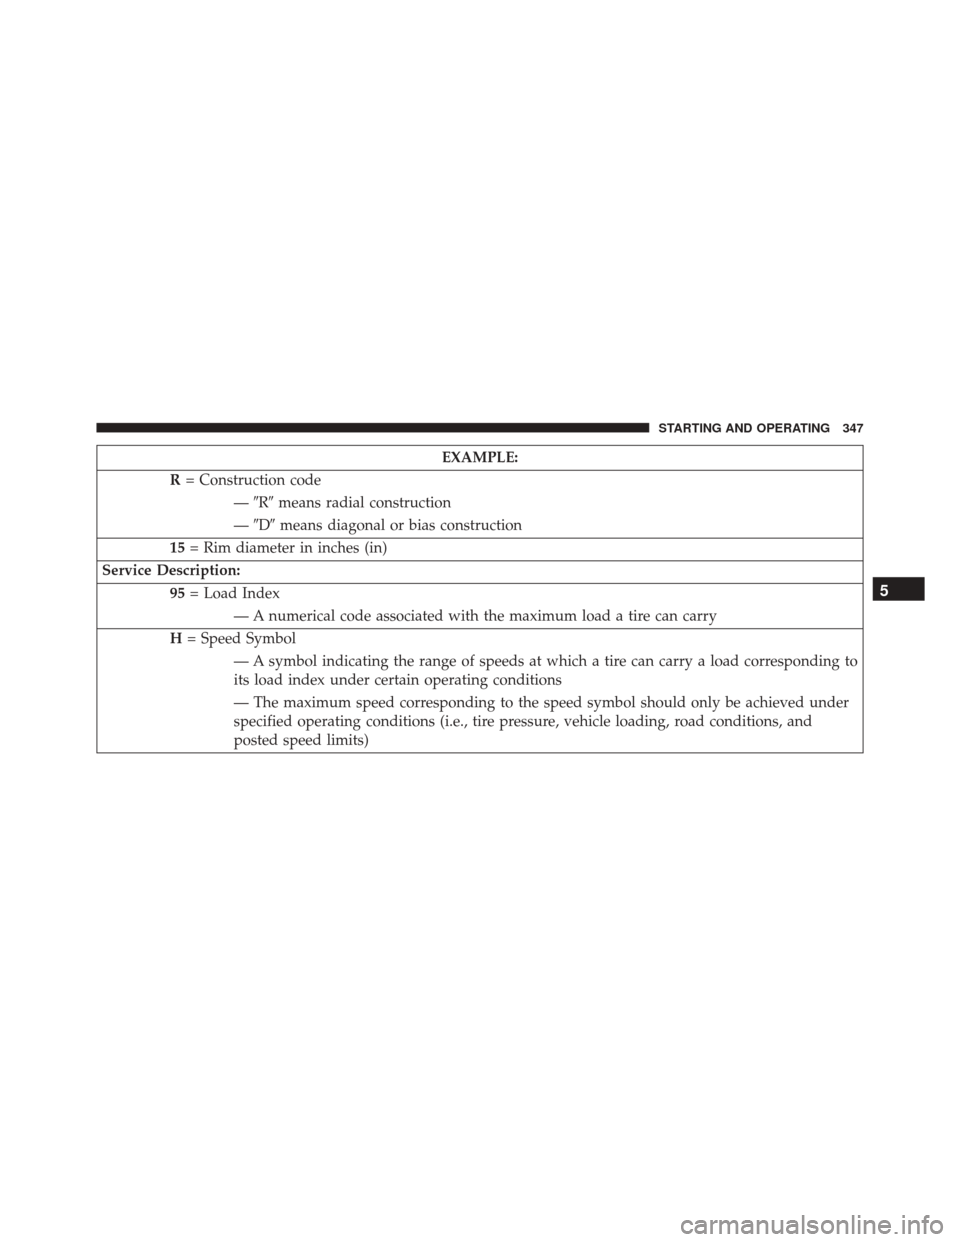
EXAMPLE:
R = Construction code
—�R� means radial construction
— �D� means diagonal or bias construction
15 = Rim diameter in inches (in)
Service Description: 95= Load Index
— A numerical code associated with the maximum load a tire can carry
H = Speed Symbol
— A symbol indicating the range of speeds at which a tire can carry a load corresponding to
its load index under certain operating conditions
— The maximum speed corresponding to the speed symbol should only be achieved under
specified operating conditions (i.e., tire pressure, vehicle loading, road conditions, and
posted speed limits)
5
STARTING AND OPERATING 347
Page 360 of 520

Inflation pressures specified on the placard are always
“cold tire inflation pressure.” Cold tire inflation pressure
is defined as the tire pressure after the vehicle has not
been driven for at least three hours, or driven less than 1
mile (1.6 km) after a three hour period. The cold tire
inflation pressure must not exceed the maximum infla-
tion pressure molded into the tire sidewall.
Check tire pressures more often if subject to a wide range
of outdoor temperatures, as tire pressures vary with
temperature changes.
Tire pressures change by approximately 1 psi (7 kPa) per
12°F (7°C) of air temperature change. Keep this in mind
when checking tire pressure inside a garage, especially in
the winter.
Example: If garage temperature = 68°F (20°C) and the
outside temperature = 32°F (0°C) then the cold tireinflation pressure should be increased by 3 psi (21 kPa),
which equals 1 psi (7 kPa) for every 12°F (7°C) for this
outside temperature condition.
Tire pressure may increase from 2 to 6 psi (13 to 40 kPa)
during operation. DO NOT reduce this normal pressure
build up or your tire pressure will be too low.
Tire Pressures For High Speed Operation
The manufacturer advocates driving at safe speeds and
within posted speed limits. Where speed limits or condi-
tions are such that the vehicle can be driven at high
speeds, maintaining correct tire inflation pressure is very
important. Increased tire pressure and reduced vehicle
loading may be required for high-speed vehicle opera-
tion. Refer to your authorized tire or original equipment
vehicle dealer for recommended safe operating speeds,
loading and cold tire inflation pressures.
358 STARTING AND OPERATING
Page 367 of 520
 Super Z6 low profile traction device or equiva-
lent is recommended on P215/65R17, P225/60R18 or
P235/55R1")
•Install on Rear Tires Only.
• Due to limited clearance, the Security Chain Company
(SCC) Super Z6 low profile traction device or equiva-
lent is recommended on P215/65R17, P225/60R18 or
P235/55R18 tires..
• For an All Wheel Drive vehicle, P235/55R19 tire with
the use of a traction device that meets the SAE type
“Class S” specification is recommended.
WARNING!
Using tires of different size and type (M+S, Snow)
between front and rear axles can cause unpredictable
handling. You could lose control and have a collision.
CAUTION!
To avoid damage to your vehicle or tires, observe the
following precautions:
• Because of restricted traction device clearance be-
tween tires and other suspension components, it is
important that only traction devices in good condi-
tion are used. Broken devices can cause serious
damage. Stop the vehicle immediately if noise
occurs that could indicate device breakage. Remove
the damaged parts of the device before further use.
• Install device as tightly as possible and then re-
tighten after driving about ½ mile (0.8 km).
• Do not exceed 30 mph (48 km/h).
• Drive cautiously and avoid severe turns and large
bumps, especially with a loaded vehicle.
• Do not drive for prolonged period on dry pave-
ment.
(Continued)
5
STARTING AND OPERATING 365