Page 131 of 248
12
9
Changing a bulb
QUICK HEL
P
7
CHANGING A BULB
Type A
All glass bulb: pull
gently as it is fitted by
pressure.
Type B
Bayonet bulb: press
on the bulb then turn it
anticlockwise.
Type C
Halogen bulb: release
the retaining spring from
its housing.
TYPES OF BULB
Various types of bulb are installed on your vehicle. To remove them: Halogen bulbs must be changed after
the headlamp has been off for several
minutes (risk of serious burns). Do not touch
the bulb directly with your fingers, use lint-
free cloths.
When each operation has been completed,
check the operation of the lighting.
Page 132 of 248

130
Changing a bulb
3.
Direction indicators
Type B
, PY21W - 21W (amber)
- Turn the bulb holder a quarter turn
anticlockwise.
- Remove the bulb by pressing it lightly
while turning it anticlockwise.
- Change the bulb.
- Ensure that the cover is refitted
correctly all the way round to ensure
sealing.
FRONT LAMPS
Open the bonnet. To access the bulbs, reach
behind the headlamp unit.
Carry out the operations in reverse order to
refit each bulb.
1.
Dipped / Main beam headlamps
Type C
, H4 - 55W
- Remove the centre cover by pulling
the flexible rubber tab.
- Disconnect the electrical connector.
- Release the retaining spring.
- Change the bulb taking care to align
the metal part with the slots in the
lamp.
2.
Sidelamps
Type A
, W5W - 5W
- Remove the cover by pulling the
flexible rubber tab.
- Remove the bulb holder fitted by
pressure by pulling the connector.
- Change the bulb.
- Ensure that the cover is refitted
correctly all the way round to ensure
sealing.
4.
Foglamps
Type C
, H1 - 55W
Contact a CITROËN dealer or a qualified
workshop.
Page 134 of 248
132
Changing a bulb
REAR LAMPS
For more information on bulbs, refer to the
"Types of bulb".
- Identify the faulty bulb then open the
rear doors to 180°. Refer to the "Access"
section of chapter 2.
- Remove the two fixing nuts.
Pull the lens unit from the outside.
- Holding the lamp unit, disconnect the
electrical connector.
- Move aside the 8 tabs then extract the
bulb holder.
- Remove the failed bulb by pressing it
lightly while turning it anticlockwise.
- Change the bulb.
1.
Brake lamps / sidelamps
Type B
, P21/5W - 21/5W
2.
Direction indicators
Type B
, PY21W - 21W (amber)
3.
Reversing lamps
Type B
, P21W - 21W
4.
Foglamps
Type B
, P21W - 21W When refitting, take care to correctly
reposition:
- the 8 tabs,
- the two white lugs in the two rubber
holes to maintain the sealing of the lamp
unit,
- the supply wire to avoid trapping it.
Page 135 of 248

133
Changing a bulb
QUICK HEL
P
7
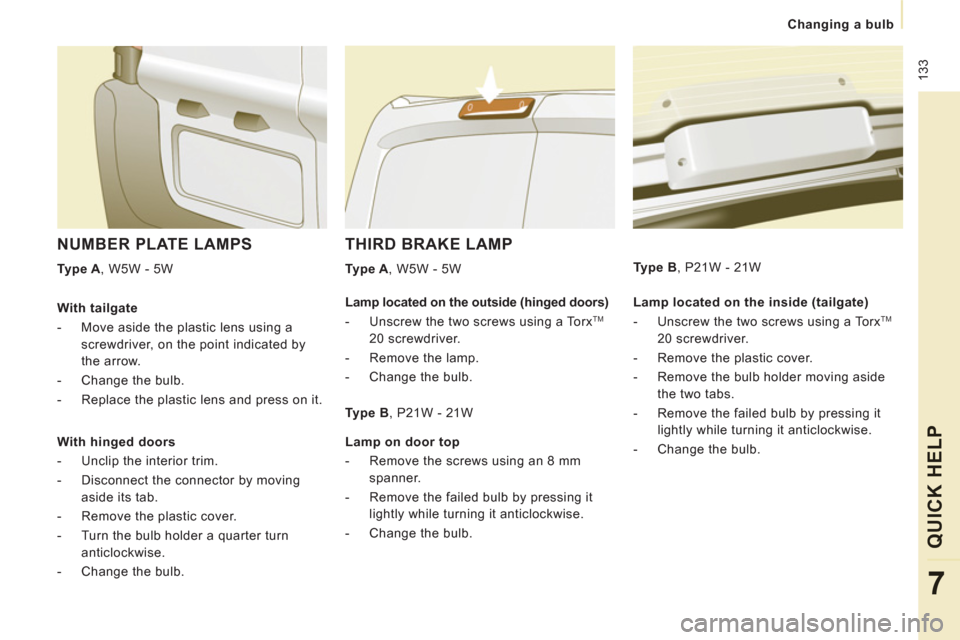
THIRD BRAKE LAMP
Type A
, W5W - 5W
NUMBER PLATE LAMPS
Type A
, W5W - 5W
Lamp located on the inside (tailgate)
- Unscrew the two screws using a Torx
TM
20 screwdriver.
- Remove the plastic cover.
- Remove the bulb holder moving aside
the two tabs.
- Remove the failed bulb by pressing it
lightly while turning it anticlockwise.
- Change the bulb.
Type B
, P21W - 21W
With tailgate
- Move aside the plastic lens using a
screwdriver, on the point indicated by
the arrow.
- Change the bulb.
- Replace the plastic lens and press on it.
With hinged doors
- Unclip the interior trim.
- Disconnect the connector by moving
aside its tab.
- Remove the plastic cover.
- Turn the bulb holder a quarter turn
anticlockwise.
- Change the bulb.
Lamp located on the outside (hinged doors)
- Unscrew the two screws using a Torx TM
20 screwdriver.
- Remove the lamp.
- Change the bulb.
Type B
, P21W - 21W
Lamp on door top
- Remove the screws using an 8 mm
spanner.
- Remove the failed bulb by pressing it
lightly while turning it anticlockwise.
- Change the bulb.
Page 137 of 248

135
Changing a fuse
QUICK HEL
P
7
RIGHT-HAND SIDE DASHBOARD
FUSES
- Tilt the storage compartment then pull it
firmly to access the fuses.
Fuses
F
Amperes
A
Allocation
1
15
Rear wiper
2
-
Free
3
5
Airbag control unit
4
10
Steering wheel angle sensor, Diagnostic socket, DSC
sensor, Manual ventilation, Clutch switch, Headlamp beam
height, Particle emission filter pump
5
30
Electric mirrors, Passenger electric window motor
6
30
Front electric windows supply
7
5
Courtesy lamps and glove box lamp
8
20
Multifunction screen, Anti-theft alarm siren, Audio
equipment, Compact disc changer, Audio/telephone, Trailer
fusebox (accessory), Coachbuilder/vehicle converter unit
(platform cab)
9
10
Load space accessory socket
10
30
Rear ride height corrector, Steering wheel switching,
Instrument panel
11
15
Diagnostic socket, Ignition switch
12
15
Hands-free kit, Airbag control unit, Parking sensors control
unit
13
5
Engine fusebox, Trailer fusebox
14
15
Rain sensor, Digital air conditioning, Instrument panel
15
30
Locking/unlocking/deadlocking
16
-
Free
17
40 Heated rear screen, Heated mirrors
17
10
Heated mirrors only
Page 138 of 248
136
Changing a fuse
PASSENGER COMPARTMENT
FUSES
- Unclip the battery compartment cover.
- Remove the red battery terminal (+).
When you have finished, close the cover
carefully.
Fuses
F
Amperes
A
Allocation
1
30
Heated seats
2
20/-
Battery state of charge unit/Free
3
40/50
Trailer fuse box (accessory) / Coachbuilder/vehicle modifier
unit (platform cab)
4
-
Free
36
15
Hinged door locks
37
10
Hinged door locks
38
20
Hinged door rear wiper
39
-
Free
40
5
Folding door mirrors
Page 143 of 248
14
1
Having your vehicle towed
QUICK HEL
P
7
General recommendations
Observe the legislation in force in your
country.
Ensure that the weight of the towing vehicle
is higher than that of the towed vehicle.
The person at the wheel of the towed vehicle
must have a valid driving licence.
When towing a vehicle with all four wheels
on the ground, always use an approved
towing bar; rope and straps are prohibited.
When towing a vehicle with the engine off,
there is no longer any power assistance for
braking or steering.
In the following cases, you must always call
on a professional recovery service:
- vehicle broken down on a motorway or
fast road,
- 4 wheel drive vehicle,
- when it is not possible to put the
gearbox into neutral, unlock the
steering, or release the parking brake,
- towing with only two wheels on the
ground,
- where there is no approved towing bar
available...
Page 211 of 248

9.59
FREQUENTLY ASKED QUESTIONS
QUESTIONANSWERSOLUTION
Some characters in themedia information are not
displayed correctly while playing. The audio s
ystem does not display some types of characters. Use standard characters to name tracks andfolders.
Pla
ying of streaming fi lesdoes not start. The peripheral device connected does not support automatic play. Start the playback from the device.
Th
e names of tracks and
the track length are not
displayed on the screen
when streaming audio. The Bluetooth
profi le does not allow the transfer of this information.
The qualit
y of receptionof the radio station
listened to graduallydeteriorates or the stored stations do not function(no sound, 87.5 Mhz is
displayed...). The vehicle is too
far from the transmitter used by the station listened
to or there is no transmitter in the geographical area through which the
vehicle is travelling.
Activate the "RDS" function by means of theshort-cut menu to enable the system to check
whether there is a more powerful transmitter in thegeographical area.
The environment
(hills, buildings, tunnels, basement car parks...) block reception, including in RDS mode. This phenomenon is normal and does not indicate
a fault with the audio system.
The aerial is absent or has been dama
ged (for example when goingthrough a car wash or into an underground car park). Have the aerial checked by a CITROËN dealer.
I
cannot fi nd some radiostations in the list of stations received.The station is not received or its name has chan
ged in the list.
Some radio stations send other information in place of their name (the
title of the song for example).
The s
ystem interprets this information as the name of the station. The name of the radio station changes.