Page 69 of 699
WARNING!
•A belt that is buckled into the wrong buckle will
not protect you properly. The lap portion could ride
too high on your body, possibly causing internal
injuries. Always buckle your belt into the buckle
nearest you.
• A belt that is too loose will not protect you prop-
erly. In a sudden stop you could move too far
forward, increasing the possibility of injury. Wear
your seat belt snugly.
4. Position the lap belt across your thighs, below your abdomen. To remove slack in the lap belt portion, pull
up on the shoulder belt. To loosen the lap belt if it is
too tight, tilt the latch plate and pull on the lap belt.
A snug belt reduces the risk of sliding under the belt in
a collision.
Inserting Latch Plate Into Buckle
2
THINGS TO KNOW BEFORE STARTING YOUR VEHICLE 67
Page 71 of 699
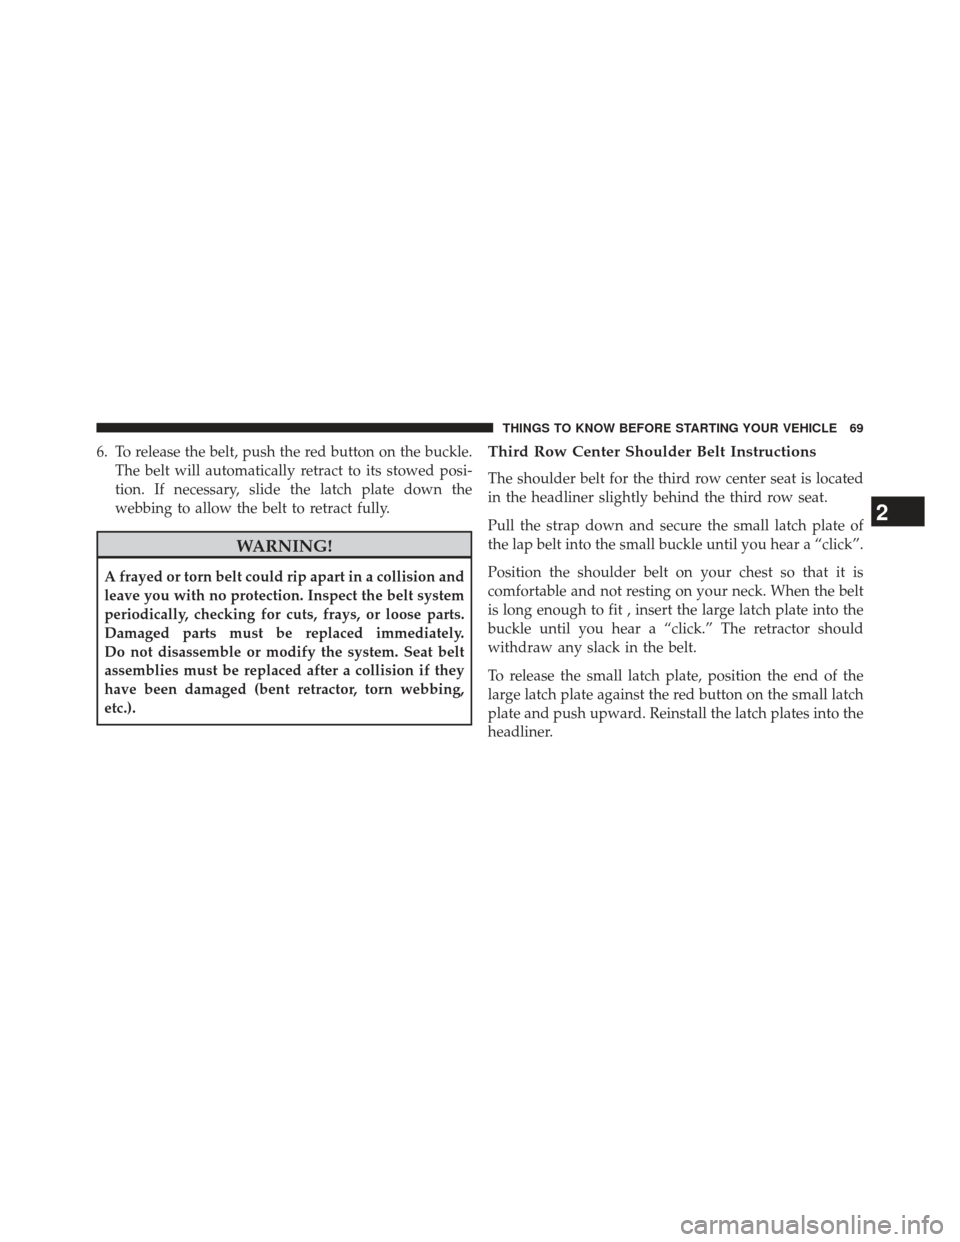
6. To release the belt, push the red button on the buckle.The belt will automatically retract to its stowed posi-
tion. If necessary, slide the latch plate down the
webbing to allow the belt to retract fully.
WARNING!
A frayed or torn belt could rip apart in a collision and
leave you with no protection. Inspect the belt system
periodically, checking for cuts, frays, or loose parts.
Damaged parts must be replaced immediately.
Do not disassemble or modify the system. Seat belt
assemblies must be replaced after a collision if they
have been damaged (bent retractor, torn webbing,
etc.).
Third Row Center Shoulder Belt Instructions
The shoulder belt for the third row center seat is located
in the headliner slightly behind the third row seat.
Pull the strap down and secure the small latch plate of
the lap belt into the small buckle until you hear a “click”.
Position the shoulder belt on your chest so that it is
comfortable and not resting on your neck. When the belt
is long enough to fit , insert the large latch plate into the
buckle until you hear a “click.” The retractor should
withdraw any slack in the belt.
To release the small latch plate, position the end of the
large latch plate against the red button on the small latch
plate and push upward. Reinstall the latch plates into the
headliner.
2
THINGS TO KNOW BEFORE STARTING YOUR VEHICLE 69
Page 73 of 699
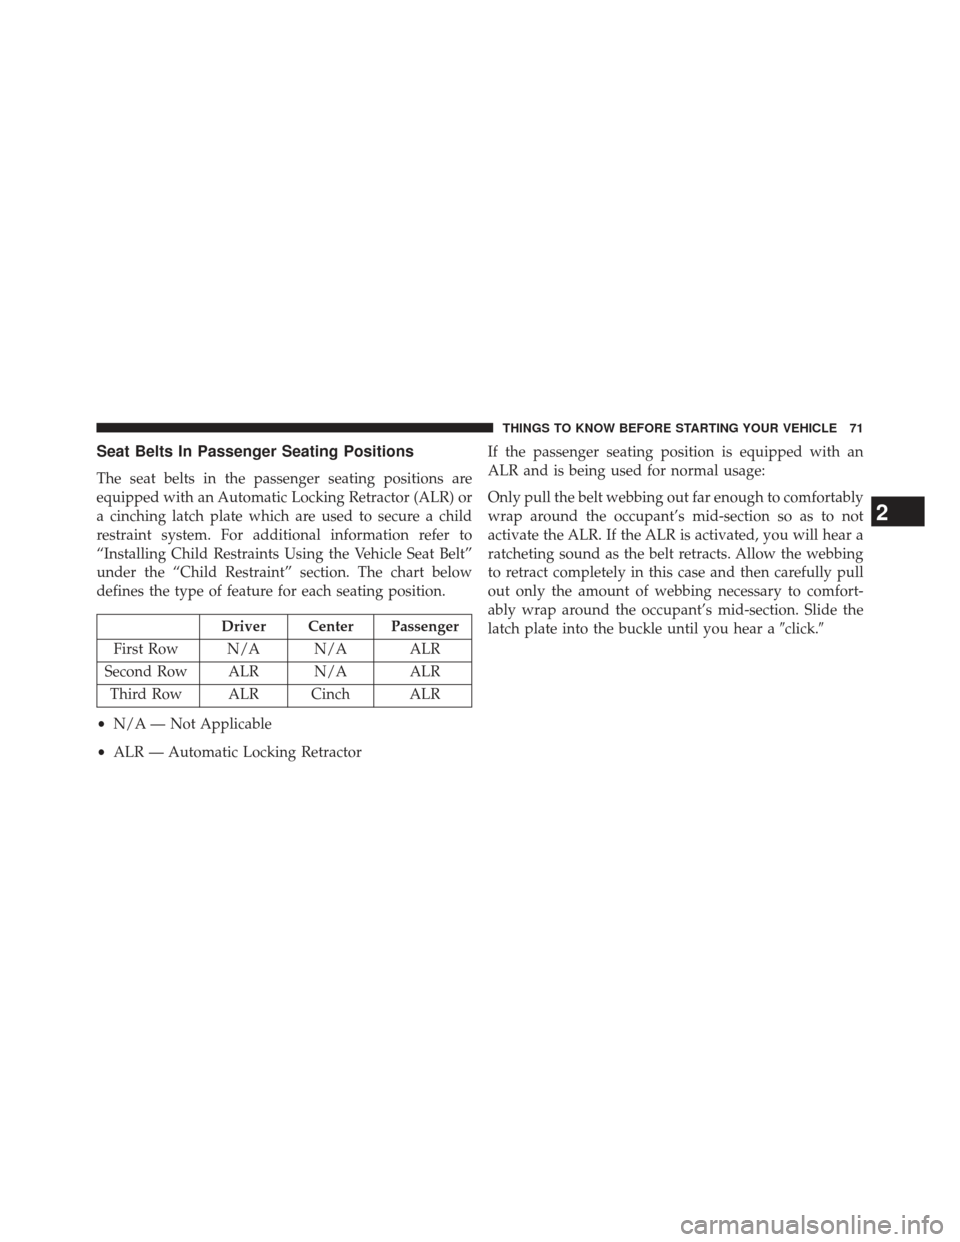
Seat Belts In Passenger Seating Positions
The seat belts in the passenger seating positions are
equipped with an Automatic Locking Retractor (ALR) or
a cinching latch plate which are used to secure a child
restraint system. For additional information refer to
“Installing Child Restraints Using the Vehicle Seat Belt”
under the “Child Restraint” section. The chart below
defines the type of feature for each seating position.
Driver Center Passenger
First Row N/A N/A ALR
Second Row ALR N/A ALR Third Row ALR Cinch ALR
• N/A — Not Applicable
• ALR — Automatic Locking Retractor If the passenger seating position is equipped with an
ALR and is being used for normal usage:
Only pull the belt webbing out far enough to comfortably
wrap around the occupant’s mid-section so as to not
activate the ALR. If the ALR is activated, you will hear a
ratcheting sound as the belt retracts. Allow the webbing
to retract completely in this case and then carefully pull
out only the amount of webbing necessary to comfort-
ably wrap around the occupant’s mid-section. Slide the
latch plate into the buckle until you hear a
�click.�
2
THINGS TO KNOW BEFORE STARTING YOUR VEHICLE 71
Page 100 of 699
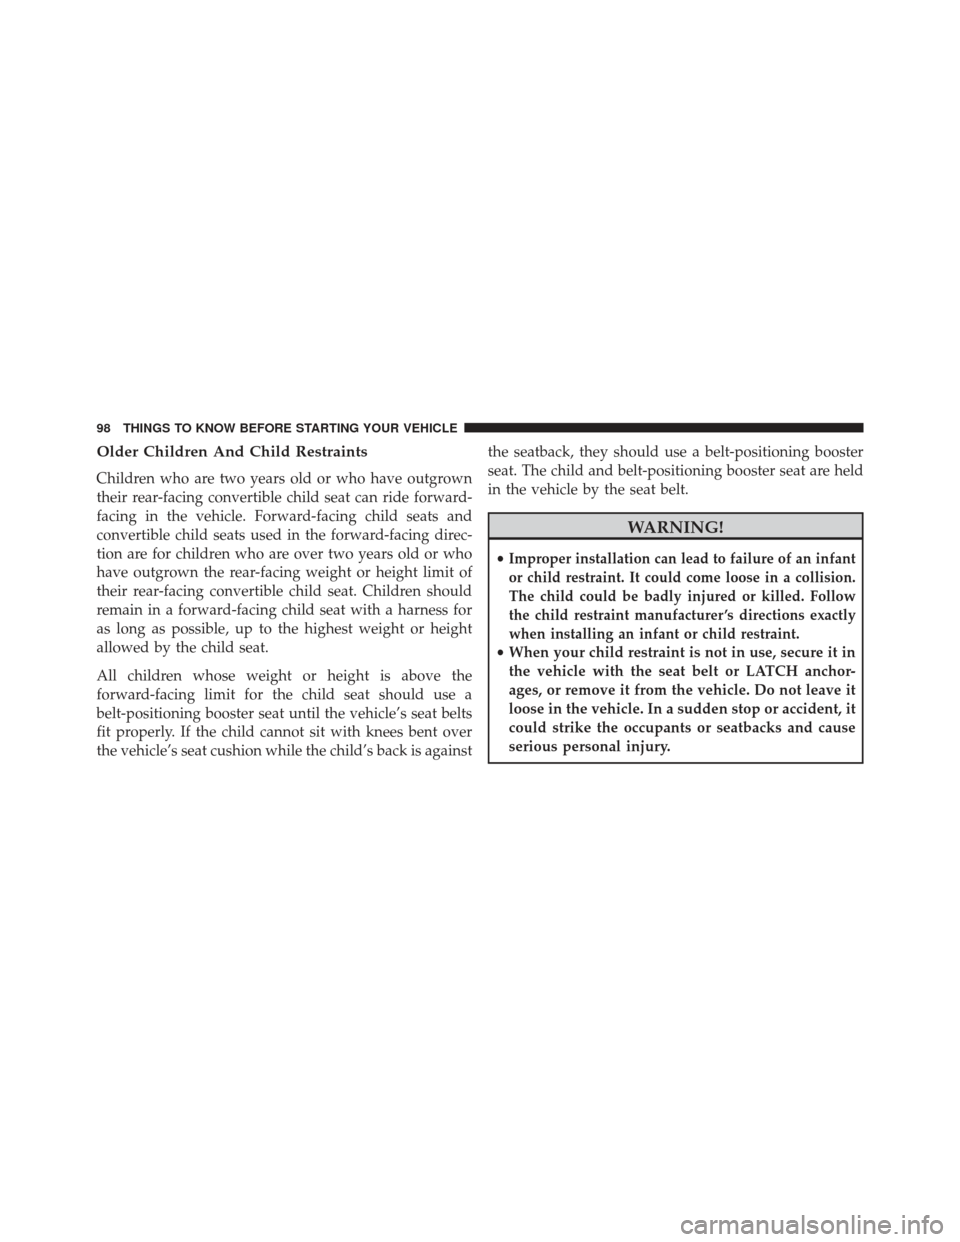
Older Children And Child Restraints
Children who are two years old or who have outgrown
their rear-facing convertible child seat can ride forward-
facing in the vehicle. Forward-facing child seats and
convertible child seats used in the forward-facing direc-
tion are for children who are over two years old or who
have outgrown the rear-facing weight or height limit of
their rear-facing convertible child seat. Children should
remain in a forward-facing child seat with a harness for
as long as possible, up to the highest weight or height
allowed by the child seat.
All children whose weight or height is above the
forward-facing limit for the child seat should use a
belt-positioning booster seat until the vehicle’s seat belts
fit properly. If the child cannot sit with knees bent over
the vehicle’s seat cushion while the child’s back is againstthe seatback, they should use a belt-positioning booster
seat. The child and belt-positioning booster seat are held
in the vehicle by the seat belt.
WARNING!
•Improper installation can lead to failure of an infant
or child restraint. It could come loose in a collision.
The child could be badly injured or killed. Follow
the child restraint manufacturer ’s directions exactly
when installing an infant or child restraint.
• When your child restraint is not in use, secure it in
the vehicle with the seat belt or LATCH anchor-
ages, or remove it from the vehicle. Do not leave it
loose in the vehicle. In a sudden stop or accident, it
could strike the occupants or seatbacks and cause
serious personal injury.
98 THINGS TO KNOW BEFORE STARTING YOUR VEHICLE
Page 102 of 699
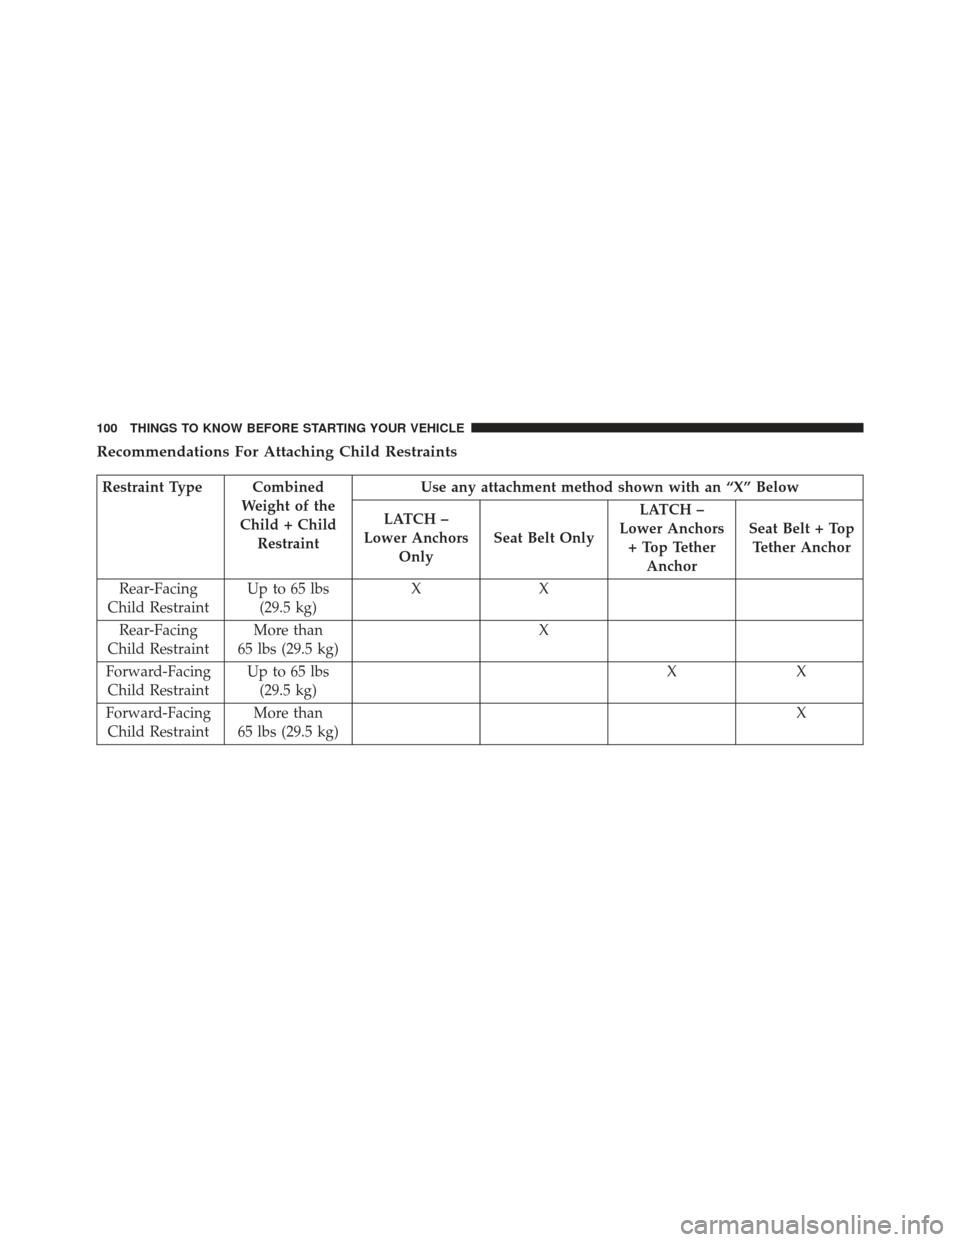
Recommendations For Attaching Child Restraints
Restraint Type CombinedWeight of the
Child + Child Restraint Use any attachment method shown with an “X” Below
LATCH –
Lower Anchors Only Seat Belt Only LATCH –
Lower Anchors + Top Tether Anchor Seat Belt + Top
Tether Anchor
Rear-Facing
Child Restraint Up to 65 lbs
(29.5 kg) XX
Rear-Facing
Child Restraint More than
65 lbs (29.5 kg) X
Forward-Facing Child Restraint Up to 65 lbs
(29.5 kg) XX
Forward-Facing Child Restraint More than
65 lbs (29.5 kg) X
100 THINGS TO KNOW BEFORE STARTING YOUR VEHICLE
Page 103 of 699
Lower Anchors and Tethers for Children (LATCH)
Restraint SystemYour vehicle is equipped with the child restraint anchor-
age system called LATCH, which stands for Lower
Anchors and Tethers for CHildren. The LATCH system
has three vehicle anchor points for installing LATCH-
equipped child seats. There are two lower anchorages
located at the back of the seat cushion where it meets the
seatback and one top tether anchorage located behind the
seating position. These anchorages are used to install
LATCH-equipped child seats without using the vehicle’s
seat belts. Some seating positions may have a top tether
anchorage but no lower anchorages. In these seating
positions, the seat belt must be used with the top tether
anchorage to install the child restraint. Please see the
following table for more information.
2
THINGS TO KNOW BEFORE STARTING YOUR VEHICLE 101
Page 104 of 699
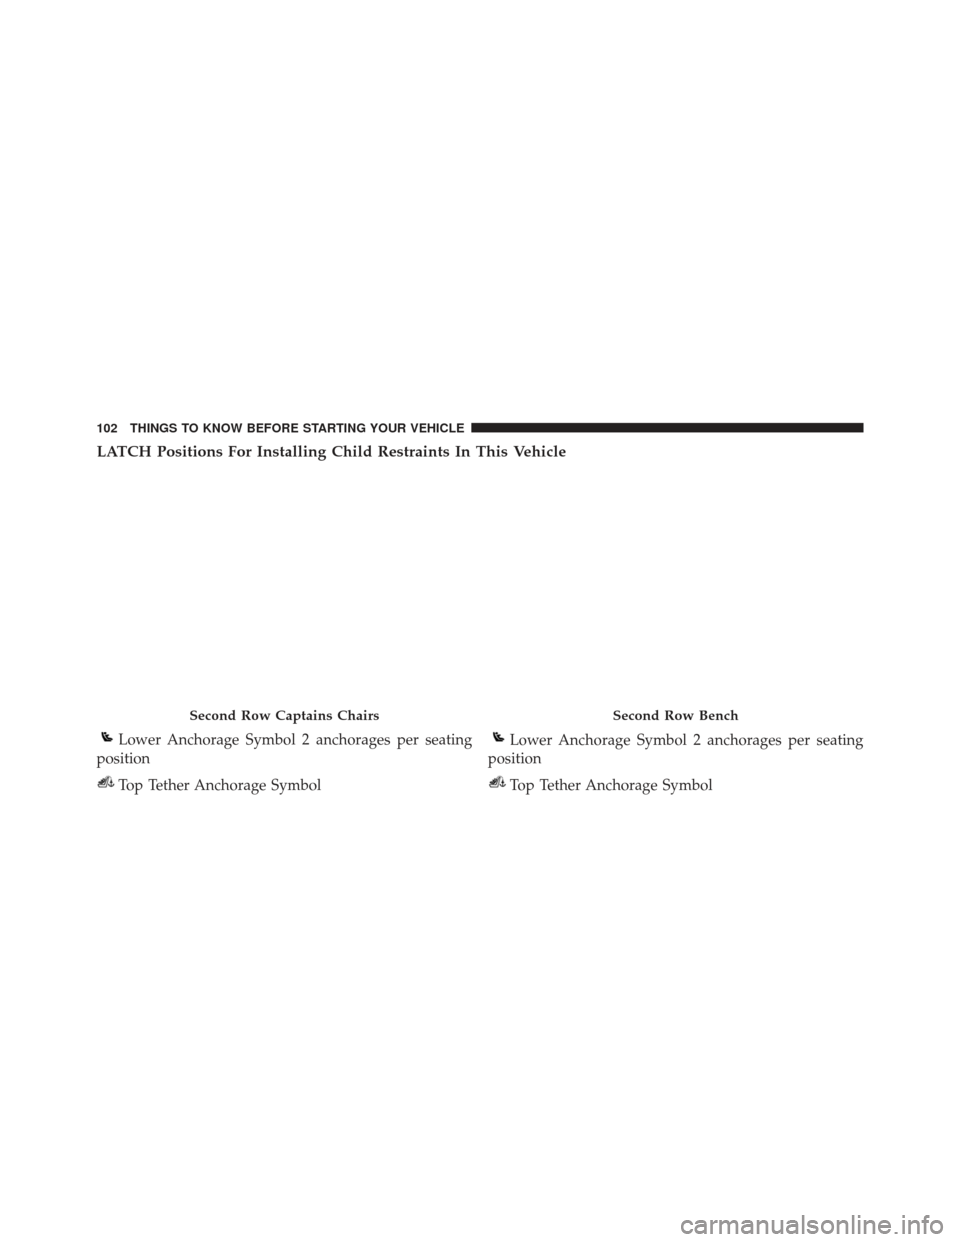
LATCH Positions For Installing Child Restraints In This Vehicle
Second Row Captains Chairs
Lower Anchorage Symbol 2 anchorages per seating
position
Top Tether Anchorage Symbol
Second Row Bench
Lower Anchorage Symbol 2 anchorages per seating
position
Top Tether Anchorage Symbol
102 THINGS TO KNOW BEFORE STARTING YOUR VEHICLE
Page 105 of 699
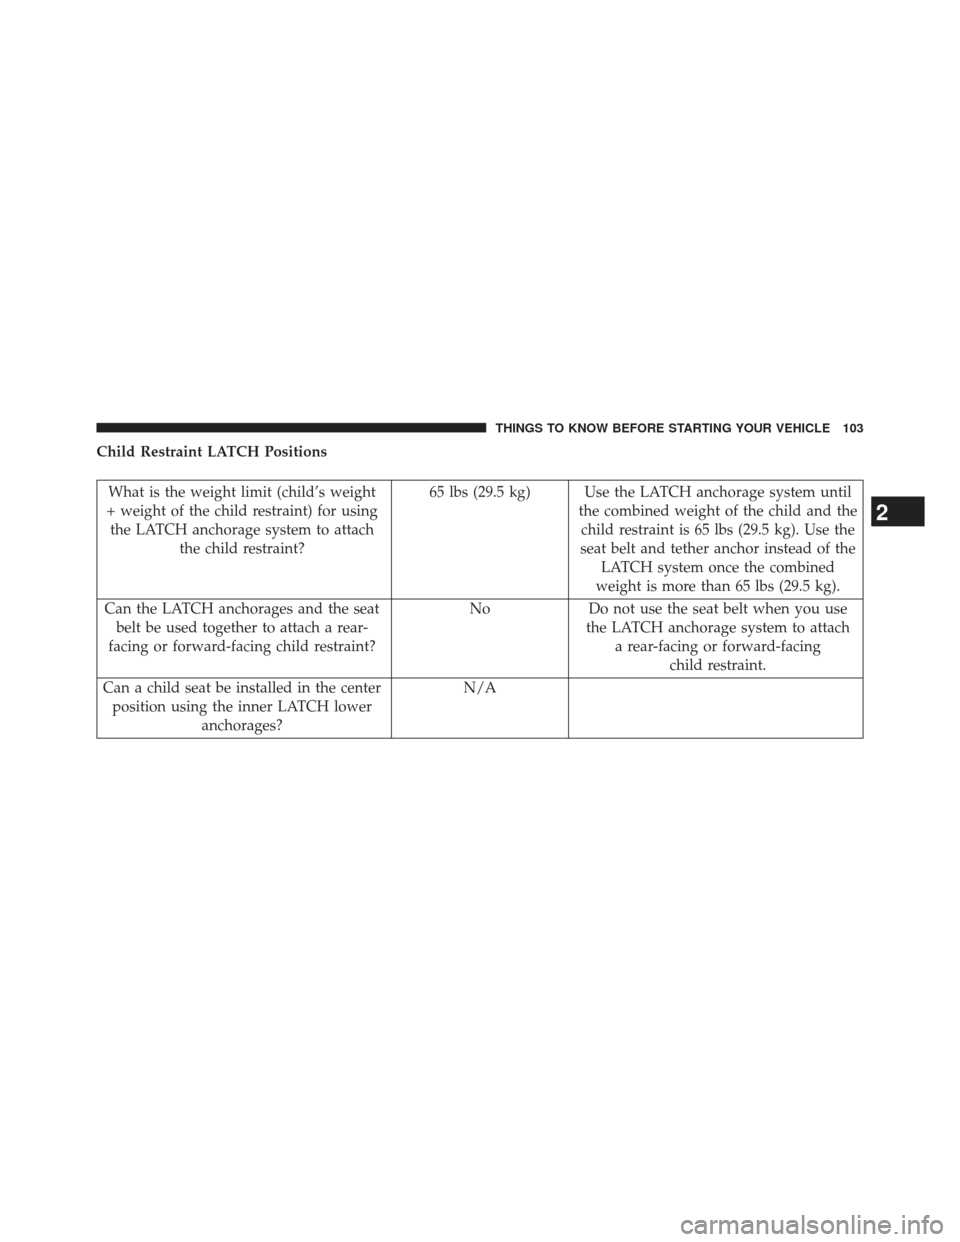
Child Restraint LATCH Positions
What is the weight limit (child’s weight
+ weight of the child restraint) for using the LATCH anchorage system to attach the child restraint? 65 lbs (29.5 kg) Use the LATCH anchorage system until
the combined weight of the child and thechild restraint is 65 lbs (29.5 kg). Use the
seat belt and tether anchor instead of the LATCH system once the combined
weight is more than 65 lbs (29.5 kg).
Can the LATCH anchorages and the seat belt be used together to attach a rear-
facing or forward-facing child restraint? No
Do not use the seat belt when you use
the LATCH anchorage system to attach a rear-facing or forward-facing child restraint.
Can a child seat be installed in the center position using the inner LATCH lower anchorages? N/A
2
THINGS TO KNOW BEFORE STARTING YOUR VEHICLE 103