Page 7 of 116
A. Turn Signal/Lights Lever(behind steering wheel) pg. 19
B. Electronic Vehicle Information Center (EVIC) Display (behind
steering wheel) pg. 6
C. Instrument Cluster pg. 6
D. Wiper/Washer Lever (behind steering wheel) pg. 21
E. Audio System (touch-screen-radio shown) pg. 28 F. Switch Panel
• Heated Seat Switches pg. 17
• Electronic Stability Control pg. 76
• Hazard Switch
G. Manual Climate Controls pg. 23
H. Transmission Gear Selector
I. Park Brake Lever
J. Power Outlet/Cigar Lighter pg. 73 K. USB Port
L. Electronic Speed Control pg. 22
M. Electronic Vehicle Information
Center (EVIC) Controls pg. 69
N. Hood Release pg. 92
O. Power Mirrors
P. Power Door Locks
Q. Power Windows
CONTROLS AT A GLANCE
5
Page 28 of 116
Raising
• Press and hold the switch in the top up position until the operation of raising the top andlatching is complete. “TOP DONE” will be displayed in the odometer or “CONVERTIBLE
TOP COMPLETE” in the Electronic Vehicle Information Center once the convertible top is
completely raised and latched.
• Continue to hold the switch in the up position to completely raise all four windows.
Emergency Bypass Mode (To Raise The Top Only)
• This procedure is only to be used to raise the top when the top cannot be returned to the UP (raised) position by pressing the POWER TOP switch or is in a position in which the vehicle
cannot be driven. Please follow these emergency bypass instructions to return the top to the
UP (raised) position.
• Press the POWER TOP switch in the Top Up direction five times within two seconds and hold the switch in the Top Up position for a minimum of two minutes.
• If damage starts to occur while in the Emergency Bypass Mode, immediately release the POWER TOP switch and see your authorized dealer.
NOTE:
This procedure may take more time to fully raise and close the power top. It is not uncommon to
see delays of up to 30 seconds before operation begins.
OPERATING YOUR VEHICLE
26
Page 32 of 116
Uconnect® 130
NOTE:
Your radio has many features that add to the comfort and convenience of you and your
passengers. Some of these radio features should not be used when driving because they take your
eyes from the road or your attention from driving.
Clock Setting
• Press and hold the “TIME” button until the hours blink; turn the “TUNE/ SCROLL” controlknob to set the hours.
• Press the “TUNE/SCROLL” control knob until the minutes begin to blink; turn the “TUNE/ SCROLL” control knob to set the minutes.
• Press the “TUNE/SCROLL” control knob to save the time change.
• To exit, press any button/knob or wait five seconds.
Equalizer, Balance And Fade
• Press the “TUNE/SCROLL” control knob and BASS, MID, TREBLE, BALANCE and FADE will display. Rotate the “TUNE/SCROLL” control knob to select the desired setting.
ELECTRONICS
30
Page 33 of 116
Radio Operation
Seek Up/Down Buttons
• Press to seek through radio stations in AM or FM bands.
• Hold either button to bypass stations without stopping.
Store Radio Presets
• Press the “SET/RND” button once and SET 1 will show in the display. Then select button (1–6).
• A second station may be added to each push button. Press the “SET/RND” button twice andSET 2 will show in the display. Then select button (1–6).
CD/DISC Operation
Seek Up/Down Buttons
• Press to seek through CD tracks.
• Hold either button to bypass tracks without stopping.
SET/RND Button (Random Play)
• Press this button while the CD is playing to activate Random Play.
• This feature plays the selections on the CD in random order to provide an interesting change of pace.
Audio Jack Operation
• The AUX/Audio Jack provides a means to connect a portable audio device, such as an MP3 player, or an iPod®, to the vehicles sound system. This requires the use of a 3.5 mm stereo audio
patch cable.
• Pressing the AUX button will change the mode to auxiliary device if the Audio Jack is connected, allowing the music from your portable device to play through the vehicle's
speakers.
• The functions of the portable device are controlled using the device buttons, not the buttons on the radio. The volume may be controlled using the radio or portable device.
ELECTRONICS
31
Page 35 of 116
Equalizer, Balance And Fade
• Press the “TUNE/SCROLL” control knob and BASS, MID, TREBLE, BALANCE and FADEwill display. Rotate the “TUNE/SCROLL” control knob to select the desired setting.
Radio Operation
Seek Up/Down Buttons
• Press to seek through radio stations in AM, FM, or SAT bands.
• Hold either button to bypass stations without stopping.
Store Radio Presets
• Press the “SET/RND” button once and SET 1 will show in the display. Then select button (1–6).
• A second station may be added to each push button. Press the “SET/RND” button twice and SET 2 will show in the display. Then select button (1–6).
Music Type
• Press the “MUSIC TYPE” button to activate this mode. Press the “MUSIC TYPE” button again or turn the “TUNE/SCROLL” control knob to select the desired music type (Adult Hits,
Country, Jazz, Oldies, Rock, etc.).
• Once a music type is chosen and the icon is displayed, press either “SEEK” button and the radio will only search for stations with the selected music type.
NOTE:
The Music Type function only operates when in FM mode.
SETUP Button
• Pressing the “SETUP” button allows you to select between items that are available in that particular mode.
• Turn the “TUNE/SCROLL” control knob to scroll through the entries. Push the “AUDIO/ SELECT” button to select an entry and make changes.
SiriusXM Satellite Radio
• SiriusXM Satellite Radio gives you over 130 channels, including 100% commercial-free music from nearly every genre, plus all your favorite sports, news, talk and entertainment channels–all
with crystal clear, coast-to-coast coverage, all in one place and all at your fingertips.
• To access SiriusXM Satellite Radio, press the “SAT” hard-key.
ELECTRONICS
33
Page 37 of 116
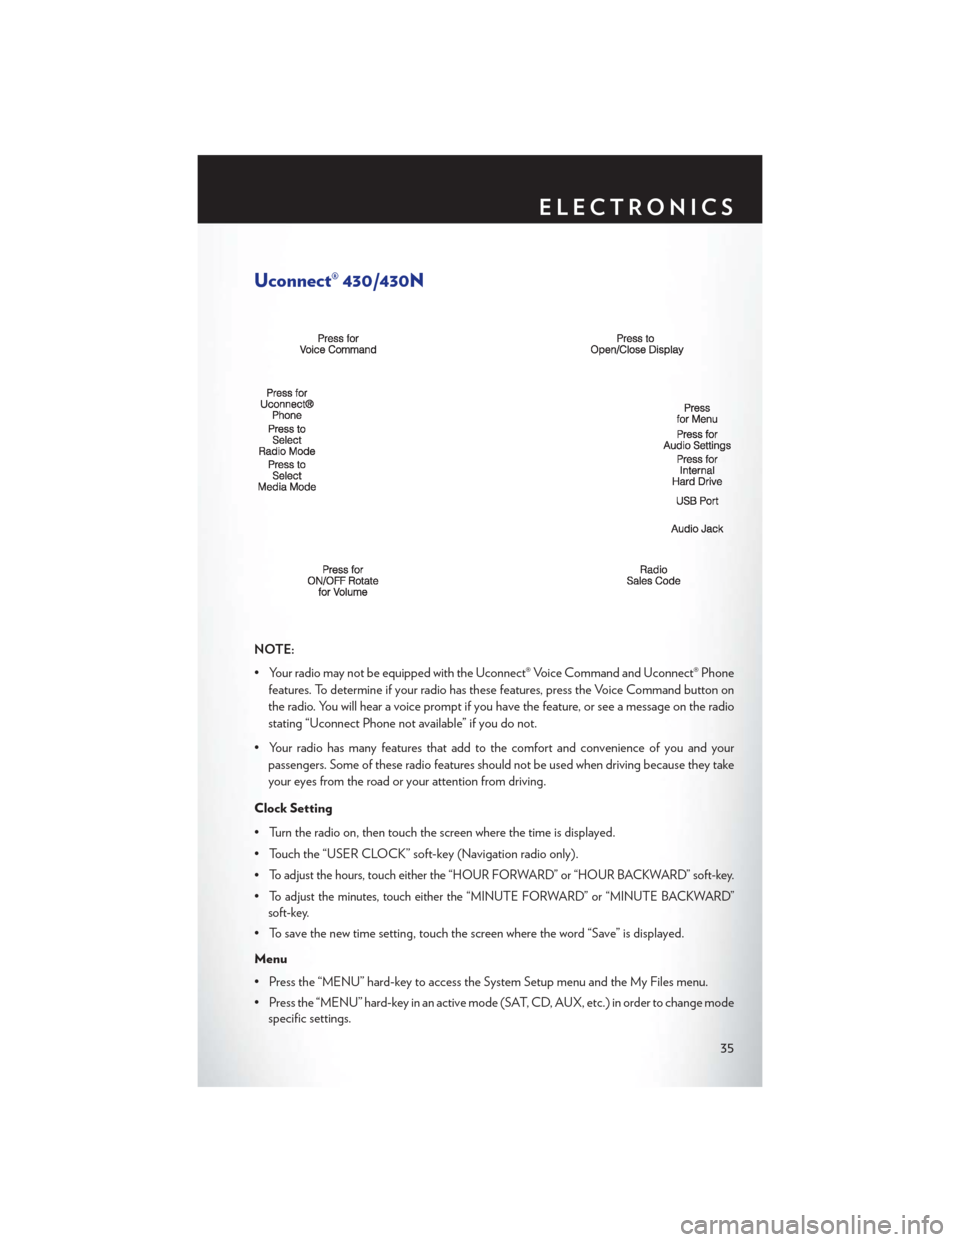
Uconnect® 430/430N
NOTE:
• Your radio may not be equipped with the Uconnect® Voice Command and Uconnect® Phonefeatures. To determine if your radio has these features, press the Voice Command button on
the radio. You will hear a voice prompt if you have the feature, or see a message on the radio
stating “Uconnect Phone not available” if you do not.
• Your radio has many features that add to the comfort and convenience of you and your passengers. Some of these radio features should not be used when driving because they take
your eyes from the road or your attention from driving.
Clock Setting
• Turn the radio on, then touch the screen where the time is displayed.
• Touch the “USER CLOCK” soft-key (Navigation radio only).
•
To adjust the hours, touch either the “HOUR FORWARD” or “HOUR BACKWARD” soft-key.
•To adjust the minutes, touch either the “MINUTE FORWARD” or “MINUTE BACKWARD”
soft-key.
• To save the new time setting, touch the screen where the word “Save” is displayed.
Menu
• Press the “MENU” hard-key to access the System Setup menu and the My Files menu.
• Press the “MENU” hard-key in an active mode (SAT, CD, AUX, etc.) in order to change mode specific settings.
ELECTRONICS
35
Page 38 of 116
Equalizer, Balance And Fade
Audio Control Menu
• Press the “AUDIO” hard-key on the rightside of the radio.
• Use either the arrow soft-keys or the cross- hair on the screen to change Balance and
Fade. The “CENTER” soft-key resets the
settings.
•
Touch the “Equalizer” soft-key and use either
the arrow soft-keys or the sliders on the screen
to adjust BASS, MID, and/or TREBLE.
Display Settings
• Press the “MENU” hard-key and touch the “Display Settings” soft-key to access the
Display Settings menu.
• Select the “Daytime Colors” soft-key to switch to manual daytime mode and to ad-
just the brightness of the display using day-
time colors.
• Select the “Nighttime Colors” soft-key to switch to manual nighttime mode and to
adjust the brightness of the display using nighttime colors.
• Select the “Auto Color Mode” soft-key to switch to automatic daytime/nighttime mode and to control the brightness of the display using the dimmer switch of the vehicle.
• Touch the “EXIT” soft-key to save your settings.
ELECTRONICS
36
Page 40 of 116
CD/DVD Disc Operation
• Press the “MEDIA” hard key to display the media source tabs at the top of the screen. Selectthe source by touching the “HDD,” “DISC,” or “AUX” media source soft-key tab.
NOTE:
Your Touch-Screen Radio will usually automatically switch to the appropriate mode when
something is first connected or inserted into the system.
Insert a CD/DVD Disc
• To insert a disc, press the “LOAD” hard-key.
• With the printed side upwards, insert the disc into the disc slot of the radio. The radio pulls the disc in automatically and closes the flip screen. The radio selects the appropriate mode after
the disc is recognized, and starts playing the first track. The display shows “Reading...” during
this process.
Seek Up/Seek Down
• Press the “Seek Up” or “Seek Down” soft-keys to seek through tracks in Disc Mode. Hold either Seek to bypass tracks without stopping.
ELECTRONICS
38