2013 CHEVROLET TRAVERSE phone
[x] Cancel search: phonePage 218 of 444

Black plate (38,1)Chevrolet Traverse Owner Manual - 2013 - CRC 2nd Edition - 11/13/12
7-38 Infotainment System
If the foam ear pads attached to the
headphones become worn or
damaged, the pads can be replaced
separately from the headphone set.
To purchase replacement ear pads,
call 1‐888‐293‐3332, then prompt
zero (0), or contact your dealer.
Headphones should be stored in the
front floor console and not in the
front seat back pocket. Headphone
damage can occur when the second
row seats are folded forward.
Battery Replacement
To change the batteries on the
headphones:
1. Turn the screw to loosen thebattery door located on the left
side of the headphones. Slide
the battery door open.
2. Replace the two batteries in the compartment. Make sure that
they are installed correctly, using
the diagram on the inside of the
battery compartment.
3. Replace the battery door and tighten the door screw. If the headphones are to be stored
for a long period of time, remove the
batteries and keep them in a cool,
dry place.
Audio/Video (A/V) Jacks
A. Yellow: Video Input
B. White: Left Audio Input
C. Red: Right Audio Input
The A/V jacks are color coded to
match typical home entertainment
system equipment.
The A/V jacks, located on the rear
of the floor console, allow audio or
video signals to be connected from
an auxiliary device such as a
camcorder or a video game unit to
the RSE system. Adapter
connectors or cables (not supplied)
might be required to connect the
auxiliary device to the A/V jacks.
Refer to the manufacturer
’s
instructions for proper usage.
Power for auxiliary devices is not
supplied by the radio system.
To use the auxiliary inputs of the
RSE system, connect an external
auxiliary device to the color-coded
A/V jacks and turn both the auxiliary
device and the video screen power
on. If the video screen is in the DVD
player mode, pressing the AUX
(auxiliary) button on the remote
control switches the video screen
from the DVD player mode to the
auxiliary device. The radio can listen
to the audio of the connected
auxiliary device by sourcing to
auxiliary. See Auxiliary Devices on
page 7‑35 for more information.
Page 219 of 444

Black plate (39,1)Chevrolet Traverse Owner Manual - 2013 - CRC 2nd Edition - 11/13/12
Infotainment System 7-39
How to Change the RSE Video
Screen Settings
The screen display mode (normal,
full, and zoom), screen brightness,
and setup menu language can be
changed from the on screen setup
menu by using the remote control.
To change a setting:
1. Press
z.
2. Use
n,q,p,oandrto
navigate and use the
setup menu.
3. Press
zagain to remove the
setup menu from the screen.
Audio Output
Audio from the DVD player or
auxiliary inputs can be heard
through the following sources:
.Wireless headphones
.Vehicle speakers
.Vehicle‐wired headphone jacks
on the RSA system, if the
vehicle has this feature. The RSE system always transmits
the audio signal to the wireless
headphones, if there is audio
available. See
“Headphones” earlier
in this section for more information.
The DVD player is capable of
outputting audio to the wired
headphone jacks on the RSA
system, if the vehicle has this
feature. The DVD player can be
selected as an audio source on the
RSA system. See Rear Seat Audio
(RSA) System on page 7‑36 for
more information.
When a device is connected to the
A/V jacks, or the radio's auxiliary
input jack, if the vehicle has this
feature, the rear seat passengers
are able to hear audio from the
auxiliary device through the wireless
or wired headphones. The front seat
passengers are able to listen to
playback from this device through
the vehicle speakers by selecting
AUX as the source on the radio.
Video Screen
The video screen is located in the
overhead console. When the video
screen is not in use, push it up into
its locked position.
To use the video screen:
1. Push the release button located on the overhead console.
2. Move the screen to the desired position.
If a DVD is playing and the screen
is raised to its locked position, the
screen remains on; this is normal,
and the DVD continues to play
through the previous audio source.
Press
Pon the remote control or
eject the disc to turn off the screen.
The infrared receivers for the
wireless headphones and the
remote control are located at the
rear of the overhead console.
Page 224 of 444

Black plate (44,1)Chevrolet Traverse Owner Manual - 2013 - CRC 2nd Edition - 11/13/12
7-44 Infotainment System
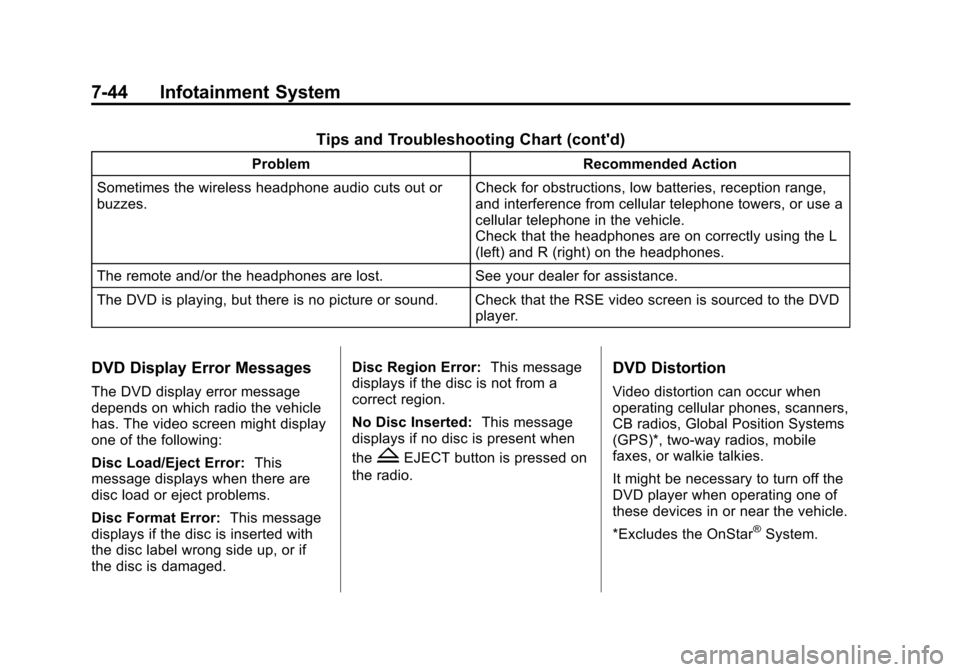
Tips and Troubleshooting Chart (cont'd)
ProblemRecommended Action
Sometimes the wireless headphone audio cuts out or
buzzes. Check for obstructions, low batteries, reception range,
and interference from cellular telephone towers, or use a
cellular telephone in the vehicle.
Check that the headphones are on correctly using the L
(left) and R (right) on the headphones.
The remote and/or the headphones are lost. See your dealer for assistance.
The DVD is playing, but there is no picture or sound. Check that the RSE video screen is sourced to the DVD player.
DVD Display Error Messages
The DVD display error message
depends on which radio the vehicle
has. The video screen might display
one of the following:
Disc Load/Eject Error:This
message displays when there are
disc load or eject problems.
Disc Format Error: This message
displays if the disc is inserted with
the disc label wrong side up, or if
the disc is damaged. Disc Region Error:
This message
displays if the disc is not from a
correct region.
No Disc Inserted: This message
displays if no disc is present when
the
ZEJECT button is pressed on
the radio.
DVD Distortion
Video distortion can occur when
operating cellular phones, scanners,
CB radios, Global Position Systems
(GPS)*, two-way radios, mobile
faxes, or walkie talkies.
It might be necessary to turn off the
DVD player when operating one of
these devices in or near the vehicle.
*Excludes the OnStar
®System.
Page 226 of 444

Black plate (46,1)Chevrolet Traverse Owner Manual - 2013 - CRC 2nd Edition - 11/13/12
7-46 Infotainment System
Phone
Bluetooth
For vehicles equipped with
Bluetooth capability, the system can
interact with many cell phones,
allowing:
.Placement and receipt of calls in
a hands-free mode.
.Sharing of the cell phone’s
address book or contact list with
the vehicle.
To minimize driver distraction,
before driving, and with the vehicle
parked:
.Become familiar with the
features of the cell phone.
Organize the phone book and
contact lists clearly and delete
duplicate or rarely used entries.
If possible, program speed dial
or other shortcuts.
.Review the controls and
operation of the infotainment
system.
.Pair cell phone(s) to the vehicle.
The system may not work with
all cell phones. See “Pairing”in
this section for more information.
.If the cell phone has voice
dialing capability, learn to use
that feature to access the
address book or contact list. See
“Voice Pass-Thru” in this section
for more information.
.See “Storing and Deleting Phone
Numbers” in this section for
more information.
{WARNING
When using a cell phone, it can
be distracting to look too long or
too often at the screen of the
phone or the infotainment
(navigation) system. Taking your
eyes off the road too long or too
often could cause a crash
resulting in injury or death. Focus
your attention on driving. A Bluetooth system can use a
Bluetooth-capable cell phone with a
Hands-Free Profile to make and
receive phone calls. The system
can be used while the key is in the
ON/RUN or ACC/ACCESSORY
position. The range of the Bluetooth
system can be up to 9.1 m (30 ft).
Not all phones support all functions,
and not all phones work with the
in-vehicle Bluetooth system. See
www.gm.com/bluetooth for more
information on compatible phones.
Voice Recognition
The Bluetooth system uses voice
recognition to interpret voice
commands to dial phone numbers
and name tags.
For additional information, say
“Help”
while you are in a voice
recognition menu.
Noise: Keep interior noise levels to
a minimum. The system may not
recognize voice commands if there
is too much background noise.
Page 227 of 444

Black plate (47,1)Chevrolet Traverse Owner Manual - 2013 - CRC 2nd Edition - 11/13/12
Infotainment System 7-47
When to Speak:A short tone
sounds after the system responds
indicating when it is waiting for a
voice command. Wait until the tone
and then speak.
How to Speak: Speak clearly in a
calm and natural voice.
Audio System
When using the in-vehicle Bluetooth
system, sound comes through the
vehicle's front audio system
speakers and overrides the audio
system. Use the audio system
volume knob, during a call, to
change the volume level. The
adjusted volume level remains in
memory for later calls. To prevent
missed calls, a minimum volume
level is used if the volume is turned
down too low.
Bluetooth Controls
Use the buttons located on the
steering wheel to operate the
in-vehicle Bluetooth system. See
Steering Wheel Controls on
page 5‑2.
b/g(Push To Talk): Press to
answer incoming calls, confirm
system information, and start
speech recognition.
c/x(End): Press to end a call,
reject a call, or cancel an operation.
Pairing
A Bluetooth enabled cell phone
must be paired to the Bluetooth
system and then connected to the
vehicle before it can be used. See
the cell phone manufacturer's user
guide for Bluetooth functions before
pairing the cell phone. If a Bluetooth
phone is not connected, calls will be
made using OnStar Hands-Free
Calling, if equipped. See OnStar
Overview on page 14‑1.
Pairing Information
.A Bluetooth phone with MP3
capability cannot be paired to
the vehicle as a phone and an
MP3 player at the same time.
.Up to five cell phones can be
paired to the Bluetooth system.
.The pairing process is disabled
when the vehicle is moving.
.Pairing only needs to be
completed once, unless the
pairing information on the cell
phone changes or the cell phone
is deleted from the system.
.Only one paired cell phone can
be connected to the Bluetooth
system at a time.
.If multiple paired cell phones are
within range of the system, the
system connects to the first
available paired cell phone in the
order that they were first paired
to the system. To connect to a
different paired phone, see
“Connecting to a Different
Phone” later in this section.
Pairing a Phone
1. Press and hold
b/gfor
two seconds.
2. Say “Bluetooth.” This command
can be skipped.
Page 228 of 444

Black plate (48,1)Chevrolet Traverse Owner Manual - 2013 - CRC 2nd Edition - 11/13/12
7-48 Infotainment System
3. Say“Pair.”The system responds
with instructions and a four-digit
Personal Identification Number
(PIN). The PIN is used in Step 5.
4. Start the pairing process on the cell phone that you want to pair.
For help with this process, see
the cell phone manufacturer's
user guide.
5. Locate the device named “Your
Vehicle” in the list on the cell
phone. Follow the instructions
on the cell phone to enter the
PIN provided in Step 3. After the
PIN is successfully entered, the
system prompts you to provide a
name for the paired cell phone.
This name will be used to
indicate which phones are
paired and connected to the
vehicle. The system responds
with “
successfully paired” after the
pairing process is complete.
6. Repeat Steps 1–5 to pair additional phones. Listing All Paired and Connected
Phones
The system can list all cell phones
paired to it. If a paired cell phone is
also connected to the vehicle, the
system responds with
“is connected”
after that phone name.
1. Press and hold
b/gfor
two seconds.
2. Say “Bluetooth.”
3. Say “List.”
Deleting a Paired Phone
If the phone name you want to
delete is unknown, see “Listing All
Paired and Connected Phones.”
1. Press and hold
b/gfor
two seconds.
2. Say “Bluetooth.”
3. Say “Delete.” The system asks
which phone to delete.
4. Say the name of the phone you want to delete. Connecting to a Different Phone
To connect to a different cell phone,
the Bluetooth system looks for the
next available cell phone in the
order in which all the available cell
phones were paired. Depending on
which cell phone you want to
connect to, you may have to use
this command several times.
1. Press and hold
b/gfor
two seconds.
2. Say “Bluetooth.”
3. Say “Change phone.”
.If another cell phone is
found, the response will be
“
connected.”
.If another cell phone is not
found, the original phone
remains connected.
Page 229 of 444

Black plate (49,1)Chevrolet Traverse Owner Manual - 2013 - CRC 2nd Edition - 11/13/12
Infotainment System 7-49
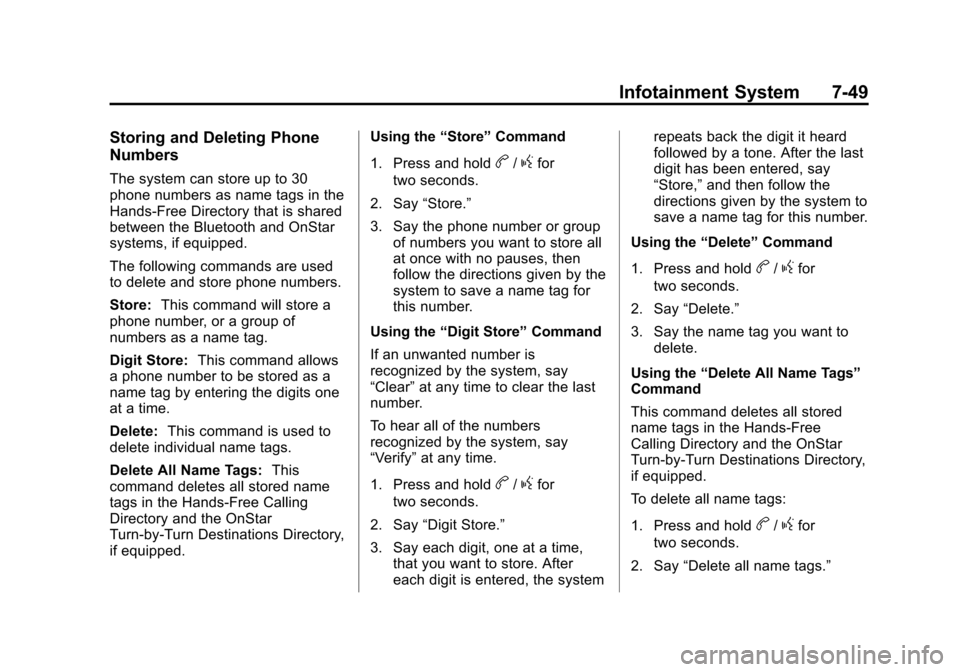
Storing and Deleting Phone
Numbers
The system can store up to 30
phone numbers as name tags in the
Hands-Free Directory that is shared
between the Bluetooth and OnStar
systems, if equipped.
The following commands are used
to delete and store phone numbers.
Store:This command will store a
phone number, or a group of
numbers as a name tag.
Digit Store: This command allows
a phone number to be stored as a
name tag by entering the digits one
at a time.
Delete: This command is used to
delete individual name tags.
Delete All Name Tags: This
command deletes all stored name
tags in the Hands-Free Calling
Directory and the OnStar
Turn-by-Turn Destinations Directory,
if equipped. Using the
“Store”Command
1. Press and holdb/gfor
two seconds.
2. Say “Store.”
3. Say the phone number or group of numbers you want to store all
at once with no pauses, then
follow the directions given by the
system to save a name tag for
this number.
Using the “Digit Store” Command
If an unwanted number is
recognized by the system, say
“Clear” at any time to clear the last
number.
To hear all of the numbers
recognized by the system, say
“Verify” at any time.
1. Press and hold
b/gfor
two seconds.
2. Say “Digit Store.”
3. Say each digit, one at a time, that you want to store. After
each digit is entered, the system repeats back the digit it heard
followed by a tone. After the last
digit has been entered, say
“Store,”
and then follow the
directions given by the system to
save a name tag for this number.
Using the “Delete”Command
1. Press and hold
b/gfor
two seconds.
2. Say “Delete.”
3. Say the name tag you want to delete.
Using the “Delete All Name Tags”
Command
This command deletes all stored
name tags in the Hands-Free
Calling Directory and the OnStar
Turn-by-Turn Destinations Directory,
if equipped.
To delete all name tags:
1. Press and hold
b/gfor
two seconds.
2. Say “Delete all name tags.”
Page 230 of 444

Black plate (50,1)Chevrolet Traverse Owner Manual - 2013 - CRC 2nd Edition - 11/13/12
7-50 Infotainment System
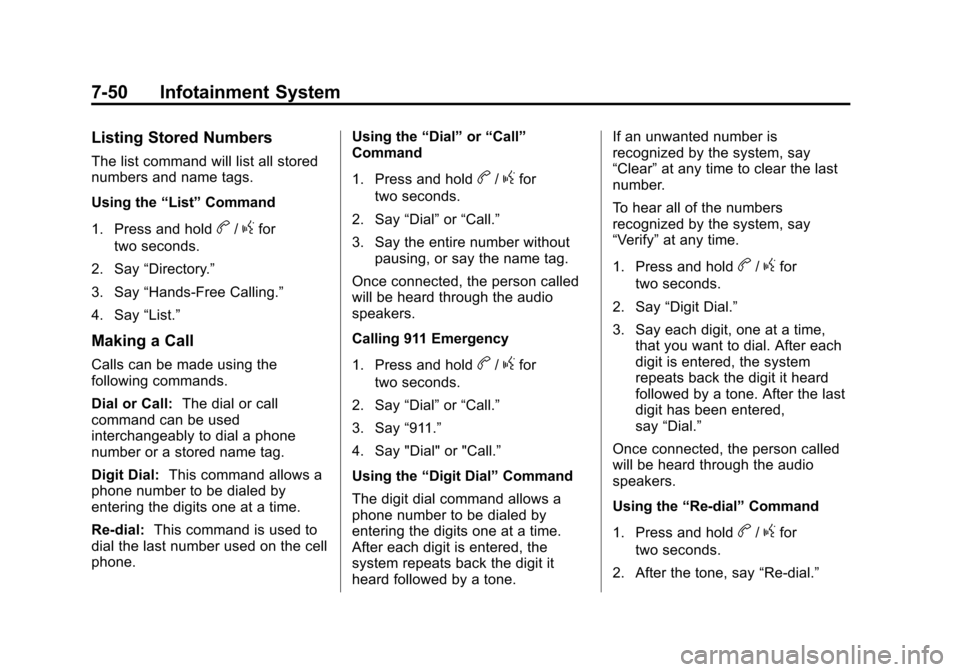
Listing Stored Numbers
The list command will list all stored
numbers and name tags.
Using the“List”Command
1. Press and hold
b/gfor
two seconds.
2. Say “Directory.”
3. Say “Hands-Free Calling.”
4. Say “List.”
Making a Call
Calls can be made using the
following commands.
Dial or Call: The dial or call
command can be used
interchangeably to dial a phone
number or a stored name tag.
Digit Dial: This command allows a
phone number to be dialed by
entering the digits one at a time.
Re-dial: This command is used to
dial the last number used on the cell
phone. Using the
“Dial”or“Call”
Command
1. Press and hold
b/gfor
two seconds.
2. Say “Dial”or“Call.”
3. Say the entire number without pausing, or say the name tag.
Once connected, the person called
will be heard through the audio
speakers.
Calling 911 Emergency
1. Press and hold
b/gfor
two seconds.
2. Say “Dial”or“Call.”
3. Say “911.”
4. Say "Dial" or "Call.”
Using the “Digit Dial” Command
The digit dial command allows a
phone number to be dialed by
entering the digits one at a time.
After each digit is entered, the
system repeats back the digit it
heard followed by a tone. If an unwanted number is
recognized by the system, say
“Clear”
at any time to clear the last
number.
To hear all of the numbers
recognized by the system, say
“Verify” at any time.
1. Press and hold
b/gfor
two seconds.
2. Say “Digit Dial.”
3. Say each digit, one at a time, that you want to dial. After each
digit is entered, the system
repeats back the digit it heard
followed by a tone. After the last
digit has been entered,
say “Dial.”
Once connected, the person called
will be heard through the audio
speakers.
Using the “Re-dial”Command
1. Press and hold
b/gfor
two seconds.
2. After the tone, say “Re-dial.”