2013 CHEVROLET SILVERADO display
[x] Cancel search: displayPage 341 of 542
Black plate (73,1)Chevrolet Silverado Owner Manual - 2013 - crc2 - 8/13/12
Driving and Operating 9-73
The tethered fuel cap is located
behind a hinged fuel door on the
driver side of the vehicle. Vehicles
that have a FlexFuel badge and a
yellow fuel cap can use either
unleaded gasoline or ethanol fuel
containing up to 85% ethanol (E85).
SeeFuel E85 (85% Ethanol) on
page 9‑71.
To remove the fuel cap, turn it
slowly counterclockwise.
If the vehicle is a dual fuel tank
chassis cab model, and it runs out
of fuel, refuel the front fuel tank first
to ensure a quick restart.
Be careful not to spill fuel. Do not
top off or overfill the tank and wait a
few seconds after you have finished
pumping before removing the
nozzle. Clean fuel from painted
surfaces as soon as possible. See
Exterior Care on page 10‑93. When replacing the fuel cap, turn it
clockwise until it clicks. It will require
more effort to turn the fuel cap on
the last turn as you tighten it. Make
sure the cap is fully installed. The
diagnostic system can determine if
the fuel cap has been left off or
improperly installed. This would
allow fuel to evaporate into the
atmosphere. See
Malfunction
Indicator Lamp on page 5‑21.
The TIGHTEN GAS CAP message
displays on the Driver Information
Center (DIC) if the fuel cap is not
properly installed. See Fuel System
Messages on page 5‑41 for more
information.
{WARNING
If a fire starts while you are
refueling, do not remove the
nozzle. Shut off the flow of fuel by
shutting off the pump or by
notifying the station attendant.
Leave the area immediately. Notice:
If a new fuel cap is
needed, be sure to get the right
type of cap from your dealer. The
wrong type of fuel cap might not
fit properly, might cause the
malfunction indicator lamp to
light, and could damage the fuel
tank and emissions system. See
Malfunction Indicator Lamp on
page 5‑21.
Page 368 of 542
Black plate (100,1)Chevrolet Silverado Owner Manual - 2013 - crc2 - 8/13/12
9-100 Driving and Operating
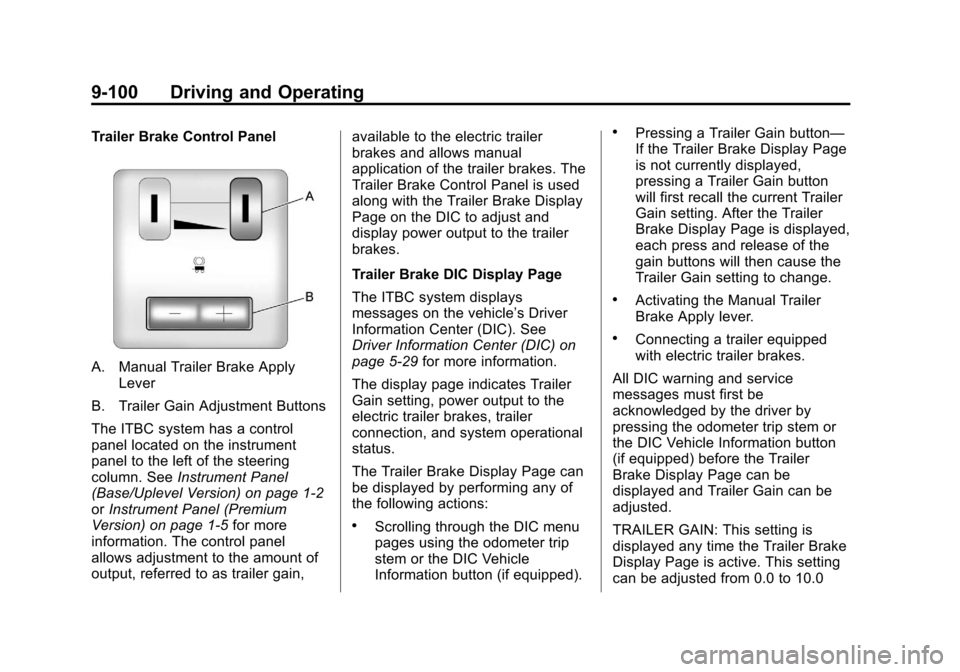
Trailer Brake Control Panel
A. Manual Trailer Brake ApplyLever
B. Trailer Gain Adjustment Buttons
The ITBC system has a control
panel located on the instrument
panel to the left of the steering
column. See Instrument Panel
(Base/Uplevel Version) on page 1‑2
or Instrument Panel (Premium
Version) on page 1‑5 for more
information. The control panel
allows adjustment to the amount of
output, referred to as trailer gain, available to the electric trailer
brakes and allows manual
application of the trailer brakes. The
Trailer Brake Control Panel is used
along with the Trailer Brake Display
Page on the DIC to adjust and
display power output to the trailer
brakes.
Trailer Brake DIC Display Page
The ITBC system displays
messages on the vehicle’s Driver
Information Center (DIC). See
Driver Information Center (DIC) on
page 5‑29
for more information.
The display page indicates Trailer
Gain setting, power output to the
electric trailer brakes, trailer
connection, and system operational
status.
The Trailer Brake Display Page can
be displayed by performing any of
the following actions:
.Scrolling through the DIC menu
pages using the odometer trip
stem or the DIC Vehicle
Information button (if equipped).
.Pressing a Trailer Gain button—
If the Trailer Brake Display Page
is not currently displayed,
pressing a Trailer Gain button
will first recall the current Trailer
Gain setting. After the Trailer
Brake Display Page is displayed,
each press and release of the
gain buttons will then cause the
Trailer Gain setting to change.
.Activating the Manual Trailer
Brake Apply lever.
.Connecting a trailer equipped
with electric trailer brakes.
All DIC warning and service
messages must first be
acknowledged by the driver by
pressing the odometer trip stem or
the DIC Vehicle Information button
(if equipped) before the Trailer
Brake Display Page can be
displayed and Trailer Gain can be
adjusted.
TRAILER GAIN: This setting is
displayed any time the Trailer Brake
Display Page is active. This setting
can be adjusted from 0.0 to 10.0
Page 369 of 542
Black plate (101,1)Chevrolet Silverado Owner Manual - 2013 - crc2 - 8/13/12
Driving and Operating 9-101
with either a trailer connected or
disconnected. To adjust the Trailer
Gain, press one of the Trailer Gain
adjustment buttons located on the
Trailer Brake Control Panel. Press
and hold a gain button to cause the
Trailer Gain to continuously adjust.
To turn the output to the trailer off,
adjust the Trailer Gain setting to
0.0 (zero).
0.0 (zero) gain is the factory default
setting. To properly adjust trailer
gain, see“Trailer Gain Adjustment
Procedure” later in this section.
TRAILER OUTPUT: This is
displayed any time a trailer with
electric brakes is connected. Output
to the electric brakes is based on
the amount of vehicle braking
present and relative to the Trailer
Gain setting. Output is displayed
from 0 to 10 bars for each gain
setting.
Non-hybrid vehicles with Trailer
Sway Control (TSC) or Hill Start
Assist (HSA), output to the electric
trailer brakes may be displayed when the systems are active. See
Trailer Sway Control (TSC) on
page 9‑104
andHill Start Assist
(HSA) on page 9‑55.
The Trailer Output will indicate “- - -
- - -” on the Trailer Brake Display
Page whenever the following occur:
.No trailer is connected
.A trailer without electric brakes
is connected (no DIC message
is displayed)
.A trailer with electric brakes has
become disconnected (a
CHECK TRAILER WIRING
message will also be displayed
on the DIC)
.There is a fault present in the
wiring to the electric trailer
brakes (a CHECK TRAILER
WIRING message will also be
displayed on the DIC)
.There is a fault in the ITBC
system (a SERVICE TRAILER
BRAKE SYSTEM message will
also be displayed in the DIC) Manual Trailer Brake Apply
The Manual Trailer Brake Apply
Lever is located on the Trailer Brake
Control Panel and is used to apply
the trailer
’s electric brakes
independent of the vehicle’s brakes.
This lever is used in the Trailer Gain
Adjustment Procedure to properly
adjust the power output to the trailer
brakes. Sliding the lever to the left
will apply only the trailer brakes.
The power output to the trailer is
indicated in the Trailer Brake
Display Page on the DIC. If the
vehicle’s service brakes are applied
while using the Manual Trailer Brake
Apply Lever, the trailer output power
will be the greater of the two.
The trailer's and the vehicle's brake
lamps will come on when either
vehicle braking or manual trailer
brakes are applied.
Page 370 of 542

Black plate (102,1)Chevrolet Silverado Owner Manual - 2013 - crc2 - 8/13/12
9-102 Driving and Operating
Trailer Gain Adjustment Procedure
Trailer Gain should be set for a
specific trailering condition and must
be adjusted any time vehicle
loading, trailer loading, or road
surface conditions change.
Setting the Trailer Gain properly is
needed for the best trailer stopping
performance. A trailer that is
over-gained may result in locked
trailer brakes. A trailer that is
under-gained may result in not
enough trailer braking. Both of these
conditions may result in poorer
stopping and stability of the vehicle
and trailer.
Use the following procedure to
correctly adjust Trailer Gain for each
towing condition:
1. Make sure the trailer brakes arein proper working condition.
2. Connect a properly loaded trailer to the vehicle and make all
necessary mechanical and electrical connections. See
Vehicle Load Limits on
page 9‑15
for more information.
3. After the electrical connection is made to a trailer equipped with
electric brakes:
.A TRAILER CONNECTED
message will be briefly
displayed on the DIC.
.The Trailer Brake Display
Page will appear on the
DIC showing TRAILER
GAIN and TRAILER
OUTPUT.
.In the Trailer Output display
on the DIC, “- - - - - -”will
disappear if there is no
error present. Connecting a
trailer without electric
brakes will not clear the six
dashed lines.
4. Adjust the Trailer Gain by using the gain adjustment (+ / -)
buttons on the Trailer Brake
Control Panel. 5. Drive the vehicle with the trailer
attached on a level road surface
representative of the towing
condition and free of traffic at
about 32 to 40 km/h (20 to
25 mph) and fully apply the
Manual Trailer Brake Apply
Lever.
Adjusting trailer gain at speeds
lower than 32 to 40 km/h (20 to
25 mph) may result in an
incorrect gain setting.
6. Adjust the Trailer Gain to just below the point of trailer wheel
lock-up, indicated by trailer
wheel squeal or tire smoke when
a trailer wheel locks.
Trailer wheel lock-up may not
occur if towing a heavily loaded
trailer. In this case, adjust the
Trailer Gain to the highest
allowable setting for the towing
condition.
Page 371 of 542
Black plate (103,1)Chevrolet Silverado Owner Manual - 2013 - crc2 - 8/13/12
Driving and Operating 9-103
7. Re-adjust Trailer Gain any timevehicle loading, trailer loading or
road surface conditions change
or if trailer wheel lock-up is
noticed at any time while towing.
Other ITBC-Related DIC Messages
In addition to displaying TRAILER
GAIN and TRAILER OUTPUT
through the DIC, trailer connection
and ITBC system status are
displayed on the DIC.
TRAILER CONNECTED: This
message will be briefly displayed
when a trailer with electric brakes is
first connected to the vehicle. This
message will automatically turn off
in about 10 seconds. The driver can
also acknowledge this message
before it automatically turns off. CHECK TRAILER WIRING: This
message will be displayed if:
1. The ITBC system first
determines connection to a
trailer with electric brakes and
then the trailer harness becomes
disconnected from the vehicle.
If the disconnect occurs while
the vehicle is stationary, this
message will automatically turn
off in about 30 seconds. This
message will also turn off if the
driver acknowledges this
message or if the trailer harness
is re-connected.
If the disconnect occurs while
the vehicle is moving, this
message will continue until the
ignition is turned off. This
message will also turn off if the
driver acknowledges this
message or if the trailer harness
is re-connected.
2. There is an electrical fault in the wiring to the electric trailer
brakes. This message will
continue as long as there is an electrical fault in the trailer
wiring. This message will also
turn off if the driver
acknowledges this message.
To determine if the electrical fault is
on the vehicle side or trailer side of
the trailer wiring harness
connection, do the following:
1. Disconnect the trailer wiring harness from the vehicle.
2. Turn the ignition off.
3. Wait 10 seconds, then turn the ignition back to RUN.
4. If the CHECK TRAILER WIRING message re-appears, the
electrical fault is on the
vehicle side.
If the CHECK TRAILER WIRING
message only re-appears when
connecting the trailer wiring
harness to the vehicle, the
electrical fault is on the
trailer side.
Page 372 of 542
Black plate (104,1)Chevrolet Silverado Owner Manual - 2013 - crc2 - 8/13/12
9-104 Driving and Operating
SERVICE TRAILER BRAKE
SYSTEM: This message will be
displayed when there is a problem
with the ITBC system. If this
message persists over multiple
ignition cycles, there is a problem
with the ITBC system. Take the
vehicle to an authorized GM dealer
to have the ITBC system diagnosed
and repaired.
If either the CHECK TRAILER
WIRING or SERVICE TRAILER
BRAKE SYSTEM message is
displayed while driving the vehicle,
power is no longer available to the
trailer brakes. When traffic
conditions allow, carefully pull the
vehicle over to the side of the road
and turn the ignition off. Check the
wiring connection to the trailer and
turn the ignition back on. If either of
these messages continues, either
the vehicle or trailer needs service.An authorized GM dealer may be
able to diagnose and repair
problems with the trailer. However,
any diagnosis and repair of the
trailer is not covered under the
vehicle warranty. Please contact
your trailer dealer for assistance
with trailer repairs and trailer
warranty information.
Trailer Sway
Control (TSC)
Non-hybrid vehicles with StabiliTrak
have a Trailer Sway Control (TSC)
feature. If the vehicle is towing a
trailer and the system detects that
the trailer is swaying, the vehicle
brakes are applied without the driver
pressing the brake pedal. If the
vehicle is equipped with the
Integrated Trailer Brake Control
(ITBC) system, StabiliTrak may also
apply the trailer brakes. The TCS/
StabiliTrak warning light will flash onthe instrument panel cluster to notify
the driver to reduce speed. If the
trailer continues to sway, StabiliTrak
will reduce engine torque to help
slow the vehicle. See
StabiliTrak
®
System on page 9‑56 for more
information.
Adding non‐dealer accessories can
affect the vehicle performance. See
Accessories and Modifications on
page 10‑3 for more information.
Page 384 of 542
Black plate (8,1)Chevrolet Silverado Owner Manual - 2013 - crc2 - 8/13/12
10-8 Vehicle Care
Specification
Use and ask for licensed engine oils
with the dexos1
®approved
certification mark. Engine oils
meeting the requirements for the
vehicle should have the dexos™1
approved certification mark. This
certification mark indicates that the
oil has been approved to the dexos1
specification.
Notice: Failure to use the
recommended engine oil or
equivalent can result in engine
damage not covered by the
vehicle warranty. Check with your
dealer or service provider on
whether the oil is approved to the
dexos1 specification. Viscosity Grade
SAE 5W-30 is the best viscosity
grade for the vehicle. Do not use
other viscosity grade oils such as
SAE 10W-30, 10W-40, or 20W-50.
Cold Temperature Operation: In an
area of extreme cold, where the
temperature falls below
−29°C
(−20°F), an SAE 0W-30 oil may be
used. An oil of this viscosity grade
will provide easier cold starting for
the engine at extremely low
temperatures. When selecting an oil
of the appropriate viscosity grade,
always select an oil of the correct
specification. See “Specification”
earlier in this section for more
information.
Engine Oil Additives/Engine
Oil Flushes
Do not add anything to the oil. The
recommended oils with the dexos
specification and displaying the
dexos certification mark are all that
is needed for good performance and
engine protection. Engine oil system flushes are not
recommended and could cause
engine damage not covered by the
vehicle warranty.
What to Do with Used Oil
Used engine oil contains certain
elements that can be unhealthy for
your skin and could even cause
cancer. Do not let used oil stay on
your skin for very long. Clean your
skin and nails with soap and water,
or a good hand cleaner. Wash or
properly dispose of clothing or rags
containing used engine oil. See the
manufacturer's warnings about the
use and disposal of oil products.
Used oil can be a threat to the
environment. If you change your
own oil, be sure to drain all the oil
from the filter before disposal. Never
dispose of oil by putting it in the
trash or pouring it on the ground,
into sewers, or into streams or
bodies of water. Recycle it by taking
it to a place that collects used oil.
Page 385 of 542
Black plate (9,1)Chevrolet Silverado Owner Manual - 2013 - crc2 - 8/13/12
Vehicle Care 10-9
Engine Oil Life System
When to Change Engine Oil
This vehicle has a computer system
that indicates when to change the
engine oil and filter. This is based
on a combination of factors which
include engine revolutions, engine
temperature, and miles driven.
Based on driving conditions, the
mileage at which an oil change is
indicated can vary considerably. For
the oil life system to work properly,
the system must be reset every time
the oil is changed.
On some vehicles, when the system
has calculated that oil life has been
diminished, a CHANGE ENGINE
OIL SOON message comes on to
indicate that an oil change is
necessary. SeeEngine Oil
Messages on page 5‑40. Change
the oil as soon as possible within
the next 1 000 km (600 mi). It is
possible that, if driving under the
best conditions, the oil life system
might indicate that an oil change is
not necessary for up to a year. The engine oil and filter must be
changed at least once a year and,
at this time, the system must be
reset. For vehicles without the
CHANGE ENGINE OIL SOON
message, an oil change is needed
when the OIL LIFE
REMAINING percentage is near
0%. Your dealer has trained service
people who will perform this work
and reset the system. It is also
important to check the oil regularly
over the course of an oil drain
interval and keep it at the proper
level.
If the system is ever reset
accidentally, the oil must be
changed at 5 000 km (3,000 mi)
since the last oil change.
Remember to reset the oil life
system whenever the oil is changed.
How to Reset the Engine Oil
Life System
Reset the system whenever the
engine oil is changed so that the
system can calculate the next
engine oil change. Always reset the
engine oil life to 100% after every oil
change. It will not reset itself. To
reset the system on most vehicles:
1. Display the OIL LIFE
REMAINING on the DIC. If the
vehicle does not have DIC
buttons, the vehicle must be in
P (Park) to access this display.
See Driver Information Center
(DIC) on page 5‑29.
2. Press and hold the SET/RESET button on the DIC, or the trip
odometer reset stem if the
vehicle does not have DIC
buttons, for more than
five seconds. The oil life will
change to 100%.