2013 CHEVROLET SILVERADO 1500 wiring
[x] Cancel search: wiringPage 99 of 542
Black plate (37,1)Chevrolet Silverado Owner Manual - 2013 - crc2 - 8/13/12
Seats and Restraints 3-37
WARNING (Continued)
proper service procedures, and
make sure the person performing
work for you is qualified to do so.
Adding Equipment to the
Airbag-Equipped Vehicle
Q: Is there anything I might addto or change about the vehicle
that could keep the airbags
from working properly?
A: Yes. If you add things that
change your vehicle's frame,
bumper system, height, front end
or side sheet metal, they may
keep the airbag system from
working properly. Changing or
moving any parts of the front
seats, safety belts, the airbag
sensing and diagnostic module,
steering wheel, instrument
panel, roof-rail airbag modules,
ceiling headliner or pillar garnish
trim, overhead console, front sensors, side impact sensors,
or airbag wiring can affect the
operation of the airbag system.
In addition, the vehicle may have
a passenger sensing system for
the right front passenger's
position, which includes sensors
that are part of the passenger's
seat. The passenger sensing
system may not operate properly
if the original seat trim is
replaced with non-GM covers,
upholstery or trim, or with GM
covers, upholstery or trim
designed for a different vehicle.
Any object, such as an
aftermarket seat heater or a
comfort enhancing pad or
device, installed under or on top
of the seat fabric, could also
interfere with the operation of
the passenger sensing system.
This could either prevent proper
deployment of the passenger
airbag(s) or prevent the
passenger sensing system from
properly turning off the
passenger airbag(s). See
Passenger Sensing System on
page 3‑32.
If you have any questions about
this, you should contact
Customer Assistance before you
modify your vehicle. The phone
numbers and addresses for
Customer Assistance are in
Step Two of the Customer
Satisfaction Procedure in this
manual. See
Customer
Satisfaction Procedure (U.S. and
Canada) on page 13‑2 or
Customer Satisfaction
Procedure (Mexico) on
page 13‑4.
If the vehicle has rollover
roof-rail airbags, see Different
Size Tires and Wheels on
page 10‑68 for additional
important information.
Page 100 of 542
Black plate (38,1)Chevrolet Silverado Owner Manual - 2013 - crc2 - 8/13/12
3-38 Seats and Restraints
Q: What if I added a snow plow?Will it keep the airbags from
working properly?
A: We have designed our airbag
systems to work properly under
a wide range of conditions,
including snow plowing with
vehicles that have the optional
Snow Plow Prep Package
(RPO VYU). But do not change
or defeat the snow plow's
“tripping mechanism.” If you do,
it can damage your snow plow
and your vehicle, and it may
cause an airbag inflation.
Q: Because I have a disability, I have to get my vehicle
modified. How can I find out
whether this will affect my
airbag system?
A: If you have questions, call
Customer Assistance. The
phone numbers and addresses
for Customer Assistance are in
Step Two of the Customer
Satisfaction Procedure in this
manual. See
Customer Satisfaction
Procedure (U.S. and Canada) on
page 13‑2 orCustomer
Satisfaction Procedure (Mexico)
on page 13‑4.
In addition, your dealer and the
service manual have information
about the location of the airbag
sensors, sensing and diagnostic
module and airbag wiring.
Airbag System Check
The airbag system does not need
regularly scheduled maintenance or
replacement. Make sure the airbag
readiness light is working. See
Airbag Readiness Light on
page 5‑17.
Notice: If an airbag covering is
damaged, opened, or broken, the
airbag may not work properly. Do
not open or break the airbag
coverings. If there are any
opened or broken airbag covers,
have the airbag covering and/or
airbag module replaced. For the
location of the airbags, see Where Are the Airbags? on
page 3‑24. See your dealer for
service.
Replacing Airbag System
Parts after a Crash
{WARNING
A crash can damage the airbag
systems in the vehicle.
A damaged airbag system may
not work properly and may not
protect you and your
passenger(s) in a crash, resulting
in serious injury or even death. To
help make sure the airbag
systems are working properly
after a crash, have them
inspected and any necessary
replacements made as soon as
possible.
Page 147 of 542
Black plate (17,1)Chevrolet Silverado Owner Manual - 2013 - crc2 - 8/13/12
Instruments and Controls 5-17
When the vehicle is started this light
flashes and a chime may come on
to remind the driver to fasten their
safety belt. Then the light stays on
solid until the belt is buckled. This
cycle may continue several times if
the driver remains or becomes
unbuckled while the vehicle is
moving.
If the driver safety belt is buckled,
neither the light nor the chime
comes on.
Passenger Safety Belt
Reminder Light
There may be a passenger safety
belt reminder light near the
passenger airbag status indicator.
SeePassenger Sensing System on
page 3‑32.
For vehicles equipped with the
passenger safety belt warning light,
when the vehicle is started this light
flashes and a chime may come on
to remind passengers to fasten their
safety belt. Then the light stays on
solid until the belt is buckled. This
cycle continues several times if the
passenger remains or becomes
unbuckled while the vehicle is
moving.
If the passenger safety belt is
buckled, neither the chime nor the
light comes on.
The front passenger safety belt
warning light and chime may turn on
if an object is put on the seat such
as a briefcase, handbag, grocery
bag, laptop, or other electronic
device. To turn off the warning light
and/or chime, remove the object
from the seat or buckle the
safety belt.Airbag Readiness Light
This light shows if there is an
electrical problem with the airbag
system. The system check includes
the airbag sensor(s), passenger
sensing system (if equipped), the
pretensioners, the airbag modules,
the wiring, and the crash sensing
and diagnostic module. For more
information on the airbag system,
see Airbag System on page 3‑22.
The airbag readiness light comes on
for several seconds when the
vehicle is started. If the light does
not come on then, have it fixed
immediately.
Page 168 of 542
Black plate (38,1)Chevrolet Silverado Owner Manual - 2013 - crc2 - 8/13/12
5-38 Instruments and Controls
Battery Voltage and
Charging Messages
BATTERY LOW START
VEHICLE
When the vehicle’s battery is
severely discharged, this message
will display and four chimes will
sound. Start the vehicle
immediately. If the vehicle is not
started and the battery continues to
discharge, the climate controls,
heated seats, and audio systems
will shut off and the vehicle may
require a jump start. These systems
will function again after the vehicle
is started.
SERVICE BATTERY
CHARGING SYSTEM
On some vehicles, this message
displays if there is a problem with
the battery charging system. Under
certain conditions, the charging
system light may also turn on in the
instrument panel cluster. See
Charging System Light on
page 5‑21. Driving with this problem could drain the battery. Turn off all
unnecessary accessories. Have the
electrical system checked as soon
as possible. See your dealer.
Brake System Messages
SERVICE BRAKE SYSTEM
This message displays along with
the brake system warning light if
there is a problem with the brake
system. See
Brake System Warning
Light on page 5‑24. If this message
appears, stop as soon as possible
and turn off the vehicle. Restart the
vehicle and check for the message
on the DIC display. If the message
is still displayed or appears again
when you begin driving, the brake
system needs service as soon as
possible. See your dealer.
SERVICE BRAKES SOON
On some vehicles, this message
displays if there is a problem with
the brake system. If this message
appears, stop as soon as possible
and turn off the vehicle. Restart the vehicle and check for the message
on the DIC display. If the message
is still displayed or appears again
when you begin driving, the brake
system needs service. See your
dealer.
SERVICE TRAILER BRAKE
SYSTEM
On vehicles with the Integrated
Trailer Brake Control (ITBC) system,
this message displays and a chime
may sound when there is a problem
with the ITBC system.
When this message displays, power
is no longer available to the trailer
brakes.
As soon as it is safe to do so,
carefully pull your vehicle over to
the side of the road and turn the
ignition off. Check the wiring
connection to the trailer and turn the
ignition back on. If this message still
displays, either your vehicle or the
trailer needs service. See your
dealer.
Page 175 of 542
Black plate (45,1)Chevrolet Silverado Owner Manual - 2013 - crc2 - 8/13/12
Instruments and Controls 5-45
GRADE BRAKING ON
This message displays when the
grade braking has been activated
while driving on downhill grades.
This message will only appear the
first time the feature is activated in
an ignition cycle. SeeTow/Haul
Mode on page 9‑38, Automatic
Transmission on page 9‑33, and
Cruise Control on page 9‑59.
SERVICE 4 WHEEL DRIVE
If the vehicle has four-wheel drive,
this message may display if a
problem occurs with the
four-wheel-drive system. If this
message appears, stop as soon as
possible and turn off the vehicle.
Make sure the key is in the LOCK/
OFF position for at least one minute
and then restart the vehicle and
check for the message on the DIC
display. If the message is still
displayed or appears again when
you begin driving, the
four-wheel-drive system needs
service. See your dealer.
TRANSMISSION HOT IDLE
ENGINE
Notice: Do not drive the vehicle
while the transmission fluid is
overheating and the transmission
temperature warning is displayed
on the instrument cluster and/or
DIC, or the transmission can be
damaged. This could lead to
costly repairs that would not be
covered by the warranty.
This message displays and a chime
may sound if the transmission fluid
in the vehicle gets hot. Driving with
the transmission fluid temperature
high can cause damage to the
vehicle. Stop the vehicle and let it
idle to allow the transmission to
cool. This message clears and the
chime stops when the fluid
temperature reaches a safe level.
Vehicle Reminder
Messages
CHECK TRAILER WIRING
On vehicles with the Integrated
Trailer Brake Control (ITBC) system,
this message may display and a
chime may sound when one of the
following conditions exists:
.A trailer with electric brakes
becomes disconnected from the
vehicle.
‐ If the disconnect occurs while
the vehicle is stopped, this
message clears itself after a
short time.
‐ If the disconnect occurs while
the vehicle is moving, this
message stays on until the
ignition is turned off.
.There is a short in the wiring to
the electric trailer brakes.
When this message displays, power
is no longer available to the trailer
brakes.
Page 176 of 542
Black plate (46,1)Chevrolet Silverado Owner Manual - 2013 - crc2 - 8/13/12
5-46 Instruments and Controls
As soon as it is safe to do so,
carefully pull the vehicle over to the
side of the road and turn the ignition
off. Check the wiring connection to
the trailer and turn the ignition back
on. This message clears if the trailer
is reconnected. This message also
clears if you acknowledge it. If this
message still displays, either the
vehicle or the trailer needs service.
See your dealer.
See“Integrated Trailer Brake
Control System” underTowing
Equipment on page 9‑93 for more
information.
ICE POSSIBLE DRIVE
WITH CARE
This message displays when ice
conditions are possible.
TRAILER CONNECTED
On vehicles with the Integrated
Trailer Brake Control (ITBC) system,
this message displays briefly when
a trailer with electric brakes is first
connected to the vehicle. This message clears itself after
several seconds. This message also
clears if you acknowledge it. After
this message clears, the TRAILER
GAIN/OUTPUT display appears in
the DIC.
See
“TRAILER GAIN/OUTPUT”
under Driver Information Center
(DIC) on page 5‑29 and“Integrated
Trailer Brake Control System” under
Towing Equipment on page 9‑93 for
more information.
Washer Fluid Messages
WASHER FLUID LOW ADD
FLUID
This message displays when the
windshield washer fluid is low. Fill
the windshield washer fluid reservoir
as soon as possible. See Engine
Compartment Overview on
page 10‑5 for the location of the
windshield washer fluid reservoir.
Also, see Washer Fluid on
page 10‑24 for more information.
Vehicle
Personalization
Vehicle Personalization
(With DIC Buttons)
The vehicle may have customization
capabilities that allow you to
program certain features to one
preferred setting. Customization
features can only be programmed to
one setting on the vehicle and
cannot be programmed to a
preferred setting for two different
drivers.
All of the customization options may
not be available on the vehicle. Only
the options available will be
displayed on the DIC.
The default settings for the
customization features were set
when the vehicle left the factory, but
may have been changed from their
default state since then.
The customization preferences are
automatically recalled.
Page 196 of 542
Black plate (6,1)Chevrolet Silverado Owner Manual - 2013 - crc2 - 8/13/12
6-6 Lighting
The message TURN SIGNAL ON
will also appear in the Driver
Information Center (DIC). To turn
the chime and message off, move
the turn signal lever to the off
position.
Fog Lamps
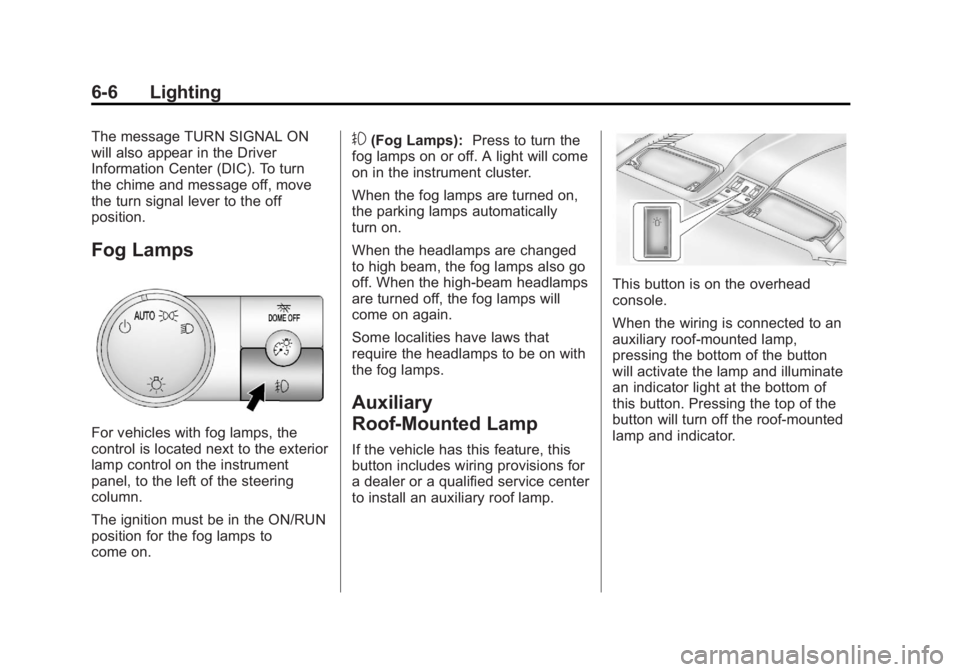
For vehicles with fog lamps, the
control is located next to the exterior
lamp control on the instrument
panel, to the left of the steering
column.
The ignition must be in the ON/RUN
position for the fog lamps to
come on.
#(Fog Lamps):Press to turn the
fog lamps on or off. A light will come
on in the instrument cluster.
When the fog lamps are turned on,
the parking lamps automatically
turn on.
When the headlamps are changed
to high beam, the fog lamps also go
off. When the high-beam headlamps
are turned off, the fog lamps will
come on again.
Some localities have laws that
require the headlamps to be on with
the fog lamps.
Auxiliary
Roof-Mounted Lamp
If the vehicle has this feature, this
button includes wiring provisions for
a dealer or a qualified service center
to install an auxiliary roof lamp.
This button is on the overhead
console.
When the wiring is connected to an
auxiliary roof-mounted lamp,
pressing the bottom of the button
will activate the lamp and illuminate
an indicator light at the bottom of
this button. Pressing the top of the
button will turn off the roof-mounted
lamp and indicator.
Page 335 of 542
Black plate (67,1)Chevrolet Silverado Owner Manual - 2013 - crc2 - 8/13/12
Driving and Operating 9-67
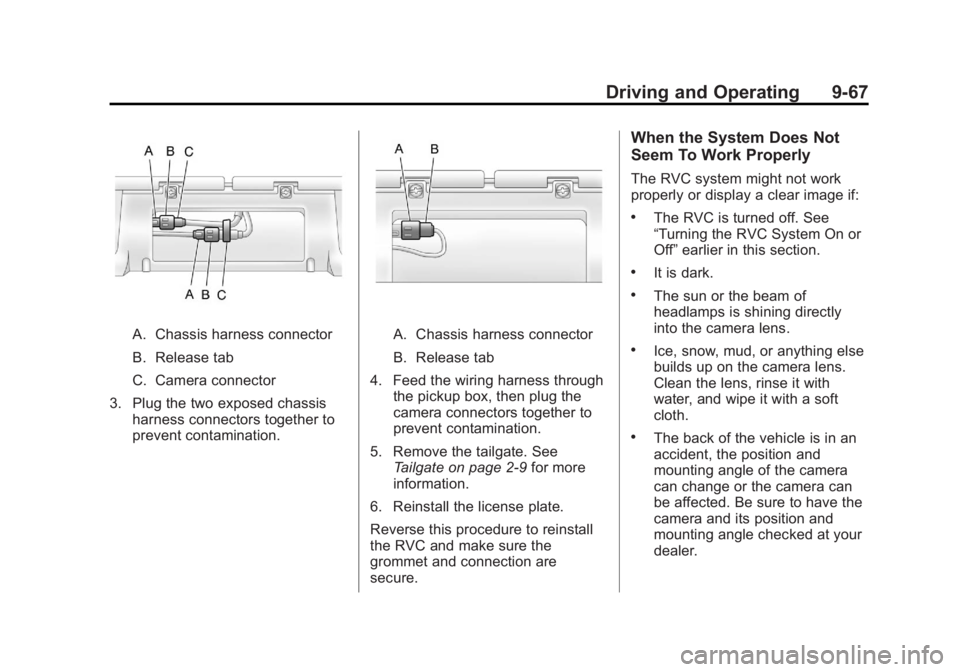
A. Chassis harness connector
B. Release tab
C. Camera connector
3. Plug the two exposed chassis harness connectors together to
prevent contamination.A. Chassis harness connector
B. Release tab
4. Feed the wiring harness through the pickup box, then plug the
camera connectors together to
prevent contamination.
5. Remove the tailgate. See Tailgate on page 2‑9 for more
information.
6. Reinstall the license plate.
Reverse this procedure to reinstall
the RVC and make sure the
grommet and connection are
secure.
When the System Does Not
Seem To Work Properly
The RVC system might not work
properly or display a clear image if:
.The RVC is turned off. See
“Turning the RVC System On or
Off” earlier in this section.
.It is dark.
.The sun or the beam of
headlamps is shining directly
into the camera lens.
.Ice, snow, mud, or anything else
builds up on the camera lens.
Clean the lens, rinse it with
water, and wipe it with a soft
cloth.
.The back of the vehicle is in an
accident, the position and
mounting angle of the camera
can change or the camera can
be affected. Be sure to have the
camera and its position and
mounting angle checked at your
dealer.