2013 CHEVROLET ORLANDO liftgate
[x] Cancel search: liftgatePage 7 of 372
Black plate (1,1)Chevrolet Orlando Owner Manual - 2013 - CRC - 6/5/12
In Brief 1-1
In Brief
Instrument Panel
Instrument Panel . . . . . . . . . . . . . . 1-2
Initial Drive Information
Initial Drive Information . . . . . . . . 1-4
Remote Keyless Entry (RKE)System . . . . . . . . . . . . . . . . . . . . . . 1-4
Remote Vehicle Start . . . . . . . . . 1-4
Door Locks . . . . . . . . . . . . . . . . . . . 1-5
Liftgate . . . . . . . . . . . . . . . . . . . . . . . . 1-6
Windows . . . . . . . . . . . . . . . . . . . . . . 1-6
Seat Adjustment . . . . . . . . . . . . . . 1-6
Second Row Seats . . . . . . . . . . . 1-8
Third Row Seats . . . . . . . . . . . . . . 1-8
Heated Seats . . . . . . . . . . . . . . . . . 1-8
Head Restraint Adjustment . . . . 1-8
Safety Belts . . . . . . . . . . . . . . . . . . . 1-9
Mirror Adjustment . . . . . . . . . . . . . 1-9
Steering Wheel Adjustment . . . . . . . . . . . . . . . . . 1-10
Interior Lighting . . . . . . . . . . . . . . 1-10
Exterior Lighting . . . . . . . . . . . . . 1-11
Windshield Wiper/Washer . . . . 1-12
Climate Controls . . . . . . . . . . . . . 1-13
Transmission . . . . . . . . . . . . . . . . 1-14
Vehicle Features
Radio(s) . . . . . . . . . . . . . . . . . . . . . 1-14
Satellite Radio . . . . . . . . . . . . . . . 1-15
Portable Audio Devices . . . . . . 1-16
Bluetooth
®. . . . . . . . . . . . . . . . . . . 1-16
Steering Wheel Controls . . . . . 1-16
Cruise Control . . . . . . . . . . . . . . . 1-17
Driver Information
Center (DIC) . . . . . . . . . . . . . . . 1-17
Ultrasonic Parking Assist . . . . 1-17
Storage Compartments . . . . . . 1-18
Power Outlets . . . . . . . . . . . . . . . 1-18
Performance and Maintenance
Traction Control System (TCS) . . . . . . . . . . . . . . 1-18
StabiliTrak
®System . . . . . . . . . 1-19
Tire Pressure Monitor . . . . . . . . 1-19
Tire Sealant and
Compressor Kit . . . . . . . . . . . . . 1-19
Engine Oil Life System . . . . . . 1-20
Driving for Better Fuel Economy . . . . . . . . . . . . . . . . . . . 1-20
Roadside Assistance Program . . . . . . . . . . . . . . . . . . . . 1-20
OnStar
®. . . . . . . . . . . . . . . . . . . . . 1-21
Page 12 of 372
Black plate (6,1)Chevrolet Orlando Owner Manual - 2013 - CRC - 6/5/12
1-6 In Brief
Presso{again to deactivate the
lockout switch.
See Safety Locks on page 2‑7.
Liftgate
Unlock the vehicle before opening
the liftgate.
Press the touch pad located in the
handle of the liftgate, above the
license plate, and lift up to open.
Do not press the touch pad while
closing the liftgate. This will cause
the liftgate to be unlatched.
Always close the liftgate before
driving.
For more information see Liftgate on
page 2‑8.
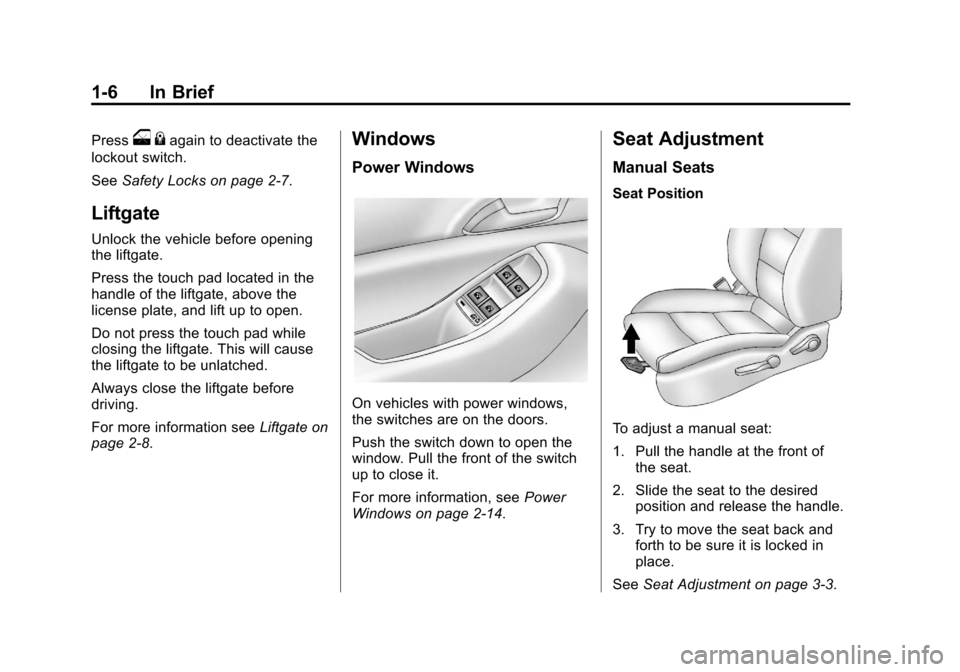
Windows
Power Windows
On vehicles with power windows,
the switches are on the doors.
Push the switch down to open the
window. Pull the front of the switch
up to close it.
For more information, see Power
Windows on page 2‑14.
Seat Adjustment
Manual Seats
Seat Position
To adjust a manual seat:
1. Pull the handle at the front of the seat.
2. Slide the seat to the desired position and release the handle.
3. Try to move the seat back and forth to be sure it is locked in
place.
See Seat Adjustment on page 3‑3.
Page 29 of 372
Black plate (1,1)Chevrolet Orlando Owner Manual - 2013 - CRC - 6/5/12
Keys, Doors, and Windows 2-1
Keys, Doors, and
Windows
Keys and Locks
Keys . . . . . . . . . . . . . . . . . . . . . . . . . . 2-1
Remote Keyless Entry (RKE)System . . . . . . . . . . . . . . . . . . . . . . 2-2
Remote Keyless Entry (RKE) System Operation . . . . . . . . . . . 2-3
Remote Vehicle Start . . . . . . . . . 2-5
Door Locks . . . . . . . . . . . . . . . . . . . 2-6
Power Door Locks . . . . . . . . . . . . 2-7
Automatic Door Locks . . . . . . . . . 2-7
Safety Locks . . . . . . . . . . . . . . . . . . 2-7
Doors
Liftgate . . . . . . . . . . . . . . . . . . . . . . . . 2-8
Vehicle Security
Vehicle Security . . . . . . . . . . . . . . . 2-9
Vehicle Alarm System . . . . . . . . . 2-9
Immobilizer . . . . . . . . . . . . . . . . . . 2-10
Immobilizer Operation . . . . . . . 2-10
Exterior Mirrors
Convex Mirrors . . . . . . . . . . . . . . 2-11
Manual Mirrors . . . . . . . . . . . . . . . 2-11
Power Mirrors . . . . . . . . . . . . . . . . 2-12
Folding Mirrors . . . . . . . . . . . . . . . 2-12
Heated Mirrors . . . . . . . . . . . . . . . 2-12
Interior Mirrors
Manual Rearview Mirror . . . . . . 2-12
Automatic Dimming Rearview Mirror . . . . . . . . . . . . . . . . . . . . . . . 2-13
Child-View Mirror . . . . . . . . . . . . 2-13
Windows
Windows . . . . . . . . . . . . . . . . . . . . . 2-14
Power Windows . . . . . . . . . . . . . 2-14
Sun Visors . . . . . . . . . . . . . . . . . . . 2-16
Roof
Sunroof . . . . . . . . . . . . . . . . . . . . . . 2-16
Keys and Locks
Keys
{WARNING
Leaving children in a vehicle with
the ignition key is dangerous and
children or others could be
seriously injured or killed. They
could operate the power windows
or other controls or make the
vehicle move. The windows will
function with the keys in the
ignition, and children or others
could be caught in the path of a
closing window. Do not leave
children in a vehicle with the
ignition key.
Page 36 of 372
Black plate (8,1)Chevrolet Orlando Owner Manual - 2013 - CRC - 6/5/12
2-8 Keys, Doors, and Windows
The rear door power windows are
also disabled.
Press
o{again to deactivate the
lockout switch.
If a rear door handle is pulled when
the safety lock is deactivated, that
door will remain locked and the
indicator light may flash. Release
the handle, then press the safety
lock twice to deactivate the safety
locks.
Doors
Liftgate
{WARNING
Exhaust gases can enter the
vehicle if it is driven with the
liftgate, trunk/hatch open, or with
any objects that pass through the
seal between the body and the
trunk/hatch or liftgate. Engine
exhaust contains carbon
monoxide (CO) which cannot be
seen or smelled. It can cause
unconsciousness and even death.
If the vehicle must be driven with
the liftgate, or trunk/hatch open:
.Close all of the windows.
.Fully open the air outlets on
or under the instrument
panel.
(Continued)
WARNING (Continued)
.Adjust the Climate Control
system to a setting that
brings in only outside air and
set the fan speed to the
highest setting. See Climate
Control System in the Index.
For more information about
carbon monoxide, see Engine
Exhaust on page 9‑20.
Notice: To avoid damage to the
liftgate or liftgate glass, make
sure the area above and behind
the liftgate is clear before
opening it.
Unlock the vehicle before opening
the liftgate.
Page 37 of 372

Black plate (9,1)Chevrolet Orlando Owner Manual - 2013 - CRC - 6/5/12
Keys, Doors, and Windows 2-9
Press the touch pad located in the
handle of the liftgate, above the
license plate, and lift up to open.
Do not press the touch pad while
closing the liftgate. This will cause
the liftgate to be unlatched.
Always close the liftgate before
driving.Vehicle Security
This vehicle has theft-deterrent
features; however, they do not make
the vehicle impossible to steal.
Vehicle Alarm System
This vehicle has a anti-theft alarm
system.
The LED light, instrument panel
near the windshield, indicates the
status of the system.
Arming the System
1. Close all doors, trunk, andliftgate.
2. Lock the vehicle using the transmitter or the power door
lock button with the door open.
The LED on the instrument
panel should come on and stay
on for about 30 seconds.
3. After 30 seconds, or if the
Q
button on the transmitter is
pressed again, the alarm system will arm, and the LED will begin
to slowly flash indicating the
alarm is operating.
If a door, the hood, or liftgate is
opened without first unlocking with
the transmitter, the turn signals will
flash and the horn will sound for
about 30 seconds. The alarm
system will then re-arm to monitor
for the next unauthorized event.
The theft-deterrent alarm system will
not activate if the doors are locked
with the key.
Disarming the System
To disarm the system, either unlock
the doors using the transmitter,
or start the vehicle.
To avoid setting off the alarm by
accident:
.Lock the vehicle with the
transmitter after all occupants
have left the vehicle and all
doors are closed.
Page 58 of 372
Black plate (12,1)Chevrolet Orlando Owner Manual - 2013 - CRC - 6/5/12
3-12 Seats and Restraints
{WARNING
If either seatback is not locked, it
could move forward in a sudden
stop or crash. That could cause
injury to the person sitting there.
Always push and pull on the
seatbacks to be sure they are
locked.
3. Push and pull on the seatback to make sure it is locked in place.
{WARNING
A safety belt that is improperly
routed, not properly attached,
or twisted will not provide the
protection needed in a crash. The
person wearing the belt could be
seriously injured. After raising the
rear seatback, always check to be
sure that the safety belts are
properly routed and attached, and
are not twisted. 4. Remove the safety belt buckles
from the seat cushion pockets.
Make sure the safety belts are
not twisted or caught between
the seat cushion and the
seatback.
Third Row Seats
Stowing the Seats
{WARNING
Using the third row seating
position while the second row is
folded, or folded and tumbled,
could cause injury in a sudden
stop or crash. Be sure to return
the seat to the passenger seating
position. Push and pull on the
seat to make sure it is locked into
place.
{WARNING
The hinge area of the seats must
remain clear when stowing or
unstowing the seats. Keep hands
away from the seat hinges to
avoid injury.
Notice: Folding a rear seat with
the safety belts still fastened may
cause damage to the seat or the
safety belts. Always unbuckle the
safety belts and return them to
their normal stowed position
before folding a rear seat.
To stow the seats:
1. Unbuckle the safety belts in the third row seats.
2. Open the liftgate.
Page 59 of 372
Black plate (13,1)Chevrolet Orlando Owner Manual - 2013 - CRC - 6/5/12
Seats and Restraints 3-13
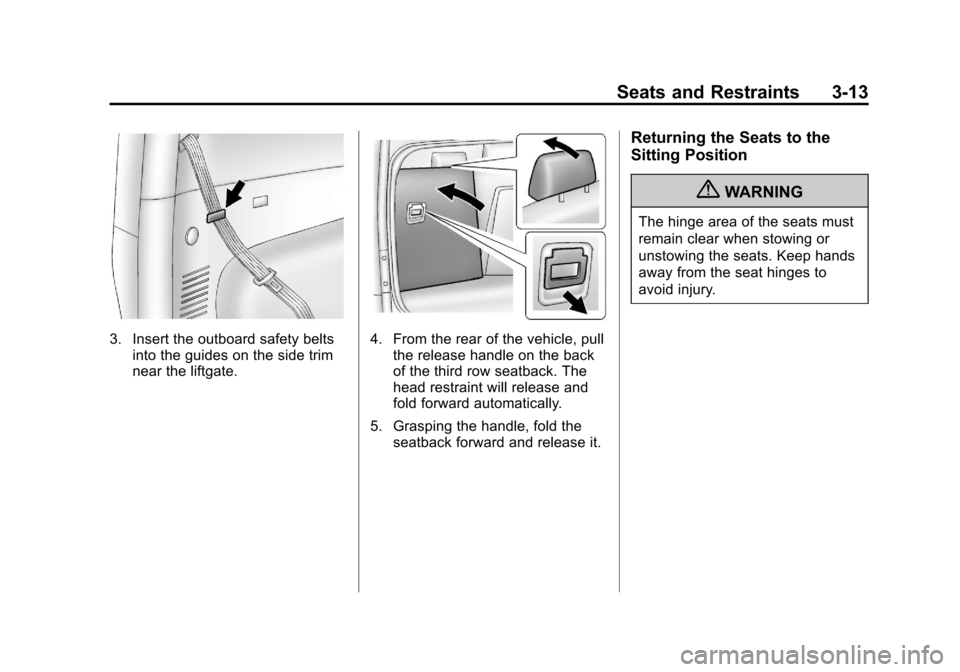
3. Insert the outboard safety beltsinto the guides on the side trim
near the liftgate.4. From the rear of the vehicle, pullthe release handle on the back
of the third row seatback. The
head restraint will release and
fold forward automatically.
5. Grasping the handle, fold the seatback forward and release it.
Returning the Seats to the
Sitting Position
{WARNING
The hinge area of the seats must
remain clear when stowing or
unstowing the seats. Keep hands
away from the seat hinges to
avoid injury.
Page 60 of 372
Black plate (14,1)Chevrolet Orlando Owner Manual - 2013 - CRC - 6/5/12
3-14 Seats and Restraints
To return the seats to the sitting
position:
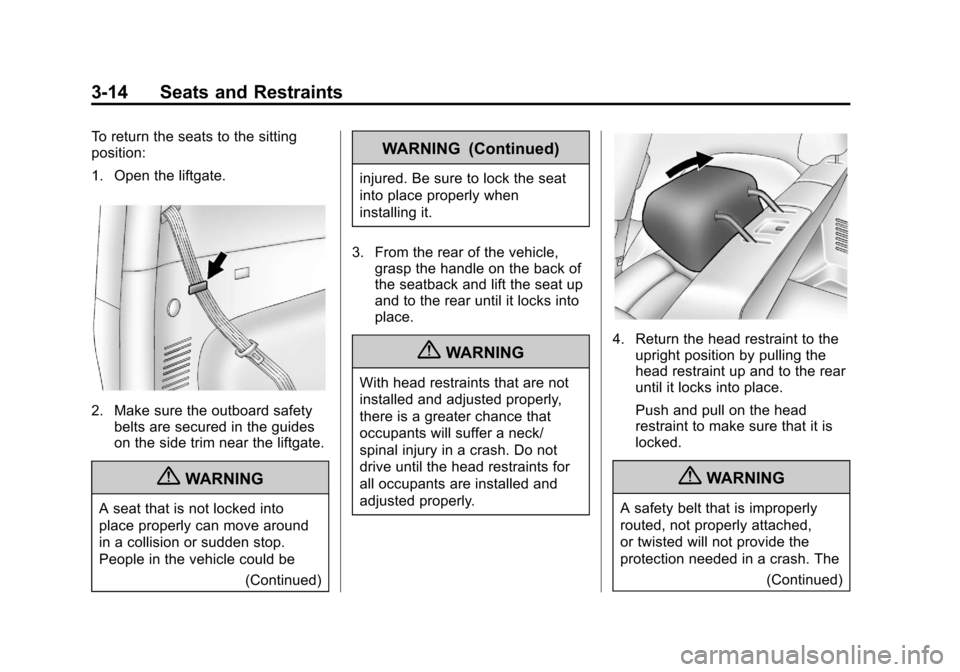
1. Open the liftgate.
2. Make sure the outboard safetybelts are secured in the guides
on the side trim near the liftgate.
{WARNING
A seat that is not locked into
place properly can move around
in a collision or sudden stop.
People in the vehicle could be
(Continued)
WARNING (Continued)
injured. Be sure to lock the seat
into place properly when
installing it.
3. From the rear of the vehicle, grasp the handle on the back of
the seatback and lift the seat up
and to the rear until it locks into
place.
{WARNING
With head restraints that are not
installed and adjusted properly,
there is a greater chance that
occupants will suffer a neck/
spinal injury in a crash. Do not
drive until the head restraints for
all occupants are installed and
adjusted properly.
4. Return the head restraint to the
upright position by pulling the
head restraint up and to the rear
until it locks into place.
Push and pull on the head
restraint to make sure that it is
locked.
{WARNING
A safety belt that is improperly
routed, not properly attached,
or twisted will not provide the
protection needed in a crash. The
(Continued)