2013 CHEVROLET ORLANDO door lock
[x] Cancel search: door lockPage 133 of 372
Black plate (33,1)Chevrolet Orlando Owner Manual - 2013 - CRC - 6/5/12
Instruments and Controls 5-33
Power Door Locks
Select Power Door Locks and the
following will be displayed:
.Auto Door Unlock
.Delayed Door Lock
.Unlocked Door Anti Lock Out
.Auto Door Lock
Auto Door Unlock
This allows selection of which of the
doors will automatically unlock when
the vehicle is shifted into P (Park).
Press the MENU knob when Auto
Door Unlock is highlighted. Turn the
knob to select All Doors, Driver
Door, or Off. Press the knob to
confirm and go back to the
last menu.
Delayed Door Lock
When on, this feature will delay the
locking of the doors until
five seconds after the last door is
closed. You will hear three chimes
to signal delayed locking is in use.
Press either the power lock button or
Qon the RKE transmitter twice to
override the delayed locking feature
and immediately lock all of the
doors.
Press the MENU knob when
Delayed Door Lock is highlighted to
select On or Off. Press BACK to
return to the last menu.
Unlocked Door Anti Lock Out
When on, all doors will lock. The
driver door will then unlock if door
locking is requested while the driver
door is open and disable the
Delayed Door Lock feature.
If Off is selected, the Delayed Door
Lock feature may be enabled
through an additional menu
selection.
Press the MENU knob when
Unlocked Door Anti Lock Out is
highlighted to select On or Off.
Press BACK to return to the
last menu. Auto Door Lock
This allows selection of which of the
doors will automatically lock when
the vehicle is shifted into P (Park).
Press the MENU knob when Auto
Door Lock is highlighted. Turn the
knob to select On or Off. Press the
knob to confirm and go back to the
last menu.
Remote Locking, Unlocking,
Starting
Select Remote Locking, Unlocking,
Starting and the following will be
displayed (depending on the
system):
.Remote Lock Feedback
.Door Unlock or Remote Door
Unlock
.Remote Unlock Light Feedback
.Remote Start
Remote Lock Feedback
This allows selection of what type of
feedback is given when locking the
vehicle with the RKE transmitter.
Page 134 of 372
Black plate (34,1)Chevrolet Orlando Owner Manual - 2013 - CRC - 6/5/12
5-34 Instruments and Controls
Press the MENU knob when
Remote Lock Feedback is
highlighted. Turn the knob to select
Lights and Horn, Lights Only, Horn
Only, or Off. Press the knob to
confirm and go back to the
last menu.
Door Unlock or Remote Door
Unlock
This allows selection of which doors
will unlock when pressing
Kon the
RKE transmitter.
Press the MENU knob when Door
Unlock is highlighted. Turn the knob
to select All Doors or Driver Door
Only. When set to Driver Door Only,
the driver door will unlock the first
time
Kis pressed and all doors will unlock when the button is pressed a
second time. When set to All Doors,
all of the doors will unlock at the
first press of
K. Press the knob
to confirm and go back to the
last menu.
Remote Unlock Light Feedback
If equipped, this allows selection of
what type of feedback is given when
unlocking the vehicle with the RKE
transmitter.
Press the MENU knob when
Remote Unlock Light Feedback is
highlighted. Turn the knob to select
On or Off. Press the knob to confirm
and go back to the last menu. Remote Start
If equipped, this allows Remote
Start to be turned on or off.
Press the MENU knob when
Remote Start is highlighted. Turn
the knob to select On or Off. Press
the knob to confirm and go back to
the last menu.
Return to Factory Settings
Select Return to Factory Settings to
return all vehicle personalization to
the default settings. Turn the knob
to select Yes or No. Press the knob
to confirm and go back to the
last menu.
Page 180 of 372
Black plate (6,1)Chevrolet Orlando Owner Manual - 2013 - CRC - 6/5/12
8-6 Climate Controls
Air Vents
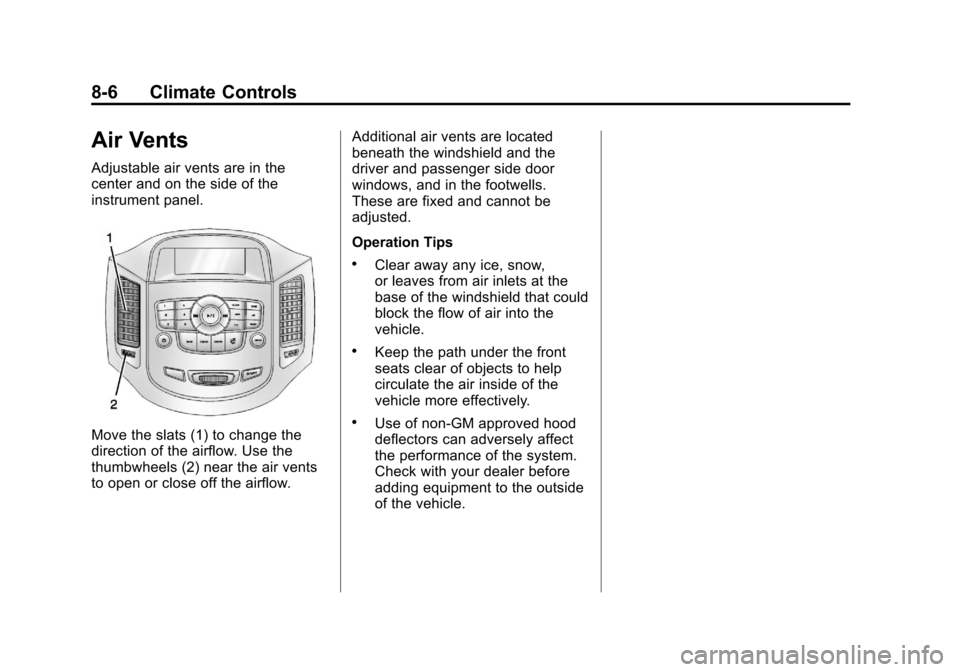
Adjustable air vents are in the
center and on the side of the
instrument panel.
Move the slats (1) to change the
direction of the airflow. Use the
thumbwheels (2) near the air vents
to open or close off the airflow.Additional air vents are located
beneath the windshield and the
driver and passenger side door
windows, and in the footwells.
These are fixed and cannot be
adjusted.
Operation Tips
.Clear away any ice, snow,
or leaves from air inlets at the
base of the windshield that could
block the flow of air into the
vehicle.
.Keep the path under the front
seats clear of objects to help
circulate the air inside of the
vehicle more effectively.
.Use of non-GM approved hood
deflectors can adversely affect
the performance of the system.
Check with your dealer before
adding equipment to the outside
of the vehicle.
Page 190 of 372
Black plate (10,1)Chevrolet Orlando Owner Manual - 2013 - CRC - 6/5/12
9-10 Driving and Operating
Tire and Loading Information
Label
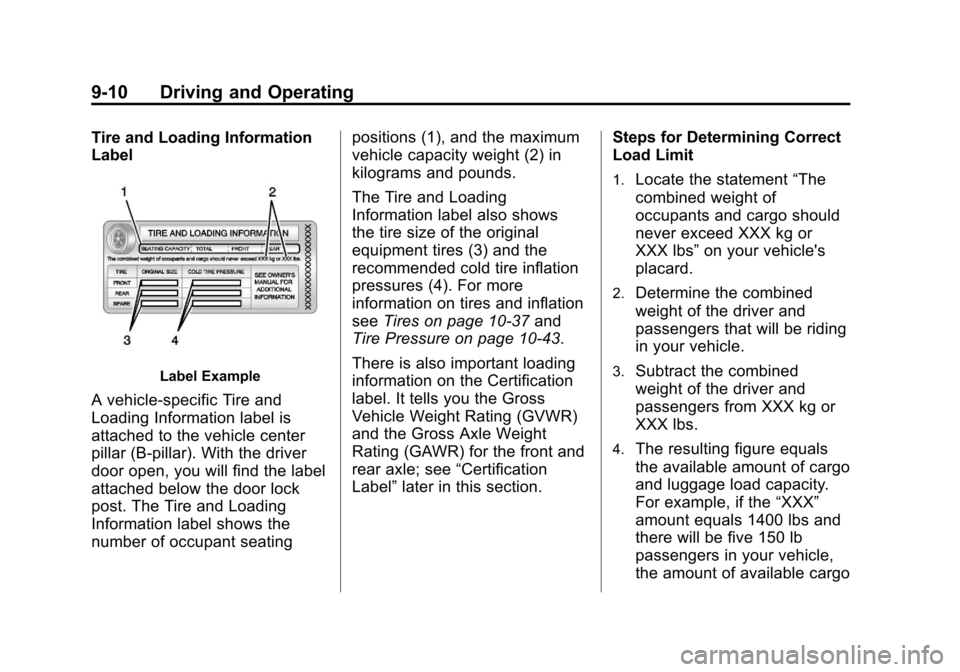
Label Example
A vehicle-specific Tire and
Loading Information label is
attached to the vehicle center
pillar (B-pillar). With the driver
door open, you will find the label
attached below the door lock
post. The Tire and Loading
Information label shows the
number of occupant seatingpositions (1), and the maximum
vehicle capacity weight (2) in
kilograms and pounds.
The Tire and Loading
Information label also shows
the tire size of the original
equipment tires (3) and the
recommended cold tire inflation
pressures (4). For more
information on tires and inflation
see
Tires on page 10‑37 and
Tire Pressure on page 10‑43.
There is also important loading
information on the Certification
label. It tells you the Gross
Vehicle Weight Rating (GVWR)
and the Gross Axle Weight
Rating (GAWR) for the front and
rear axle; see “Certification
Label” later in this section. Steps for Determining Correct
Load Limit
1.Locate the statement
“The
combined weight of
occupants and cargo should
never exceed XXX kg or
XXX lbs” on your vehicle's
placard.
2.Determine the combined
weight of the driver and
passengers that will be riding
in your vehicle.
3.Subtract the combined
weight of the driver and
passengers from XXX kg or
XXX lbs.
4.The resulting figure equals
the available amount of cargo
and luggage load capacity.
For example, if the “XXX”
amount equals 1400 lbs and
there will be five 150 lb
passengers in your vehicle,
the amount of available cargo
Page 195 of 372
Black plate (15,1)Chevrolet Orlando Owner Manual - 2013 - CRC - 6/5/12
Driving and Operating 9-15
Do not turn the engine off when the
vehicle is moving. This will cause a
loss of power assist in the brake
and steering systems and disable
the airbags.
If the vehicle must be shut off in an
emergency:
1. Brake using a firm and steadypressure. Do not pump the
brakes repeatedly. This may
deplete power assist, requiring
increased brake pedal force.
2. Shift the vehicle to neutral. This can be done while the vehicle is
moving. After shifting to neutral,
firmly apply the brakes and steer
the vehicle to a safe location.
3. Come to a complete stop. Shift to P (Park) with an automatic
transmission, or Neutral with a
manual transmission. Turn the
ignition to LOCK/OFF.
4. Set the parking brake. See Parking Brake on page 9‑27.{WARNING
Turning off the vehicle while
moving may cause loss of power
assist in the brake and steering
systems and disable the airbags.
While driving, only shut the
vehicle off in an emergency.
If the vehicle cannot be pulled over,
and must be shut off while driving,
turn the ignition to ACC/
ACCESSORY.
2 (ACC/ACCESSORY): This
position provides power to some of
the electrical accessories. It unlocks
the steering wheel. To move the key
from ACC/ACCESSORY to LOCK/
OFF, the shift lever must be in
P (Park).
3 (ON/RUN): The ignition switch
stays in this position when the
engine is running. This position can
be used to operate the electrical
accessories, as well as to display
some warning and indicator lights. This position can also be used for
service and diagnostics, and to
verify the proper operation of the
malfunction indicator lamp as may
be required for emission inspection
purposes.
The battery could be drained if the
key is left in the ACC/ACCESSORY
or ON/RUN position with the engine
off. The vehicle might not restart if
the battery is allowed to drain for an
extended period of time.
4 (START):
This position starts the
engine. When the engine starts,
release the key. The ignition switch
will return to ON/RUN for normal
driving.
A warning tone sounds when the
driver door is opened and the key is
in the ignition. If the key becomes
difficult to turn, see Keys on
page 2‑1.
Page 198 of 372
Black plate (18,1)Chevrolet Orlando Owner Manual - 2013 - CRC - 6/5/12
9-18 Driving and Operating
{WARNING
Plugging the cord into an
ungrounded outlet could cause an
electrical shock. Also, the wrong
kind of extension cord could
overheat and cause a fire. You
could be seriously injured. Plug
the cord into a properly grounded
three-prong 110-volt AC outlet.
If the cord will not reach, use a
heavy-duty three-prong extension
cord rated for at least 15 amps.
4. Before starting the engine, be sure to unplug and store the
cord as it was before to keep it
away from moving engine parts.
If you do not it could be
damaged.
The length of time the heater should
remain plugged in depends on
several factors. Ask a dealer in the
area where you will be parking the
vehicle for the best advice on this.
Retained Accessory
Power (RAP)
These vehicle accessories may be
used for up to 10 minutes after the
engine is turned off:
.Audio System
.Power Windows
.Sunroof
The power windows and sunroof
will continue to work for up to
10 minutes or until any door is
opened. The radio will work when
the key is in ON/RUN or ACC/
ACCESSORY. Once the key is
turned from ON/RUN to LOCK/OFF,
the radio will continue to work for
10 minutes, or until the driver door is
opened.
Shifting Into Park
Use this procedure to shift into
P (Park):
1. Hold the brake pedal down and set the parking brake.
See Parking Brake on page 9‑27
for more information.
2. Hold the button on the shift lever and push the lever toward
the front of the vehicle into
P (Park).
3. Turn the ignition to LOCK/OFF.
Page 221 of 372
Black plate (41,1)Chevrolet Orlando Owner Manual - 2013 - CRC - 6/5/12
Driving and Operating 9-41
The tethered fuel cap is behind the
fuel door on the vehicle's passenger
side. Turn the fuel cap
counterclockwise to remove. While
refueling, hang the tethered fuel cap
from the disk on the end of the fuel
cap to the mating feature on the fuel
door hinge. Reinstall the cap by
turning it clockwise until it clicks.
Do not top off or overfill the tank.
Wait a few seconds before removing
the nozzle. Clean fuel from painted
surfaces as soon as possible. See
Exterior Care on page 10‑78.
{WARNING
If a fire starts while you are
refueling, do not remove the
nozzle. Shut off the flow of fuel by
shutting off the pump or by
notifying the station attendant.
Leave the area immediately.Notice:
If a new fuel cap is
needed, be sure to get the right
type of cap from your dealer. The
wrong type of fuel cap might not
fit properly, might cause the
malfunction indicator lamp to
light, and could damage the fuel
tank and emissions system. See
Malfunction Indicator Lamp on
page 5‑12.
Filling a Portable Fuel
Container
{WARNING
Filling a portable fuel container
while it is in the vehicle can cause
fuel vapors that can ignite either
by static electricity or other
means. You or others could be
badly burned and the vehicle
could be damaged. Always:
.Use approved fuel
containers.
(Continued)
WARNING (Continued)
.Remove container from
vehicle, trunk, or pickup bed
before filling.
.Place container on the
ground.
.Place the nozzle inside the fill
opening of the container
before dispensing fuel, and
keep it in contact with the fill
opening until filling is
complete.
.Do not smoke while
pumping fuel.
Page 289 of 372
Black plate (61,1)Chevrolet Orlando Owner Manual - 2013 - CRC - 6/5/12
Vehicle Care 10-61
If the vehicle only has a cigarette
lighter, use the cigarette lighter.
Do not pinch the power plug
cord in the door or window.
9. Start the vehicle. The vehicle must be running while using the
air compressor.
10. Press the on/off button (5) to turn the tire sealant and
compressor kit on.
The compressor will inject
sealant and air into the tire.
The pressure gauge (8) will
initially show a high pressure
while the compressor pushes
the sealant into the tire. Once
the sealant is completely
dispersed into the tire, the
pressure will quickly drop and
start to rise again as the tire
inflates with air only. 11. Inflate the tire to the
recommended inflation
pressure using the pressure
gauge (8). The recommended
inflation pressure can be found
on the Tire and Loading
Information label. See Tire
Pressure on page 10‑43.
The pressure gauge (8) may
read higher than the actual tire
pressure while the compressor
is on. Turn the compressor off
to get an accurate pressure
reading. The compressor may
be turned on/off until the
correct pressure is reached.
Notice: If the recommended
pressure cannot be reached after
approximately 25 minutes, the
vehicle should not be driven
farther. The tire is too severely
damaged and the tire sealant and
compressor kit cannot inflate the
tire. Remove the power plug from
the accessory power outlet and
unscrew the inflating hose from the tire valve. See
Roadside
Assistance Program on
page 13‑5.
12. Press the on/off button (5) to
turn the tire sealant and
compressor kit off.
The tire is not sealed and will
continue to leak air until the
vehicle is driven and the
sealant is distributed in the tire.
Therefore, Steps 13–21 must
be done immediately after
Step 12.
Be careful while handling the
tire sealant and compressor kit
as it could be warm after
usage.
13. Unplug the power plug (9) from the accessory power outlet in
the vehicle.
14. Turn the sealant/air hose (2) counterclockwise to remove it
from the tire valve stem.
15. Replace the tire valve stem cap.