2013 CHEVROLET ORLANDO reverse
[x] Cancel search: reversePage 213 of 372
Black plate (33,1)Chevrolet Orlando Owner Manual - 2013 - CRC - 6/5/12
Driving and Operating 9-33
Ending Cruise Control
There are three ways to end cruise
control:
.To disengage cruise control,
step lightly on the brake pedal or
clutch for a manual transmission.
.Press*on the steering wheel.
.To turn off cruise control, press1on the steering wheel.
Erasing Speed Memory
The cruise control set speed is
erased from memory if
1is pressed
or if the ignition is turned off.
Object Detection
Systems
Ultrasonic Parking Assist
For vehicles with the Ultrasonic
Rear Parking Assist (URPA) system,
it assists the driver with parking and
avoiding objects while in
R (Reverse). URPA operates at
speeds less than 8 km/h (5 mph),
and the sensors on the rear bumper
detect objects up to 2.5 m (8 ft)
behind the vehicle, and at least
20 cm (8 in) off the ground.
{WARNING
The URPA system does not
detect children, pedestrians,
bicyclists, animals, or objects
below the bumper or that are too
close or too far from the vehicle.
It is not available at speeds
greater than 8 km/h (5 mph). To
prevent injury, death, or vehicle
(Continued)
WARNING (Continued)
damage, even with URPA, always
check the area around the vehicle
and check all mirrors before
backing.
How the System Works
URPA comes on automatically when
the shift lever is moved into
R (Reverse). A single tone sounds
to indicate the system is working.
URPA operates only at speeds less
than 8 km/h (5 mph).
An obstacle is indicated by audible
beeps. The interval between the
beeps becomes shorter as the
vehicle gets closer to the obstacle.
When the distance is less than
30 cm (12 in) the beeping is a
continuous tone for five seconds.
Page 215 of 372
Black plate (35,1)Chevrolet Orlando Owner Manual - 2013 - CRC - 6/5/12
Driving and Operating 9-35
Rear Vision
Camera (RVC)
The vehicle may have a Rear Vision
Camera (RVC) system. Read this
entire section before using it.
The RVC can assist the driver when
backing up by displaying a view of
the area behind the vehicle.
{WARNING
The RVC system does not display
children, pedestrians, bicyclists,
animals, or any other object
located outside the camera's field
of view, below the bumper,
or under the vehicle. Perceived
distances may be different from
actual distances. Do not back the
vehicle using only the RVC
screen, during longer, higher
speed backing maneuvers,
or where there could be cross
traffic. Failure to use proper care
before backing may result in(Continued)
WARNING (Continued)
injury, death, or vehicle damage.
Always check behind and around
the vehicle before backing.
An image appears on the radio
screen with the message Check
Surroundings for Safety when the
vehicle is shifted into R (Reverse).
The radio screen goes to the
previous screen after approximately
10 seconds once the vehicle is
shifted out of R (Reverse).
To cancel the delay, do one of the
following:
.Press a button on the radio.
.Shift into P (Park).
.Reach a vehicle speed of
8 km/h (5 mph). Turning the Rear Vision Camera
System On or Off
To turn the rear vision camera
system on or off:
1. Shift into P (Park).
2. Press the CONFIG button.
3. Select Display.
4. Select Rear Camera Options.
5. Select Camera. When a check
mark appears next to the
Camera option, then the RVC
system is on.
Symbols
The RVC system may have a
feature that lets the driver view
symbols on the radio screen while
using the RVC. The Ultrasonic Rear
Park Assist (URPA) system must
not be disabled to use the caution
symbols. The error message Rear
Parking Assist Symbols Unavailable
may display if URPA has been
disabled and the symbols have
been turned on. See Ultrasonic
Parking Assist on page 9‑33.
Page 252 of 372
Black plate (24,1)Chevrolet Orlando Owner Manual - 2013 - CRC - 6/5/12
10-24 Vehicle Care
Notice:Allowing the wiper arm to
touch the windshield when no
wiper blade is installed could
damage the windshield. Any
damage that occurs would not be
covered by your warranty. Do not
allow the wiper arm to touch the
windshield.
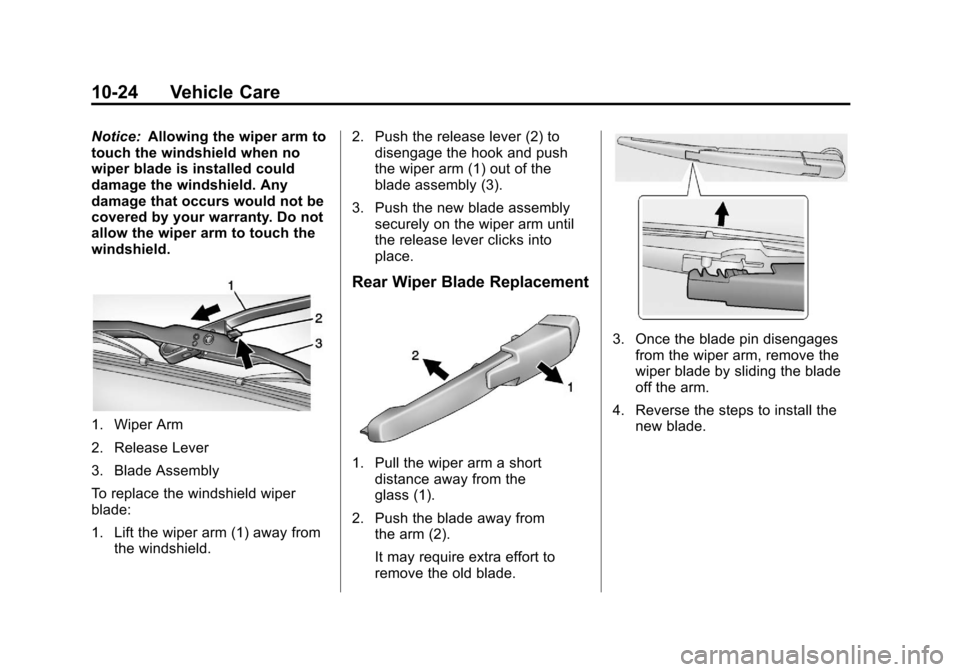
1. Wiper Arm
2. Release Lever
3. Blade Assembly
To replace the windshield wiper
blade:
1. Lift the wiper arm (1) away from the windshield. 2. Push the release lever (2) to
disengage the hook and push
the wiper arm (1) out of the
blade assembly (3).
3. Push the new blade assembly securely on the wiper arm until
the release lever clicks into
place.
Rear Wiper Blade Replacement
1. Pull the wiper arm a short
distance away from the
glass (1).
2. Push the blade away from the arm (2).
It may require extra effort to
remove the old blade.
3. Once the blade pin disengages
from the wiper arm, remove the
wiper blade by sliding the blade
off the arm.
4. Reverse the steps to install the new blade.
Page 263 of 372
Black plate (35,1)Chevrolet Orlando Owner Manual - 2013 - CRC - 6/5/12
Vehicle Care 10-35
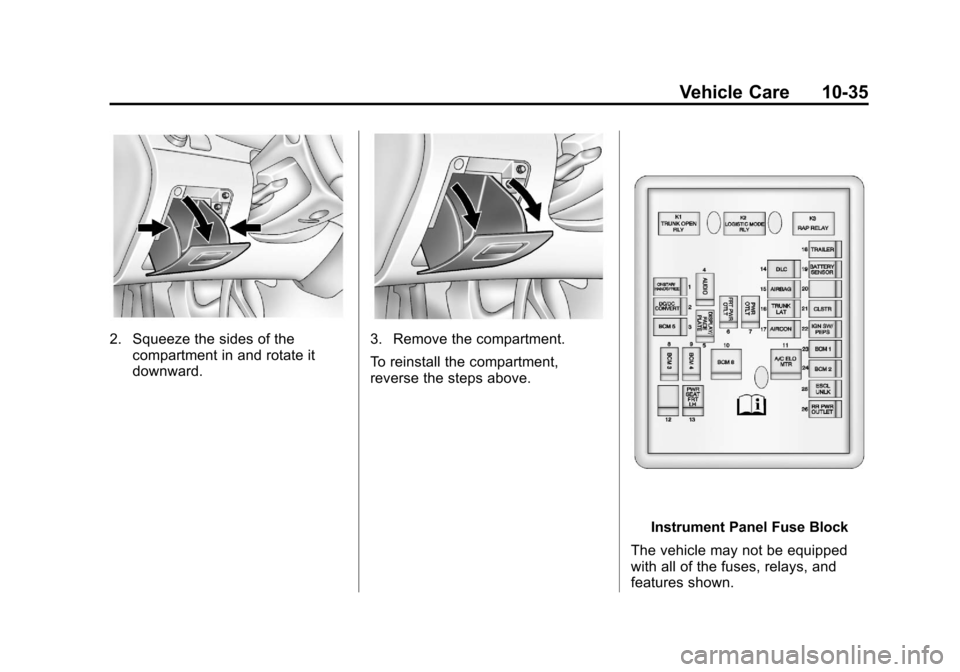
2. Squeeze the sides of thecompartment in and rotate it
downward.3. Remove the compartment.
To reinstall the compartment,
reverse the steps above.
Instrument Panel Fuse Block
The vehicle may not be equipped
with all of the fuses, relays, and
features shown.
Page 285 of 372
Black plate (57,1)Chevrolet Orlando Owner Manual - 2013 - CRC - 6/5/12
Vehicle Care 10-57
WARNING (Continued)
changing a flat tire. If it is used for
anything else, you or others could
be badly injured or killed if the
vehicle slips off the jack. If a jack
is provided with the vehicle, only
use it for changing a flat tire.
If a tire goes flat, avoid further tire
and wheel damage by driving slowly
to a level place, well off the road,
if possible. Turn on the hazard
warning flashers. See Hazard
Warning Flashers on page 6‑4.
{WARNING
Changing a tire can be
dangerous. The vehicle can slip
off the jack and roll over or fall
causing injury or death. Find a
level place to change the tire. To
help prevent the vehicle from
moving:
1. Set the parking brake firmly.
2. Put an automatic transmission in P (Park) or a
manual transmission in
1 (First) or R (Reverse).
3. Turn off the engine and do not restart while the vehicle
is raised.
4. Do not allow passengers to remain in the vehicle.
5. Place wheel blocks on both sides of the tire at the
opposite corner of the tire
being changed. This vehicle may come with a jack
and spare tire or a tire sealant and
compressor kit. To use the jacking
equipment to change a spare tire
safely, follow the instructions below.
Then see
Tire Changing on
page 10‑65. To use the tire sealant
and compressor kit, see Tire
Sealant and Compressor Kit on
page 10‑58.
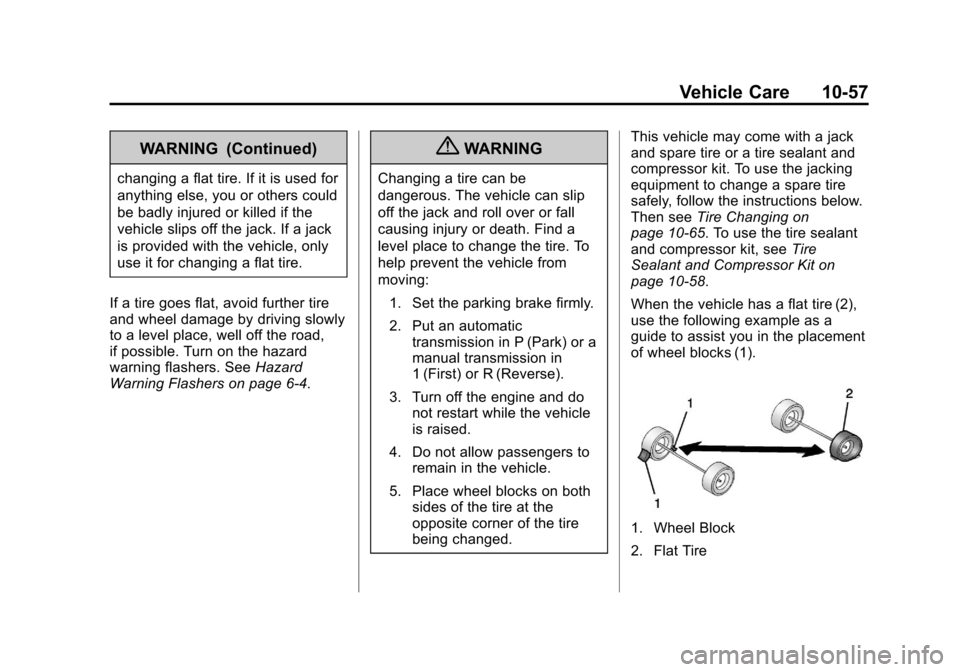
When the vehicle has a flat tire (2),
use the following example as a
guide to assist you in the placement
of wheel blocks (1).
1. Wheel Block
2. Flat Tire
Page 293 of 372
Black plate (65,1)Chevrolet Orlando Owner Manual - 2013 - CRC - 6/5/12
Vehicle Care 10-65
The tire sealant and compressor kit
has accessory adapters located in a
compartment on the bottom of its
housing that can be used to inflate
air mattresses, balls, etc.
Storing the Tire Sealant
and Compressor Kit
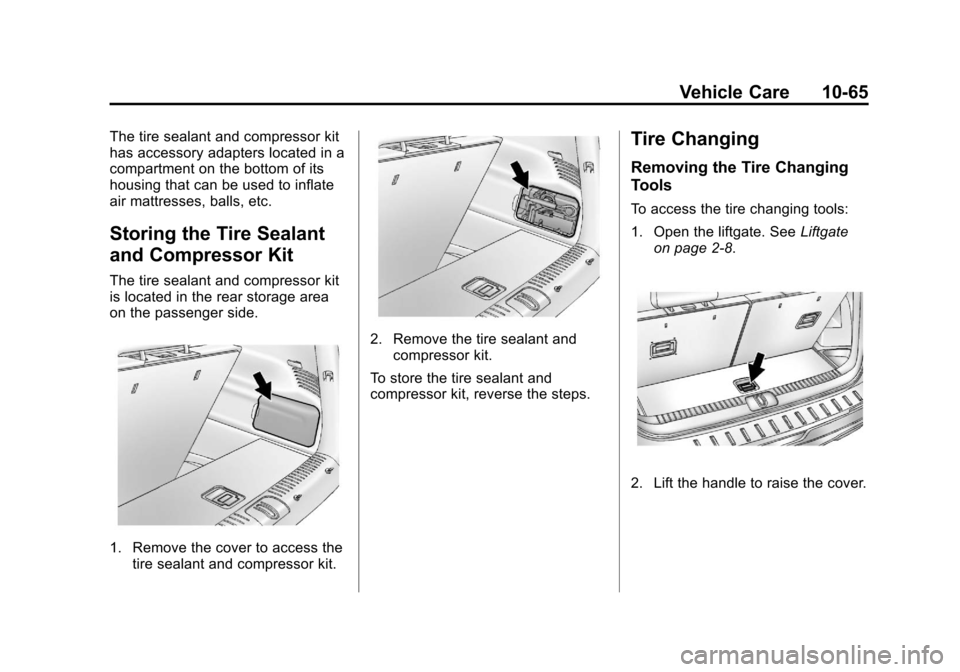
The tire sealant and compressor kit
is located in the rear storage area
on the passenger side.
1. Remove the cover to access thetire sealant and compressor kit.
2. Remove the tire sealant andcompressor kit.
To store the tire sealant and
compressor kit, reverse the steps.
Tire Changing
Removing the Tire Changing
Tools
To access the tire changing tools:
1. Open the liftgate. See Liftgate
on page 2‑8.
2. Lift the handle to raise the cover.
Page 299 of 372
Black plate (71,1)Chevrolet Orlando Owner Manual - 2013 - CRC - 6/5/12
Vehicle Care 10-71
WARNING (Continued)
aftermarket manufacturer when
using accessory locking wheel
nuts. SeeCapacities and
Specifications on page 12‑2 for
original equipment wheel nut
torque specifications.
Notice: Improperly tightened
wheel nuts can lead to brake
pulsation and rotor damage. To
avoid expensive brake repairs,
evenly tighten the wheel nuts in
the proper sequence and to the
proper torque specification. See
Capacities and Specifications on
page 12‑2 for the wheel nut
torque specification.
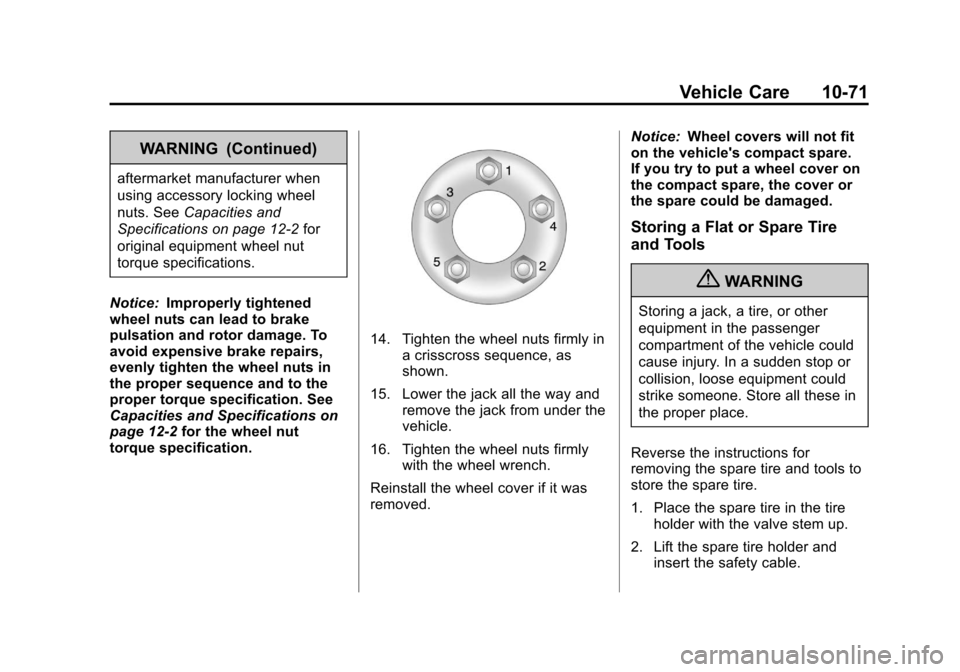
14. Tighten the wheel nuts firmly in a crisscross sequence, as
shown.
15. Lower the jack all the way and remove the jack from under the
vehicle.
16. Tighten the wheel nuts firmly with the wheel wrench.
Reinstall the wheel cover if it was
removed. Notice:
Wheel covers will not fit
on the vehicle's compact spare.
If you try to put a wheel cover on
the compact spare, the cover or
the spare could be damaged.
Storing a Flat or Spare Tire
and Tools
{WARNING
Storing a jack, a tire, or other
equipment in the passenger
compartment of the vehicle could
cause injury. In a sudden stop or
collision, loose equipment could
strike someone. Store all these in
the proper place.
Reverse the instructions for
removing the spare tire and tools to
store the spare tire.
1. Place the spare tire in the tire holder with the valve stem up.
2. Lift the spare tire holder and insert the safety cable.
Page 303 of 372
Black plate (75,1)Chevrolet Orlando Owner Manual - 2013 - CRC - 6/5/12
Vehicle Care 10-75
6. Connect the other end of the redpositive (+) cable to the
positive (+) terminal of the good
battery.
7. Connect one end of the black negative (–) cable to the
negative (–) terminal of the good
battery.
8. Connect the other end of the black negative (–) cable to the
negative (–) grounding point.
9. Start the engine in the vehicle with the good battery and run
the engine at idle speed for at
least four minutes.
10. Try to start the vehicle that had the dead battery. If it will not
start after a few tries, it
probably needs service. Notice:
If the jumper cables are
connected or removed in the
wrong order, electrical shorting
may occur and damage the
vehicle. The repairs would not be
covered by the vehicle warranty.
Always connect and remove the
jumper cables in the correct
order, making sure that the
cables do not touch each other or
other metal.
Jumper Cable Removal
Reverse the sequence exactly when
removing the jumper cables.Towing
Towing the Vehicle
Notice: Incorrectly towing a
disabled vehicle may cause
damage. The damage would not
be covered by the vehicle
warranty.
Have the vehicle towed on a flatbed
car carrier or a wheel lift tow truck.
If a wheel lift tow truck is used, the
drive wheels cannot contact the
road while the vehicle is being
towed. A wheel dolly must be used
to lift all drive wheels off the ground.
Consult your dealer or a
professional towing service if the
disabled vehicle must be towed.
To tow the vehicle behind another
vehicle for recreational purposes,
such as behind a motor home, see
“Recreational Vehicle Towing” in this
section.