2013 CHEVROLET MALIBU set clock
[x] Cancel search: set clockPage 113 of 436

Black plate (5,1)Chevrolet Malibu Owner Manual - 2013 - CRC - 6/6/12
Instruments and Controls 5-5
Clock
The infotainment system controls
are used to access the time and
date settings through the menu
system. The clock menu can only
be used with the radio on while in
ON/RUN or ACC/ACCESSORY.
SeeOverview (Radio with CD and
Touchscreen) on page 7‑5 or
Overview (Radio with CD) on
page 7‑2 for information about how
to use the menu system. For
vehicles with a navigation system,
see the separate navigation manual.
Setting the Clock (Radio
with CD)
To set the time:
1. Press the CONFIG button and select Time Settings.
2. Select Set Time.
3. Turn the TUNE/MENU knob to adjust the highlighted number.
4. Press the TUNE/MENU knob to select the next number. 5. To save the time and return to
the Time Settings menu, press
the BACK
/button at any time
or press the TUNE/MENU knob
after adjusting the minutes.
Setting the 12/24 Hour Format
1. Press the CONFIG button and select Time Settings.
2. Highlight 12/24 Hour Format.
3. Press the TUNE/MENU knob to select the 12 hour or 24 hour
display format.
Setting the Clock (Radio with
CD and Touchscreen)
To set the time:
1. Press the CONFIG button toenter the menu options. Turn the
TUNE/MENU knob to scroll
through the available setup
features. Press the TUNE/MENU
knob or press the Time screen
button to display other options
within that feature. 2. Press + or
−to increase or
decrease the Hours and Minutes
displayed on the clock.
12/24 HR Format: Press the 12 HR
screen button for standard time;
press the 24 HR screen button for
military time.
Day + or Day −:Press the Day +
or Day −display buttons to increase
or decrease the day.
Display: Press Display to turn the
display of the time on the screen on
or off.
Power Outlets
The accessory power outlets can be
used to plug in electrical equipment,
such as a cell phone or MP3 player.
There are two accessory power
outlets: one on the center stack
below the climate control system,
and one under the armrest inside
the center console storage.
Page 166 of 436

Black plate (6,1)Chevrolet Malibu Owner Manual - 2013 - CRC - 6/6/12
7-6 Infotainment System
3.F(Home)
.See“Home Page” following
in this section.
4. SOURCE
.Press to change the audio
sources such as AM-FM
Radio, CD, and AUX.
5.
v/>(Phone/Mute)
.Press to access the Phone
menu. See Bluetooth
(Overview) on page 7‑35 or
Bluetooth (Voice
Recognition) on page 7‑40
or Bluetooth (Infotainment
Controls) on page 7‑36.
Press to mute the audio
system.
6. BACK
/
.Press to return to the
previous screen in a menu.
.If on a page accessed
directly by a faceplate
button or Home Page screen button, pressing
/BACK will go to the
previous menu.
7. TUNE/MENU
.Turn to highlight a feature.
Press to activate the
highlighted feature.
.Turn to manually select a
radio station.
8.
Z(Eject)
.Press to eject a disc from
the CD player. See CD
Player on page 7‑22.
9.
H(Clock)
.Press to set the time.
10.
p/j(Play/Pause)
.Press to start, pause, and
resume playback. See CD
Player on page 7‑22 and
MP3 on page 7‑24.
11. CD Slot 12.
©SEEK¨
.Press©to seek to the
beginning of the current or
previous track. If the track
has been playing for less
than five seconds, it
seeks the previous
track. If longer than
five seconds, the current
track starts from the
beginning.
.Press and hold©to
quickly reverse through a
track. Release the button
to return to playing speed.
See CD Player on
page 7‑22 andMP3 on
page 7‑24.
.For AM or FM, press©to
seek to the previous
strong station.
.Press¨to seek the next
track.
.Press and hold¨to fast
forward through a track.
Page 168 of 436

Black plate (8,1)Chevrolet Malibu Owner Manual - 2013 - CRC - 6/6/12
7-8 Infotainment System
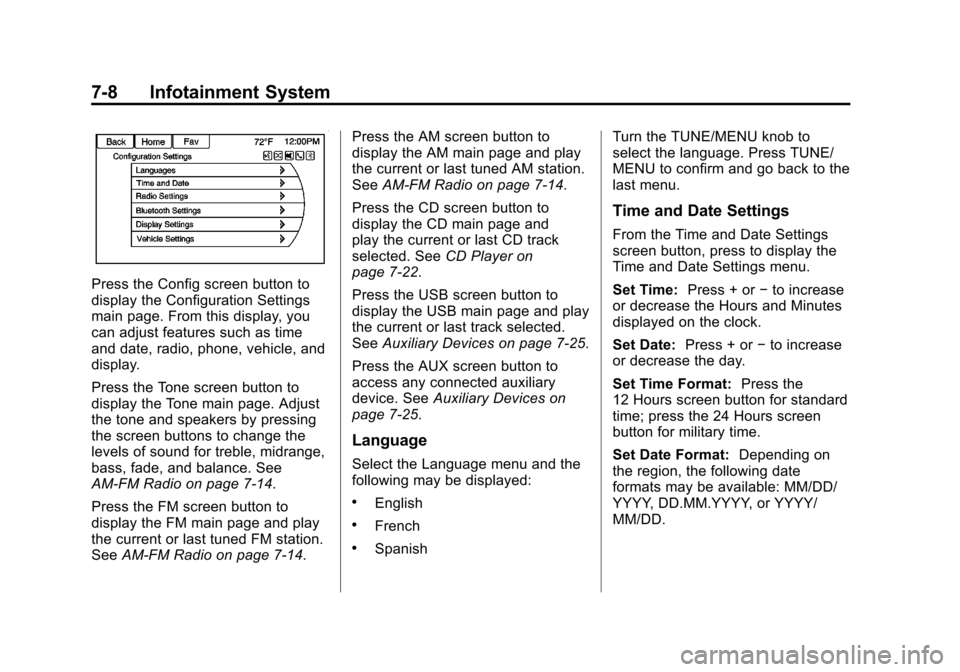
Press the Config screen button to
display the Configuration Settings
main page. From this display, you
can adjust features such as time
and date, radio, phone, vehicle, and
display.
Press the Tone screen button to
display the Tone main page. Adjust
the tone and speakers by pressing
the screen buttons to change the
levels of sound for treble, midrange,
bass, fade, and balance. See
AM-FM Radio on page 7‑14.
Press the FM screen button to
display the FM main page and play
the current or last tuned FM station.
SeeAM-FM Radio on page 7‑14. Press the AM screen button to
display the AM main page and play
the current or last tuned AM station.
See
AM-FM Radio on page 7‑14.
Press the CD screen button to
display the CD main page and
play the current or last CD track
selected. See CD Player on
page 7‑22.
Press the USB screen button to
display the USB main page and play
the current or last track selected.
See Auxiliary Devices on page 7‑25.
Press the AUX screen button to
access any connected auxiliary
device. See Auxiliary Devices on
page 7‑25.
Language
Select the Language menu and the
following may be displayed:
.English
.French
.Spanish Turn the TUNE/MENU knob to
select the language. Press TUNE/
MENU to confirm and go back to the
last menu.
Time and Date Settings
From the Time and Date Settings
screen button, press to display the
Time and Date Settings menu.
Set Time:
Press + or−to increase
or decrease the Hours and Minutes
displayed on the clock.
Set Date: Press + or−to increase
or decrease the day.
Set Time Format: Press the
12 Hours screen button for standard
time; press the 24 Hours screen
button for military time.
Set Date Format: Depending on
the region, the following date
formats may be available: MM/DD/
YYYY, DD.MM.YYYY, or YYYY/
MM/DD.
Page 207 of 436

Black plate (1,1)Chevrolet Malibu Owner Manual - 2013 - CRC - 6/6/12
Climate Controls 8-1
Climate Controls
Climate Control Systems
Climate Control Systems . . . . . . 8-1
Dual Automatic Climate ControlSystem . . . . . . . . . . . . . . . . . . . . . . 8-3
Air Vents
Air Vents . . . . . . . . . . . . . . . . . . . . . . 8-7
Maintenance
Passenger Compartment AirFilter . . . . . . . . . . . . . . . . . . . . . . . . . 8-8
Service . . . . . . . . . . . . . . . . . . . . . . . 8-9
Climate Control Systems
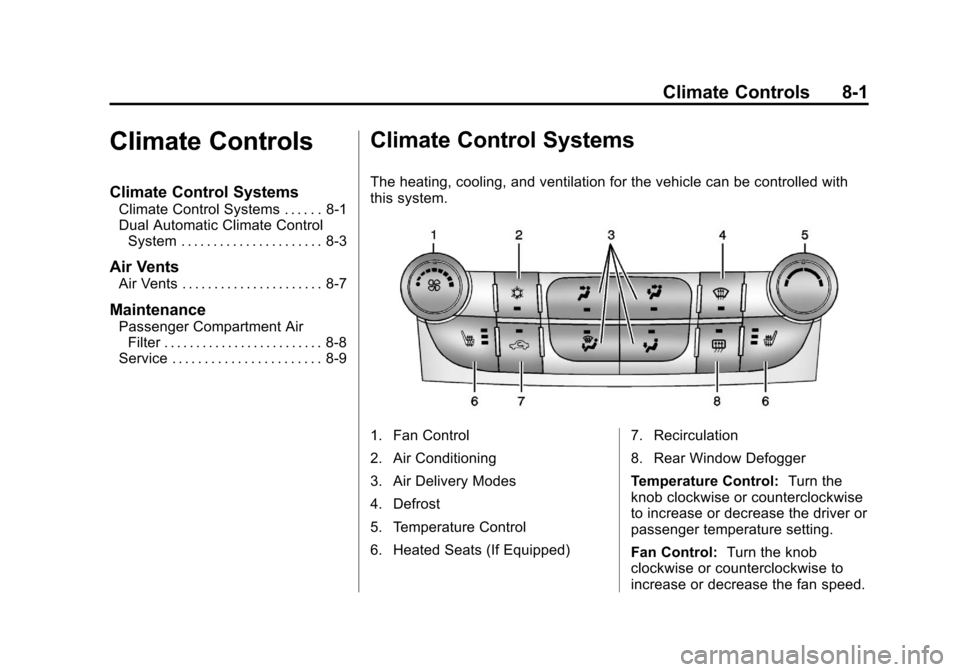
The heating, cooling, and ventilation for the vehicle can be controlled with
this system.
1. Fan Control
2. Air Conditioning
3. Air Delivery Modes
4. Defrost
5. Temperature Control
6. Heated Seats (If Equipped) 7. Recirculation
8. Rear Window Defogger
Temperature Control:
Turn the
knob clockwise or counterclockwise
to increase or decrease the driver or
passenger temperature setting.
Fan Control: Turn the knob
clockwise or counterclockwise to
increase or decrease the fan speed.
Page 210 of 436

Black plate (4,1)Chevrolet Malibu Owner Manual - 2013 - CRC - 6/6/12
8-4 Climate Controls
.Select a temperature setting that
is higher in hot weather and
lower in cold weather.
.Turn off the air conditioning
when it is not needed.
.Only use defrost to clear the
windows.
Automatic Operation
The system automatically controls
the fan speed, air delivery, air
conditioning, and recirculation in
order to heat or cool the vehicle to
the desired temperature.
When the indicator light is on, the
system is in full automatic operation.
If the air delivery mode or fan
setting is manually adjusted, the
auto indicator turns off and displays
will show the selected settings. To place the system in
automatic mode:
1. Press AUTO.
2. Set the temperature. Allow the
system time to stabilize. Then
adjust the temperature as
needed for best comfort.
To improve fuel efficiency and to
cool the vehicle faster, recirculation
may be automatically selected in
warm weather.
The recirculation light will not come
on. Press
hto select
recirculation; press it again to select
outside air.
Manual Operation
Driver and Passenger
Temperature Control: The
temperature can be adjusted
separately for the driver and
passenger.
Turn the knob clockwise or
counterclockwise to increase or
decrease the driver or passenger
temperature setting. SYNC:
Press to link all climate
zone settings to the driver settings.
The SYNC indicator light will turn
off. When the passenger settings
are adjusted, the SYNC indicator
light is on.
Fan Control: Turn the knob
clockwise or counterclockwise to
increase or decrease the fan speed.
Press AUTO to return to automatic
operation.
Air Delivery Modes: Press
Y,\,
[, or-to change the direction of
the airflow. An indicator light comes
on in the selected mode button.
Changing the mode cancels the
automatic operation and the system
goes into manual mode. Press
AUTO to return to automatic
operation.
Y(Vent): Air is directed to the
instrument panel outlets.
\(Bi-Level): Air is directed to the
instrument panel outlets and the
floor outlets.