2013 CHEVROLET MALIBU display
[x] Cancel search: displayPage 1 of 436

Black plate (1,1)Chevrolet Malibu Owner Manual - 2013 - CRC - 6/6/12
2013 Chevrolet Malibu Owner ManualM
In Brief. . . . . . . . . . . . . . . . . . . . . . . . 1-1
Instrument Panel . . . . . . . . . . . . . . 1-2
Initial Drive Information . . . . . . . . 1-4
Vehicle Features . . . . . . . . . . . . . 1-17
eAssist Features . . . . . . . . . . . . . 1-22
Performance and
Maintenance . . . . . . . . . . . . . . . . 1-24
Keys, Doors, and Windows . . . . . . . . . . . . . . . . . . . . 2-1
Keys and Locks . . . . . . . . . . . . . . . 2-2
Doors . . . . . . . . . . . . . . . . . . . . . . . . . 2-11
Vehicle Security . . . . . . . . . . . . . . 2-13
Exterior Mirrors . . . . . . . . . . . . . . . 2-15
Interior Mirrors . . . . . . . . . . . . . . . . 2-16
Windows . . . . . . . . . . . . . . . . . . . . . 2-17
Roof . . . . . . . . . . . . . . . . . . . . . . . . . . 2-19
Seats and Restraints . . . . . . . . . 3-1
Head Restraints . . . . . . . . . . . . . . . 3-2
Front Seats . . . . . . . . . . . . . . . . . . . . 3-3
Rear Seats . . . . . . . . . . . . . . . . . . . . 3-9
Safety Belts . . . . . . . . . . . . . . . . . . 3-11
Airbag System . . . . . . . . . . . . . . . . 3-19
Child Restraints . . . . . . . . . . . . . . 3-32 Storage
. . . . . . . . . . . . . . . . . . . . . . . 4-1
Storage Compartments . . . . . . . . 4-1
Additional Storage Features . . . 4-3
Instruments and Controls . . . . 5-1
Controls . . . . . . . . . . . . . . . . . . . . . . . 5-2
Warning Lights, Gauges, and
Indicators . . . . . . . . . . . . . . . . . . . . 5-7
Information Displays . . . . . . . . . . 5-24
Vehicle Messages . . . . . . . . . . . . 5-28
Vehicle Personalization . . . . . . . 5-35
Universal Remote System . . . . 5-40
Lighting . . . . . . . . . . . . . . . . . . . . . . . 6-1
Exterior Lighting . . . . . . . . . . . . . . . 6-1
Interior Lighting . . . . . . . . . . . . . . . . 6-5
Lighting Features . . . . . . . . . . . . . . 6-6
Infotainment System . . . . . . . . . 7-1
Introduction . . . . . . . . . . . . . . . . . . . . 7-1
Radio . . . . . . . . . . . . . . . . . . . . . . . . . 7-14
Audio Players . . . . . . . . . . . . . . . . 7-22
Phone . . . . . . . . . . . . . . . . . . . . . . . . 7-35 Climate Controls
. . . . . . . . . . . . . 8-1
Climate Control Systems . . . . . . 8-1
Air Vents . . . . . . . . . . . . . . . . . . . . . . . 8-7
Maintenance . . . . . . . . . . . . . . . . . . . 8-8
Driving and Operating . . . . . . . . 9-1
Driving Information . . . . . . . . . . . . . 9-2
Starting and Operating . . . . . . . 9-14
Engine Exhaust . . . . . . . . . . . . . . 9-25
Automatic Transmission . . . . . . 9-26
Brakes . . . . . . . . . . . . . . . . . . . . . . . 9-28
Ride Control Systems . . . . . . . . 9-32
Cruise Control . . . . . . . . . . . . . . . . 9-34
Object Detection Systems . . . . 9-37
Fuel . . . . . . . . . . . . . . . . . . . . . . . . . . 9-44
Towing . . . . . . . . . . . . . . . . . . . . . . . 9-50
Conversions and Add-Ons . . . 9-50
Vehicle Care . . . . . . . . . . . . . . . . . 10-1
General Information . . . . . . . . . . 10-2
Vehicle Checks . . . . . . . . . . . . . . . 10-4
Headlamp Aiming . . . . . . . . . . . 10-28
Bulb Replacement . . . . . . . . . . 10-28
Electrical System . . . . . . . . . . . . 10-37
Page 9 of 436

Black plate (3,1)Chevrolet Malibu Owner Manual - 2013 - CRC - 6/6/12
In Brief 1-3
1.Air Vents on page 8‑7.
2. Turn and Lane-Change Lever. See Turn and Lane-Change
Signals on page 6‑4.
Driver Information Center
Buttons. See Driver Information
Center (DIC) on page 5‑24.
3. Instrument Cluster on page 5‑8.
Driver Information Center (DIC)
on page 5‑24.
4. Windshield Wiper/Washer on
page 5‑3.
5. Storage Area. See Instrument
Panel Storage on page 4‑1.
6. Light Sensor. See Automatic
Headlamp System on page 6‑3.
7. Infotainment Display.
8. Infotainment on page 7‑1.
AM-FM Radio on page 7‑14.
9. CD Player on page 7‑22. 10.
Exterior Lamp Controls on
page 6‑1.
Fog Lamps on page 6‑4.
Instrument Panel Illumination
Control on page 6‑5.
11. Hood Release. See Hood on
page 10‑5.
12. Storage Compartment. See Instrument Panel Storage on
page 4‑1.
13. Data Link Connector (Out of View). See Malfunction
Indicator Lamp on page 5‑14.
14. Cruise Control on page 9‑34.
Lane Departure Warning
(LDW) on page 9‑43 (If
Equipped).
Forward Collision Alert (FCA)
System on page 9‑37 (If
Equipped).
15. Steering Wheel Adjustment on
page 5‑2. 16.
Horn on page 5‑3.
Driver Airbag. See Where Are
the Airbags? on page 3‑21.
17. Steering Wheel Controls on
page 5‑2.
18. Ignition Positions (Key Access)
on page 9‑14 orIgnition
Positions (Keyless Access) on
page 9‑16.
19. Heated Front Seats on
page 3‑8 (If Equipped).
20. Power Door Locks on
page 2‑9.
Hazard Warning Flashers on
page 6‑4.
Passenger Airbag Status
Indicator. See Passenger
Sensing System on page 3‑26.
21. Ultrasonic Parking Assist on
page 9‑39 (If Equipped).
Traction Control System (TCS)
on page 9‑32.
StabiliTrak
®System on
page 9‑33.
Page 25 of 436
Black plate (19,1)Chevrolet Malibu Owner Manual - 2013 - CRC - 6/6/12
In Brief 1-19
SET/−:Move the thumbwheel down
to set a speed and activate cruise
control or to make the vehicle
decelerate.
See Cruise Control on page 9‑34.
Infotainment System
See the infotainment manual for
information on the radio, audio
players, phone, navigation system,
and voice or speech recognition.
It also includes information on
settings and downloadable
applications (if equipped).
Driver Information
Center (DIC)
The DIC display is in the center of
the instrument cluster. It shows the
status of many vehicle systems. The
controls for the DIC are on the turn
signal lever.
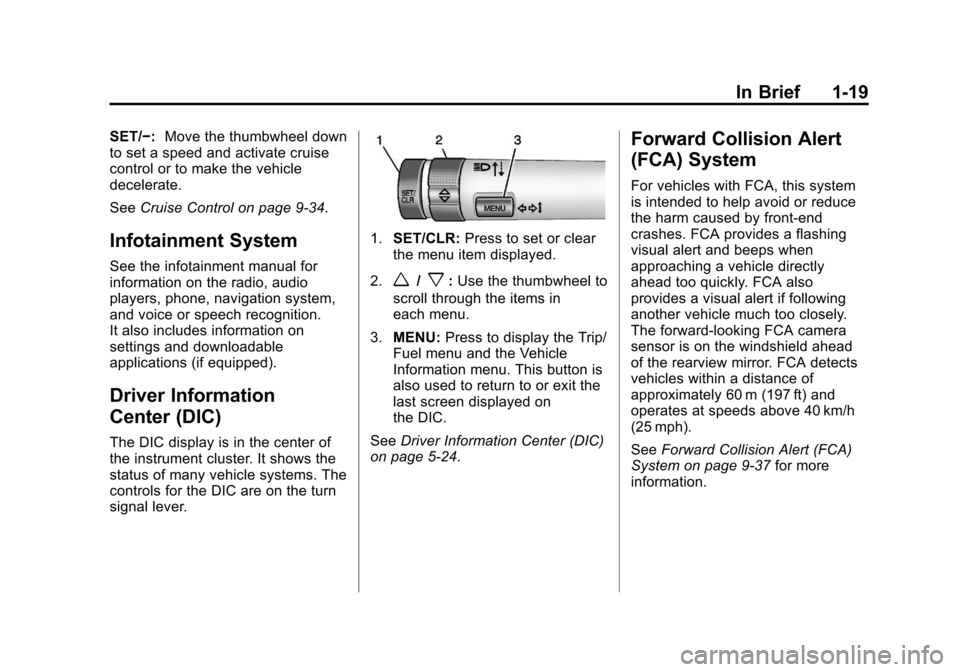
1.SET/CLR: Press to set or clear
the menu item displayed.
2.
w/x: Use the thumbwheel to
scroll through the items in
each menu.
3. MENU: Press to display the Trip/
Fuel menu and the Vehicle
Information menu. This button is
also used to return to or exit the
last screen displayed on
the DIC.
See Driver Information Center (DIC)
on page 5‑24.
Forward Collision Alert
(FCA) System
For vehicles with FCA, this system
is intended to help avoid or reduce
the harm caused by front-end
crashes. FCA provides a flashing
visual alert and beeps when
approaching a vehicle directly
ahead too quickly. FCA also
provides a visual alert if following
another vehicle much too closely.
The forward-looking FCA camera
sensor is on the windshield ahead
of the rearview mirror. FCA detects
vehicles within a distance of
approximately 60 m (197 ft) and
operates at speeds above 40 km/h
(25 mph).
See Forward Collision Alert (FCA)
System on page 9‑37 for more
information.
Page 26 of 436
Black plate (20,1)Chevrolet Malibu Owner Manual - 2013 - CRC - 6/6/12
1-20 In Brief
Lane Departure
Warning (LDW)
For vehicles with LDW, it is intended
to help avoid unintentional lane
departures. It may provide a
warning if the vehicle is crossing a
lane without using a turn signal.
LDW uses a camera sensor to
detect the lane markings. It only
operates at speeds of 56 km
(35 mph) or greater.
The LDW indicator,
@, appears
green if a lane marking is detected.
It changes to amber, flashes, and
sounds three beeps if the vehicle
crosses a detected lane marking
without using the turn signal.
To turn LDW on and off, press
@on
the center stack, forward of the shift
lever. The control indicator will light
when LDW is on.
See Lane Departure Warning (LDW)
on page 9‑43.
Rear Vision
Camera (RVC)
If available, the rear vision camera
displays a view of the area behind
the vehicle when the vehicle is
shifted into R (Reverse). The
display will appear on the radio
screen.
To clean the camera lens above the
license plate, rinse it with water and
wipe it with a soft cloth.
See Rear Vision Camera (RVC) on
page 9‑40.
Ultrasonic Parking Assist
If available, this system uses
sensors on the rear bumper to
assist with parking and avoiding
objects while in R (Reverse).
It operates at speeds less than
8 km/h (5 mph). URPA uses audible
beeps to provide distance and
system information. Keep the sensors on the vehicle's
rear bumper clean to ensure proper
operation.
See
Ultrasonic Parking Assist on
page 9‑39.
Power Outlets
The accessory power outlets can be
used to plug in electrical equipment,
such as a cell phone or MP3 player.
There are two accessory power
outlets: one on the center stack
below the climate control and one
under the armrest inside the center
console storage.
Open the protective cover to use the
accessory power outlet.
See Power Outlets on page 5‑5.
Page 28 of 436
Black plate (22,1)Chevrolet Malibu Owner Manual - 2013 - CRC - 6/6/12
1-22 In Brief
eAssist Features
eAssist®Overview
If the vehicle has eAssist, there are
several additional features that
contribute to increased efficiency.
Vehicles with eAssist have an
automatic engine start/stop feature.
This feature saves fuel by shutting
the engine off when the vehicle is
stopped. When the engine shuts off
automatically, all the accessories
will continue to operate normally. In
very hot or cold conditions, the
engine will only shut off
automatically part of the time. See
Starting the Engine on page 9‑18.
There are two air conditioning
settings available. The comfort
setting maximizes cabin comfort.
The eco setting maximizes
efficiency allowing more frequent,
and longer engine stops than the
comfort setting. SeeDual Automatic
Climate Control System on
page 8‑3. This vehicle has a Hill Start Assist
(HSA) feature, which may be useful
when the vehicle is stopped on a
grade. See
Hill Start Assist (HSA)
on page 9‑31.
Vehicles with eAssist have a slightly
different instrument cluster, which
includes an efficiency gauge, and
an AUTO STOP indicator on the
tachometer. See Instrument Cluster
on page 5‑8. There is also a Power
Flow display in the Driver
Information Center (DIC). See
Driver Information Center (DIC) on
page 5‑24.
The eAssist system uses a high
voltage battery, which is cooled with
air drawn from the vehicle interior.
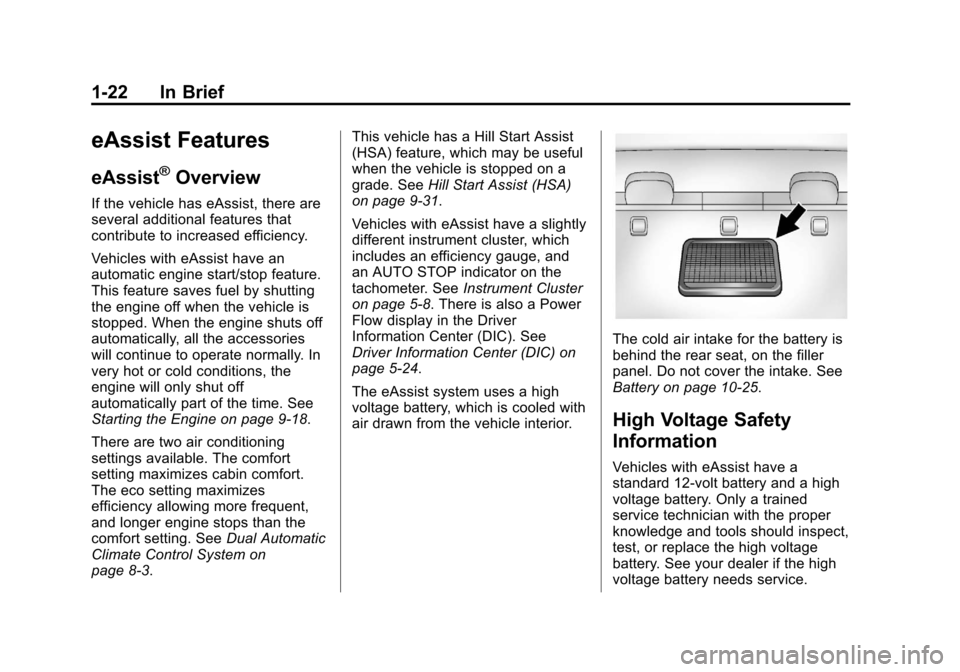
The cold air intake for the battery is
behind the rear seat, on the filler
panel. Do not cover the intake. See
Battery on page 10‑25.
High Voltage Safety
Information
Vehicles with eAssist have a
standard 12-volt battery and a high
voltage battery. Only a trained
service technician with the proper
knowledge and tools should inspect,
test, or replace the high voltage
battery. See your dealer if the high
voltage battery needs service.
Page 31 of 436
Black plate (25,1)Chevrolet Malibu Owner Manual - 2013 - CRC - 6/6/12
In Brief 1-25
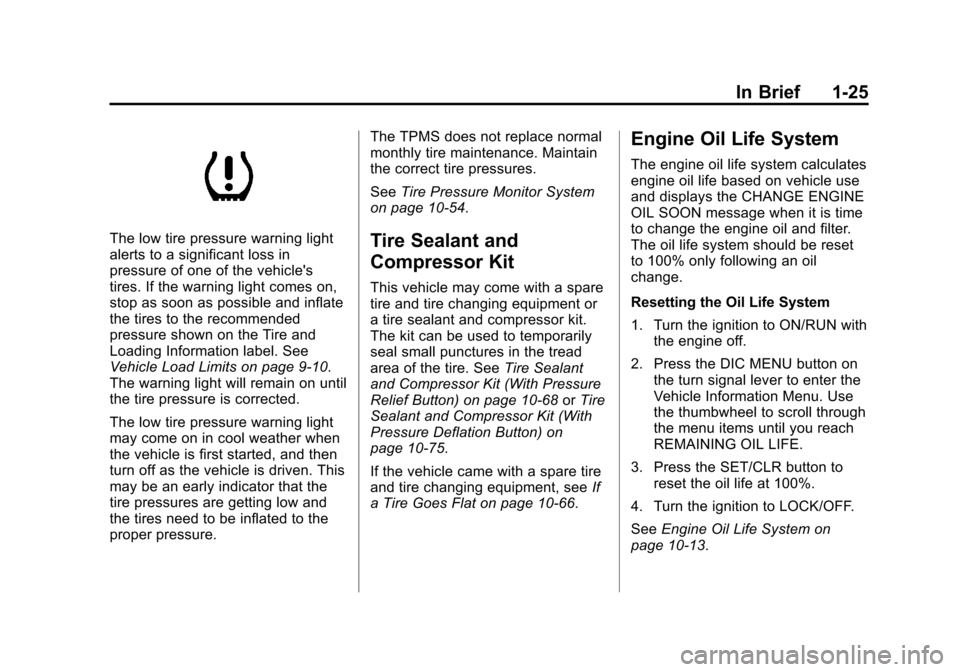
The low tire pressure warning light
alerts to a significant loss in
pressure of one of the vehicle's
tires. If the warning light comes on,
stop as soon as possible and inflate
the tires to the recommended
pressure shown on the Tire and
Loading Information label. See
Vehicle Load Limits on page 9‑10.
The warning light will remain on until
the tire pressure is corrected.
The low tire pressure warning light
may come on in cool weather when
the vehicle is first started, and then
turn off as the vehicle is driven. This
may be an early indicator that the
tire pressures are getting low and
the tires need to be inflated to the
proper pressure.The TPMS does not replace normal
monthly tire maintenance. Maintain
the correct tire pressures.
See
Tire Pressure Monitor System
on page 10‑54.Tire Sealant and
Compressor Kit
This vehicle may come with a spare
tire and tire changing equipment or
a tire sealant and compressor kit.
The kit can be used to temporarily
seal small punctures in the tread
area of the tire. See Tire Sealant
and Compressor Kit (With Pressure
Relief Button) on page 10‑68 orTire
Sealant and Compressor Kit (With
Pressure Deflation Button) on
page 10‑75.
If the vehicle came with a spare tire
and tire changing equipment, see If
a Tire Goes Flat on page 10‑66.
Engine Oil Life System
The engine oil life system calculates
engine oil life based on vehicle use
and displays the CHANGE ENGINE
OIL SOON message when it is time
to change the engine oil and filter.
The oil life system should be reset
to 100% only following an oil
change.
Resetting the Oil Life System
1. Turn the ignition to ON/RUN with the engine off.
2. Press the DIC MENU button on the turn signal lever to enter the
Vehicle Information Menu. Use
the thumbwheel to scroll through
the menu items until you reach
REMAINING OIL LIFE.
3. Press the SET/CLR button to reset the oil life at 100%.
4. Turn the ignition to LOCK/OFF.
See Engine Oil Life System on
page 10‑13.
Page 38 of 436
Black plate (6,1)Chevrolet Malibu Owner Manual - 2013 - CRC - 6/6/12
2-6 Keys, Doors, and Windows
Programming Transmitters to
the Vehicle
Only RKE transmitters programmed
to the vehicle will work. If a
transmitter is lost or stolen, a
replacement can be purchased and
programmed through your dealer.
The vehicle can be reprogrammed
so that lost or stolen transmitters no
longer work. Any remaining
transmitters will need to be
reprogrammed. Each vehicle can
have up to eight transmitters
matched to it.
Starting the Vehicle with a Low
Transmitter Battery
If the transmitter battery is weak, the
DIC may display NO REMOTE
DETECTED when you try to start
the vehicle. The REPLACE
BATTERY IN REMOTE KEY
message may also be displayed at
this time.To start the vehicle:
1. Open the center console and
place the transmitter in the
transmitter pocket with the
buttons facing the front of the
vehicle.
2. With the vehicle in P (Park) or N (Neutral), press the brake
pedal and press the START
button. See Starting the Engine
on page 9‑18.
Replace the transmitter battery
as soon as possible.
Battery Replacement
Replace the battery if the DIC
indicates that battery replacement is
necessary. See Key and Lock
Messages on page 5‑31.
The battery is not rechargeable. To
replace the battery:
1. Push the button on the transmitter to extend the key
blade.
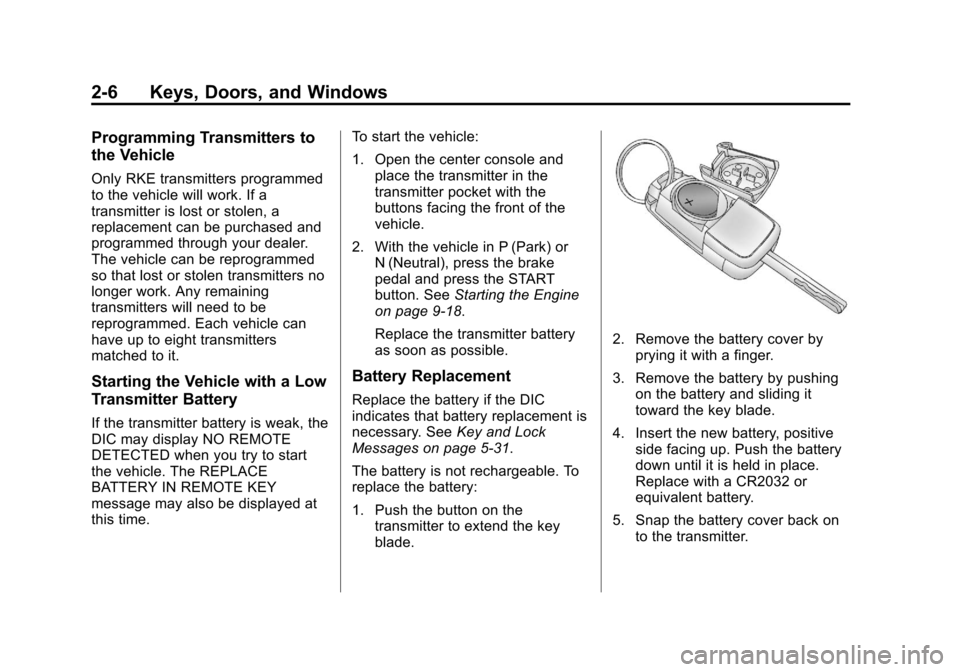
2. Remove the battery cover byprying it with a finger.
3. Remove the battery by pushing on the battery and sliding it
toward the key blade.
4. Insert the new battery, positive side facing up. Push the battery
down until it is held in place.
Replace with a CR2032 or
equivalent battery.
5. Snap the battery cover back on to the transmitter.
Page 41 of 436
Black plate (9,1)Chevrolet Malibu Owner Manual - 2013 - CRC - 6/6/12
Keys, Doors, and Windows 2-9
To lock or unlock the doors from the
outside:
.PressQorKon the Remote
Keyless Entry (RKE) transmitter.
See Remote Keyless Entry
(RKE) System Operation on
page 2‑3.
.Use the key in the driver door.
To lock or unlock the doors from the
inside:
.Push the door lock knob on the
top of the door to lock the
door only.
.Pull the door handle once to
unlock the door. Pulling the
handle again unlatches the door.
.PressQorKon the center
stack or the front door panels.
See Power Door Locks on
page 2‑9.
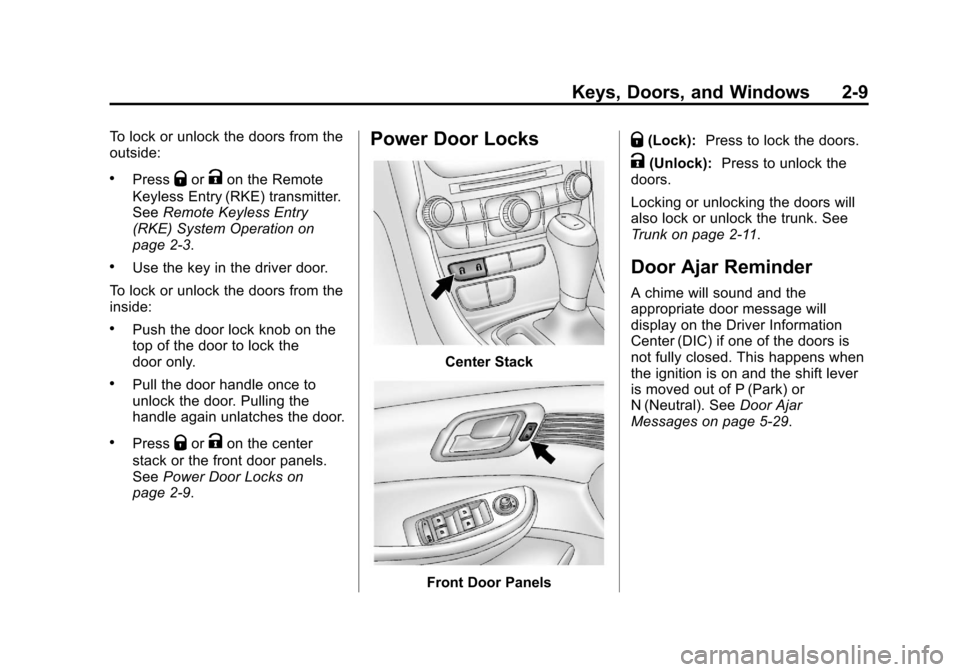
Power Door Locks
Center Stack
Front Door Panels
Q(Lock): Press to lock the doors.
K(Unlock): Press to unlock the
doors.
Locking or unlocking the doors will
also lock or unlock the trunk. See
Trunk on page 2‑11.
Door Ajar Reminder
A chime will sound and the
appropriate door message will
display on the Driver Information
Center (DIC) if one of the doors is
not fully closed. This happens when
the ignition is on and the shift lever
is moved out of P (Park) or
N (Neutral). See Door Ajar
Messages on page 5‑29.