2013 CHEVROLET MALIBU jump cable
[x] Cancel search: jump cablePage 141 of 436
Black plate (33,1)Chevrolet Malibu Owner Manual - 2013 - CRC - 6/6/12
Instruments and Controls 5-33
Starting the Vehicle
Messages
JUMP START ACTIVE WAIT TO
START
This message displays while
performing an on-board jump start
of the vehicle. See“Jump Starting
(On-board with eAssist Only).”
JUMP START COMPLETE
ATTEMPT START
This message displays while
performing an on-board jump start
of the vehicle. See “Jump Starting
(On-board with eAssist Only).”
JUMP START DISABLED SEE
OWNERS MANUAL
This message displays if there is a
problem with the on-board jump
start system, or the 12 volt battery is
too low to perform an on-board jump
start. Try using jumper cables and
performing a normal jump start. Take the vehicle to your dealer for
service to if this message continues
to be displayed.
Tire Messages
TIRE PRESSURE LOW ADD
AIR TO TIRE
On vehicles with the Tire Pressure
Monitor System (TPMS), this
message displays when the
pressure in one or more of the
vehicle's tires is low.
The low tire pressure warning light
will also come on. See
Tire
Pressure Light on page 5‑21.
If a tire pressure message appears
on the DIC, stop as soon as you
can. Inflate the tires by adding air
until the tire pressure is equal to the
values shown on the Tire and
Loading Information label. See Tires
on page 10‑44, Vehicle Load Limits
on page 9‑10, and Tire Pressure on
page 10‑52. You can receive more than one tire
pressure message at a time. To
read the other messages that may
have been sent at the same time,
press the SET/CLR button. The DIC
also shows the tire pressure values.
See
Driver Information Center (DIC)
on page 5‑24.SERVICE TIRE MONITOR
SYSTEM
This message displays if there is a
problem with the Tire Pressure
Monitor System (TPMS). See Tire
Pressure Monitor Operation on
page 10‑55.
TIRE LEARNING ACTIVE
This message displays when the
system is learning new tires. See
Tire Pressure Monitor Operation on
page 10‑55.
Page 291 of 436
Black plate (25,1)Chevrolet Malibu Owner Manual - 2013 - CRC - 6/6/12
Vehicle Care 10-25
.If brake fluid is spilled on the
vehicle's painted surfaces,
the paint finish can be
damaged. Be careful not to
spill brake fluid on the
vehicle. If you do, wash it off
immediately.
Battery
This vehicle has a standard 12-volt
battery. Refer to the replacement
number on the original battery label
when a new standard 12-volt battery
is needed.
eAssist vehicles also have a high
voltage battery. Only a trained
service technician with the proper
knowledge and tools should inspect,
test, or replace the high voltage
battery. See your dealer if the high
voltage battery needs service. The
dealer has information on how to
recycle the high voltage battery.
There is also information available
at http://www.recyclemybattery.com.
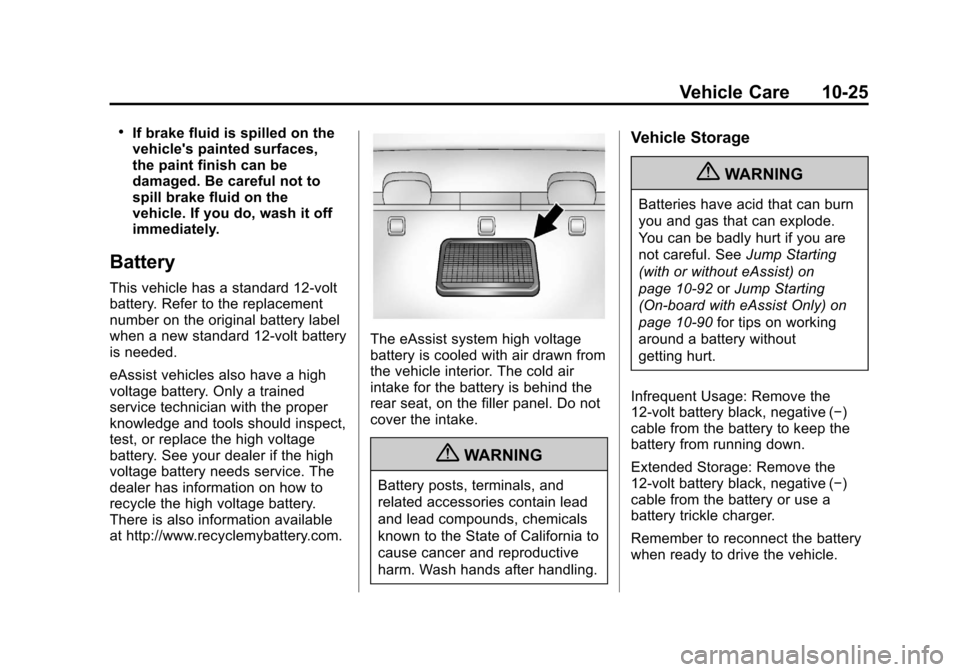
The eAssist system high voltage
battery is cooled with air drawn from
the vehicle interior. The cold air
intake for the battery is behind the
rear seat, on the filler panel. Do not
cover the intake.
{WARNING
Battery posts, terminals, and
related accessories contain lead
and lead compounds, chemicals
known to the State of California to
cause cancer and reproductive
harm. Wash hands after handling.
Vehicle Storage
{WARNING
Batteries have acid that can burn
you and gas that can explode.
You can be badly hurt if you are
not careful. SeeJump Starting
(with or without eAssist) on
page 10‑92 orJump Starting
(On-board with eAssist Only) on
page 10‑90 for tips on working
around a battery without
getting hurt.
Infrequent Usage: Remove the
12-volt battery black, negative (−)
cable from the battery to keep the
battery from running down.
Extended Storage: Remove the
12-volt battery black, negative (−)
cable from the battery or use a
battery trickle charger.
Remember to reconnect the battery
when ready to drive the vehicle.
Page 358 of 436
Black plate (92,1)Chevrolet Malibu Owner Manual - 2013 - CRC - 6/6/12
10-92 Vehicle Care
Jump Starting (with or
without eAssist)
For more information about the
vehicle battery, seeBattery on
page 10‑25.
If the battery has run down, you
may want to use another vehicle
and some jumper cables to start
your vehicle. Be sure to use the
following steps to do it safely.
{WARNING
Batteries can hurt you. They can
be dangerous because:
.They contain acid that can
burn you.
.They contain gas that can
explode or ignite.
.They contain enough
electricity to burn you.
If you do not follow these steps
exactly, some or all of these
things can hurt you. Notice:
Ignoring these steps
could result in costly damage to
the vehicle that would not be
covered by the warranty.
Trying to start the vehicle by
pushing or pulling it will not
work, and it could damage the
vehicle.
1. Check the other vehicle. It must
have a 12-volt battery with a
negative ground system.
Notice: Only use a vehicle that
has a 12-volt system with a
negative ground for jump
starting. If the other vehicle does
not have a 12-volt system with a
negative ground, both vehicles
can be damaged. 2. Get the vehicles close enough
so the jumper cables can reach,
but be sure the vehicles are not
touching each other. If they
are, it could cause a ground
connection you do not want.
You would not be able to start
your vehicle, and the bad
grounding could damage the
electrical systems.
To avoid the possibility of the
vehicles rolling, set the parking
brake firmly on both vehicles
involved in the jump start
procedure. Put an automatic
transmission in P (Park) or a
manual transmission in Neutral
before setting the parking brake.
Notice: If any accessories are left
on or plugged in during the jump
starting procedure, they could be
damaged. The repairs would not
be covered by the vehicle
warranty. Whenever possible,
turn off or unplug all accessories
on either vehicle when jump
starting the vehicle.
Page 360 of 436
Black plate (94,1)Chevrolet Malibu Owner Manual - 2013 - CRC - 6/6/12
10-94 Vehicle Care
5. Check that the jumper cables donot have loose or missing
insulation. If they do, you could
get a shock. The vehicles could
be damaged too.
Before you connect the cables,
here are some things you should
know. Positive (+) will go to
positive (+) or to a remote
positive (+) terminal if the
vehicle has one. Negative (−)
will go to a heavy, unpainted
metal engine part or to a remote
negative (−) terminal if the
vehicle has one.
Do not connect positive (+) to
negative (−) or you will get a
short that would damage the
battery and maybe other parts
too. And do not connect the
negative (−) cable to the
negative (−) terminal on the
dead battery because this can
cause sparks.
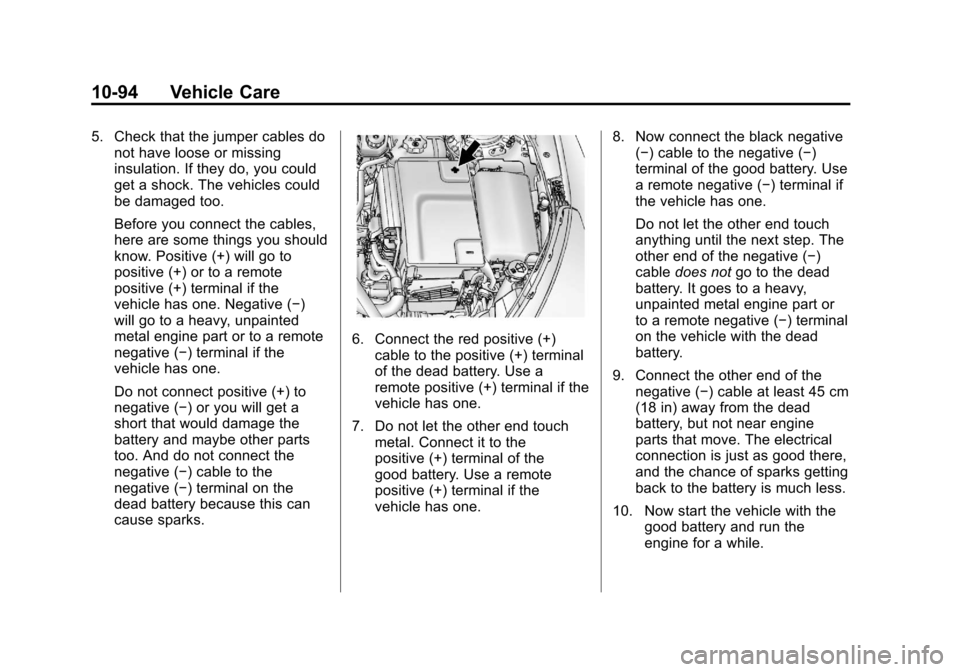
6. Connect the red positive (+)
cable to the positive (+) terminal
of the dead battery. Use a
remote positive (+) terminal if the
vehicle has one.
7. Do not let the other end touch metal. Connect it to the
positive (+) terminal of the
good battery. Use a remote
positive (+) terminal if the
vehicle has one. 8. Now connect the black negative
(−) cable to the negative (−)
terminal of the good battery. Use
a remote negative (−) terminal if
the vehicle has one.
Do not let the other end touch
anything until the next step. The
other end of the negative (−)
cable does not go to the dead
battery. It goes to a heavy,
unpainted metal engine part or
to a remote negative (−) terminal
on the vehicle with the dead
battery.
9. Connect the other end of the negative (−) cable at least 45 cm
(18 in) away from the dead
battery, but not near engine
parts that move. The electrical
connection is just as good there,
and the chance of sparks getting
back to the battery is much less.
10. Now start the vehicle with the good battery and run the
engine for a while.
Page 361 of 436
Black plate (95,1)Chevrolet Malibu Owner Manual - 2013 - CRC - 6/6/12
Vehicle Care 10-95
11. Try to start the vehicle that hadthe dead battery. If it will not
start after a few tries, it
probably needs service.
Notice: If the jumper cables are
connected or removed in the
wrong order, electrical shorting
may occur and damage the
vehicle. The repairs would not be
covered by the vehicle warranty.
Always connect and remove the
jumper cables in the correct
order, making sure that the
cables do not touch each other or
other metal.
Jumper Cable Removal
Reverse the sequence exactly when
removing the jumper cables.Towing
Towing the Vehicle
Notice: Incorrectly towing a
disabled vehicle may cause
damage. The damage would not
be covered by the vehicle
warranty.
Have the vehicle towed on a wheel
lift tow truck. A flatbed car carrier
could damage the vehicle. The
wheel lift tow truck must raise the
rear of the vehicle and wheel dollies
must be used to lift the front wheels
off the ground.
Consult your dealer or a
professional towing service if the
disabled vehicle must be towed.
To tow the vehicle behind another
vehicle for recreational purposes,
such as behind a motor home, see
“Recreational Vehicle Towing” in this
section.
Recreational Vehicle
Towing
Recreational vehicle towing means
towing the vehicle behind another
vehicle –such as behind a motor
home. The two most common types
of recreational vehicle towing are
known as dinghy towing and dolly
towing. Dinghy towing is towing the
vehicle with all four wheels on the
ground. Dolly towing is towing the
vehicle with two wheels on the
ground and two wheels up on a
device known as a dolly.
Here are some important things to
consider before recreational vehicle
towing:
.What is the towing capacity
of the towing vehicle?
Be sure to read the tow
vehicle manufacturer's
recommendations.