2013 CHEVROLET MALIBU buttons
[x] Cancel search: buttonsPage 151 of 436
Black plate (43,1)Chevrolet Malibu Owner Manual - 2013 - CRC - 6/6/12
Instruments and Controls 5-43
If you live in Canada, or you are
having difficulty programming a gate
operator or garage door opener by
using the“Programming the
Universal Remote System”
procedures, regardless of where
you live, replace Step 2 under
“Programming the Universal Remote
System” with the following:
Continue to press and hold the
Universal Remote system button
while you press and release every
two seconds (cycle) the hand-held
transmitter button until the
frequency signal has been
successfully accepted by the
Universal Remote system. The
Universal Remote system indicator
light will flash slowly at first and then
rapidly. Proceed with Step 3 under
“Programming the Universal Remote
System” to complete.Universal Remote System
Operation
Using the Universal Remote
System
Press and hold the appropriate
Universal Remote system button for
at least half of a second. The
indicator light will come on while the
signal is being transmitted.
Erasing Universal Remote
System Buttons
All programmed buttons should be
erased when the vehicle is sold or
the lease ends.
To erase all programmed buttons on
the Universal Remote system
device:
1. Press and hold down the two
outside buttons until the
indicator light begins to flash.
This should take about
10 seconds.
2. Release both buttons.
Reprogramming a Single
Universal Remote System
Button
To reprogram any of the three
Universal Remote system buttons:
1. Press and hold the desired Universal Remote system
button. Do not release the
button.
2. The indicator light will begin to flash after 20 seconds. Without
releasing the button, proceed
with Step 1 under “Programming
the Universal Remote System.”
If you have questions or need help
programming the Universal Remote
system, call 1-800-355-3515 or go
to www.homelink.com. You may
also call the customer assistance
phone number under Customer
Assistance Offices (U.S. and
Canada) on page 13‑5 orCustomer
Assistance Offices (Mexico) on
page 13‑5.
Page 158 of 436
Black plate (6,1)Chevrolet Malibu Owner Manual - 2013 - CRC - 6/6/12
6-6 Lighting
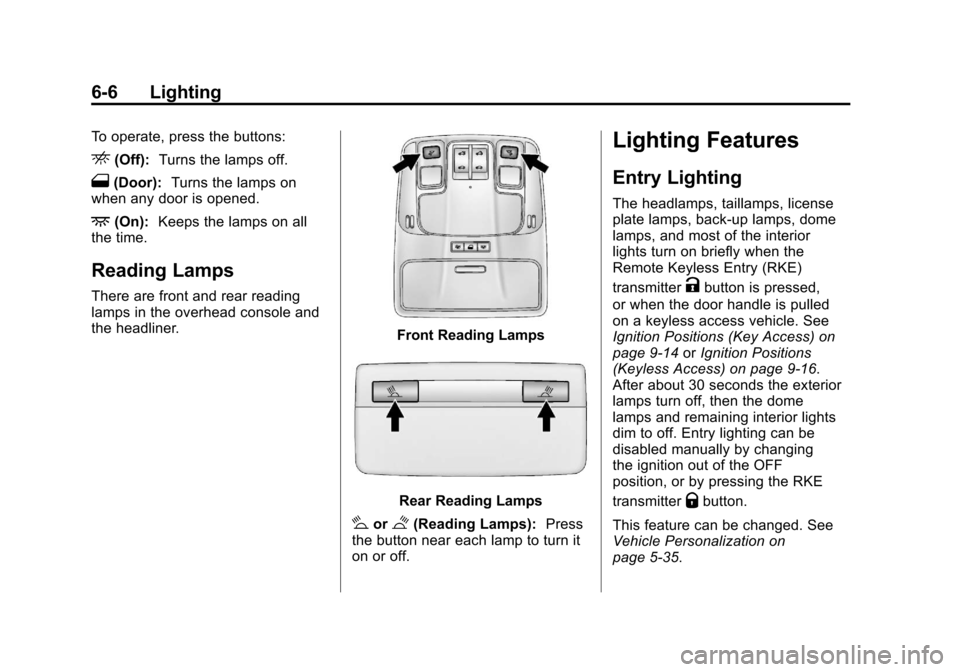
To operate, press the buttons:
E(Off):Turns the lamps off.
1(Door): Turns the lamps on
when any door is opened.
+(On): Keeps the lamps on all
the time.
Reading Lamps
There are front and rear reading
lamps in the overhead console and
the headliner.
Front Reading Lamps
Rear Reading Lamps
#or$(Reading Lamps): Press
the button near each lamp to turn it
on or off.
Lighting Features
Entry Lighting
The headlamps, taillamps, license
plate lamps, back-up lamps, dome
lamps, and most of the interior
lights turn on briefly when the
Remote Keyless Entry (RKE)
transmitter
Kbutton is pressed,
or when the door handle is pulled
on a keyless access vehicle. See
Ignition Positions (Key Access) on
page 9‑14 orIgnition Positions
(Keyless Access) on page 9‑16.
After about 30 seconds the exterior
lamps turn off, then the dome
lamps and remaining interior lights
dim to off. Entry lighting can be
disabled manually by changing
the ignition out of the OFF
position, or by pressing the RKE
transmitter
Qbutton.
This feature can be changed. See
Vehicle Personalization on
page 5‑35.
Page 162 of 436
Black plate (2,1)Chevrolet Malibu Owner Manual - 2013 - CRC - 6/6/12
7-2 Infotainment System
To minimize taking your eyes off the
road while driving, do the following
while the vehicle is parked:
.Become familiar with the
operation and controls of the
audio system.
.Set up the tone, speaker
adjustments, and preset radio
stations.
See Defensive Driving on page 9‑2.
Notice: Contact your dealer
before adding any equipment.
Adding audio or communication
equipment could interfere with
the operation of the engine, radio,
or other systems, and could
damage them. Follow federal
rules covering mobile radio and
telephone equipment. Notice:
The chime signals related
to safety belts, parking brake, and
other functions of your vehicle
operate through the radio/
entertainment system. If that
equipment is replaced or
additional equipment is added
to your vehicle, the chimes
may not work. Make sure that
replacement or additional
equipment is compatible with
your vehicle before installing it.
See Accessories and
Modifications on page 10‑3.
The vehicle has Retained
Accessory Power (RAP). With RAP,
the audio system can be played
even after the ignition is turned off.
See Retained Accessory Power
(RAP) on page 9‑22.
Theft-Deterrent Feature
The theft-deterrent feature works by
learning a portion of the Vehicle
Identification Number (VIN) to
the infotainment system. The
infotainment system does not
operate if it is stolen or moved to a
different vehicle.
Overview (Radio with CD)
Infotainment System Overview
Radio faceplate examples are
provided to help identify buttons and
to help understand the functions of
the radio. Find the faceplate that
best matches the vehicle for a
description.
Page 163 of 436
Black plate (3,1)Chevrolet Malibu Owner Manual - 2013 - CRC - 6/6/12
Infotainment System 7-3
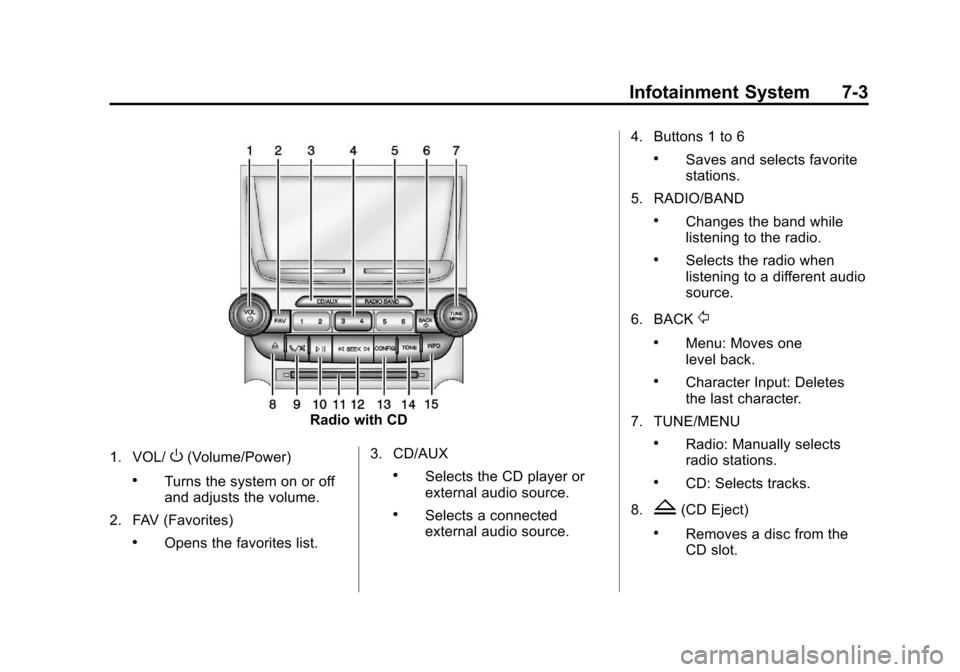
Radio with CD
1. VOL/
O(Volume/Power)
.Turns the system on or off
and adjusts the volume.
2. FAV (Favorites)
.Opens the favorites list. 3. CD/AUX
.Selects the CD player or
external audio source.
.Selects a connected
external audio source.4. Buttons 1 to 6
.Saves and selects favorite
stations.
5. RADIO/BAND
.Changes the band while
listening to the radio.
.Selects the radio when
listening to a different audio
source.
6. BACK
/
.Menu: Moves one
level back.
.Character Input: Deletes
the last character.
7. TUNE/MENU
.Radio: Manually selects
radio stations.
.CD: Selects tracks.
8.
Z(CD Eject)
.Removes a disc from the
CD slot.
Page 165 of 436
Black plate (5,1)Chevrolet Malibu Owner Manual - 2013 - CRC - 6/6/12
Infotainment System 7-5
press the desired feature on the
screen, to display more options
within that feature.
Languages
To change the display language,
seeVehicle Personalization on
page 5‑35.
The vehicle supports English,
French, and Spanish. The default
language is English.
Overview (Radio with CD
and Touchscreen)
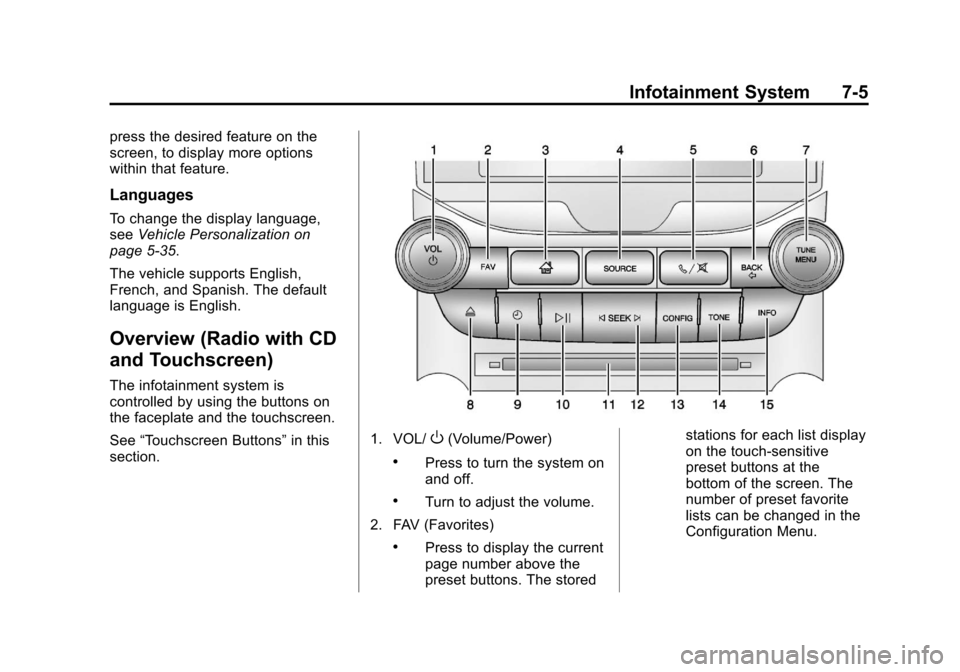
The infotainment system is
controlled by using the buttons on
the faceplate and the touchscreen.
See “Touchscreen Buttons” in this
section.
1. VOL/O(Volume/Power)
.Press to turn the system on
and off.
.Turn to adjust the volume.
2. FAV (Favorites)
.Press to display the current
page number above the
preset buttons. The stored stations for each list display
on the touch-sensitive
preset buttons at the
bottom of the screen. The
number of preset favorite
lists can be changed in the
Configuration Menu.
Page 167 of 436
Black plate (7,1)Chevrolet Malibu Owner Manual - 2013 - CRC - 6/6/12
Infotainment System 7-7
.Release¨to return to
playing speed. See CD
Player on page 7‑22 and
MP3 on page 7‑24.
.For AM or FM, press¨to
seek to the next strong
station.
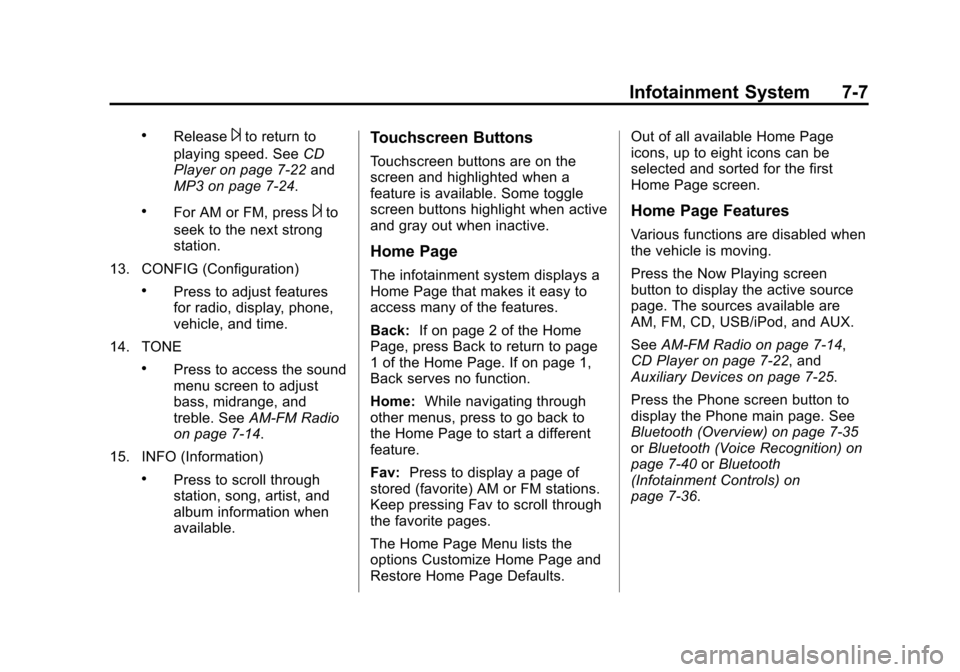
13. CONFIG (Configuration)
.Press to adjust features
for radio, display, phone,
vehicle, and time.
14. TONE
.Press to access the sound
menu screen to adjust
bass, midrange, and
treble. See AM-FM Radio
on page 7‑14.
15. INFO (Information)
.Press to scroll through
station, song, artist, and
album information when
available.
Touchscreen Buttons
Touchscreen buttons are on the
screen and highlighted when a
feature is available. Some toggle
screen buttons highlight when active
and gray out when inactive.
Home Page
The infotainment system displays a
Home Page that makes it easy to
access many of the features.
Back: If on page 2 of the Home
Page, press Back to return to page
1 of the Home Page. If on page 1,
Back serves no function.
Home: While navigating through
other menus, press to go back to
the Home Page to start a different
feature.
Fav: Press to display a page of
stored (favorite) AM or FM stations.
Keep pressing Fav to scroll through
the favorite pages.
The Home Page Menu lists the
options Customize Home Page and
Restore Home Page Defaults. Out of all available Home Page
icons, up to eight icons can be
selected and sorted for the first
Home Page screen.
Home Page Features
Various functions are disabled when
the vehicle is moving.
Press the Now Playing screen
button to display the active source
page. The sources available are
AM, FM, CD, USB/iPod, and AUX.
See
AM-FM Radio on page 7‑14,
CD Player on page 7‑22, and
Auxiliary Devices on page 7‑25.
Press the Phone screen button to
display the Phone main page. See
Bluetooth (Overview) on page 7‑35
or Bluetooth (Voice Recognition) on
page 7‑40 orBluetooth
(Infotainment Controls) on
page 7‑36.
Page 168 of 436
Black plate (8,1)Chevrolet Malibu Owner Manual - 2013 - CRC - 6/6/12
7-8 Infotainment System
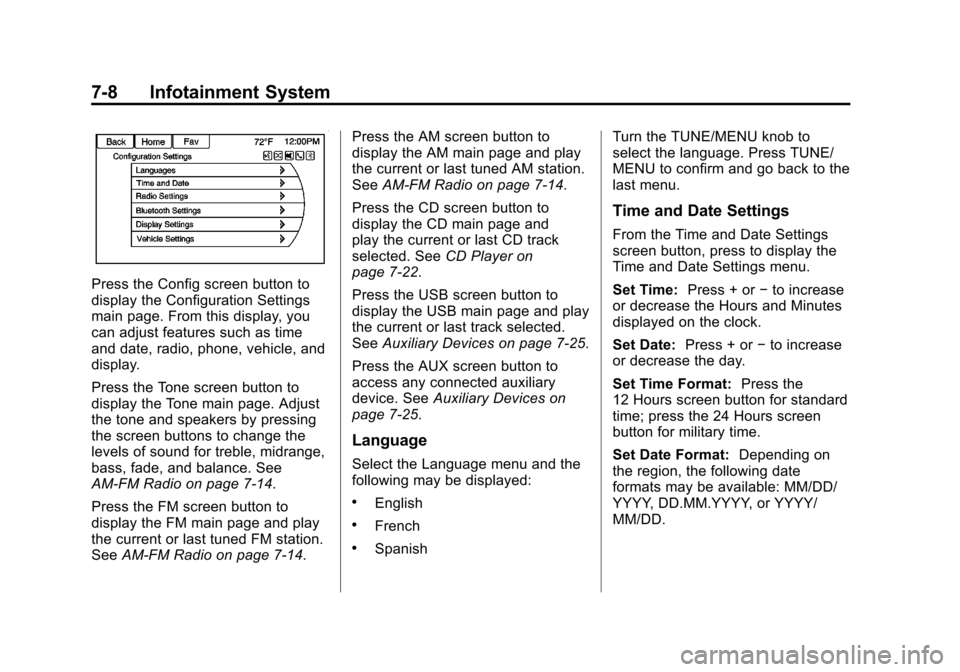
Press the Config screen button to
display the Configuration Settings
main page. From this display, you
can adjust features such as time
and date, radio, phone, vehicle, and
display.
Press the Tone screen button to
display the Tone main page. Adjust
the tone and speakers by pressing
the screen buttons to change the
levels of sound for treble, midrange,
bass, fade, and balance. See
AM-FM Radio on page 7‑14.
Press the FM screen button to
display the FM main page and play
the current or last tuned FM station.
SeeAM-FM Radio on page 7‑14. Press the AM screen button to
display the AM main page and play
the current or last tuned AM station.
See
AM-FM Radio on page 7‑14.
Press the CD screen button to
display the CD main page and
play the current or last CD track
selected. See CD Player on
page 7‑22.
Press the USB screen button to
display the USB main page and play
the current or last track selected.
See Auxiliary Devices on page 7‑25.
Press the AUX screen button to
access any connected auxiliary
device. See Auxiliary Devices on
page 7‑25.
Language
Select the Language menu and the
following may be displayed:
.English
.French
.Spanish Turn the TUNE/MENU knob to
select the language. Press TUNE/
MENU to confirm and go back to the
last menu.
Time and Date Settings
From the Time and Date Settings
screen button, press to display the
Time and Date Settings menu.
Set Time:
Press + or−to increase
or decrease the Hours and Minutes
displayed on the clock.
Set Date: Press + or−to increase
or decrease the day.
Set Time Format: Press the
12 Hours screen button for standard
time; press the 24 Hours screen
button for military time.
Set Date Format: Depending on
the region, the following date
formats may be available: MM/DD/
YYYY, DD.MM.YYYY, or YYYY/
MM/DD.
Page 169 of 436
Black plate (9,1)Chevrolet Malibu Owner Manual - 2013 - CRC - 6/6/12
Infotainment System 7-9
Radio Settings
Press the Config button on the
Home Page or the CONFIG button
on the faceplate to enter the menu
options. Turn the TUNE/MENU knob
or press the scroll bar to scroll
through the available options. Press
the TUNE/MENU knob or press
Radio Settings to display the radio
settings menu. Press this feature to
make changes for radio information
displayed, preset pages, and Auto
Volume Control.
The Radio Settings are:
Speed Dependent Volume:Select
OFF, Low, Medium, or High
sensitivity to automatically adjust
the volume to minimize the effects
of unwanted background noise that
can result from changing road
surfaces, driving speeds, or open
windows. This feature works best at
lower volume settings where
background noise is typically louder
than the sound system volume. Startup Volume:
Press to set the
maximum volume level for startup
that will be used even if a higher
volume had been set when the radio
was turned off.
Radio Favorites: Press to select
the number of favorite pages to be
used in the system.
Phone Settings
See Bluetooth (Overview) on
page 7‑35 orBluetooth (Voice
Recognition) on page 7‑40 or
Bluetooth (Infotainment Controls) on
page 7‑36 in the“Phone” section.
Vehicle Settings
SeeVehicle Personalization on
page 5‑35.
Display Settings
Press the Config button on the
Home Page or the CONFIG button
on the faceplate, then select Display
Settings from the list. The following options may display:
Dimming Mode:
Press to change
the screen background. The
Automatic setting adjusts the screen
background automatically
depending on the exterior lighting
conditions.
To change the overall brightness
setting for the display, use the
vehicle interior lighting instrument
panel illumination control.
Operation
Controls (Radio with CD)
The infotainment system is operated
by using the pushbuttons,
multifunction knobs, menus shown
on the display, and steering wheel
controls, if equipped.
Turning the System On or Off
VOL/O(Volume/Power): Press to
turn the system on and off.