2013 CHEVROLET MALIBU light
[x] Cancel search: lightPage 281 of 436
Black plate (15,1)Chevrolet Malibu Owner Manual - 2013 - CRC - 6/6/12
Vehicle Care 10-15
Engine Air Cleaner/Filter
The engine air cleaner/filter is in the
engine compartment on the
passenger side of the vehicle. See
Engine Compartment Overview on
page 10‑6for more information on
location.
When to Inspect the Engine Air
Cleaner/Filter
Inspect the air cleaner/filter at the
scheduled maintenance intervals
and replace it at the first oil change
after each 80 000 km (50,000 mi)
interval. See Maintenance Schedule
on page 11‑2. If you are driving in
dusty/dirty conditions, inspect the
filter at each engine oil change.
How to Inspect the Engine Air
Cleaner/Filter
To inspect the air cleaner/filter,
remove the filter from the vehicle
and lightly shake the filter to release
loose dust and dirt. If the filter
remains covered with dirt, a new
filter is required. To inspect or replace the engine air
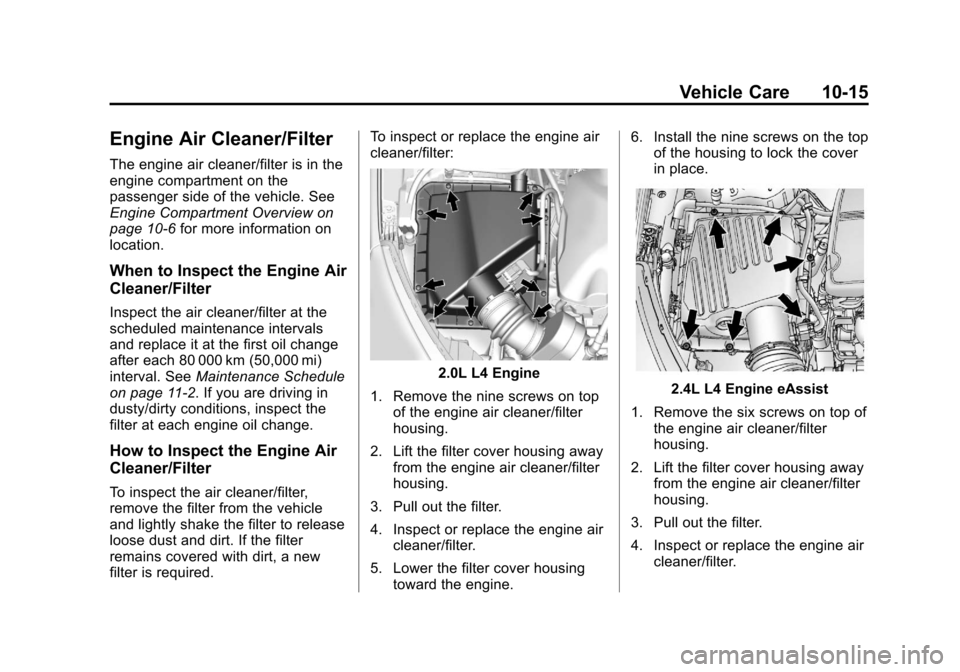
cleaner/filter:
2.0L L4 Engine
1. Remove the nine screws on top of the engine air cleaner/filter
housing.
2. Lift the filter cover housing away from the engine air cleaner/filter
housing.
3. Pull out the filter.
4. Inspect or replace the engine air cleaner/filter.
5. Lower the filter cover housing toward the engine. 6. Install the nine screws on the top
of the housing to lock the cover
in place.2.4L L4 Engine eAssist
1. Remove the six screws on top of the engine air cleaner/filter
housing.
2. Lift the filter cover housing away from the engine air cleaner/filter
housing.
3. Pull out the filter.
4. Inspect or replace the engine air cleaner/filter.
Page 286 of 436
Black plate (20,1)Chevrolet Malibu Owner Manual - 2013 - CRC - 6/6/12
10-20 Vehicle Care
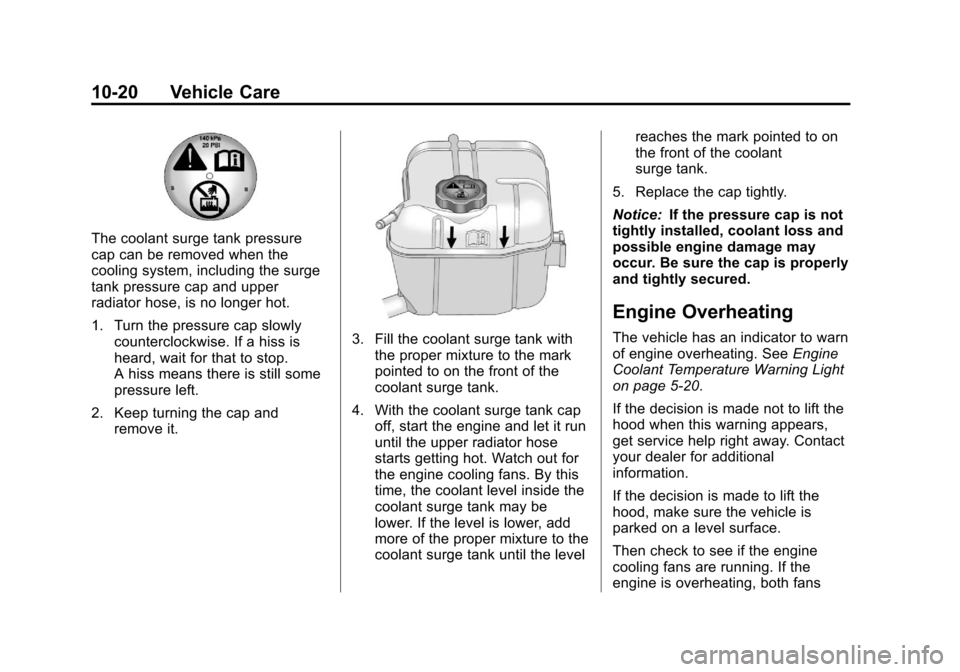
The coolant surge tank pressure
cap can be removed when the
cooling system, including the surge
tank pressure cap and upper
radiator hose, is no longer hot.
1. Turn the pressure cap slowlycounterclockwise. If a hiss is
heard, wait for that to stop.
A hiss means there is still some
pressure left.
2. Keep turning the cap and remove it.
3. Fill the coolant surge tank withthe proper mixture to the mark
pointed to on the front of the
coolant surge tank.
4. With the coolant surge tank cap off, start the engine and let it run
until the upper radiator hose
starts getting hot. Watch out for
the engine cooling fans. By this
time, the coolant level inside the
coolant surge tank may be
lower. If the level is lower, add
more of the proper mixture to the
coolant surge tank until the level reaches the mark pointed to on
the front of the coolant
surge tank.
5. Replace the cap tightly.
Notice: If the pressure cap is not
tightly installed, coolant loss and
possible engine damage may
occur. Be sure the cap is properly
and tightly secured.
Engine Overheating
The vehicle has an indicator to warn
of engine overheating. See Engine
Coolant Temperature Warning Light
on page 5‑20.
If the decision is made not to lift the
hood when this warning appears,
get service help right away. Contact
your dealer for additional
information.
If the decision is made to lift the
hood, make sure the vehicle is
parked on a level surface.
Then check to see if the engine
cooling fans are running. If the
engine is overheating, both fans
Page 289 of 436
Black plate (23,1)Chevrolet Malibu Owner Manual - 2013 - CRC - 6/6/12
Vehicle Care 10-23
{WARNING
The brake wear warning sound
means that soon the brakes will
not work well. That could lead to
a crash. When the brake wear
warning sound is heard, have the
vehicle serviced.
Notice: Continuing to drive with
worn-out brake pads could result
in costly brake repair.
Some driving conditions or climates
can cause a brake squeal when the
brakes are first applied or lightly
applied. This does not mean
something is wrong with the brakes.
Properly torqued wheel nuts are
necessary to help prevent brake
pulsation. When tires are rotated,
inspect brake pads for wear and
evenly tighten wheel nuts in the
proper sequence to torque
specifications in Capacities and
Specifications on page 12‑2. Brake linings should always be
replaced as complete axle sets.Brake Pedal Travel
See your dealer if the brake pedal
does not return to normal height,
or if there is a rapid increase in
pedal travel. This could be a sign
that brake service might be
required.
Brake Adjustment
Every time the brakes are applied,
with or without the vehicle moving,
the brakes adjust for wear.
Replacing Brake System Parts
The braking system on a vehicle is
complex. Its many parts have to be
of top quality and work well together
if the vehicle is to have really good
braking. The vehicle was designed
and tested with top-quality brake
parts. When parts of the braking
system are replaced, be sure to get
new, approved replacement parts.
If this is not done, the brakes might
not work properly. For example,
installing disc brake pads that are
wrong for the vehicle, can change
the balance between the front and
rear brakes
—for the worse. The
braking performance expected can
change in many other ways if the
wrong replacement brake parts are
installed.
Brake Fluid
The brake master cylinder reservoir
is filled with DOT 3 brake fluid as
indicated on the reservoir cap. See
Engine Compartment Overview on
page 10‑6 for the location of the
reservoir.
Page 290 of 436
Black plate (24,1)Chevrolet Malibu Owner Manual - 2013 - CRC - 6/6/12
10-24 Vehicle Care
There are only two reasons why the
brake fluid level in the reservoir
might go down:
.The brake fluid level goes down
because of normal brake lining
wear. When new linings are
installed, the fluid level goes
back up.
.A fluid leak in the brake
hydraulic system can also cause
a low fluid level. Have the brake
hydraulic system fixed, since a
leak means that sooner or later
the brakes will not work well.
Do not top off the brake fluid.
Adding fluid does not correct a leak.
If fluid is added when the linings are
worn, there will be too much fluid
when new brake linings are
installed. Add or remove brake fluid,
as necessary, only when work is
done on the brake hydraulic system.
{WARNING
If too much brake fluid is added, it
can spill on the engine and burn,
if the engine is hot enough. You
or others could be burned, and
the vehicle could be damaged.
Add brake fluid only when work is
done on the brake hydraulic
system.
When the brake fluid falls to a low
level, the brake warning light comes
on. See Brake System Warning
Light on page 5‑17.
What to Add
Use only new DOT 3 brake fluid
from a sealed container. See
Recommended Fluids and
Lubricants on page 11‑12.
Always clean the brake fluid
reservoir cap and the area around
the cap before removing it. This
helps keep dirt from entering the
reservoir.
{WARNING
With the wrong kind of fluid in the
brake hydraulic system, the
brakes might not work well. This
could cause a crash. Always use
the proper brake fluid.
Notice
.Using the wrong fluid can
badly damage brake
hydraulic system parts. For
example, just a few drops of
mineral-based oil, such as
engine oil, in the brake
hydraulic system can
damage brake hydraulic
system parts so badly that
they will have to be replaced.
Do not let someone put in
the wrong kind of fluid.
Page 295 of 436
Black plate (29,1)Chevrolet Malibu Owner Manual - 2013 - CRC - 6/6/12
Vehicle Care 10-29
High Intensity Discharge
(HID) Lighting
{WARNING
The low beam high intensity
discharge lighting system
operates at a very high voltage.
If you try to service any of the
system components, you could be
seriously injured. Have your
dealer or a qualified technician
service them.
The vehicle may have HID
headlamps. After an HID headlamp
bulb has been replaced, you may
notice that the beam is a slightly
different shade than it was originally.
This is normal.
LED Lighting
This vehicle has several LED lamps.
For replacement of any LED lighting
assembly, contact your dealer.
Headlamps, Front Turn
Signal, Sidemarker, and
Parking Lamps
Base Headlamp Assembly
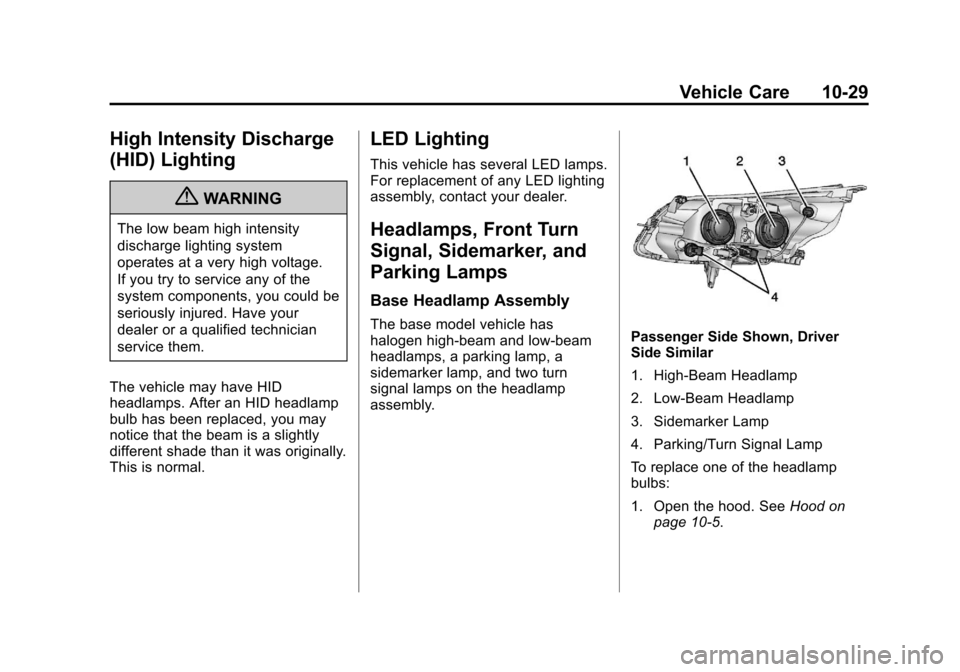
The base model vehicle has
halogen high-beam and low-beam
headlamps, a parking lamp, a
sidemarker lamp, and two turn
signal lamps on the headlamp
assembly.Passenger Side Shown, Driver
Side Similar
1. High-Beam Headlamp
2. Low-Beam Headlamp
3. Sidemarker Lamp
4. Parking/Turn Signal Lamp
To replace one of the headlamp
bulbs:
1. Open the hood. See Hood on
page 10‑5.
Page 297 of 436
Black plate (31,1)Chevrolet Malibu Owner Manual - 2013 - CRC - 6/6/12
Vehicle Care 10-31
5. Disengage the spring clip (2)from the bulb by pressing down
on the end and then swing
upward.
6. Remove the bulb from the lamp assembly.
7. Install a new bulb in the lamp assembly.
8. Install the spring clip (2).
9. Connect the electrical connector (1).
10. Replace the cap from the back of the headlamp assembly by
turning it clockwise.
11. For the driver side, reinstall the windshield washer bottle filler
neck by firmly pushing it
straight into the bottle. Ensure
that the filler neck clip engages
into the underhood electrical
center retainer. Low-Beam Headlamp
1. For the driver side bulb, remove
the windshield washer bottle
filler neck by firmly pulling it
straight up and out of the bottle.
2. Remove the cap from the back of the headlamp assembly by
turning it counterclockwise.
3. Disconnect the electrical connector.
4. Remove the bulb from the lamp assembly by turning
counterclockwise.
5. Install a new bulb in the lamp assembly.
6. Connect the electrical connector.
7. Replace the cap from the back of the headlamp assembly by
turning it clockwise. 8. For the driver side, reinstall the
windshield washer bottle filler
neck by firmly pushing it straight
into the bottle. Ensure that the
filler neck clip engages into the
underhood electrical center
retainer.
HID Headlamp Assembly
The HID assembly has a high
intensity discharge (HID) high/low
beam, a DRL/parking lamp,
sidemarker lamp, and a turn signal
lamp on the headlamp assembly.
For replacement of the headlamp on
an HID assembly, contact your
dealer. See High Intensity
Discharge (HID) Lighting on
page 10‑29.
Page 308 of 436
Black plate (42,1)Chevrolet Malibu Owner Manual - 2013 - CRC - 6/6/12
10-42 Vehicle Care
Instrument Panel Fuse
Block
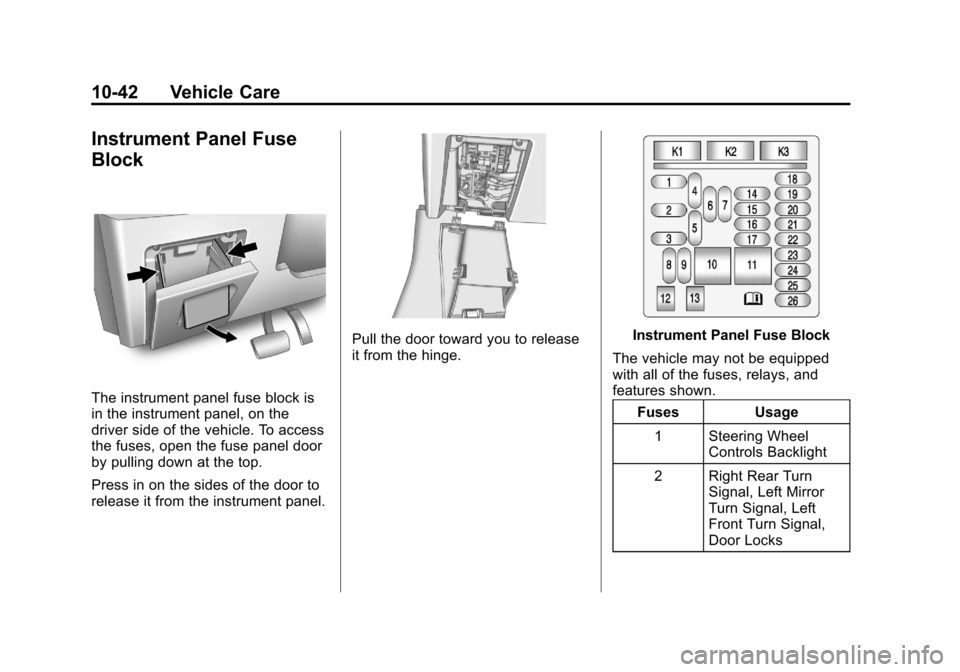
The instrument panel fuse block is
in the instrument panel, on the
driver side of the vehicle. To access
the fuses, open the fuse panel door
by pulling down at the top.
Press in on the sides of the door to
release it from the instrument panel.
Pull the door toward you to release
it from the hinge.Instrument Panel Fuse Block
The vehicle may not be equipped
with all of the fuses, relays, and
features shown. Fuses Usage
1 Steering Wheel Controls Backlight
2 Right Rear Turn Signal, Left Mirror
Turn Signal, Left
Front Turn Signal,
Door Locks
Page 309 of 436
Black plate (43,1)Chevrolet Malibu Owner Manual - 2013 - CRC - 6/6/12
Vehicle Care 10-43
FusesUsage
3 Left Stoplamp, Left DRL Lamp,
Headlamp Control,
Right Taillamp, Right
Park/Sidemarker
Lamps, Right Mirror
Turn, Right Front
Turn Signals
4 Radio
5 OnStar
6 Front Accessory Power Outlet
7 Console Bin Power Outlet Fuses
Usage
8 License Plate Lamp, Center
High-Mounted
Stoplamp, Rear Fog
Lamps, Right Front
Park/Sidemarker
Lamps, LED
Indicator Dim,
Washer Pump, Right
Stoplamp, Trunk
Release
9 Left Low-Beam Headlamp, DRL
10 Body Control Module 8 (J-Case
Fuse), Power Locks
11 Front Heater Ventilation Air
Conditioning/Blower
(J-Case Fuse)
12 Passenger Seat (Circuit Breaker)
13 Driver Seat (Circuit Breaker) Fuses
Usage
14 Diagnostic Link Connector
15 Airbag, SDM
16 Trunk Release
17 Heater Ventilation Air Conditioning
Controller
18 Audio Main
19 Displays
20 Passenger Occupant Sense
21 Instrument Cluster
22 Ignition Switch
23 Right Low-Beam Headlamp, DRL
24 Ambient Light, Switch Backlighting
(LED), Trunk Lamp,
Shift Lock, Key
Capture