2013 CHEVROLET MALIBU engine
[x] Cancel search: enginePage 304 of 436
Black plate (38,1)Chevrolet Malibu Owner Manual - 2013 - CRC - 6/6/12
10-38 Vehicle Care
Fuses
The wiring circuits in the vehicle are
protected from short circuits by
fuses. This greatly reduces the
chance of damage caused by
electrical problems.
To check a fuse, look at the
silver-colored band inside the fuse.
If the band is broken or melted,
replace the fuse. Be sure to replace
a bad fuse with a new one of the
identical size and rating.Fuses of the same amperage can
be temporarily borrowed from
another fuse location, if a fuse goes
out. Replace the fuse as soon as
possible.
To identify and check fuses, circuit
breakers, and relays, see
Engine
Compartment Fuse Block on
page 10‑38 andInstrument Panel
Fuse Block on page 10‑42.
Engine Compartment
Fuse Block
The engine compartment fuse block
is on the driver side of the engine
compartment, near the battery.
Notice: Spilling liquid on any
electrical component on the
vehicle may damage it. Always
keep the covers on any electrical
component.
Page 306 of 436
Black plate (40,1)Chevrolet Malibu Owner Manual - 2013 - CRC - 6/6/12
10-40 Vehicle Care
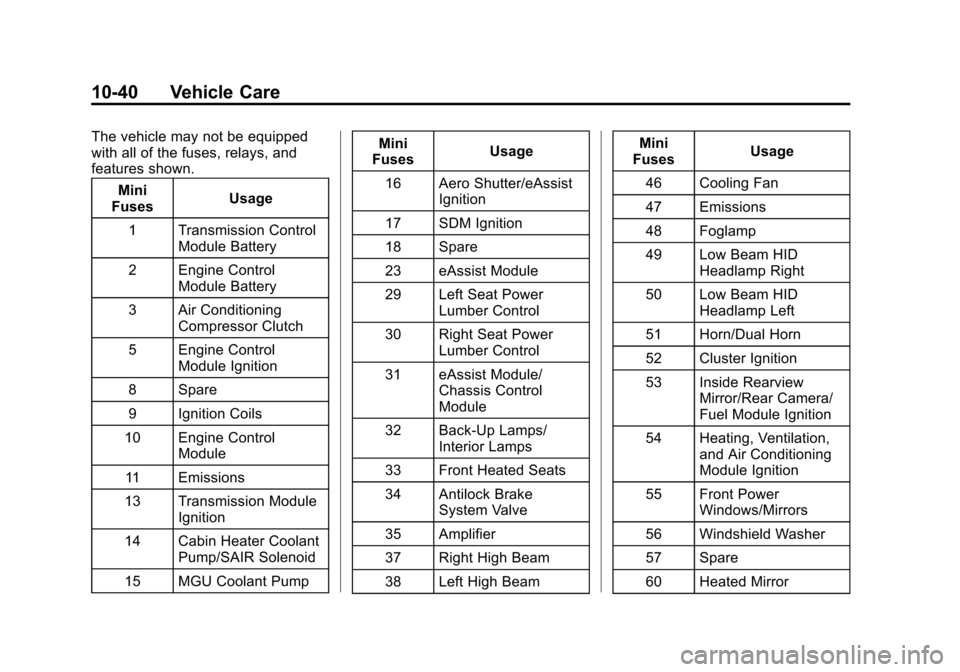
The vehicle may not be equipped
with all of the fuses, relays, and
features shown.Mini
Fuses Usage
1 Transmission Control Module Battery
2 Engine Control Module Battery
3 Air Conditioning Compressor Clutch
5 Engine Control Module Ignition
8 Spare
9 Ignition Coils
10 Engine Control Module
11 Emissions
13 Transmission Module Ignition
14 Cabin Heater Coolant Pump/SAIR Solenoid
15 MGU Coolant Pump Mini
Fuses Usage
16 Aero Shutter/eAssist Ignition
17 SDM Ignition
18 Spare
23 eAssist Module
29 Left Seat Power Lumber Control
30 Right Seat Power Lumber Control
31 eAssist Module/ Chassis Control
Module
32 Back-Up Lamps/ Interior Lamps
33 Front Heated Seats
34 Antilock Brake System Valve
35 Amplifier
37 Right High Beam
38 Left High Beam Mini
Fuses Usage
46 Cooling Fan
47 Emissions
48 Foglamp
49 Low Beam HID Headlamp Right
50 Low Beam HID Headlamp Left
51 Horn/Dual Horn
52 Cluster Ignition
53 Inside Rearview Mirror/Rear Camera/
Fuel Module Ignition
54 Heating, Ventilation, and Air Conditioning
Module Ignition
55 Front Power Windows/Mirrors
56 Windshield Washer
57 Spare
60 Heated Mirror
Page 314 of 436
Black plate (48,1)Chevrolet Malibu Owner Manual - 2013 - CRC - 6/6/12
10-48 Vehicle Care
The compact spare tire is for
emergency use when a regular
road tire has lost air and gone
flat. If the vehicle has a compact
spare tire, seeCompact Spare
Tire on page 10‑89 andIf a Tire
Goes Flat on page 10‑66.
(3) Tire Identification Number
(TIN)
:The letters and numbers
following the DOT (Department
of Transportation) code are
the Tire Identification Number
(TIN). The TIN shows the
manufacturer and plant code,
tire size, and date the tire was
manufactured. The TIN is
molded onto both sides of the
tire, although only one side may
have the date of manufacture.
(4) Maximum Cold Inflation
Load Limit
:Maximum load
that can be carried and the
maximum pressure needed to
support that load. (5) Tire Inflation
:The
temporary use tire or compact
spare tire should be inflated to
420 kPa (60 psi). For more
information on tire pressure and
inflation see Tire Pressure on
page 10‑52.
(6) Tire Size
:A combination of
letters and numbers define a
tire's width, height, aspect ratio,
construction type, and service
description. The letter T as the
first character in the tire size
means the tire is for temporary
use only.
(7) TPC Spec (Tire
Performance Criteria
Specification)
:Original
equipment tires designed to
GM's specific tire performance
criteria have a TPC specification
code molded onto the sidewall.
GM's TPC specifications meet
or exceed all federal safety
guidelines.
Tire Designations
Tire Size
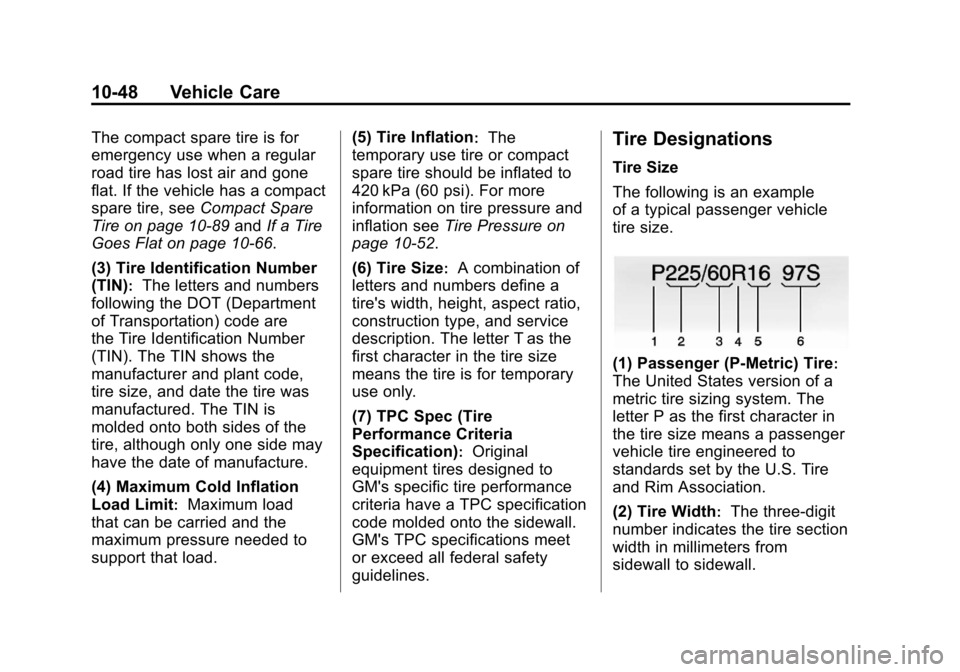
The following is an example
of a typical passenger vehicle
tire size.
(1) Passenger (P-Metric) Tire:
The United States version of a
metric tire sizing system. The
letter P as the first character in
the tire size means a passenger
vehicle tire engineered to
standards set by the U.S. Tire
and Rim Association.
(2) Tire Width
:The three-digit
number indicates the tire section
width in millimeters from
sidewall to sidewall.
Page 324 of 436
Black plate (58,1)Chevrolet Malibu Owner Manual - 2013 - CRC - 6/6/12
10-58 Vehicle Care
The TPMS sensor matching
process is:
1. Set the parking brake.
2. Turn the ignition to ON/RUN withthe engine off or place the
vehicle power mode in ON/RUN/
START. See Ignition Positions
(Key Access) on page 9‑14 or
Ignition Positions (Keyless
Access) on page 9‑16.
3. Use the MENU button to select the Vehicle Information Menu in
the Driver Information
Center (DIC).
4. Use the thumbwheel to scroll to the Tire Pressure Menu Item
screen.
5. Press the SET/CLR button to begin the sensor matching
process.
A message asking if the process
should begin should appear. 6. Press the SET/CLR button again
to confirm the selection.
The horn sounds twice to signal
the receiver is in relearn mode
and the TIRE LEARNING
ACTIVE message displays on
the DIC screen.
7. Start with the driver side front tire.
8. Place the relearn tool against the tire sidewall, near the valve
stem. Then press the button to
activate the TPMS sensor.
A horn chirp confirms that the
sensor identification code has
been matched to this tire and
wheel position.
9. Proceed to the passenger side front tire, and repeat the
procedure in Step 8.
10. Proceed to the passenger side rear tire, and repeat the
procedure in Step 8. 11. Proceed to the driver side rear
tire, and repeat the procedure
in Step 8. The horn sounds two
times to indicate the sensor
identification code has been
matched to the driver side rear
tire, and the TPMS sensor
matching process is no longer
active. The TIRE LEARNING
ACTIVE message on the DIC
display screen goes off.
12. Turn the ignition to LOCK/OFF or press STOP to turn the
ignition off.
13. Set all four tires to the recommended air pressure
level as indicated on the Tire
and Loading Information label.
Tire Inspection
We recommend that the tires,
including the spare tire, if the
vehicle has one, be inspected
for signs of wear or damage at
least once a month.
Page 333 of 436
Black plate (67,1)Chevrolet Malibu Owner Manual - 2013 - CRC - 6/6/12
Vehicle Care 10-67
WARNING (CONTINUED)
changing a flat tire. If it is used for
anything else, you or others could
be badly injured or killed if the
vehicle slips off the jack. If a jack
is provided with the vehicle, only
use it for changing a flat tire.
If a tire goes flat, avoid further tire
and wheel damage by driving slowly
to a level place, well off the road,
if possible. Turn on the hazard
warning flashers. See Hazard
Warning Flashers on page 6‑4.
{WARNING
Changing a tire can be
dangerous. The vehicle can slip
off the jack and roll over or fall
causing injury or death. Find a
level place to change the tire. To
help prevent the vehicle from
moving:
1. Set the parking brake firmly.
2. Put an automatic transmission in P (Park) or a
manual transmission in
1 (First) or R (Reverse).
3. Turn off the engine and do not restart while the vehicle
is raised.
(Continued)
WARNING (CONTINUED)
4. Do not allow passengers toremain in the vehicle.
5. Place wheel blocks on both sides of the tire at the
opposite corner of the tire
being changed.
This vehicle may come with a jack
and spare tire or a tire sealant and
compressor kit. To use the jacking
equipment to change a spare tire
safely, follow the instructions below.
Then see Tire Changing on
page 10‑84. To use the tire sealant
and compressor kit, see Tire
Sealant and Compressor Kit (With
Pressure Relief Button) on
page 10‑68 orTire Sealant and
Compressor Kit (With Pressure
Deflation Button) on page 10‑75.
Page 334 of 436
Black plate (68,1)Chevrolet Malibu Owner Manual - 2013 - CRC - 6/6/12
10-68 Vehicle Care
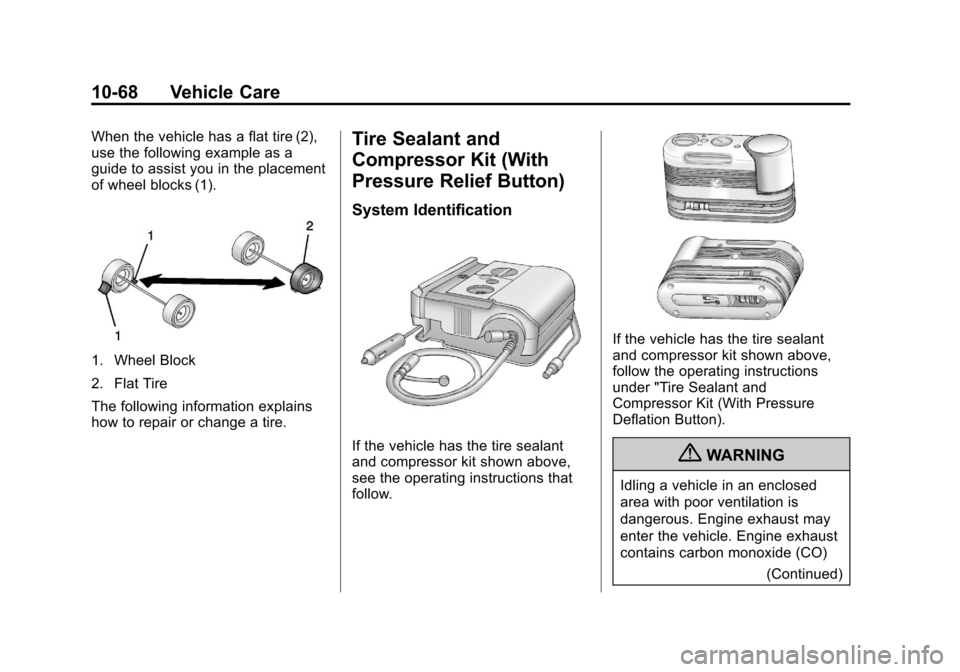
When the vehicle has a flat tire (2),
use the following example as a
guide to assist you in the placement
of wheel blocks (1).
1. Wheel Block
2. Flat Tire
The following information explains
how to repair or change a tire.
Tire Sealant and
Compressor Kit (With
Pressure Relief Button)
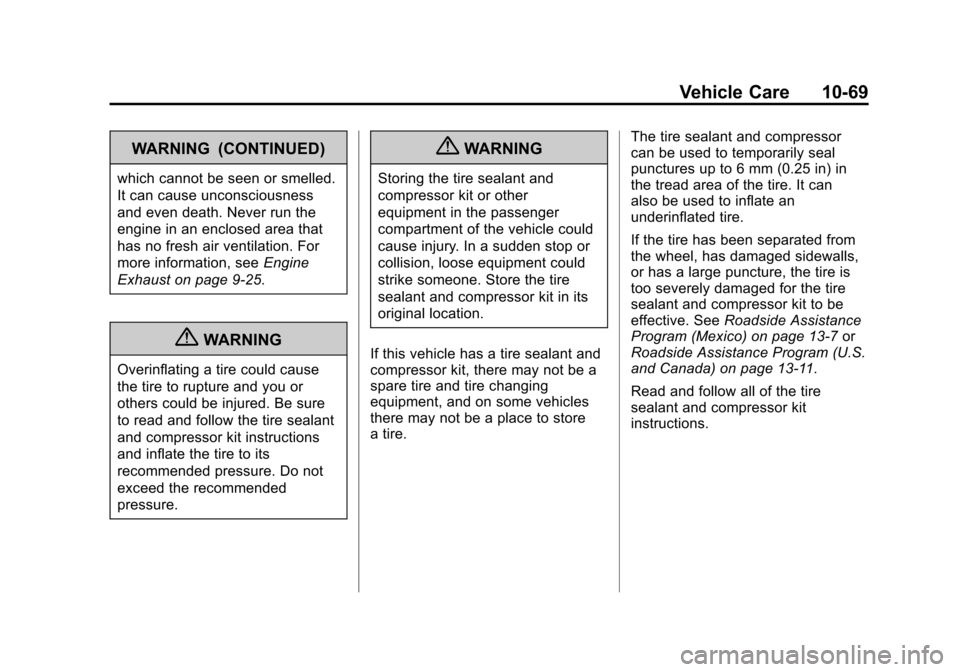
System Identification
If the vehicle has the tire sealant
and compressor kit shown above,
see the operating instructions that
follow.
If the vehicle has the tire sealant
and compressor kit shown above,
follow the operating instructions
under "Tire Sealant and
Compressor Kit (With Pressure
Deflation Button).
{WARNING
Idling a vehicle in an enclosed
area with poor ventilation is
dangerous. Engine exhaust may
enter the vehicle. Engine exhaust
contains carbon monoxide (CO)(Continued)
Page 335 of 436
Black plate (69,1)Chevrolet Malibu Owner Manual - 2013 - CRC - 6/6/12
Vehicle Care 10-69
WARNING (CONTINUED)
which cannot be seen or smelled.
It can cause unconsciousness
and even death. Never run the
engine in an enclosed area that
has no fresh air ventilation. For
more information, seeEngine
Exhaust on page 9‑25.
{WARNING
Overinflating a tire could cause
the tire to rupture and you or
others could be injured. Be sure
to read and follow the tire sealant
and compressor kit instructions
and inflate the tire to its
recommended pressure. Do not
exceed the recommended
pressure.
{WARNING
Storing the tire sealant and
compressor kit or other
equipment in the passenger
compartment of the vehicle could
cause injury. In a sudden stop or
collision, loose equipment could
strike someone. Store the tire
sealant and compressor kit in its
original location.
If this vehicle has a tire sealant and
compressor kit, there may not be a
spare tire and tire changing
equipment, and on some vehicles
there may not be a place to store
a tire. The tire sealant and compressor
can be used to temporarily seal
punctures up to 6 mm (0.25 in) in
the tread area of the tire. It can
also be used to inflate an
underinflated tire.
If the tire has been separated from
the wheel, has damaged sidewalls,
or has a large puncture, the tire is
too severely damaged for the tire
sealant and compressor kit to be
effective. See
Roadside Assistance
Program (Mexico) on page 13‑7 or
Roadside Assistance Program (U.S.
and Canada) on page 13‑11.
Read and follow all of the tire
sealant and compressor kit
instructions.
Page 342 of 436
Black plate (76,1)Chevrolet Malibu Owner Manual - 2013 - CRC - 6/6/12
10-76 Vehicle Care
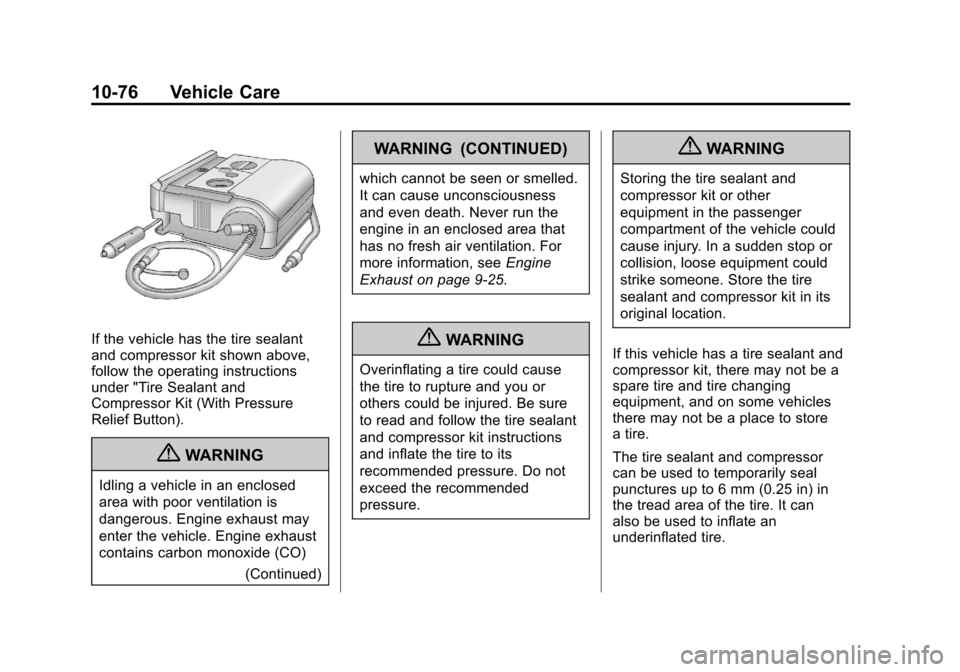
If the vehicle has the tire sealant
and compressor kit shown above,
follow the operating instructions
under "Tire Sealant and
Compressor Kit (With Pressure
Relief Button).
{WARNING
Idling a vehicle in an enclosed
area with poor ventilation is
dangerous. Engine exhaust may
enter the vehicle. Engine exhaust
contains carbon monoxide (CO)(Continued)
WARNING (CONTINUED)
which cannot be seen or smelled.
It can cause unconsciousness
and even death. Never run the
engine in an enclosed area that
has no fresh air ventilation. For
more information, seeEngine
Exhaust on page 9‑25.
{WARNING
Overinflating a tire could cause
the tire to rupture and you or
others could be injured. Be sure
to read and follow the tire sealant
and compressor kit instructions
and inflate the tire to its
recommended pressure. Do not
exceed the recommended
pressure.
{WARNING
Storing the tire sealant and
compressor kit or other
equipment in the passenger
compartment of the vehicle could
cause injury. In a sudden stop or
collision, loose equipment could
strike someone. Store the tire
sealant and compressor kit in its
original location.
If this vehicle has a tire sealant and
compressor kit, there may not be a
spare tire and tire changing
equipment, and on some vehicles
there may not be a place to store
a tire.
The tire sealant and compressor
can be used to temporarily seal
punctures up to 6 mm (0.25 in) in
the tread area of the tire. It can
also be used to inflate an
underinflated tire.