2013 CHEVROLET IMPALA run flat
[x] Cancel search: run flatPage 30 of 350
Black plate (4,1)Chevrolet Impala Owner Manual - 2013 - crc - 8/27/12
2-4 Keys, Doors, and Windows
Each vehicle can have up to eight
transmitters programmed to it. See
your dealer to program new
transmitters.
Battery Replacement
Replace the battery if the REPLACE
BATTERY IN REMOTE KEY
message displays in the DIC. See
“REPLACE BATTERY IN REMOTE
KEY”under Key and Lock
Messages on page 5‑29 for
additional information.
Notice: When replacing the
battery, do not touch any of the
circuitry on the transmitter. Static
from your body could damage the
transmitter.
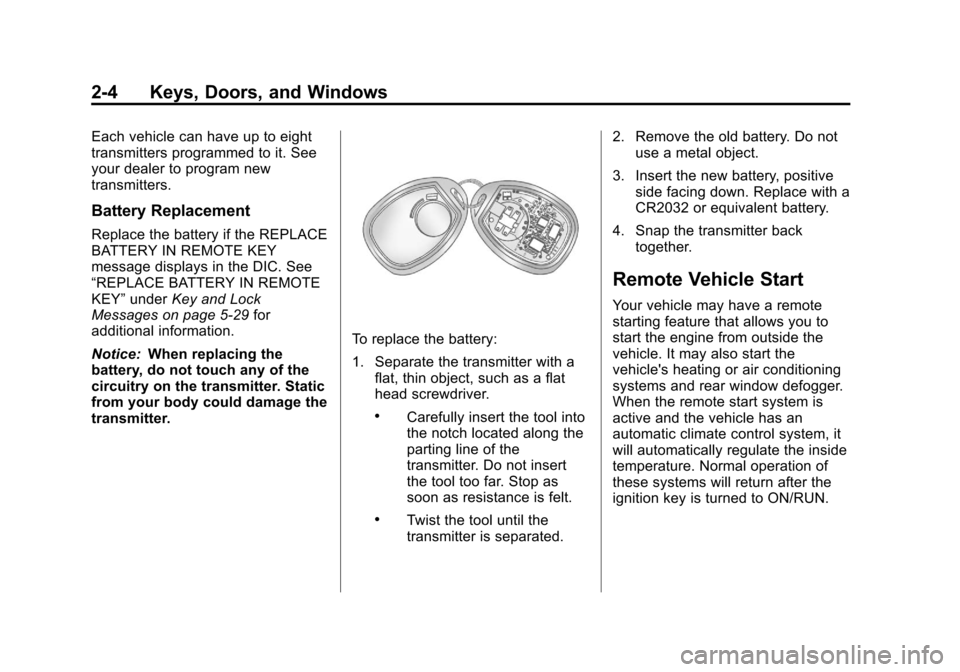
To replace the battery:
1. Separate the transmitter with a flat, thin object, such as a flat
head screwdriver.
.Carefully insert the tool into
the notch located along the
parting line of the
transmitter. Do not insert
the tool too far. Stop as
soon as resistance is felt.
.Twist the tool until the
transmitter is separated. 2. Remove the old battery. Do not
use a metal object.
3. Insert the new battery, positive side facing down. Replace with a
CR2032 or equivalent battery.
4. Snap the transmitter back together.
Remote Vehicle Start
Your vehicle may have a remote
starting feature that allows you to
start the engine from outside the
vehicle. It may also start the
vehicle's heating or air conditioning
systems and rear window defogger.
When the remote start system is
active and the vehicle has an
automatic climate control system, it
will automatically regulate the inside
temperature. Normal operation of
these systems will return after the
ignition key is turned to ON/RUN.
Page 218 of 350
Black plate (38,1)Chevrolet Impala Owner Manual - 2013 - crc - 8/27/12
9-38 Driving and Operating
When towing a trailer, the arrows on
the instrument cluster flash for turns
even if the bulbs on the trailer are
burned out. Check occasionally to
be sure the trailer bulbs are still
working.
Driving on Grades
Reduce speed and shift to a lower
gear before starting down a long or
steep downgrade. If the
transmission is not shifted down, the
brakes might have to be used so
much that they would get hot and no
longer work well.
The vehicle can tow in D (Drive).
Use a lower gear if the transmission
shifts too often.
When towing at high altitude on
steep uphill grades, engine coolant
boils at a lower temperature than at
normal altitudes. If the engine is
turned off immediately after towing
at high altitude on steep uphill
grades, the vehicle could show
signs similar to engine overheating.To avoid this, let the engine run
while parked, preferably on level
ground, with the transmission in
P (Park) for a few minutes before
turning the engine off. If the
overheat warning comes on, see
Engine Overheating on page 10‑14.Parking on Hills
{WARNING
Parking the vehicle on a hill with
the trailer attached can be
dangerous. If something goes
wrong, the rig could start to move.
People can be injured, and both
the vehicle and the trailer can be
damaged. When possible, always
park the rig on a flat surface.
If parking the rig on a hill:
1. Press the brake pedal, but do not shift into P (Park) yet. Turn
the wheels into the curb if facing
downhill or into traffic if facing
uphill. 2. Have someone place chocks
under the trailer wheels.
3. When the wheel chocks are in place, release the brake pedal
until the chocks absorb the load.
4. Reapply the brake pedal. Then apply the parking brake and shift
into P (Park).
5. Release the brake pedal.Leaving After Parking on a Hill
1. Apply and hold the brake pedal while you:
.Start the engine.
.Shift into a gear.
.Release the parking brake.
2. Let up on the brake pedal.
3. Drive slowly until the trailer is clear of the chocks.
4. Stop and have someone pick up and store the chocks.
Page 253 of 350
Black plate (31,1)Chevrolet Impala Owner Manual - 2013 - crc - 8/27/12
Vehicle Care 10-31
FusesUsage
PWR/MIR Power Mirrors
PWR/SEAT Power Seats
PWR/WNDW Power Window
RAP Retained Accessory Power
S/ROOF Sunroof
TRUNK Trunk
TRUNK Trunk Relay
XM XM™RadioWheels and Tires
Tires
Every new GM vehicle has
high-quality tires made by a
leading tire manufacturer. See
the warranty manual for
information regarding the tire
warranty and where to get
service. For additional
information refer to the tire
manufacturer.
{WARNING
.Poorly maintained and
improperly used tires are
dangerous.
.Overloading the tires can
cause overheating as a
result of too much flexing.
There could be a blowout
(Continued)
WARNING (Continued)
and a serious crash. See
Vehicle Load Limits on
page 9‑9.
.Underinflated tires pose
the same danger as
overloaded tires. The
resulting crash could
cause serious injury.
Check all tires frequently
to maintain the
recommended pressure.
Tire pressure should be
checked when the tires
are cold.
.Overinflated tires are more
likely to be cut, punctured,
or broken by a sudden
impact— such as when
hitting a pothole. Keep
tires at the recommended
pressure.
(Continued)
Page 275 of 350
Black plate (53,1)Chevrolet Impala Owner Manual - 2013 - crc - 8/27/12
Vehicle Care 10-53
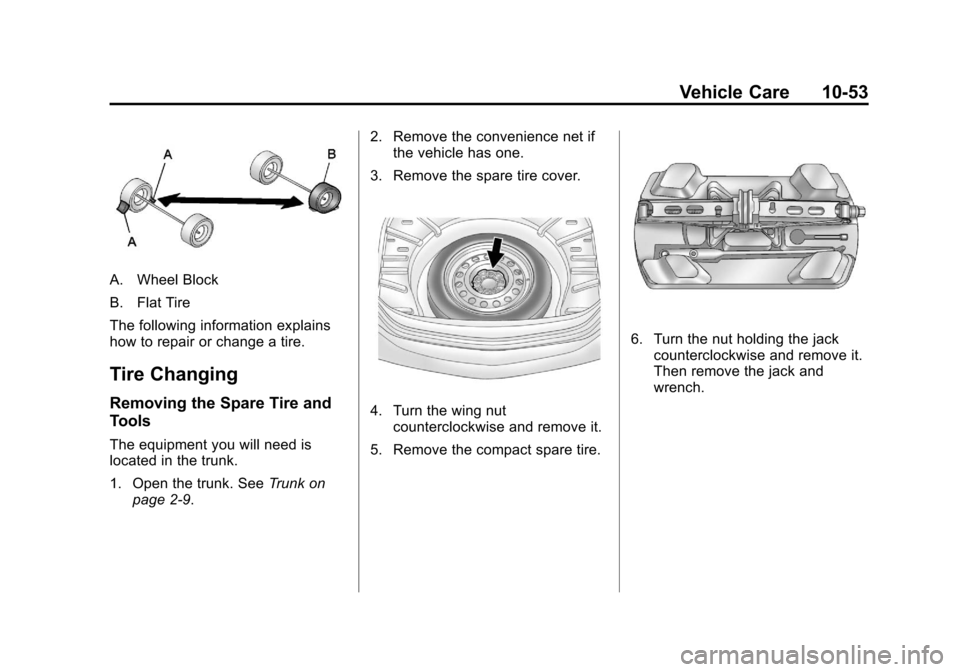
A. Wheel Block
B. Flat Tire
The following information explains
how to repair or change a tire.
Tire Changing
Removing the Spare Tire and
Tools
The equipment you will need is
located in the trunk.
1. Open the trunk. SeeTrunk on
page 2‑9. 2. Remove the convenience net if
the vehicle has one.
3. Remove the spare tire cover.
4. Turn the wing nut counterclockwise and remove it.
5. Remove the compact spare tire.
6. Turn the nut holding the jack counterclockwise and remove it.
Then remove the jack and
wrench.
Page 276 of 350
Black plate (54,1)Chevrolet Impala Owner Manual - 2013 - crc - 8/27/12
10-54 Vehicle Care
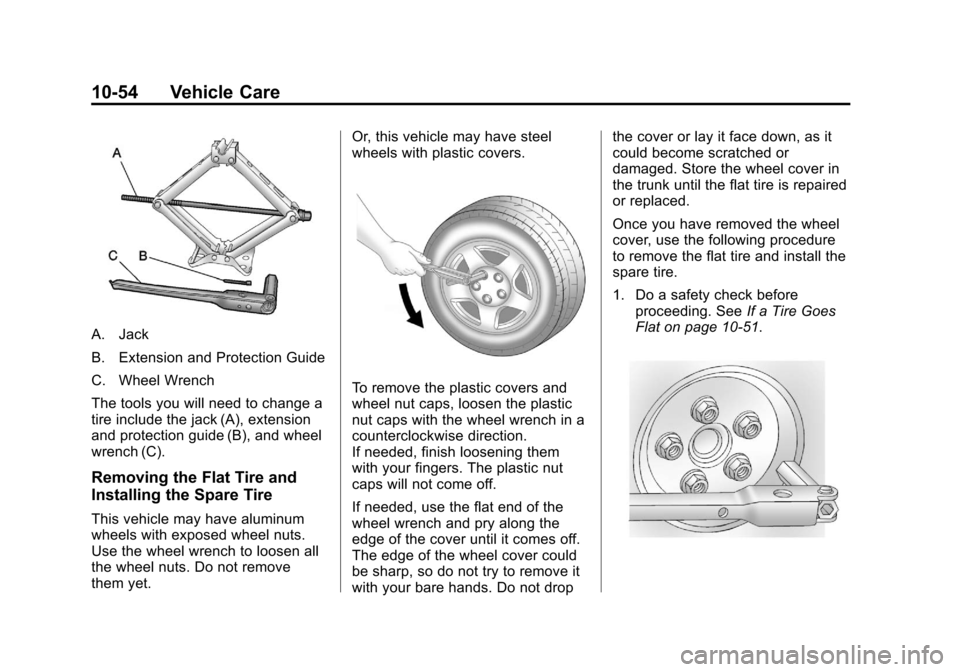
A. Jack
B. Extension and Protection Guide
C. Wheel Wrench
The tools you will need to change a
tire include the jack (A), extension
and protection guide (B), and wheel
wrench (C).
Removing the Flat Tire and
Installing the Spare Tire
This vehicle may have aluminum
wheels with exposed wheel nuts.
Use the wheel wrench to loosen all
the wheel nuts. Do not remove
them yet.Or, this vehicle may have steel
wheels with plastic covers.
To remove the plastic covers and
wheel nut caps, loosen the plastic
nut caps with the wheel wrench in a
counterclockwise direction.
If needed, finish loosening them
with your fingers. The plastic nut
caps will not come off.
If needed, use the flat end of the
wheel wrench and pry along the
edge of the cover until it comes off.
The edge of the wheel cover could
be sharp, so do not try to remove it
with your bare hands. Do not dropthe cover or lay it face down, as it
could become scratched or
damaged. Store the wheel cover in
the trunk until the flat tire is repaired
or replaced.
Once you have removed the wheel
cover, use the following procedure
to remove the flat tire and install the
spare tire.
1. Do a safety check before
proceeding. See If a Tire Goes
Flat on page 10‑51.
Page 280 of 350
Black plate (58,1)Chevrolet Impala Owner Manual - 2013 - crc - 8/27/12
10-58 Vehicle Care
Storing a Flat or Spare Tire
and Tools
{WARNING
Storing a jack, a tire, or other
equipment in the passenger
compartment of the vehicle could
cause injury. In a sudden stop or
collision, loose equipment could
strike someone. Store all these in
the proper place.
After the compact spare tire has
been installed on the vehicle, store
the flat tire in the trunk.
When storing a full-size tire, use the
extension with the extension
protector, located in the foam
holder, to help avoid wheel surface
damage. To store a full-size tire:
1. Install the tools in their original
location in the trunk area and
secure.
2. Place the tire valve stem facing down and the protector/guide
placed through a wheel bolt hole
and threaded onto the bolt
screw.
3. Remove the protector and attach the retainer securely
4. Store the cover as far forward as possible.
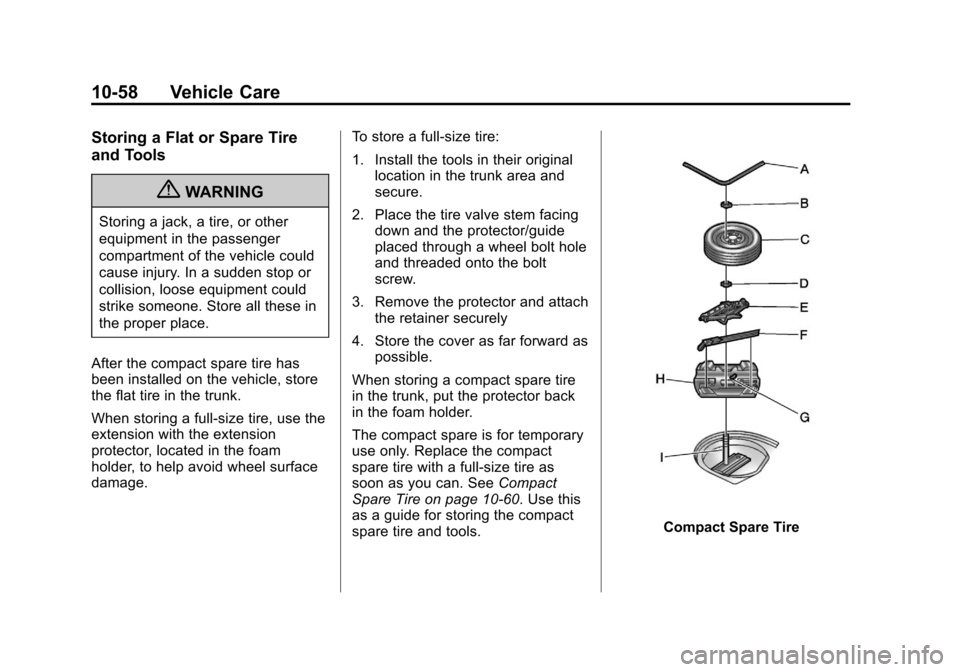
When storing a compact spare tire
in the trunk, put the protector back
in the foam holder.
The compact spare is for temporary
use only. Replace the compact
spare tire with a full-size tire as
soon as you can. See Compact
Spare Tire on page 10‑60. Use this
as a guide for storing the compact
spare tire and tools.
Compact Spare Tire
Page 285 of 350
Black plate (63,1)Chevrolet Impala Owner Manual - 2013 - crc - 8/27/12
Vehicle Care 10-63
part away from the dead battery,
but not near engine parts
that move.
9. Start the engine in the vehicle with the good battery and run
the engine at idle speed for at
least four minutes.
10. Try to start the vehicle that had the dead battery. If it will not
start after a few tries, it
probably needs service.
Notice: If the jumper cables are
connected or removed in the
wrong order, electrical shorting
may occur and damage the
vehicle. The repairs would not be
covered by the vehicle warranty.
Always connect and remove the
jumper cables in the correct
order, making sure that the
cables do not touch each other or
other metal.
Jumper Cable Removal
Reverse the sequence exactly when
removing the jumper cables.Towing
Towing the Vehicle
Notice: Incorrectly towing a
disabled vehicle may cause
damage. The damage would not
be covered by the vehicle
warranty.
Have the vehicle towed on a flatbed
car carrier. A wheel lift tow truck
could damage the vehicle.
Consult your dealer or a
professional towing service if the
disabled vehicle must be towed.
To tow the vehicle behind another
vehicle for recreational purposes,
such as behind a motor home, see
“Recreational Vehicle Towing” in this
section.
Recreational Vehicle
Towing
Recreational vehicle towing means
towing the vehicle behind another
vehicle such as a motor home. The two most common types of
recreational vehicle towing are
known as dinghy towing and dolly
towing. Dinghy towing is towing the
vehicle with all four wheels on the
ground. Dolly towing is towing the
vehicle with two wheels on the
ground and two wheels up on a
device known as a dolly.
Here are some important things to
consider before recreational vehicle
towing:
.What is the towing capacity of
the towing vehicle? Be sure to
read the tow vehicle
manufacturer's
recommendations.
.What is the distance that will be
travelled? Some vehicles have
restrictions on how far and how
long they can tow.
.Is the proper towing equipment
going to be used? See your
dealer or trailering professional
for additional advice and
equipment recommendations.
Page 342 of 350

Black plate (4,1)Chevrolet Impala Owner Manual - 2013 - crc - 8/27/12
i-4 INDEX
E
E85 Fuel . . . . . . . . . . . . . . . . . . . . . . . 9-33
Electrical Equipment,Add-On . . . . . . . . . . . . . . . . . . . . . . 9-41
Electrical System Engine CompartmentFuse Block . . . . . . . . . . . . . . . . 10-27
Fuses and Circuit Breakers . . . . . . . . . . . . . . . . . . 10-27
Instrument Panel Fuse Block . . . . . . . . . . . . . . . . . . . . . . 10-30
Overload . . . . . . . . . . . . . . . . . . . 10-26
Electronic Stability Control . . . . . 9-26
Electronic Stability Control (ESC) Off Light . . . . . . . . . . . . . . . 5-18
Electronic Stability Control
(ESC)/Traction Control
System (TCS) Indicator
Warning Light . . . . . . . . . . . . . . . . 5-19
Emergency
OnStar
®. . . . . . . . . . . . . . . . . . . . . . 14-2
Engine Air Cleaner/Filter . . . . . . . . . . . 10-10
Check and Service EngineSoon Light . . . . . . . . . . . . . . . . . . 5-14
Compartment Overview . . . . . . . 10-5 Engine (cont'd)
Coolant . . . . . . . . . . . . . . . . . . . . . .10-11
Coolant Temperature
Gauge . . . . . . . . . . . . . . . . . . . . . . 5-11
Coolant Temperature Warning Light . . . . . . . . . . . . . . . 5-19
Cooling System . . . . . . . . . . . . . .10-11
Cooling System Messages . . . 5-27
Drive Belt Routing . . . . . . . . . . . . 12-4
Exhaust . . . . . . . . . . . . . . . . . . . . . . 9-19
Heater . . . . . . . . . . . . . . . . . . . . . . . . 9-16
Oil Life System . . . . . . . . . . . . . . . 10-8
Oil Messages . . . . . . . . . . . . . . . . . 5-28
Overheated Protection Operating Mode . . . . . . . . . . . 10-15
Overheating . . . . . . . . . . . . . . . . 10-14
Power Messages . . . . . . . . . . . . . 5-29
Pressure Light . . . . . . . . . . . . . . . . 5-20
Running While Parked . . . . . . . . 9-20
Starting . . . . . . . . . . . . . . . . . . . . . . . 9-15
Entry Lighting . . . . . . . . . . . . . . . . . . . 6-6
Equipment, Towing . . . . . . . . . . . . 9-40
Event Data Recorders . . . . . . . . 13-14
Extender, Safety Belt . . . . . . . . . . 3-16
Exterior Lamp Controls . . . . . . . . . 6-1
F
Filter, Engine Air Cleaner . . . . . . . . . 10-10
Flash-to-Pass . . . . . . . . . . . . . . . . . . . 6-2
Flashers, Hazard Warning . . . . . . 6-3
Flat Tire . . . . . . . . . . . . . . . . . . . . . . 10-51 Changing . . . . . . . . . . . . . . . . . . . 10-53
Floor Mats . . . . . . . . . . . . . . . . . . . . 10-71
Fluid Automatic Transmission . . . . . . 10-9
Brakes . . . . . . . . . . . . . . . . . . . . . . 10-18
Power Steering . . . . . . . . . . . . . 10-15
Washer . . . . . . . . . . . . . . . . . . . . . 10-16
Fog Lamps Bulb Replacement . . . . . . . . . . . . . 6-4
Front Fog Lamp
Light . . . . . . . . . . . . . . . . . . . . . . . . . . 5-21
Front Seats Adjustment . . . . . . . . . . . . . . . . . . . . 3-3
Heated . . . . . . . . . . . . . . . . . . . . . . . . 3-6
Fuel . . . . . . . . . . . . . . . . . . . . . . . . . . . 9-30 Additives . . . . . . . . . . . . . . . . . . . . . 9-32
E85 (85% Ethanol) . . . . . . . . . . . 9-33
Economy Driving . . . . . . . . . . . . . 1-18
Filling a Portable FuelContainer . . . . . . . . . . . . . . . . . . . 9-35