2013 CHEVROLET CRUZE seat adjustment
[x] Cancel search: seat adjustmentPage 7 of 394

Black plate (1,1)Chevrolet Cruze Owner Manual - 2013 - crc - 10/16/12
In Brief 1-1
In Brief
Instrument Panel
Instrument Panel Overview . . . . 1-2
Initial Drive Information
Initial Drive Information . . . . . . . . 1-4
Remote Keyless Entry (RKE)System . . . . . . . . . . . . . . . . . . . . . . 1-4
Remote Vehicle Start . . . . . . . . . 1-5
Door Locks . . . . . . . . . . . . . . . . . . . 1-5
Seat Adjustment . . . . . . . . . . . . . . 1-6
Heated Seats . . . . . . . . . . . . . . . . . 1-8
Head Restraint Adjustment . . . . 1-8
Safety Belts . . . . . . . . . . . . . . . . . . . 1-8
Passenger Sensing System . . . 1-9
Mirror Adjustment . . . . . . . . . . . . . 1-9
Steering Wheel Adjustment . . . . . . . . . . . . . . . . . 1-10
Interior Lighting . . . . . . . . . . . . . . 1-10
Exterior Lighting . . . . . . . . . . . . . 1-11
Windshield Wiper/Washer . . . . 1-12
Climate Controls . . . . . . . . . . . . . 1-13
Transmission . . . . . . . . . . . . . . . . 1-14
Vehicle Features
Radio(s) . . . . . . . . . . . . . . . . . . . . . 1-14
Satellite Radio . . . . . . . . . . . . . . . 1-15
Portable Audio Devices . . . . . . 1-16
Bluetooth
®. . . . . . . . . . . . . . . . . . . 1-16
Steering Wheel Controls . . . . . 1-16
Cruise Control . . . . . . . . . . . . . . . 1-17
Navigation System . . . . . . . . . . . 1-17
Driver Information
Center (DIC) . . . . . . . . . . . . . . . 1-17
Ultrasonic Parking Assist . . . . 1-18
Power Outlets . . . . . . . . . . . . . . . 1-18
Performance and Maintenance
Traction Control System (TCS) . . . . . . . . . . . . . . 1-18
StabiliTrak
®System . . . . . . . . . 1-19
Tire Pressure Monitor . . . . . . . . 1-19
Tire Sealant and
Compressor Kit . . . . . . . . . . . . . 1-19
Engine Oil Life System . . . . . . 1-20
Driving for Better Fuel Economy . . . . . . . . . . . . . . . . . . . 1-20
Roadside Assistance Program . . . . . . . . . . . . . . . . . . . . 1-21
OnStar
®. . . . . . . . . . . . . . . . . . . . . 1-21
Page 12 of 394
Black plate (6,1)Chevrolet Cruze Owner Manual - 2013 - crc - 10/16/12
1-6 In Brief
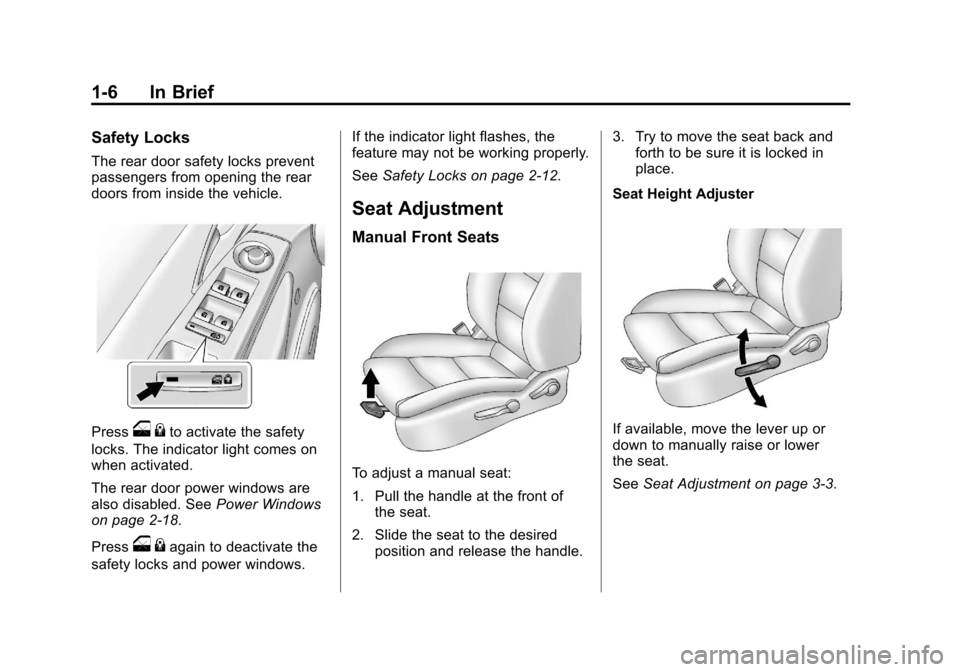
Safety Locks
The rear door safety locks prevent
passengers from opening the rear
doors from inside the vehicle.
Presso{to activate the safety
locks. The indicator light comes on
when activated.
The rear door power windows are
also disabled. See Power Windows
on page 2‑18.
Press
o {again to deactivate the
safety locks and power windows. If the indicator light flashes, the
feature may not be working properly.
See
Safety Locks on page 2‑12.
Seat Adjustment
Manual Front Seats
To adjust a manual seat:
1. Pull the handle at the front of
the seat.
2. Slide the seat to the desired position and release the handle. 3. Try to move the seat back and
forth to be sure it is locked in
place.
Seat Height Adjuster
If available, move the lever up or
down to manually raise or lower
the seat.
See Seat Adjustment on page 3‑3.
Page 13 of 394
Black plate (7,1)Chevrolet Cruze Owner Manual - 2013 - crc - 10/16/12
In Brief 1-7
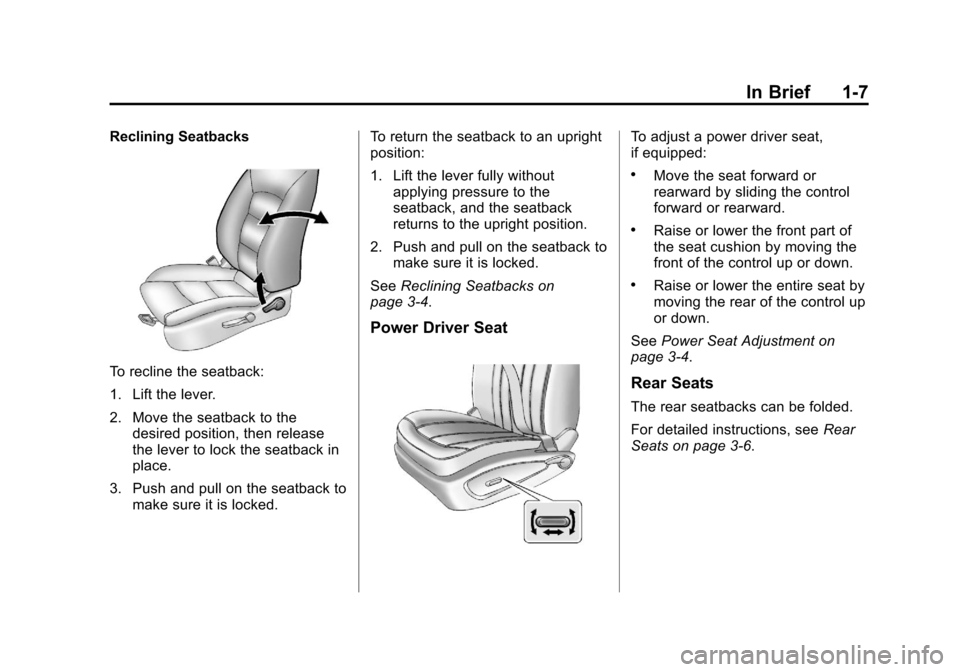
Reclining Seatbacks
To recline the seatback:
1. Lift the lever.
2. Move the seatback to thedesired position, then release
the lever to lock the seatback in
place.
3. Push and pull on the seatback to make sure it is locked. To return the seatback to an upright
position:
1. Lift the lever fully without
applying pressure to the
seatback, and the seatback
returns to the upright position.
2. Push and pull on the seatback to make sure it is locked.
See Reclining Seatbacks on
page 3‑4.
Power Driver Seat
To adjust a power driver seat,
if equipped:
.Move the seat forward or
rearward by sliding the control
forward or rearward.
.Raise or lower the front part of
the seat cushion by moving the
front of the control up or down.
.Raise or lower the entire seat by
moving the rear of the control up
or down.
See Power Seat Adjustment on
page 3‑4.
Rear Seats
The rear seatbacks can be folded.
For detailed instructions, see Rear
Seats on page 3‑6.
Page 14 of 394
Black plate (8,1)Chevrolet Cruze Owner Manual - 2013 - crc - 10/16/12
1-8 In Brief
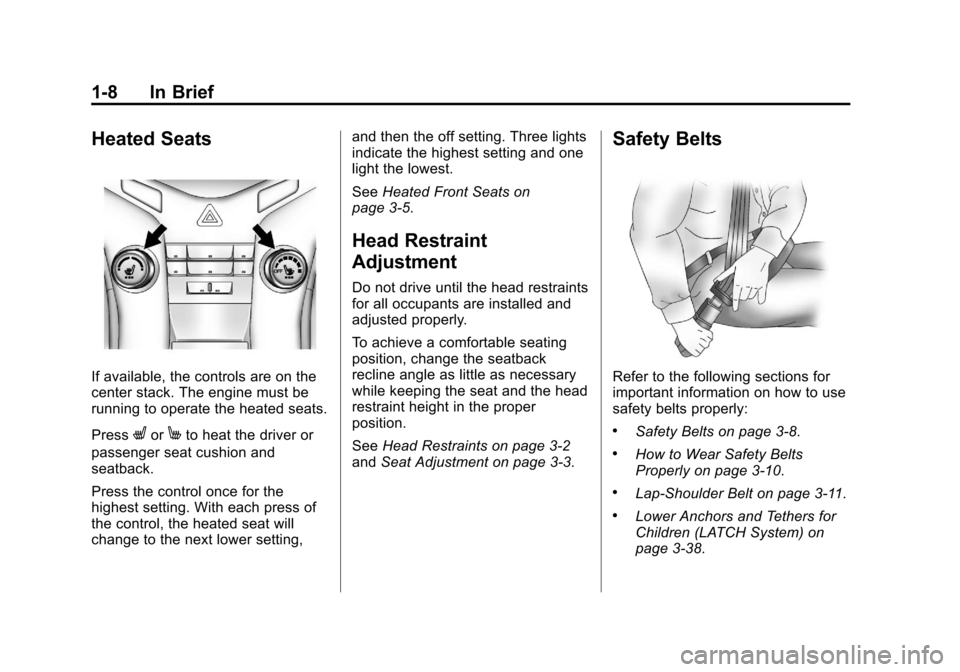
Heated Seats
If available, the controls are on the
center stack. The engine must be
running to operate the heated seats.
Press
LorMto heat the driver or
passenger seat cushion and
seatback.
Press the control once for the
highest setting. With each press of
the control, the heated seat will
change to the next lower setting, and then the off setting. Three lights
indicate the highest setting and one
light the lowest.
See
Heated Front Seats on
page 3‑5.
Head Restraint
Adjustment
Do not drive until the head restraints
for all occupants are installed and
adjusted properly.
To achieve a comfortable seating
position, change the seatback
recline angle as little as necessary
while keeping the seat and the head
restraint height in the proper
position.
See Head Restraints on page 3‑2
and Seat Adjustment on page 3‑3.
Safety Belts
Refer to the following sections for
important information on how to use
safety belts properly:
.Safety Belts on page 3‑8.
.How to Wear Safety Belts
Properly on page 3‑10.
.Lap-Shoulder Belt on page 3‑11.
.Lower Anchors and Tethers for
Children (LATCH System) on
page 3‑38.
Page 51 of 394
Black plate (1,1)Chevrolet Cruze Owner Manual - 2013 - crc - 10/16/12
Seats and Restraints 3-1
Seats and
Restraints
Head Restraints
Head Restraints . . . . . . . . . . . . . . . 3-2
Front Seats
Seat Adjustment . . . . . . . . . . . . . . 3-3
Power Seat Adjustment . . . . . . . 3-4
Reclining Seatbacks . . . . . . . . . . 3-4
Heated Front Seats . . . . . . . . . . . 3-5
Rear Seats
Rear Seats . . . . . . . . . . . . . . . . . . . . 3-6
Safety Belts
Safety Belts . . . . . . . . . . . . . . . . . . . 3-8
How to Wear Safety BeltsProperly . . . . . . . . . . . . . . . . . . . . 3-10
Lap-Shoulder Belt . . . . . . . . . . . . 3-11
Safety Belt Use During Pregnancy . . . . . . . . . . . . . . . . . . 3-15 Safety Belt Extender . . . . . . . . . 3-15
Safety System Check . . . . . . . . 3-15
Safety Belt Care . . . . . . . . . . . . . 3-16
Replacing Safety Belt System
Parts after a Crash . . . . . . . . . 3-16
Airbag System
Airbag System . . . . . . . . . . . . . . . 3-17
Where Are the Airbags? . . . . . 3-19
When Should an Airbag
Inflate? . . . . . . . . . . . . . . . . . . . . . 3-21
What Makes an Airbag Inflate? . . . . . . . . . . . . . . . . . . . . . 3-22
How Does an Airbag Restrain? . . . . . . . . . . . . . . . . . . . 3-22
What Will You See after an Airbag Inflates? . . . . . . . . . . . . 3-22
Passenger Sensing System . . . . . . . . . . . . . . . . . . . . . 3-24
Servicing the Airbag-Equipped Vehicle . . . . . . . . . . . . . . . . . . . . . 3-28 Adding Equipment to the
Airbag-Equipped Vehicle . . . 3-29
Airbag System Check . . . . . . . . 3-30
Replacing Airbag System Parts after a Crash . . . . . . . . . 3-30
Child Restraints
Older Children . . . . . . . . . . . . . . . 3-31
Infants and Young
Children . . . . . . . . . . . . . . . . . . . . 3-33
Child Restraint Systems . . . . . 3-35
Where to Put the Restraint . . . 3-37
Lower Anchors and Tethers for Children (LATCH
System) . . . . . . . . . . . . . . . . . . . . 3-38
Replacing LATCH System Parts After a Crash . . . . . . . . . 3-45
Securing Child Restraints (Front Passenger Seat) . . . . 3-45
Securing Child Restraints (Rear Seat) . . . . . . . . . . . . . . . . . 3-48
Page 53 of 394
Black plate (3,1)Chevrolet Cruze Owner Manual - 2013 - crc - 10/16/12
Seats and Restraints 3-3
The front seat outboard head
restraints are not designed to be
removed.
If you are installing a child restraint
in the rear seat, see“Securing a
Child Restraint Designed for the
LATCH System” underLower
Anchors and Tethers for Children
(LATCH System) on page 3‑38.Front Seats
Seat Adjustment
{WARNING
You can lose control of the
vehicle if you try to adjust a driver
seat while the vehicle is moving.
Adjust the driver seat only when
the vehicle is not moving.
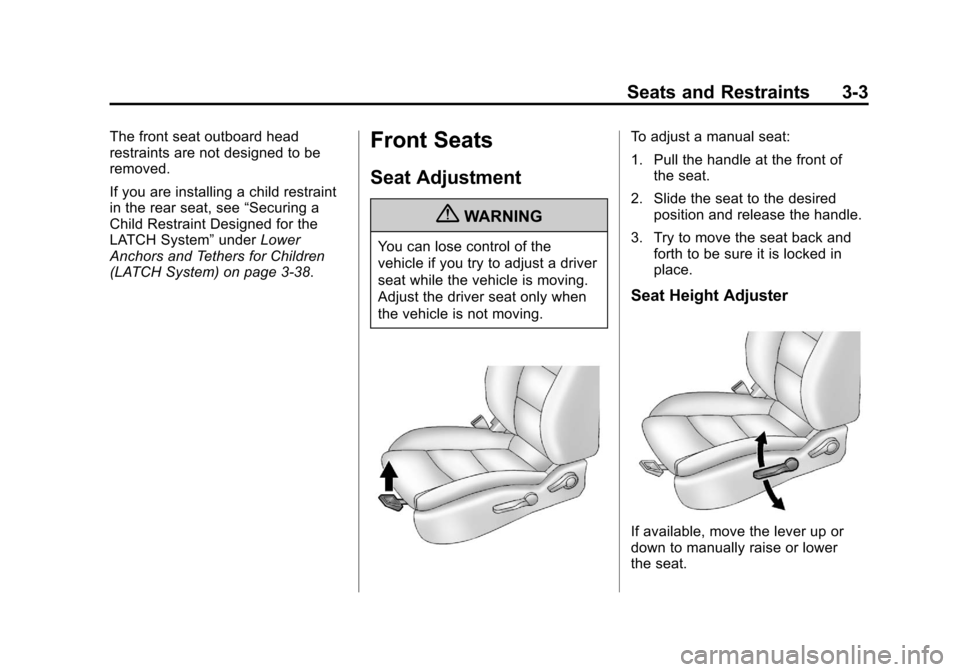
To adjust a manual seat:
1. Pull the handle at the front of the seat.
2. Slide the seat to the desired position and release the handle.
3. Try to move the seat back and forth to be sure it is locked in
place.
Seat Height Adjuster
If available, move the lever up or
down to manually raise or lower
the seat.
Page 54 of 394
Black plate (4,1)Chevrolet Cruze Owner Manual - 2013 - crc - 10/16/12
3-4 Seats and Restraints
Power Seat Adjustment
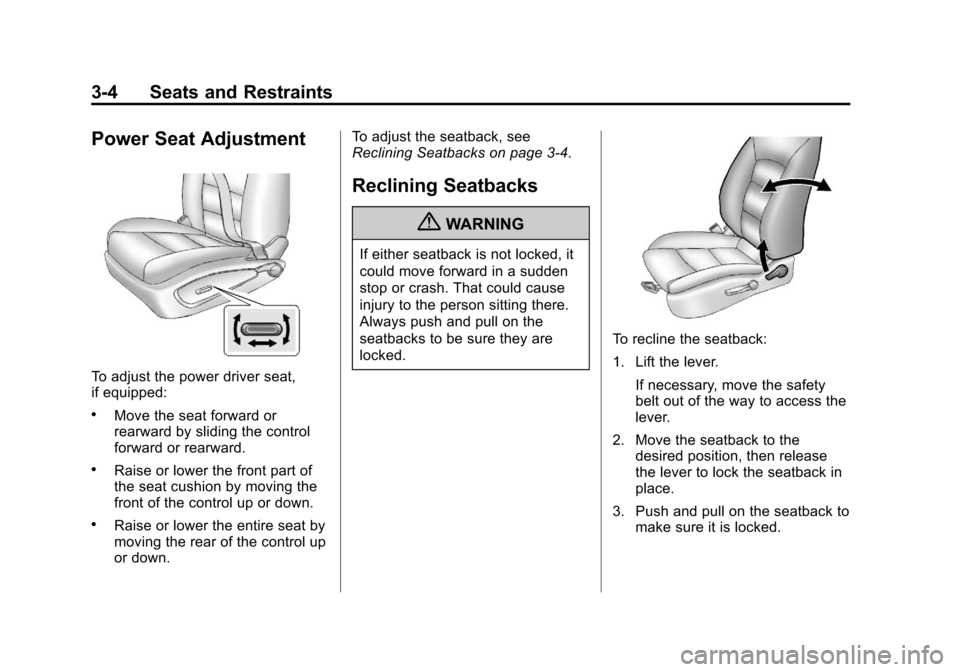
To adjust the power driver seat,
if equipped:
.Move the seat forward or
rearward by sliding the control
forward or rearward.
.Raise or lower the front part of
the seat cushion by moving the
front of the control up or down.
.Raise or lower the entire seat by
moving the rear of the control up
or down.To adjust the seatback, see
Reclining Seatbacks on page 3‑4.
Reclining Seatbacks
{WARNING
If either seatback is not locked, it
could move forward in a sudden
stop or crash. That could cause
injury to the person sitting there.
Always push and pull on the
seatbacks to be sure they are
locked.
To recline the seatback:
1. Lift the lever.
If necessary, move the safety
belt out of the way to access the
lever.
2. Move the seatback to the desired position, then release
the lever to lock the seatback in
place.
3. Push and pull on the seatback to make sure it is locked.
Page 62 of 394
Black plate (12,1)Chevrolet Cruze Owner Manual - 2013 - crc - 10/16/12
3-12 Seats and Restraints
Position the release button on
the buckle so that the safety belt
could be quickly unbuckled if
necessary.
If equipped with a shoulder belt
height adjuster, move it to the
height that is right for you. See
“Shoulder Belt Height Adjuster”
later in this section for
instructions on use and
important safety information.
4. To make the lap part tight, pullup on the shoulder belt.
To unlatch the belt, push the button
on the buckle. The belt should
return to its stowed position.
Before a door is closed, be sure the
safety belt is out of the way. If a
door is slammed against a safety
belt, damage can occur to both the
safety belt and the vehicle.
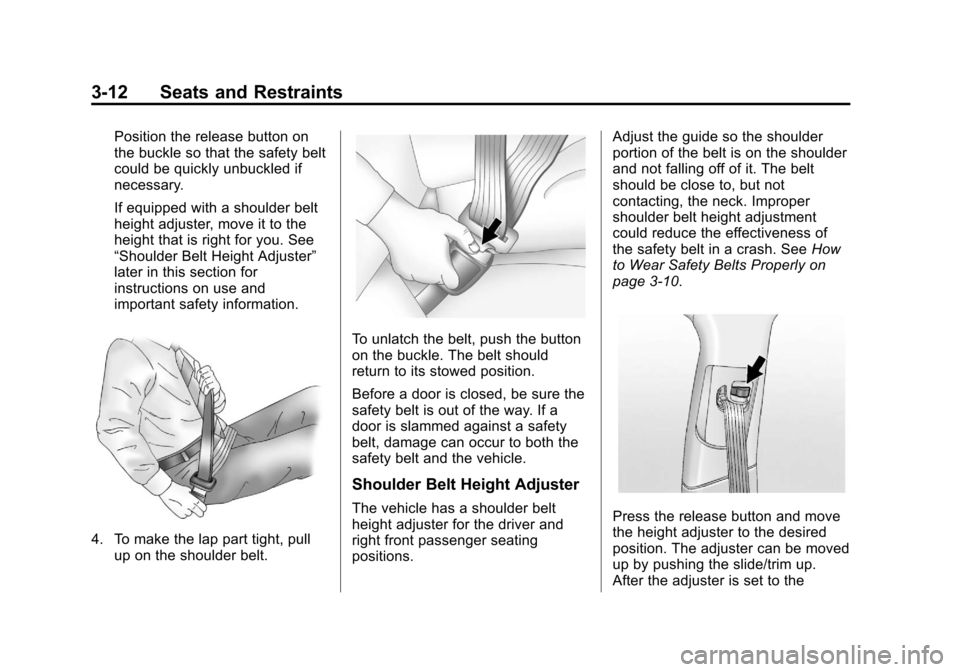
Shoulder Belt Height Adjuster
The vehicle has a shoulder belt
height adjuster for the driver and
right front passenger seating
positions. Adjust the guide so the shoulder
portion of the belt is on the shoulder
and not falling off of it. The belt
should be close to, but not
contacting, the neck. Improper
shoulder belt height adjustment
could reduce the effectiveness of
the safety belt in a crash. See
How
to Wear Safety Belts Properly on
page 3‑10.Press the release button and move
the height adjuster to the desired
position. The adjuster can be moved
up by pushing the slide/trim up.
After the adjuster is set to the