2013 CHEVROLET CRUZE heating
[x] Cancel search: heatingPage 19 of 394
Black plate (13,1)Chevrolet Cruze Owner Manual - 2013 - crc - 10/16/12
In Brief 1-13
Climate Controls
The heating, cooling, defrosting, and
ventilation for the vehicle can be
controlled with these systems.
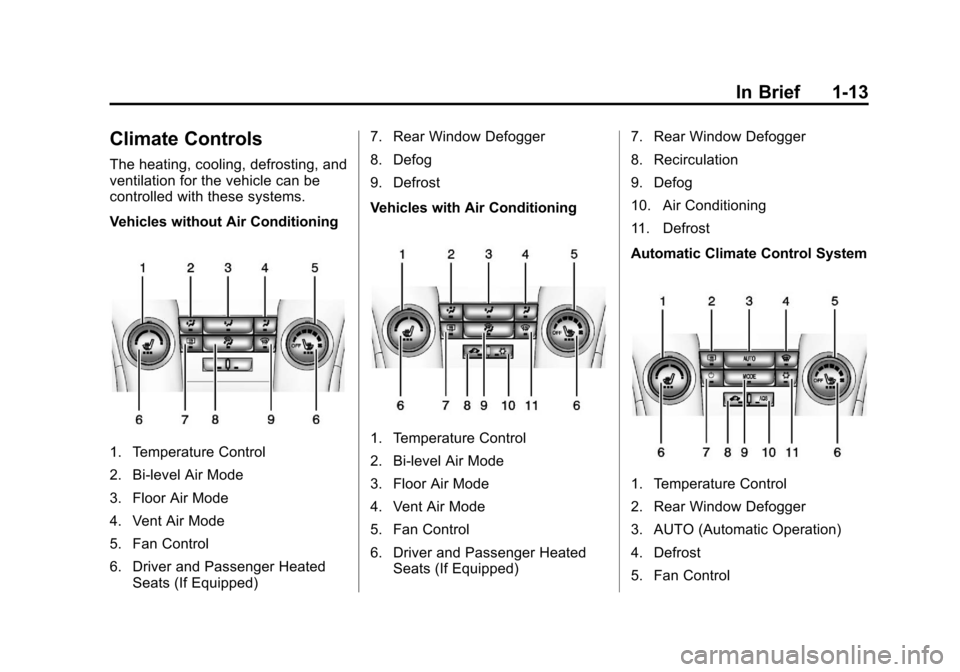
Vehicles without Air Conditioning
1. Temperature Control
2. Bi-level Air Mode
3. Floor Air Mode
4. Vent Air Mode
5. Fan Control
6. Driver and Passenger HeatedSeats (If Equipped) 7. Rear Window Defogger
8. Defog
9. Defrost
Vehicles with Air Conditioning1. Temperature Control
2. Bi-level Air Mode
3. Floor Air Mode
4. Vent Air Mode
5. Fan Control
6. Driver and Passenger Heated
Seats (If Equipped) 7. Rear Window Defogger
8. Recirculation
9. Defog
10. Air Conditioning
11. Defrost
Automatic Climate Control System
1. Temperature Control
2. Rear Window Defogger
3. AUTO (Automatic Operation)
4. Defrost
5. Fan Control
Page 108 of 394
Black plate (6,1)Chevrolet Cruze Owner Manual - 2013 - crc - 10/16/12
5-6 Instruments and Controls
Power Outlets
The accessory power outlets can be
used to plug in electrical equipment,
such as a cell phone or MP3 player.
There is one accessory power outlet
located on the center floor console
and one on the rear of the center
floor console. These outlets are
powered when the key is in ON/
RUN or ACC/ACCESSORY, or until
the driver door is opened within
10 minutes of turning off the vehicle.
SeeRetained Accessory Power
(RAP) on page 9‑22.
Open the cover to access.
Notice: Leaving electrical
equipment plugged in for an
extended period of time while the
vehicle is off will drain the
battery. Always unplug electrical
equipment when not in use and
do not plug in equipment that
exceeds the maximum 20 ampere
rating. Certain electrical accessories may
not be compatible with the
accessory power outlet and could
overload vehicle or adapter fuses.
If a problem is experienced, see
your dealer.
When adding electrical equipment,
be sure to follow the installation
instructions included with the
equipment. See
Add-On Electrical
Equipment on page 9‑56.
Notice: Hanging heavy
equipment from the power outlet
can cause damage not covered
by the vehicle warranty. The
power outlets are designed for
accessory power plugs only, such
as cell phone charge cords.
Cigarette Lighter
For vehicles with a cigarette lighter,
it is on the center floor console near
the shift lever.
To activate the cigarette lighter,
push it into the heating element and
let go. When the lighter is ready it
will pop back out. Notice:
Holding a cigarette lighter
in while it is heating does not let
the lighter back away from the
heating element when it is hot.
Damage from overheating can
occur to the lighter or heating
element, or a fuse could be
blown. Do not hold a cigarette
lighter in while it is heating.
Ashtrays
For vehicles with a removable
ashtray, the ashtray can be placed
into the front console cupholders.
To open the ashtray, lift the lid of the
ashtray. After using, close the lid.
To empty the ashtray for cleaning,
slightly turn the upper part of the
ashtray counterclockwise and
remove it.
Notice: If papers, pins, or other
flammable items are put in the
ashtray, hot cigarettes or other
smoking materials could ignite
them and possibly damage the
vehicle. Never put flammable
items in the ashtray.
Page 130 of 394
Black plate (28,1)Chevrolet Cruze Owner Manual - 2013 - crc - 10/16/12
5-28 Instruments and Controls
TRUNK OPEN
This message will display when the
trunk is open. Close the trunk
completely.
Engine Cooling System
Messages
A/C OFF DUE TO HIGH
ENGINE TEMP
This message displays when the
engine coolant becomes hotter than
the normal operating temperature.
To avoid added strain on a hot
engine, the air conditioning
compressor automatically turns off.
When the coolant temperature
returns to normal, the air
conditioning compressor turns back
on. You can continue to drive the
vehicle.
If this message continues to appear,
have the system repaired by your
dealer as soon as possible to avoid
damage to the engine.
ENGINE OVERHEATED—
IDLE ENGINE
This message displays when the
engine coolant temperature is too
hot. Stop and allow the vehicle to
idle until it cools down.
ENGINE OVERHEATED —
STOP ENGINE
This message displays and a
continuous chime sounds if the
engine cooling system reaches
unsafe temperatures for operation.
Stop and turn off the vehicle as
soon as it is safe to do so to avoid
severe damage. This message
clears when the engine has cooled
to a safe operating temperature.
HIGH COOLANT
TEMPERATURE
This message displays if the coolant
temperature is hot. See Engine
Overheating on page 10‑19.
Engine Oil Messages
CHANGE ENGINE OIL SOON
This message displays when the
engine oil needs to be changed.
When you change the engine oil, be
sure to reset the Oil Life System.
See Engine Oil Life System on
page 10‑11 andDriver Information
Center (DIC) on page 5‑22 for
information on how to reset the
system. See Engine Oil on
page 10‑9 andMaintenance
Schedule on page 11‑2 for more
information.
OIL PRESSURE LOW —STOP
ENGINE
This message displays if low oil
pressure levels occur. Stop the
vehicle as soon as safely possible
and do not operate it until the cause
of the low oil pressure has been
corrected. Check the oil as soon as
possible and have the vehicle
serviced by your dealer.
Page 183 of 394
Black plate (1,1)Chevrolet Cruze Owner Manual - 2013 - crc - 10/16/12
Climate Controls 8-1
Climate Controls
Climate Control Systems
Climate Control Systems . . . . . . 8-1
Automatic Climate ControlSystem . . . . . . . . . . . . . . . . . . . . . . 8-3
Air Vents
Air Vents . . . . . . . . . . . . . . . . . . . . . . 8-6
Maintenance
Passenger Compartment AirFilter . . . . . . . . . . . . . . . . . . . . . . . . . 8-7
Service . . . . . . . . . . . . . . . . . . . . . . . 8-7
Climate Control
Systems
The heating, cooling, defrosting, and
ventilation for the vehicle can be
controlled with these systems.
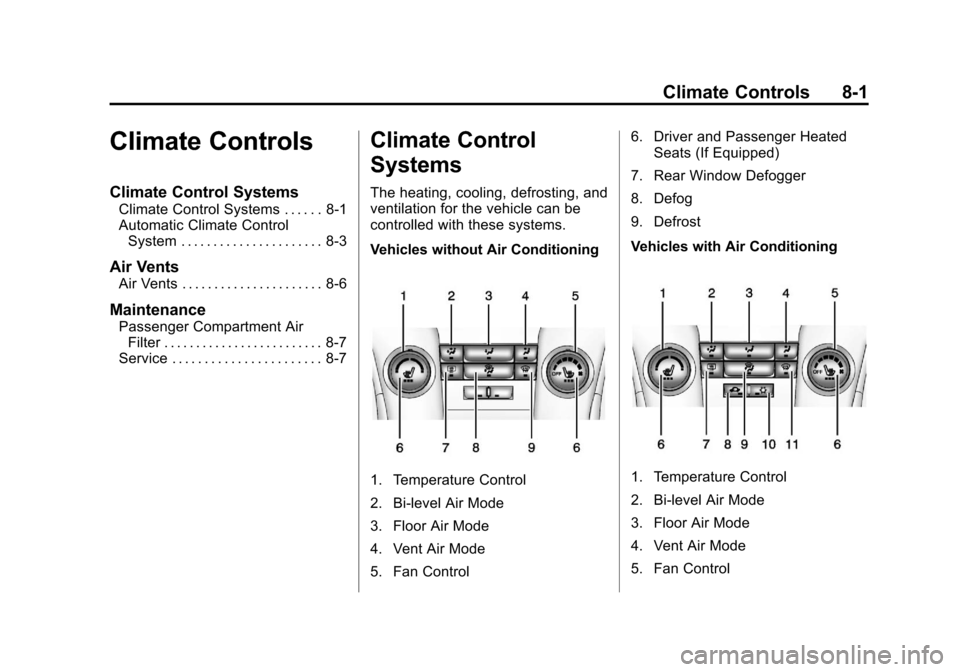
Vehicles without Air Conditioning
1. Temperature Control
2. Bi-level Air Mode
3. Floor Air Mode
4. Vent Air Mode
5. Fan Control 6. Driver and Passenger Heated
Seats (If Equipped)
7. Rear Window Defogger
8. Defog
9. Defrost
Vehicles with Air Conditioning1. Temperature Control
2. Bi-level Air Mode
3. Floor Air Mode
4. Vent Air Mode
5. Fan Control
Page 185 of 394

Black plate (3,1)Chevrolet Cruze Owner Manual - 2013 - crc - 10/16/12
Climate Controls 8-3
For vehicles with heated outside
rearview mirrors, they turn on when
the rear window defogger button is
on and help to clear fog or frost from
the surface of the mirrors. See
Heated Mirrors on page 2‑16.
Notice:Do not use a razor blade
or sharp object to clear the inside
rear window. Do not adhere
anything to the defogger grid
lines in the rear glass. These
actions may damage the rear
defogger. Repairs would not be
covered by your warranty.
Heated Seats (If Equipped): Press
to turn the heated seats on or off.
See Heated Front Seats on
page 3‑5Automatic Climate
Control System
The heating, cooling, and ventilation
for the vehicle can be controlled
with this system.
1. Temperature Control
2. Rear Window Defogger
3. AUTO (Automatic Operation)
4. Defrost
5. Fan Control
6. Driver and Passenger Heated Seats 7. Power
8. Recirculation
9. MODE (Air Delivery Mode)
10. AQS (Air Quality Sensor)
11. Air Conditioning
Automatic Operation
The system automatically controls
the fan speed, air delivery, air
conditioning, and recirculation in
order to heat or cool the vehicle to
the desired temperature.
When the indicator light is on, the
system is in full automatic operation.
If the air delivery mode or fan
setting is manually adjusted, the
auto indicator turns off and displays
will show the selected settings.
To place the system in automatic
mode do the following:
1. Press AUTO.
2. Set the temperature. Allow the
system time to stabilize. Then
adjust the temperature as
needed for best comfort.
Page 243 of 394
Black plate (53,1)Chevrolet Cruze Owner Manual - 2013 - crc - 10/16/12
Driving and Operating 9-53
When towing at high altitude on
steep uphill grades, engine coolant
boils at a lower temperature than at
normal altitudes. If the engine is
turned off immediately after towing
at high altitude on steep uphill
grades, the vehicle could show
signs similar to engine overheating.
To avoid this, let the engine run
while parked, preferably on level
ground, with the transmission in
P (Park) for a few minutes before
turning the engine off. If the
overheat warning comes on, see
Engine Overheating on page 10‑19.
Parking on Hills
{WARNING
Parking the vehicle on a hill with
the trailer attached can be
dangerous. If something goes
wrong, the rig could start to move.
People can be injured, and both
the vehicle and the trailer can be
damaged. When possible, always
park the rig on a flat surface.If parking the rig on a hill:
1. Press the brake pedal, but do
not shift into P (Park) yet. Turn
the wheels into the curb if facing
downhill or into traffic if facing
uphill.
2. Have someone place chocks under the trailer wheels.
3. When the wheel chocks are in place, release the brake pedal
until the chocks absorb the load.
4. Reapply the brake pedal. Then apply the parking brake and shift
into P (Park) for vehicles with an
automatic transmission or into
gear for vehicles with a manual
transmission.
5. Release the brake pedal.
Leaving After Parking on a Hill
1. Apply and hold the brake pedal while you:
.Start the engine.
.Shift into a gear.
.Release the parking brake. 2. Let up on the brake pedal.
3. Drive slowly until the trailer is
clear of the chocks.
4. Stop and have someone pick up and store the chocks.
Maintenance When Trailer
Towing
The vehicle needs service more
often when pulling a trailer. See the
Maintenance Schedule on
page 11‑2. Things that are
especially important in trailer
operation are automatic
transmission fluid, engine oil, axle
lubricant, belts, cooling system and
brake system. Inspect these before
and during the trip.
Check periodically to see that all
hitch nuts and bolts are tight.
Page 244 of 394
Black plate (54,1)Chevrolet Cruze Owner Manual - 2013 - crc - 10/16/12
9-54 Driving and Operating
Engine Cooling When Trailer
Towing
The cooling system may temporarily
overheat during severe operating
conditions. SeeEngine Overheating
on page 10‑19.
Trailer Towing (Fuel
Economy Model)
The vehicle is neither designed nor
intended to tow a trailer.
Trailer Towing (Except
Fuel Economy Model)
Before pulling a trailer, there are
three important considerations that
have to do with weight:
.The weight of the trailer.
.The weight of the trailer tongue.
.The total weight on your
vehicle's tires.
Weight of the Trailer
How heavy can a trailer safely be?
It should never weigh more than
454 kg (1,000 lbs). But even that
can be too heavy.
It depends on how the rig is used.
For example, speed, altitude, road
grades, outside temperature, and
how much the vehicle is used to pull
a trailer are all important. It can
depend on any special equipment
on the vehicle, and the amount of
tongue weight the vehicle can carry.
See “Weight of the Trailer Tongue”
later in this section.
Maximum trailer weight is calculated
assuming only the driver is in the
tow vehicle and it has all the
required trailering equipment. The
weight of additional optional
equipment, passengers, and cargo
in the tow vehicle must be
subtracted from the maximum trailer
weight.
Ask your dealer for trailering
information or advice .
Weight of the Trailer Tongue
The tongue load (1) of any trailer is
an important weight to measure
because it affects the total gross
weight of the vehicle. The Gross
Vehicle Weight (GVW) includes the
curb weight of the vehicle, any
cargo carried in it, and the people
who will be riding in the vehicle.
If there are a lot of options,
equipment, passengers, or cargo in
the vehicle, it will reduce the tongue
weight the vehicle can carry, which
will also reduce the trailer weight the
vehicle can tow. If towing a trailer,
the tongue load must be added to
the GVW because the vehicle will
be carrying that weight, too. See
Vehicle Load Limits on page 9‑10.
Page 247 of 394
Black plate (1,1)Chevrolet Cruze Owner Manual - 2013 - crc - 10/16/12
Vehicle Care 10-1
Vehicle Care
General Information
General Information . . . . . . . . . . 10-2
California Proposition65 Warning . . . . . . . . . . . . . . . . . 10-2
California Perchlorate Materials Requirements . . . . 10-3
Accessories and Modifications . . . . . . . . . . . . . . . 10-3
Vehicle Checks
Doing Your OwnService Work . . . . . . . . . . . . . . . 10-3
Hood . . . . . . . . . . . . . . . . . . . . . . . . 10-4
Engine Compartment Overview . . . . . . . . . . . . . . . . . . . 10-6
Engine Oil . . . . . . . . . . . . . . . . . . . 10-9
Engine Oil Life System . . . . . 10-11
Automatic Transmission Fluid . . . . . . . . . . . . . . . . . . . . . . 10-12
Manual Transmission Fluid . . . . . . . . . . . . . . . . . . . . . . 10-13
Hydraulic Clutch . . . . . . . . . . . . 10-13
Engine Air Cleaner/Filter . . . . 10-13
Cooling System . . . . . . . . . . . . 10-15
Engine Coolant . . . . . . . . . . . . . 10-15
Engine Overheating . . . . . . . . 10-19 Overheated Engine
Protection
Operating Mode . . . . . . . . . . . 10-20
Washer Fluid . . . . . . . . . . . . . . . 10-20
Brakes . . . . . . . . . . . . . . . . . . . . . 10-21
Brake Fluid . . . . . . . . . . . . . . . . . 10-22
Battery . . . . . . . . . . . . . . . . . . . . . 10-24
Starter Switch Check . . . . . . . 10-24
Automatic Transmission Shift Lock Control Function
Check . . . . . . . . . . . . . . . . . . . . . 10-25
Ignition Transmission Lock Check . . . . . . . . . . . . . . . . . . . . . 10-25
Park Brake and P (Park) Mechanism Check . . . . . . . . 10-25
Wiper Blade Replacement . . . . . . . . . . . . . . 10-26
Headlamp Aiming
Headlamp Aiming . . . . . . . . . . 10-26
Bulb Replacement
Bulb Replacement . . . . . . . . . . 10-27
Halogen Headlamps . . . . . . . . 10-27
Headlamps, Front TurnSignal and Parking
Lamps . . . . . . . . . . . . . . . . . . . . 10-27 Taillamps, Turn Signal,
Sidemarker, Stoplamps,
and Back-Up Lamps . . . . . . 10-29
License Plate Lamp . . . . . . . . 10-31
Replacement Bulbs . . . . . . . . . 10-32
Electrical System
Electrical System Overload . . . . . . . . . . . . . . . . . . 10-32
Fuses and Circuit Breakers . . . . . . . . . . . . . . . . . . 10-33
Engine Compartment Fuse Block . . . . . . . . . . . . . . . . . . . . . 10-33
Instrument Panel Fuse Block . . . . . . . . . . . . . . . . . . . . . 10-37
Wheels and Tires
Tires . . . . . . . . . . . . . . . . . . . . . . . . 10-38
All-Season Tires . . . . . . . . . . . . 10-39
Winter Tires . . . . . . . . . . . . . . . . 10-40
Low-Profile Tires . . . . . . . . . . . 10-40
Summer Tires . . . . . . . . . . . . . . 10-40
Tire Sidewall Labeling . . . . . . 10-41
Tire Designations . . . . . . . . . . . 10-43
Tire Terminology andDefinitions . . . . . . . . . . . . . . . . 10-44
Tire Pressure . . . . . . . . . . . . . . . 10-47
Tire Pressure Monitor System . . . . . . . . . . . . . . . . . . . 10-48