2013 CHEVROLET CORVETTE horn
[x] Cancel search: hornPage 9 of 414

Black plate (3,1)Chevrolet Corvette Owner Manual - 2013 - crc2 - 11/8/12
In Brief 1-3
A.Air Vents on page 8‑6.
B. Head-Up Display Controls (If Equipped). See Head-Up
Display (HUD) on page 5‑30.
C. Turn and Lane-Change Lever. See Turn and Lane-Change
Signals on page 6‑4.
Cruise Control on page 9‑42.
Fog Lamps on page 6‑5.
Exterior Lamp Controls on
page 6‑1.
D. Manual Shift Paddles (If Equipped). See Automatic
Transmission on page 9‑25.
E. Driver Information Center (DIC)
on page 5‑25.
F. Instrument Cluster on page 5‑9.
G. Windshield Wiper/Washer on
page 5‑4.
H. Driver Information Center (DIC) Buttons. See Driver Information
Center (DIC) on page 5‑25.
I. Hazard Warning Flashers on
page 6‑4. J.
Infotainment on page 7‑1.
K. Dual Automatic Climate Control
System on page 8‑1.
L. Fuel Door Release Button. See Filling the Tank on page 9‑47.
Hatch/Trunk Release Button.
See “Hatch/Trunk Release”
under Hatch on page 2‑10.
M. Instrument Panel Illumination
Control on page 6‑6.
N. Convertible Top Switch (If Equipped). See Convertible
Top on page 2‑22.
O. Data Link Connector (DLC) (Out of View). See Malfunction
Indicator Lamp on page 5‑18.
P. Bluetooth Controls (If Equipped). See Bluetooth on
page 7‑17.
Steering Wheel Controls on
page 5‑3 (If Equipped).
Q. Steering Wheel Adjustment on
page 5‑2.
R. Horn on page 5‑4. S. Telescopic Steering Column
Control (If Equipped). See
Steering Wheel Adjustment on
page 5‑2.
T. Keyless Ignition. See Ignition
Positions on page 9‑18.
U. Heated Front Seats on page 3‑7
(If Equipped).
V. Shift Lever (Automatic Shown). See Automatic Transmission on
page 9‑25 orManual
Transmission on page 9‑29.
W. Active Handling System on
page 9‑35.
X. Power Outlets on page 5‑6.
Y. Selective Ride Control on
page 9‑40 (If Equipped).
Z. Parking Brake on page 9‑33.
Page 10 of 414
Black plate (4,1)Chevrolet Corvette Owner Manual - 2013 - crc2 - 11/8/12
1-4 In Brief
Initial Drive
Information
This section provides a brief
overview about some of the
important features that may or may
not be on your specific vehicle.
For more detailed information, refer
to each of the features which can be
found later in this owner manual.
Remote Keyless Entry
(RKE) System
The RKE transmitter is used to lock
and unlock the doors from up to
30 m (100 ft) away from the vehicle.
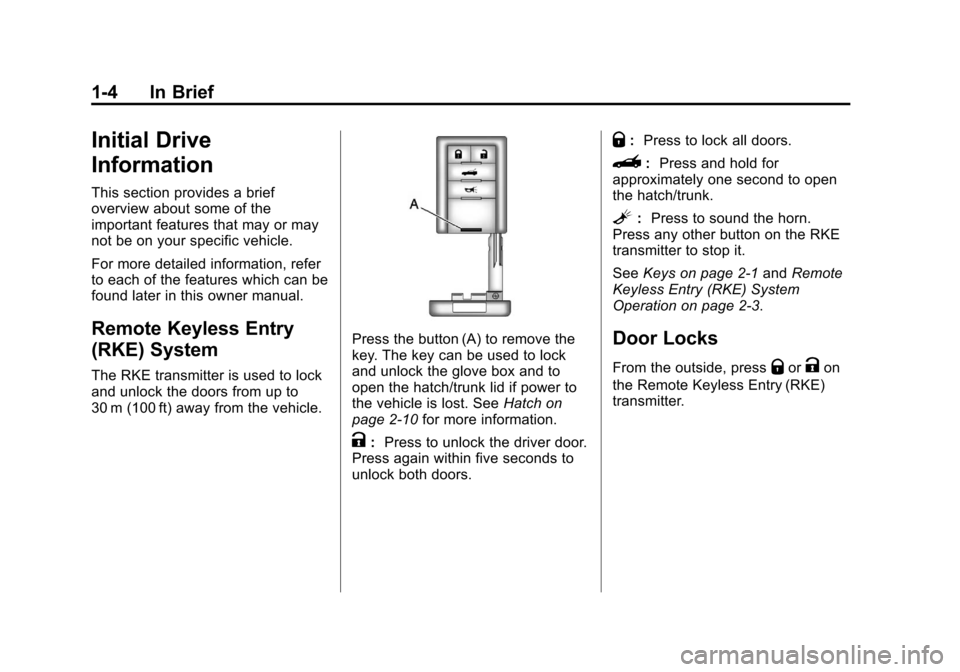
Press the button (A) to remove the
key. The key can be used to lock
and unlock the glove box and to
open the hatch/trunk lid if power to
the vehicle is lost. SeeHatch on
page 2‑10 for more information.
K:Press to unlock the driver door.
Press again within five seconds to
unlock both doors.
Q: Press to lock all doors.
}: Press and hold for
approximately one second to open
the hatch/trunk.
L: Press to sound the horn.
Press any other button on the RKE
transmitter to stop it.
See Keys on page 2‑1 andRemote
Keyless Entry (RKE) System
Operation on page 2‑3.
Door Locks
From the outside, pressQorKon
the Remote Keyless Entry (RKE)
transmitter.
Page 33 of 414
Black plate (3,1)Chevrolet Corvette Owner Manual - 2013 - crc2 - 11/8/12
Keys, Doors, and Windows 2-3
.Check the location. Other
vehicles or objects may be
blocking the signal.
.Check the transmitter's battery.
See“Battery Replacement” later
in this section.
.If the transmitter is still not
working correctly, see your
dealer or a qualified technician
for service.
Remote Keyless Entry
(RKE) System Operation
The Remote Keyless Entry (RKE)
transmitter functions work up to
30 m (100 ft) away from the vehicle.
There are other conditions that can
affect the performance of the
transmitter. See Remote Keyless
Entry (RKE) System on page 2‑2.
The vehicle comes with
two transmitters. Each transmitter
will have a number on top of it,
“1” or“2.” These numbers
correspond to the driver of the
vehicle. For example, the memory seat position for driver 1 will be
recalled when using the transmitter
labeled
“1,”if enabled through the
DIC. See Memory Seats on
page 3‑4 andVehicle
Personalization on page 5‑51 for
more information.
Keyless Unlocking
Press the door handle sensor to
unlock and open the doors if the
RKE transmitter is within range. See
Door Locks on page 2‑7 and
“Passive Door Unlock” under
Vehicle Personalization on
page 5‑51 for additional information.
Keyless Locking
The doors lock after several
seconds if all doors are closed and
at least one RKE transmitter has
been removed from the interior of
the vehicle. To customize whether
the doors automatically lock when
exiting the vehicle, see “Passive
Door Locking” underVehicle
Personalization on page 5‑51 for
additional information. Keyless Trunk Opening
Press the hatch/trunk release button
located on the rear of the hatch/
trunk lid above the license plate to
open the trunk if the RKE
transmitter is within range. See
Hatch on page 2‑10
for additional
information.
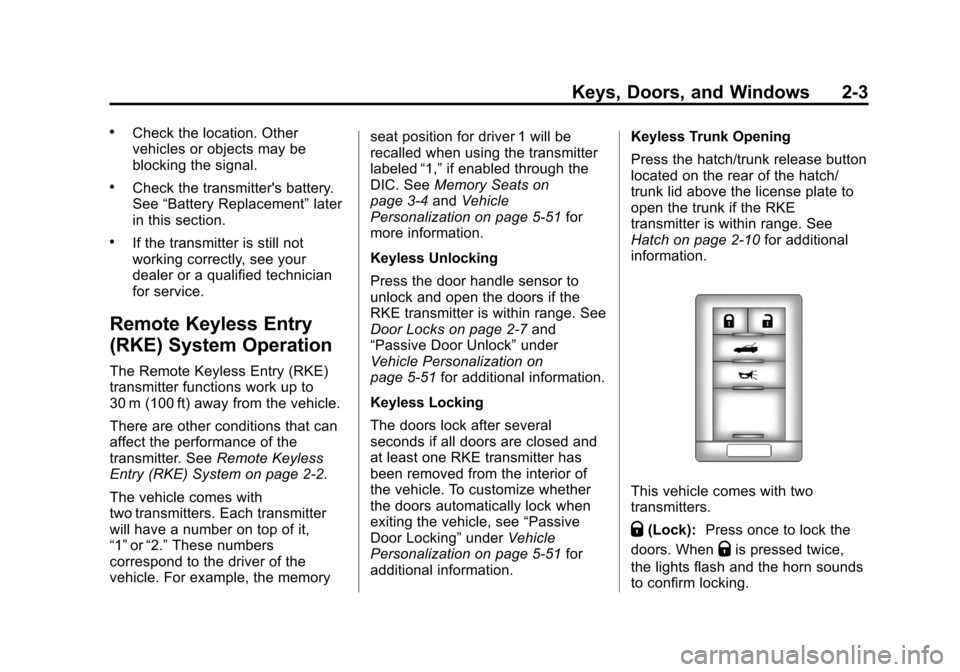
This vehicle comes with two
transmitters.
Q(Lock): Press once to lock the
doors. When
Qis pressed twice,
the lights flash and the horn sounds
to confirm locking.
Page 34 of 414
Black plate (4,1)Chevrolet Corvette Owner Manual - 2013 - crc2 - 11/8/12
2-4 Keys, Doors, and Windows
K(Unlock):Press once to unlock
only the driver door. Press
Ktwice
within five seconds to unlock both
doors. The interior lamps may
come on.
Pressing
Kalso recalls the memory
settings. See Memory Seats on
page 3‑4 for more information.
}(Hatch/Trunk): Press and
hold for about one second to unlock
the hatch/trunk. If the engine is
running, the shift lever must be in
P (Park) for an automatic
transmission. For a manual
transmission, the shift lever must be
in N (Neutral) with the parking
brake set.
L(Panic): Press to sound the
horn. Press any other button on the
RKE transmitter to stop it.
Programming Transmitters to
the Vehicle
Only RKE transmitters programmed
to this vehicle will work. If a
transmitter is lost or stolen, a replacement can be purchased and
programmed through your dealer.
The vehicle can be reprogrammed
so that lost or stolen transmitters no
longer work. Each vehicle can have
up to four transmitters
programmed to it.
Programming with a Recognized
Transmitter
A new transmitter can be
programmed to the vehicle when
there is one recognized transmitter.
For vehicles sold in Canada, two
recognized transmitters are required
to program a new transmitter.
1. The vehicle must be off.
2. Both the recognized and new
transmitters must be with you.
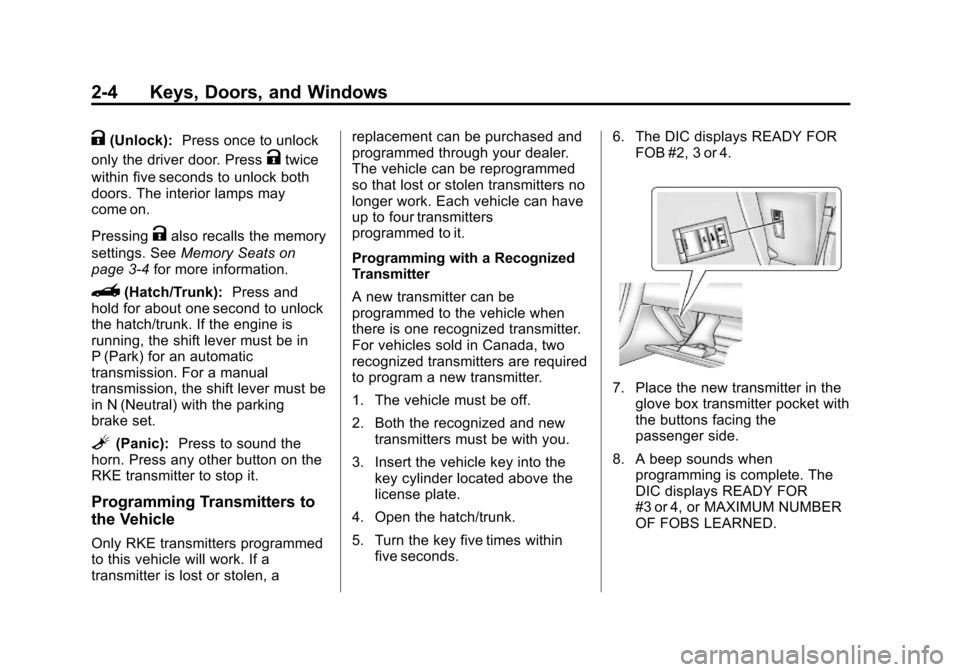
3. Insert the vehicle key into the key cylinder located above the
license plate.
4. Open the hatch/trunk.
5. Turn the key five times within five seconds. 6. The DIC displays READY FOR
FOB #2, 3 or 4.
7. Place the new transmitter in theglove box transmitter pocket with
the buttons facing the
passenger side.
8. A beep sounds when programming is complete. The
DIC displays READY FOR
#3 or 4, or MAXIMUM NUMBER
OF FOBS LEARNED.
Page 39 of 414
Black plate (9,1)Chevrolet Corvette Owner Manual - 2013 - crc2 - 11/8/12
Keys, Doors, and Windows 2-9
Q(Lock):Press to lock the doors.
When pressed, a beep sounds.
If the door is closed when pressed,
the indicator light comes on for a
few seconds, then turns off. If the
door is open when pressed, the
indicator light stays on.
Automatic Door Locks
The vehicle is programmed so that
when the doors are closed, the
ignition is on, and the shift lever is
moved out of P (Park) for automatic
transmissions, or when vehicle
speed becomes faster than 13 km/h
(8 mph) for manual transmissions,
both doors will lock.
Use the power door unlock switch to
unlock the door when the vehicle is
not in P (Park). When the door is
closed again, the doors will lock
either when your foot is removed
from the brake or the vehicle speed
becomes faster than
13 km/h (8 mph).
Automatic Door Unlock
The vehicle is programmed so that
when the shift lever is moved into
P (Park) for automatic transmission
vehicles or when the ignition is
turned off or is in Retained
Accessory Power (RAP) for manual
transmission vehicles, both doors
will unlock.
With the vehicle stopped and the
engine running, door unlocking can
be programmed through the Driver
Information Center (DIC). This
allows the driver to choose various
unlock settings. For programming
information, see Vehicle
Personalization on page 5‑51.
Lockout Protection
The vehicle can be programmed to
sound the horn three times and
unlock the driver door when both
doors are closed and there is a
Remote Keyless Entry (RKE)
transmitter inside the vehicle. When
the driver door is opened, a
reminder chime will sound. The
vehicle will remain locked only when
at least one transmitter has been
removed from the vehicle and both
doors are closed. See Vehicle
Personalization on page 5‑51.
Page 43 of 414

Black plate (13,1)Chevrolet Corvette Owner Manual - 2013 - crc2 - 11/8/12
Keys, Doors, and Windows 2-13
door lock switch. The security light
should flash. Remove the RKE
transmitter from inside the vehicle
and close the door. The security
light stops flashing and stays on.
After 30 seconds, the light should
turn off.
The vehicle can be programmed to
automatically lock the doors and
arm the theft-deterrent system when
you exit the vehicle. SeeVehicle
Personalization on page 5‑51.
If a door or the hatch/trunk is
opened without using the RKE
transmitter, the alarm goes off. The
horn sounds for two minutes, then
goes off to save battery power. The
vehicle will not start without a RKE
transmitter present.
The theft-deterrent system does not
arm if the driver door is locked with
the power door lock switch after the
doors are closed.
If the RKE transmitter is removed
from the vehicle while a passenger
is in it, have them lock the doors after they are closed. The alarm will
not arm, so the passenger will not
set it off.
Testing the Alarm
To test the system use the following
procedure.
1. Make sure the trunk lid/hatch is
latched.
2. Lower the window on the driver door.
3. Manually arm the system.
4. Close the doors and wait 30 seconds.
5. Reach through the open window and manually pull the release
lever on the floor.
6. Press the
Kbutton on the
transmitter to turn off the alarm.
If the alarm does not sound, check
to see if the horn works. The horn
fuse may be blown. See Fuses and
Circuit Breakers on page 10‑45.
If the horn works, but the alarm
does not go off, see your dealer.
Disarming the System
Press theKbutton on the RKE
transmitter or squeeze the door
handle sensor while the transmitter
is near the vehicle to unlock a door.
Unlocking a door any other way sets
off the alarm. If the alarm sounds,
press the
Kbutton on the RKE
transmitter to disarm it.
Do not leave the key or device that
disarms or deactivates the
theft-deterrent system in the vehicle.
Immobilizer
See Radio Frequency Statement on
page 13‑20 for information
regarding Part 15 of the Federal
Communications Commission (FCC)
rules and Industry Canada
Standards RSS-GEN/210/220/310.
Page 105 of 414
Black plate (1,1)Chevrolet Corvette Owner Manual - 2013 - crc2 - 11/8/12
Instruments and Controls 5-1
Instruments and
Controls
Controls
Steering Wheel Adjustment . . . 5-2
Steering Wheel Controls . . . . . . 5-3
Horn . . . . . . . . . . . . . . . . . . . . . . . . . . 5-4
Windshield Wiper/Washer . . . . . 5-4
Compass . . . . . . . . . . . . . . . . . . . . . 5-5
Clock . . . . . . . . . . . . . . . . . . . . . . . . . 5-6
Power Outlets . . . . . . . . . . . . . . . . . 5-6
Cigarette Lighter . . . . . . . . . . . . . . 5-7
Ashtrays . . . . . . . . . . . . . . . . . . . . . . 5-7
Warning Lights, Gauges, and
Indicators
Warning Lights, Gauges, andIndicators . . . . . . . . . . . . . . . . . . . . 5-8
Instrument Cluster . . . . . . . . . . . . 5-9
Speedometer . . . . . . . . . . . . . . . . 5-12
Odometer . . . . . . . . . . . . . . . . . . . . 5-12
Tachometer . . . . . . . . . . . . . . . . . . 5-12
Fuel Gauge . . . . . . . . . . . . . . . . . . 5-12
Boost Gauge (ZR1) . . . . . . . . . . 5-13
Engine Oil Pressure Gauge . . . . . . . . . . . . . . . . . . . . . . 5-14 Engine Coolant Temperature
Gauge . . . . . . . . . . . . . . . . . . . . . . 5-15
Voltmeter Gauge . . . . . . . . . . . . . 5-16
Safety Belt Reminders . . . . . . . 5-16
Airbag Readiness Light . . . . . . 5-16
Passenger Airbag Status Indicator . . . . . . . . . . . . . . . . . . . . 5-17
Malfunction Indicator Lamp . . . . . . . . . . . . . 5-18
Brake System Warning Light . . . . . . . . . . . . . . . . . . . . . . . 5-20
Antilock Brake System (ABS) Warning Light . . . . . . . . . . . . . . 5-21
One-to-Four Shift Light (Manual Transmission) . . . . . 5-21
Traction Off Light . . . . . . . . . . . . 5-22
StabiliTrak
®OFF Light . . . . . . . 5-22
Active Handling System Light . . . . . . . . . . . . . . . . . . . . . . . 5-23
Tire Pressure Light . . . . . . . . . . 5-23
Security Light . . . . . . . . . . . . . . . . 5-24
High-Beam On Light . . . . . . . . . 5-24
Front Fog Lamp Light . . . . . . . . 5-24
Lamps On Reminder . . . . . . . . . 5-25
Information Displays
Driver Information Center (DIC) . . . . . . . . . . . . . . . 5-25
Head-Up Display (HUD) . . . . . 5-30
Vehicle Messages
Vehicle Messages . . . . . . . . . . . 5-34
Battery Voltage and Charging Messages . . . . . . . . . . . . . . . . . . 5-34
Brake System Messages . . . . 5-35
Convertible Top Messages . . . 5-36
Cruise Control Messages . . . . 5-37
Door Ajar Messages . . . . . . . . . 5-37
Engine Cooling System Messages . . . . . . . . . . . . . . . . . . 5-38
Engine Oil Messages . . . . . . . . 5-39
Engine Power Messages . . . . 5-39
Fuel System Messages . . . . . . 5-40
Key and Lock Messages . . . . . 5-40
Lamp Messages . . . . . . . . . . . . . 5-42
Ride Control System Messages . . . . . . . . . . . . . . . . . . 5-42
Safety Belt Messages . . . . . . . 5-46
Service Vehicle Messages . . . 5-47
Starting the Vehicle Messages . . . . . . . . . . . . . . . . . . 5-47
Tire Messages . . . . . . . . . . . . . . . 5-48
Transmission Messages . . . . . 5-50
Vehicle Reminder Messages . . . . . . . . . . . . . . . . . . 5-51
Washer Fluid Messages . . . . . 5-51
Vehicle Personalization
Vehicle Personalization . . . . . . 5-51
Page 108 of 414
Black plate (4,1)Chevrolet Corvette Owner Manual - 2013 - crc2 - 11/8/12
5-4 Instruments and Controls
.Press and holdworxfor
more than four seconds to scan
all of the CDs loaded. The CD
goes to the next CD, plays the
first 10 seconds of each track,
then goes to the next CD. Press
again to stop scanning.
+
e−e(Volume): Press to
increase or to decrease the radio
volume.
1 to 6 (Preset Pushbuttons):
Press to play stations that are
programmed on the radio preset
pushbuttons.
Horn
Press near or on the horn symbols
on the steering wheel pad to sound
the horn.
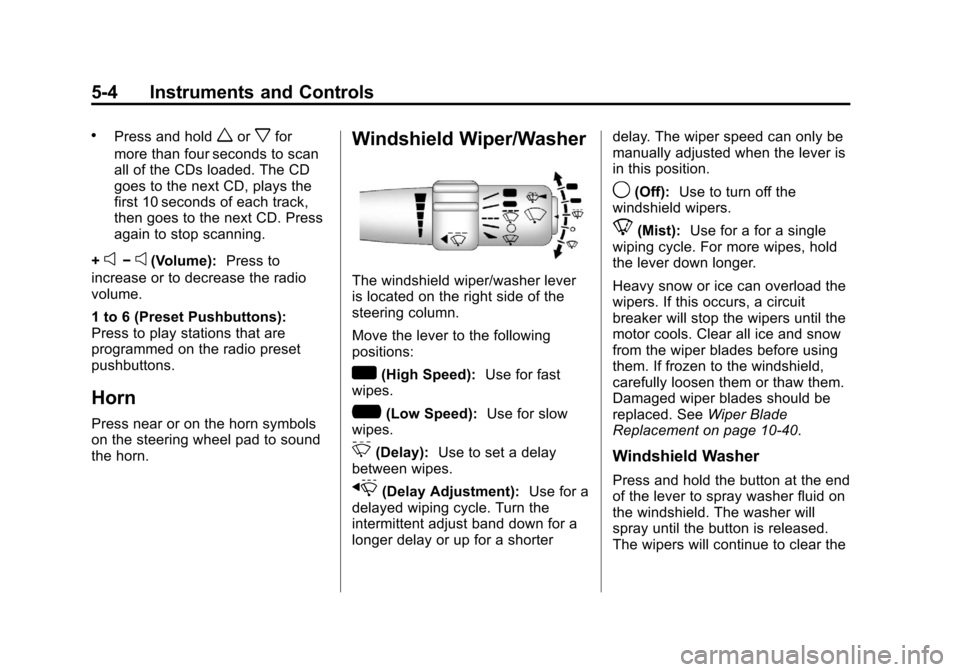
Windshield Wiper/Washer
The windshield wiper/washer lever
is located on the right side of the
steering column.
Move the lever to the following
positions:
w(High Speed): Use for fast
wipes.
?(Low Speed): Use for slow
wipes.
3(Delay): Use to set a delay
between wipes.
x(Delay Adjustment): Use for a
delayed wiping cycle. Turn the
intermittent adjust band down for a
longer delay or up for a shorter delay. The wiper speed can only be
manually adjusted when the lever is
in this position.
9(Off):
Use to turn off the
windshield wipers.
8(Mist): Use for a for a single
wiping cycle. For more wipes, hold
the lever down longer.
Heavy snow or ice can overload the
wipers. If this occurs, a circuit
breaker will stop the wipers until the
motor cools. Clear all ice and snow
from the wiper blades before using
them. If frozen to the windshield,
carefully loosen them or thaw them.
Damaged wiper blades should be
replaced. See Wiper Blade
Replacement on page 10‑40.
Windshield Washer
Press and hold the button at the end
of the lever to spray washer fluid on
the windshield. The washer will
spray until the button is released.
The wipers will continue to clear the