2013 CHEVROLET CORVETTE change time
[x] Cancel search: change timePage 28 of 414

Black plate (22,1)Chevrolet Corvette Owner Manual - 2013 - crc2 - 11/8/12
1-22 In Brief
Car Wash Guidelines
Automatic car washes are not
recommended for this vehicle.
Some car washes cause damage to
the vehicle, the wheels, and the
convertible top, if the vehicle is so
equipped.
If you drive the vehicle through an
automatic car wash that does not
have enough clearance for the
undercarriage and/or wide rear tires
and wheels, you could damage the
vehicle. Verify with the manager of
the car wash that the vehicle will fit
before entering the car wash or use
a touchless car wash. See“Washing
Your Vehicle” underExterior Care
on page 10‑79.
Engine Oil Life System
The engine oil life system calculates
engine oil life based on vehicle use
and displays a DIC message when
it is necessary to change the engine
oil and filter. The oil life system
should be reset to 100% only
following an oil change. Resetting the Oil Life System
1. Press the TRIP button so the
OIL LIFE percentage is
displayed.
2. Press RESET and hold for two seconds. OIL LIFE
REMAINING 100% will appear.
See Engine Oil Life System on
page 10‑19.
Driving for Better Fuel
Economy
Driving habits can affect fuel
mileage. Here are some driving tips
to get the best fuel economy
possible.
.Avoid fast starts and accelerate
smoothly.
.Brake gradually and avoid
abrupt stops.
.Avoid idling the engine for long
periods of time.
.When road and weather
conditions are appropriate, use
cruise control, if equipped.
.Always follow posted speed
limits or drive more slowly when
conditions require.
.Keep vehicle tires properly
inflated.
.Combine several trips into a
single trip.
.Replace the vehicle's tires with
the same TPC Spec number
molded into the tire's sidewall
near the size.
.Follow recommended scheduled
maintenance.
Premium Fuel
This vehicle's engine was designed
to use premium unleaded gasoline.
See Recommended Fuel on
page 9‑45.
Page 67 of 414
Black plate (7,1)Chevrolet Corvette Owner Manual - 2013 - crc2 - 11/8/12
Seats and Restraints 3-7
{WARNING
If either seatback is not locked, it
could move forward in a sudden
stop or crash. That could cause
injury to the person sitting there.
Always push and pull on the
seatbacks to be sure they are
locked.
To return a seatback to the sitting
position, lift up on the latch, raise
the seatback, and push the
seatback rearward. Push and pull
on the seatback to make sure it is
locked in place.
Heated Front Seats
{WARNING
If you cannot feel temperature
change or pain to the skin, the
seat heater may cause burns. To
reduce the risk of burns, people
with such a condition should use
care when using the seat heater,
especially for long periods of
time. Do not place anything on
the seat that insulates against
heat, such as a blanket, cushion,
cover, or similar item. This may
cause the seat heater to
overheat. An overheated seat
heater may cause a burn or may
damage the seat.
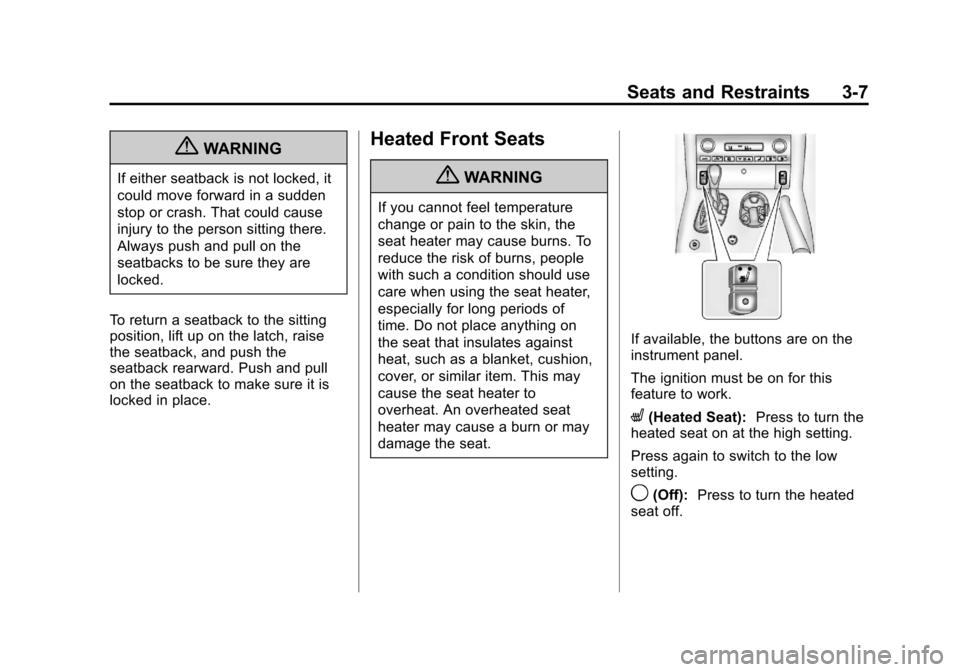
If available, the buttons are on the
instrument panel.
The ignition must be on for this
feature to work.
L(Heated Seat): Press to turn the
heated seat on at the high setting.
Press again to switch to the low
setting.
9(Off): Press to turn the heated
seat off.
Page 109 of 414

Black plate (5,1)Chevrolet Corvette Owner Manual - 2013 - crc2 - 11/8/12
Instruments and Controls 5-5
window for about six seconds after
the button is released and then stop
or return to your preset speed.
{WARNING
In freezing weather, do not use
the washer until the windshield is
warmed. Otherwise the washer
fluid can form ice on the
windshield, blocking your vision.
If the fluid in the windshield washer
fluid reservoir is low a message may
appear on the Driver Information
Center (DIC) display. See Washer
Fluid Messages on page 5‑51. It will
take 15 seconds after the bottle is
refilled for this message to turn off.
For information on the correct
washer fluid to use, see Washer
Fluid on page 10‑32 and
Recommended Fluids and
Lubricants on page 11‑12.
Compass
Compass Operation
With the compass feature on, each
time the vehicle is started, the
compass will take a few seconds to
adjust and display the current
compass heading. For example, NE
is displayed for north-east.
Compass Calibration
PressPonce to turn the compass
display on or off.
If after several seconds the display
does not show a compass heading,
there may be a strong magnetic
field interfering with the compass.
Interference can be caused by a
magnetic antenna mount, note pad
holder, or similar object. If the
letter C or CAL appears in the
compass window, the compass
needs calibration.
Depending on the mirror, in order to
calibrate, CAL must be displayed in
the mirror compass windows. If CAL is not displayed, press
Pfor
several seconds or until CAL is
displayed.
If the compass has map lamps, it
can be placed in calibration mode
by pressing and holding the left map
light button until a C appears on the
compass display.
The mirror compass can be
calibrated by driving the vehicle in
circles at 8 km/h (5 mph) or less until
the display reads a direction.
Compass Variance
The mirror is set to zone eight.
If you do not live in zone eight or
drive out of the area, the compass
variance needs to be changed to
the appropriate zone.
To adjust for compass variance:
1. Find your current location and variance zone number on the
zone map that follows.
Page 110 of 414

Black plate (6,1)Chevrolet Corvette Owner Manual - 2013 - crc2 - 11/8/12
5-6 Instruments and Controls
2. Press and holdPuntil a Z and
a zone number displays. The
compass is now in zone mode.
3. Once the zone number displays, press
Prepeatedly until you
reach the correct zone number.
Stop pressing
Pand the mirror
returns to normal operation.
Clock
To set the clock:
1. Press and hold H until the correct hour displays.
2. Press and hold M until the correct minute displays.
The clock mode automatically times
out with the changed display format
set as the current default setting.
To set the clock on a navigation
system, see the navigation manual.
Power Outlets
The accessory power outlet can be
used to plug in electrical equipment,
such as a cell phone or MP3 player.
The accessory power outlet is
located inside the center console
storage compartment, on the
forward left side.
Remove the cover to access and
replace when not in use.
{WARNING
Power is always supplied to the
outlets. Do not leave electrical
equipment plugged in when the
vehicle is not in use because the
vehicle could catch fire and cause
injury or death.
Notice: Leaving electrical
equipment plugged in for an
extended period of time while the
vehicle is off will drain the
battery. Always unplug electrical
equipment when not in use and
do not plug in equipment that
exceeds the maximum 20 ampere
rating.
Certain electrical accessories may
not be compatible with the
accessory power outlet and could
overload vehicle or adapter fuses.
If a problem is experienced, see
your dealer.
Page 117 of 414
Black plate (13,1)Chevrolet Corvette Owner Manual - 2013 - crc2 - 11/8/12
Instruments and Controls 5-13
Here are five things that some
owners ask about. All these things
are normal and do not indicate that
anything is wrong with the fuel
gauge.
.At the service station, the gas
pump shuts off before the gauge
reads the full.
.It takes a little more or less fuel
to fill up than the gauge
indicated. For example, the
gauge may have indicated half
full, but it took a little more or
less than half of the tank's
capacity to fill the tank.
.The gauge pointer may move
while cornering, braking or
speeding up.
.The gauge may not indicate the
tank is empty when the ignition
is turned off.
.The gauge reading may change
slightly within the first several
minutes after starting the
vehicle.See
“DIC Operation and Displays”
in Driver Information Center (DIC)
on page 5‑25 for more information.
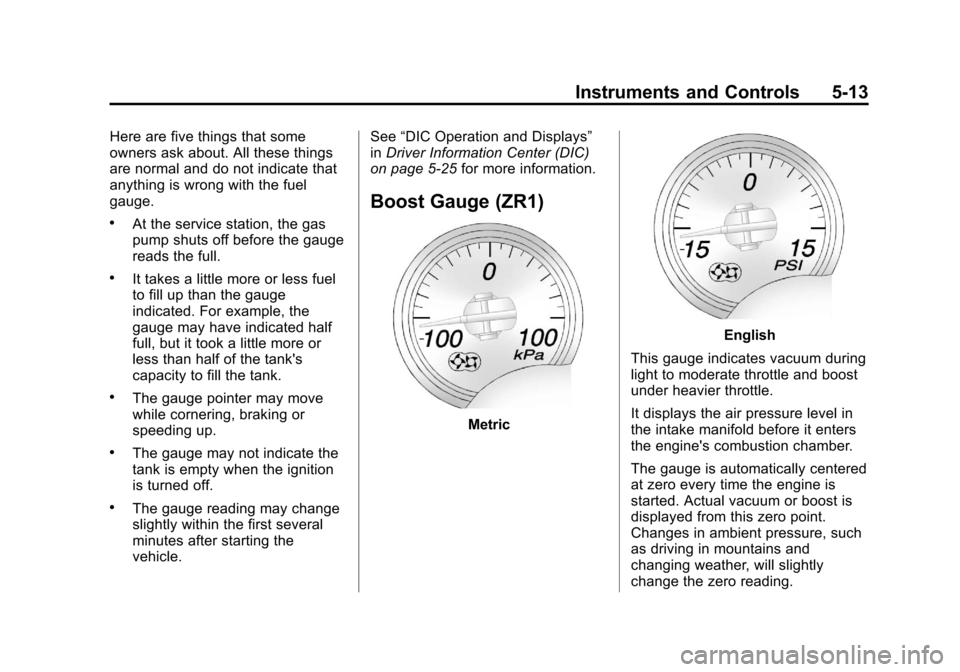
Boost Gauge (ZR1)
Metric
English
This gauge indicates vacuum during
light to moderate throttle and boost
under heavier throttle.
It displays the air pressure level in
the intake manifold before it enters
the engine's combustion chamber.
The gauge is automatically centered
at zero every time the engine is
started. Actual vacuum or boost is
displayed from this zero point.
Changes in ambient pressure, such
as driving in mountains and
changing weather, will slightly
change the zero reading.
Page 130 of 414
Black plate (26,1)Chevrolet Corvette Owner Manual - 2013 - crc2 - 11/8/12
5-26 Instruments and Controls
2(Gauges):Press this button to
display gauge information like oil
pressure and temperature, coolant
temperature, automatic transmission
fluid temperature, if equipped,
battery voltage, and front/rear tire
pressures.
TRIP: Press this button to display
your total and trip distance driven,
the elapsed time function, your
average speed, and the engine
oil life.
OPTION: Press this button to
choose personal options that are
available on your vehicle,
depending on the options your
vehicle is equipped with, such as
door locks, easy entry seats, and
language.
RESET: Press this button, used
along with the other buttons, to
reset system functions, select
personal options, and turn off or
acknowledge messages on the DIC.Fuel Button
The fuel button displays average
fuel economy and instantaneous
fuel economy, calculated for your
specific driving conditions, and
range information.
Average Fuel Economy: The
average fuel economy is viewed as
a long-term approximation of your
overall driving conditions. You
should reset the average fuel
economy display every time you
refuel. If you press the RESET
button in this mode while you are
driving, the system will reset this
display and begin figuring fuel
economy from that point in time.
Press the fuel button to display
average fuel economy, such as:
.AVERAGE FUEL ECONOMY
11.7 L/100 km or
.AVERAGE FUEL ECONOMY
20.1 MPG Instantaneous Fuel Economy:
Instantaneous fuel economy reflects
only the fuel economy that the
vehicle has right now and will
change frequently as driving
conditions change. Unlike average
fuel economy, this menu item
cannot be reset.
Press the fuel button again to
display instantaneous fuel economy,
such as:
.INSTANT FUEL ECONOMY
11.7 L/100 km or
.INSTANT FUEL ECONOMY
20.1 MPG
Fuel Range: The range calculates
the remaining distance you can
drive without refueling. It is based
on fuel economy and the fuel
remaining in the tank.
Press the fuel button again to
display the range, such as:
.RANGE 48 km or
.RANGE 30 MI
Page 131 of 414
Black plate (27,1)Chevrolet Corvette Owner Manual - 2013 - crc2 - 11/8/12
Instruments and Controls 5-27
If the LOW FUEL warning is
displayed or if RANGE is less than
64 km (40 miles), the display will
read RANGE LOW.
The fuel economy data used to
determine fuel range is an average
of recent driving conditions. As your
driving conditions change, this data
is gradually updated automatically.
If the vehicle has been idling for a
long time, the range displayed on
the DIC could be abnormally low.
The vehicle must be driven
8 to 16 km (5 to 10 miles) to get an
accurate reading.
Gauges Button
The gauges button displays oil
pressure, oil temperature, coolant
temperature, transmission fluid
temperature for automatic
transmission vehicles only, battery
voltage, and tire pressure
information.Oil Pressure:
This display shows
the oil pressure.
Press the gauges button to display
the oil pressure, such as:
.OIL PRESSURE 276 kPa or
.OIL PRESSURE 40 PSI
Oil Temperature: This display
shows the oil temperature.
Press the gauges button again to
display the oil temperature, such as:
.OIL TEMPERATURE 112°C or
.OIL TEMPERATURE 234°F
If the oil temperature is low, the
display will show OIL
TEMPERATURE LOW. If the oil
temperature is high, the display will
show OIL TEMPERATURE HIGH.
Coolant Temperature: This display
shows the engine coolant
temperature. Press the gauges button again to
display the coolant temperature,
such as:
.COOLANT TEMPERATURE
51°C or
.COOLANT
TEMPERATURE 123°F
If the coolant temperature is low, the
display will show COOLANT
TEMPERATURE LOW. If the
coolant temperature is high, the
display will show COOLANT
TEMPERATURE HIGH.
Transmission Fluid
Temperature: If you have an
automatic transmission vehicle, this
display shows the automatic
transmission fluid temperature.
Press the gauges button again to
display the automatic transmission
fluid temperature, such as:
.TRANS FLUID TEMP 51°C or
.TRANS FLUID TEMP 123°F
Page 133 of 414
Black plate (29,1)Chevrolet Corvette Owner Manual - 2013 - crc2 - 11/8/12
Instruments and Controls 5-29
The kilometers (miles) since the last
ignition cycle will be set into the trip
odometer.
Elapsed Timer:Press the TRIP
button until ELAPSED TIMER is
displayed, such as
ELAPSED TIMER .00.
When the ignition is in on, the DIC
can be used as a stopwatch. The
display can show hours, minutes,
and seconds. The elapsed time
indicator will record up to 23 hours,
59 minutes, and 59 seconds, then it
will reset to zero and continue
counting. The display appears as
ELAPSED TIMER .00 in the elapsed
time function.
You can start or stop the elapsed
time by pressing the RESET button.
To reset the elapsed time to zero,
press the RESET button for
three seconds while the timer is
displayed.
Pressing and holding the RESET
button for at least 10 seconds will
reset the timer display to the time
since last ignition cycle. Average Speed:
Press the TRIP
button until the average speed is
displayed, such as:
.AVERAGE SPEED 100 km/h or
.AVERAGE SPEED 62 MPH
Press and hold the RESET button to
reset to 0.0 km/h (mph).
Engine Oil Life: Press the TRIP
button until the engine oil life is
displayed, such as OIL LIFE
REMAINING 89%.
This is an estimate of the engine
oil's remaining useful life. It will
show 100% when the system is
reset after an oil change. It will alert
you to change the oil on a schedule
consistent with your driving
conditions.
When the remaining oil life is low,
the system will alert you with the
message CHANGE ENGINE OIL. Remember, you must reset the
engine oil life system yourself after
each oil change. It will not reset
itself. To reset the system, see
Engine Oil Life System on
page 10‑19. Be careful not to reset
the engine oil life system
accidentally at any time other than
when the oil has just been changed.
It cannot be reset accurately until
the next oil change.
See
Maintenance Schedule on
page 11‑3 andEngine Oil on
page 10‑13 for more information.
OPTION Button
The OPTION button allows you to
access the PERSONAL OPTIONS
menu and customize the
personalization settings on your
vehicle. See Vehicle Personalization
on page 5‑51 for more information.