2013 CHEVROLET CORVETTE instrument panel
[x] Cancel search: instrument panelPage 260 of 414
Black plate (48,1)Chevrolet Corvette Owner Manual - 2013 - crc2 - 11/8/12
9-48 Driving and Operating
WARNING (Continued)
.Fuel can spray out if the fuel
cap is opened too quickly.
This spray can happen if the
tank is nearly full, and is
more likely in hot weather.
Open the fuel cap slowly and
wait for any hiss noise to stop
then unscrew the cap all
the way
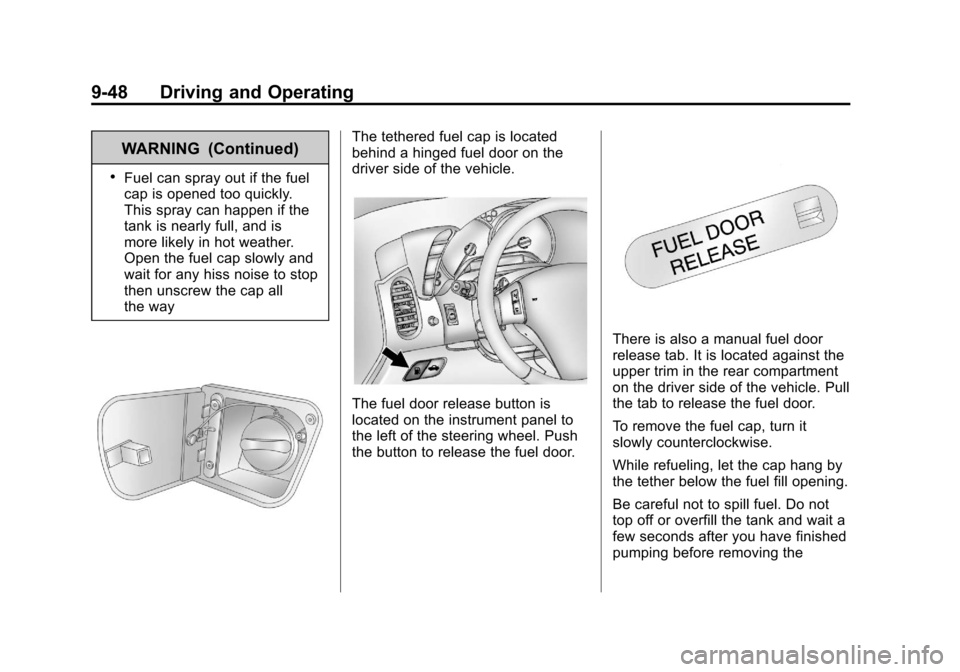
The tethered fuel cap is located
behind a hinged fuel door on the
driver side of the vehicle.
The fuel door release button is
located on the instrument panel to
the left of the steering wheel. Push
the button to release the fuel door.
There is also a manual fuel door
release tab. It is located against the
upper trim in the rear compartment
on the driver side of the vehicle. Pull
the tab to release the fuel door.
To remove the fuel cap, turn it
slowly counterclockwise.
While refueling, let the cap hang by
the tether below the fuel fill opening.
Be careful not to spill fuel. Do not
top off or overfill the tank and wait a
few seconds after you have finished
pumping before removing the
Page 263 of 414

Black plate (1,1)Chevrolet Corvette Owner Manual - 2013 - crc2 - 11/8/12
Vehicle Care 10-1
Vehicle Care
General Information
General Information . . . . . . . . . . 10-2
California Proposition65 Warning . . . . . . . . . . . . . . . . . 10-2
California Perchlorate Materials Requirements . . . . 10-3
Accessories and Modifications . . . . . . . . . . . . . . . 10-3
Lifting the Vehicle . . . . . . . . . . . . 10-3
Vehicle Checks
Doing Your Own Service Work . . . . . . . . . . . . . . . 10-6
Hood . . . . . . . . . . . . . . . . . . . . . . . . 10-7
Engine Compartment Overview . . . . . . . . . . . . . . . . . . . 10-8
Engine Oil . . . . . . . . . . . . . . . . . . 10-13
Engine Oil Life System . . . . . 10-19
Automatic Transmission Fluid . . . . . . . . . . . . . . . . . . . . . . 10-20
Manual Transmission Fluid . . . . . . . . . . . . . . . . . . . . . . 10-21
Hydraulic Clutch . . . . . . . . . . . . 10-21
Engine Air Cleaner/Filter . . . . 10-21
Cooling System (Engine) . . . 10-24 Cooling System
(Intercooler) . . . . . . . . . . . . . . . 10-25
Engine Coolant . . . . . . . . . . . . . 10-26
Engine Overheating . . . . . . . . 10-29
Overheated Engine Protection
Operating Mode . . . . . . . . . . . 10-30
Power Steering Fluid . . . . . . . 10-31
Washer Fluid . . . . . . . . . . . . . . . 10-32
Brakes . . . . . . . . . . . . . . . . . . . . . 10-32
Brake Fluid . . . . . . . . . . . . . . . . . 10-36
Battery . . . . . . . . . . . . . . . . . . . . . 10-37
Rear Axle . . . . . . . . . . . . . . . . . . 10-38
Starter Switch Check . . . . . . . 10-38
Automatic Transmission Shift Lock Control Function
Check . . . . . . . . . . . . . . . . . . . . . 10-39
Park Brake and P (Park) Mechanism Check . . . . . . . . 10-39
Wiper Blade Replacement . . . . . . . . . . . . . . 10-40
Windshield Replacement . . . 10-41
Headlamp Aiming
Headlamp Aiming . . . . . . . . . . 10-41
Bulb Replacement
Bulb Replacement . . . . . . . . . . 10-41
Halogen Bulbs . . . . . . . . . . . . . . 10-41 High Intensity Discharge
(HID) Lighting . . . . . . . . . . . . . 10-42
Headlamps, Front Turn Signal and Parking
Lamps . . . . . . . . . . . . . . . . . . . . 10-42
Taillamps, Turn Signal, and Stoplamps . . . . . . . . . . . . . . . . 10-43
Back-Up Lamps . . . . . . . . . . . . 10-43
License Plate Lamp . . . . . . . . 10-44
Replacement Bulbs . . . . . . . . . 10-44
Electrical System
Electrical System Overload . . . . . . . . . . . . . . . . . . 10-44
Fuses and Circuit Breakers . . . . . . . . . . . . . . . . . . 10-45
Engine Compartment Fuse
Block . . . . . . . . . . . . . . . . . . . . . 10-45
Instrument Panel Fuse Block . . . . . . . . . . . . . . . . . . . . . 10-48
Wheels and Tires
Tires . . . . . . . . . . . . . . . . . . . . . . . . 10-52
Winter Tires . . . . . . . . . . . . . . . . 10-53
Run-Flat Tires . . . . . . . . . . . . . . 10-53
Low-Profile Tires . . . . . . . . . . . 10-54
Sport Cup Tires . . . . . . . . . . . . 10-55
Summer Tires . . . . . . . . . . . . . . 10-55
Tire Sidewall Labeling . . . . . . 10-55
Page 269 of 414
Black plate (7,1)Chevrolet Corvette Owner Manual - 2013 - crc2 - 11/8/12
Vehicle Care 10-7
This vehicle has an airbag system.
Before attempting to do your own
service work, seeServicing the
Airbag-Equipped Vehicle on
page 3‑24.
Keep a record with all parts receipts
and list the mileage and the date of
any service work performed. See
Maintenance Records on
page 11‑15.
Notice: Even small amounts of
contamination can cause damage
to vehicle systems. Do not allow
contaminants to contact the
fluids, reservoir caps,
or dipsticks.Hood
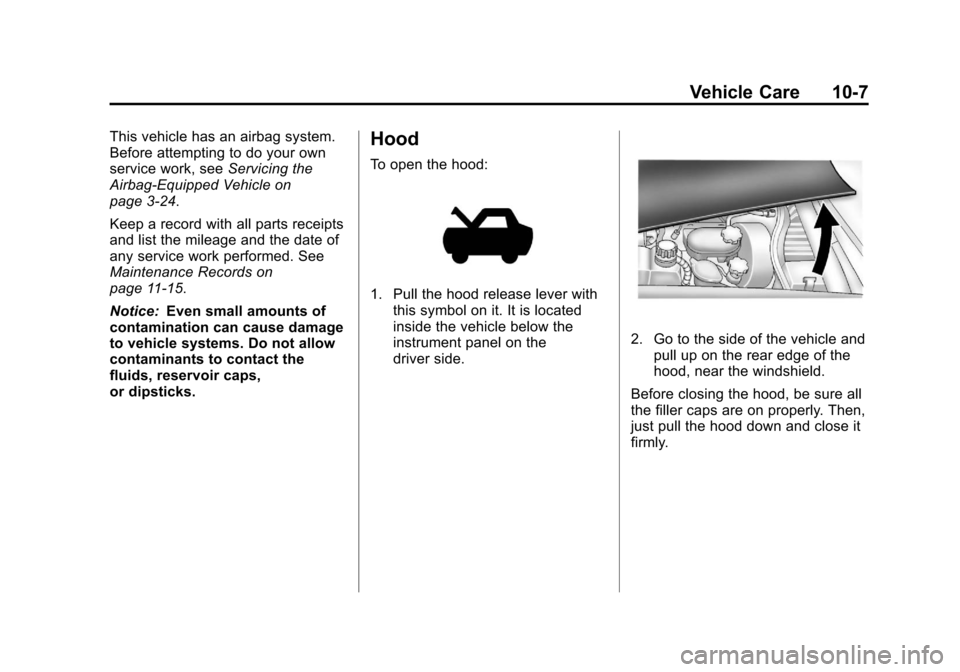
To open the hood:
1. Pull the hood release lever with this symbol on it. It is located
inside the vehicle below the
instrument panel on the
driver side.
2. Go to the side of the vehicle andpull up on the rear edge of the
hood, near the windshield.
Before closing the hood, be sure all
the filler caps are on properly. Then,
just pull the hood down and close it
firmly.
Page 291 of 414
Black plate (29,1)Chevrolet Corvette Owner Manual - 2013 - crc2 - 11/8/12
Vehicle Care 10-29
5. Replace the pressure cap tightly.Check the level in the surge tank
when the system has cooled
down. If the coolant is not at the
proper level, repeat Steps 1−4,
then reinstall the pressure cap.
If the coolant is not at the proper
level when the system cools
down again, see the dealer.
Notice: If the pressure cap is not
tightly installed, coolant loss and
possible engine damage may
occur. Be sure the cap is properly
and tightly secured.
Engine Overheating
The vehicle has several indicators
to warn of engine overheating.
There is an engine coolant
temperature gauge on the
instrument panel cluster. See
Engine Coolant Temperature Gauge
on page 5‑15. The vehicle may also
display a COOLANT OVER
TEMPERATURE message on the Driver Information Center (DIC). See
Engine Cooling System Messages
on page 5‑38.
If the decision is made not to lift the
hood but to get service help right
away. See
Roadside Assistance
Program (Mexico) on page 13‑7 or
Roadside Assistance Program (U.S.
and Canada) on page 13‑10.
If the decision is made to lift the
hood, make sure the vehicle is
parked on a level surface.
Then check to see if the engine
cooling fan is running. If the engine
is overheating, the fan should be
running. If it is not, do not continue
to run the engine and have the
vehicle serviced.
Notice: Running the engine
without coolant may cause
damage or a fire. Vehicle damage
would not be covered by the
warranty. See Overheated Engine
Protection Operating Mode on
page 10‑30 for information on
driving to a safe place in an
emergency.
If Steam is Coming from the
Engine
{WARNING
Steam from an overheated engine
can burn you badly, even if you
just open the hood. Stay away
from the engine if you see or hear
steam coming from it. Turn it off
and get everyone away from the
vehicle until it cools down. Wait
until there is no sign of steam or
coolant before you open
the hood.
If you keep driving when the
vehicles engine is overheated,
the liquids in it can catch fire. You
or others could be badly burned.
Stop the engine if it overheats,
and get out of the vehicle until the
engine is cool.
(Continued)
Page 310 of 414

Black plate (48,1)Chevrolet Corvette Owner Manual - 2013 - crc2 - 11/8/12
10-48 Vehicle Care
Mini-Relays Usage40 Rear Defog
41 Windshield Wiper High/Low
42 Windshield Wiper Run/Accessory
43 Crank
44 Powertrain Ignition 1
45 Windshield Wiper On/Off
47 Low-Beam Headlamp Spare Fuses Usage
48 Spare
49 Spare
50 Spare
51 Spare
52 Spare
53 Spare
54 Fuse Puller
Diodes Usage § Diode 1
§ Wiper
§ Diode 2Instrument Panel Fuse
Block
The instrument panel fuse block is
located on the passenger side of the
vehicle, under the instrument panel
and under the toe-board.
Remove the carpet and toe-board
covering to access the fuse block by
pulling at the top of each corner of
the panel. Open the fuse block
cover to access the fuses.
You can remove fuses using the
fuse puller.
Page 347 of 414
Black plate (85,1)Chevrolet Corvette Owner Manual - 2013 - crc2 - 11/8/12
Vehicle Care 10-85
If the soil is not completely
removed, it may be necessary to
use a commercial upholstery
cleaner or spot lifter. Test a small
hidden area for colorfastness before
using a commercial upholstery
cleaner or spot lifter. If ring
formation occurs, clean the entire
fabric or carpet.
Following the cleaning process, a
paper towel can be used to blot
excess moisture.
Cleaning High Gloss Surfaces
and Vehicle Information and
Radio Displays
For vehicles with high gloss
surfaces or vehicle displays, use a
microfiber cloth to wipe surfaces.
Before wiping the surface with the
microfiber cloth, use a soft bristle
brush to remove dirt that could
scratch the surface. Then use the
microfiber cloth by gently rubbing to
clean. Never use window cleaners
or solvents. Periodically hand wash
the microfiber cloth separately,using mild soap. Do not use bleach
or fabric softener. Rinse thoroughly
and air dry before next use.
Notice:
Do not attach a device
with a suction cup to the display.
This may cause damage and
would not be covered by the
warranty.
Instrument Panel, Leather,
Vinyl, and Other Plastic
Surfaces
Use a soft microfiber cloth
dampened with water to remove
dust and loose dirt. For a more
thorough cleaning, use a soft
microfiber cloth dampened with a
mild soap solution.
Notice: Soaking or saturating
leather, especially perforated
leather, as well as other interior
surfaces, may cause permanent
damage. Wipe excess moisture
from these surfaces after
cleaning and allow them to dry
naturally. Never use heat, steam,
spot lifters, or spot removers. Do not use cleaners that contain
silicone or wax-based products.
Cleaners containing these
solvents can permanently change
the appearance and feel of leather
or soft trim and are not
recommended.
Do not use cleaners that increase
gloss, especially on the instrument
panel. Reflected glare can decrease
visibility through the windshield
under certain conditions.
Notice:
Use of air fresheners may
cause permanent damage to
plastics and painted surfaces.
If an air freshener comes in
contact with any plastic or
painted surface in the vehicle,
blot immediately and clean with a
soft cloth dampened with a mild
soap solution. Damage caused by
air fresheners would not be
covered by the vehicle warranty.
Page 369 of 414
Black plate (1,1)Chevrolet Corvette Owner Manual - 2013 - crc2 - 11/8/12
Technical Data 12-1
Technical Data
Vehicle Identification
Vehicle IdentificationNumber (VIN) . . . . . . . . . . . . . . 12-1
Service Parts Identification Label . . . . . . . . . . . . . . . . . . . . . . . 12-1
Vehicle Data
Capacities andSpecifications . . . . . . . . . . . . . . 12-2
Engine Drive Belt Routing . . . 12-5
Vehicle Identification
Vehicle Identification
Number (VIN)
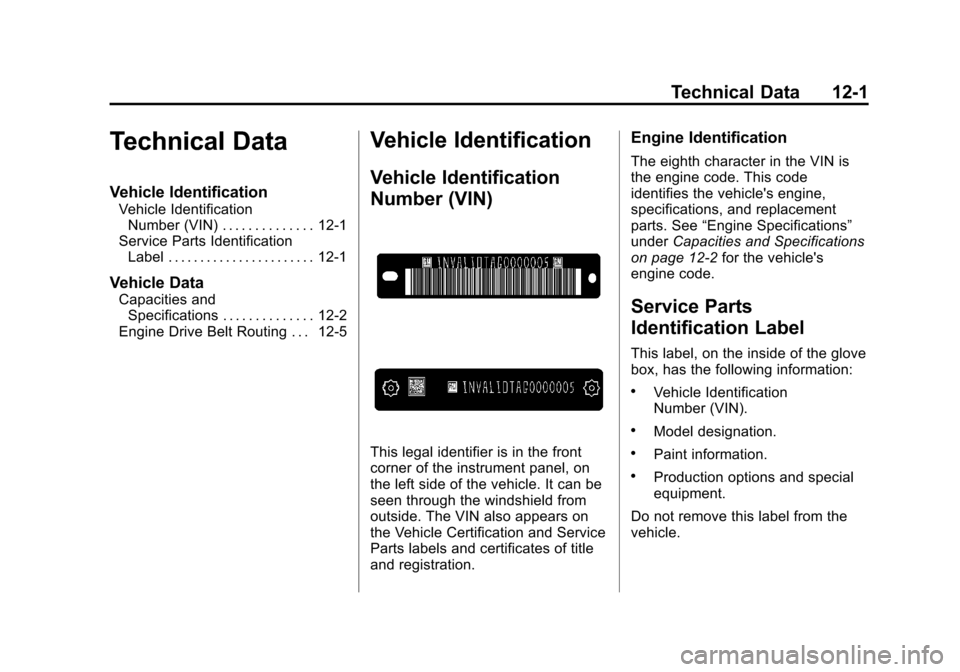
This legal identifier is in the front
corner of the instrument panel, on
the left side of the vehicle. It can be
seen through the windshield from
outside. The VIN also appears on
the Vehicle Certification and Service
Parts labels and certificates of title
and registration.
Engine Identification
The eighth character in the VIN is
the engine code. This code
identifies the vehicle's engine,
specifications, and replacement
parts. See “Engine Specifications”
under Capacities and Specifications
on page 12‑2 for the vehicle's
engine code.
Service Parts
Identification Label
This label, on the inside of the glove
box, has the following information:
.Vehicle Identification
Number (VIN).
.Model designation.
.Paint information.
.Production options and special
equipment.
Do not remove this label from the
vehicle.
Page 376 of 414
Black plate (2,1)Chevrolet Corvette Owner Manual - 2013 - crc2 - 11/8/12
13-2 Customer Information
Customer Information
Customer Satisfaction
Procedure (U.S. and
Canada)
Your satisfaction and goodwill are
important to your dealer and to
Chevrolet. Normally, any concerns
with the sales transaction or the
operation of the vehicle will be
resolved by your dealer's sales or
service departments. Sometimes,
however, despite the best intentions
of all concerned, misunderstandings
can occur. If your concern has not
been resolved to your satisfaction,
the following steps should be taken:
STEP ONE:Discuss your concern
with a member of dealership
management. Normally, concerns
can be quickly resolved at that level.
If the matter has already been
reviewed with the sales, service,
or parts manager, contact the owner
of your dealership or the general
manager. STEP TWO:
If after contacting a
member of dealership management,
it appears your concern cannot be
resolved by your dealership without
further help, in the U.S., call the
Chevrolet Customer Assistance
Center at 1-800-222-1020. In
Canada, call General Motors of
Canada Customer Care Centre at
1-800-263-3777 (English),
or 1-800-263-7854 (French).
We encourage you to call the
toll-free number in order to give your
inquiry prompt attention. Have the
following information available to
give the Customer Assistance
representative:
.Vehicle Identification
Number (VIN). This is available
from the vehicle registration or
title, or the plate at the top left of
the instrument panel and visible
through the windshield.
.Dealership name and location.
.Vehicle delivery date and
present mileage. When contacting Chevrolet,
remember that your concern will
likely be resolved at a dealer's
facility. That is why we suggest
following Step One first.
STEP THREE
—U.S. Owners:
Both General Motors and your
dealer are committed to making
sure you are completely satisfied
with your new vehicle. However,
if you continue to remain unsatisfied
after following the procedure
outlined in Steps One and Two, you
can file with the Better Business
Bureau (BBB) Auto Line
®Program
to enforce your rights.
The BBB Auto Line Program is an
out-of-court program administered
by the Council of Better Business
Bureaus to settle automotive
disputes regarding vehicle repairs or
the interpretation of the New Vehicle
Limited Warranty. Although you may
be required to resort to this informal
dispute resolution program prior to
filing a court action, use of the
program is free of charge and your
case will generally be heard within