2013 CHEVROLET CORVETTE warning light
[x] Cancel search: warning lightPage 244 of 414
Black plate (32,1)Chevrolet Corvette Owner Manual - 2013 - crc2 - 11/8/12
9-32 Driving and Operating
Be careful when shifting from
1 (First) to 2 (Second) or
downshifting from 6 (Sixth) to
5 (Fifth). The spring will try to pull
the shift lever toward 4 (Fourth) and
3 (Third). Make sure you move the
lever into 2 (Second) or 5 (Fifth).
If you let the shift lever move in the
direction of the pulling, you may end
up shifting from 1 (First) to 4 (Fourth)
or from 6 (Sixth) to 3 (Third).
If the driver does not upshift as the
engine speed approaches fuel shut
off RPM, the engine speed will be
limited to protect the engine. See
Tachometer on page 5‑12for more
information.Brakes
Antilock Brake
System (ABS)
This vehicle has the Antilock Brake
System (ABS), an advanced
electronic braking system that helps
prevent a braking skid.
When the vehicle begins to drive
away, ABS checks itself.
A momentary motor or clicking noise
might be heard while this test is
going on, and it might even be
noticed that the brake pedal moves
a little. This is normal.
If there is a problem with ABS, this
warning light stays on. See Antilock
Brake System (ABS) Warning Light
on page 5‑21. If driving safely on a wet road and it
becomes necessary to slam on the
brakes and continue braking to
avoid a sudden obstacle, a
computer senses that the wheels
are slowing down. If one of the
wheels is about to stop rolling, the
computer will separately work the
brakes at each wheel.
ABS can change the brake pressure
to each wheel, as required, faster
than any driver could. This can help
you steer around the obstacle while
braking hard.
As the brakes are applied, the
computer keeps receiving updates
on wheel speed and controls
braking pressure accordingly.
Page 245 of 414
Black plate (33,1)Chevrolet Corvette Owner Manual - 2013 - crc2 - 11/8/12
Driving and Operating 9-33
Remember: ABS does not change
the time needed to get a foot up to
the brake pedal or always decrease
stopping distance. If you get too
close to the vehicle in front of you,
there will not be enough time to
apply the brakes if that vehicle
suddenly slows or stops. Always
leave enough room up ahead to
stop, even with ABS.
Using ABS
Do not pump the brakes. Just hold
the brake pedal down firmly and let
ABS work. You might hear the ABS
pump or motor operating and feel
the brake pedal pulsate, but this is
normal.
Braking in Emergencies
ABS allows you to steer and brake
at the same time. In many
emergencies, steering can help
more than even the very best
braking.
Parking Brake
The parking brake lever is located to
the right of the center console.
To set the parking brake, hold the
brake pedal down. Pull the parking
brake lever up. If the ignition is on,
the brake system warning light will
come on.
To release the parking brake, hold
the brake pedal down. Then push
the release button in as you move
the parking brake lever all the
way down.
Notice:Driving with the parking
brake on can overheat the brake
system and cause premature
wear or damage to brake system
parts. Make sure that the parking
brake is fully released and the
brake warning light is off before
driving.
Brake Assist
This vehicle has a brake assist
feature designed to assist the driver
in stopping or decreasing vehicle
speed in emergency driving
conditions. This feature uses the
stability system hydraulic brake
control module to supplement the
power brake system under
conditions where the driver has
quickly and forcefully applied the
brake pedal in an attempt to quickly
stop or slow down the vehicle. The
stability system hydraulic brake
control module increases brake
pressure at each corner of the
vehicle until the ABS activates.
Minor brake pedal pulsation or
pedal movement during this time is
normal and the driver should
continue to apply the brake pedal as
the driving situation dictates. The
brake assist feature will
automatically disengage when the
brake pedal is released or brake
pedal pressure is quickly
decreased.
Page 261 of 414
Black plate (49,1)Chevrolet Corvette Owner Manual - 2013 - crc2 - 11/8/12
Driving and Operating 9-49
nozzle. Clean fuel from painted
surfaces as soon as possible. See
Exterior Care on page 10‑79.
When replacing the fuel cap, turn it
clockwise until it clicks. Make sure
the cap is fully installed. The
diagnostic system can determine if
the fuel cap has been left off or
improperly installed. This would
allow fuel to evaporate into the
atmosphere. SeeMalfunction
Indicator Lamp on page 5‑18.
The CHECK GAS CAP message
displays on the Driver Information
Center (DIC) if the fuel cap is not
properly installed. See Fuel System
Messages on page 5‑40 for more
information.
{WARNING
If a fire starts while you are
refueling, do not remove the
nozzle. Shut off the flow of fuel by
shutting off the pump or by
notifying the station attendant.
Leave the area immediately. Notice:
If you need a new fuel
cap, be sure to get the right type.
Your dealer can get one for you.
If you get the wrong type, it may
not fit properly. This may cause
the malfunction indicator lamp to
light and may damage the fuel
tank and emissions system. See
Malfunction Indicator Lamp on
page 5‑18.
Filling a Portable Fuel
Container
{WARNING
Filling a portable fuel container
while it is in the vehicle can cause
fuel vapors that can ignite either
by static electricity or other
means. You or others could be
badly burned and the vehicle
could be damaged. Always:
.Use approved fuel
containers.
(Continued)
WARNING (Continued)
.Remove the container from
the vehicle, trunk, or pickup
bed before filling.
.Place the container on the
ground.
.Place the nozzle inside the fill
opening of the container
before dispensing fuel, and
keep it in contact with the fill
opening until filling is
complete.
.Fill the container no more
than 95% full to allow for
expansion.
.Do not smoke, light matches,
or use lighters while
pumping fuel.
.Avoid using cell phones or
other electronic devices.
Page 263 of 414

Black plate (1,1)Chevrolet Corvette Owner Manual - 2013 - crc2 - 11/8/12
Vehicle Care 10-1
Vehicle Care
General Information
General Information . . . . . . . . . . 10-2
California Proposition65 Warning . . . . . . . . . . . . . . . . . 10-2
California Perchlorate Materials Requirements . . . . 10-3
Accessories and Modifications . . . . . . . . . . . . . . . 10-3
Lifting the Vehicle . . . . . . . . . . . . 10-3
Vehicle Checks
Doing Your Own Service Work . . . . . . . . . . . . . . . 10-6
Hood . . . . . . . . . . . . . . . . . . . . . . . . 10-7
Engine Compartment Overview . . . . . . . . . . . . . . . . . . . 10-8
Engine Oil . . . . . . . . . . . . . . . . . . 10-13
Engine Oil Life System . . . . . 10-19
Automatic Transmission Fluid . . . . . . . . . . . . . . . . . . . . . . 10-20
Manual Transmission Fluid . . . . . . . . . . . . . . . . . . . . . . 10-21
Hydraulic Clutch . . . . . . . . . . . . 10-21
Engine Air Cleaner/Filter . . . . 10-21
Cooling System (Engine) . . . 10-24 Cooling System
(Intercooler) . . . . . . . . . . . . . . . 10-25
Engine Coolant . . . . . . . . . . . . . 10-26
Engine Overheating . . . . . . . . 10-29
Overheated Engine Protection
Operating Mode . . . . . . . . . . . 10-30
Power Steering Fluid . . . . . . . 10-31
Washer Fluid . . . . . . . . . . . . . . . 10-32
Brakes . . . . . . . . . . . . . . . . . . . . . 10-32
Brake Fluid . . . . . . . . . . . . . . . . . 10-36
Battery . . . . . . . . . . . . . . . . . . . . . 10-37
Rear Axle . . . . . . . . . . . . . . . . . . 10-38
Starter Switch Check . . . . . . . 10-38
Automatic Transmission Shift Lock Control Function
Check . . . . . . . . . . . . . . . . . . . . . 10-39
Park Brake and P (Park) Mechanism Check . . . . . . . . 10-39
Wiper Blade Replacement . . . . . . . . . . . . . . 10-40
Windshield Replacement . . . 10-41
Headlamp Aiming
Headlamp Aiming . . . . . . . . . . 10-41
Bulb Replacement
Bulb Replacement . . . . . . . . . . 10-41
Halogen Bulbs . . . . . . . . . . . . . . 10-41 High Intensity Discharge
(HID) Lighting . . . . . . . . . . . . . 10-42
Headlamps, Front Turn Signal and Parking
Lamps . . . . . . . . . . . . . . . . . . . . 10-42
Taillamps, Turn Signal, and Stoplamps . . . . . . . . . . . . . . . . 10-43
Back-Up Lamps . . . . . . . . . . . . 10-43
License Plate Lamp . . . . . . . . 10-44
Replacement Bulbs . . . . . . . . . 10-44
Electrical System
Electrical System Overload . . . . . . . . . . . . . . . . . . 10-44
Fuses and Circuit Breakers . . . . . . . . . . . . . . . . . . 10-45
Engine Compartment Fuse
Block . . . . . . . . . . . . . . . . . . . . . 10-45
Instrument Panel Fuse Block . . . . . . . . . . . . . . . . . . . . . 10-48
Wheels and Tires
Tires . . . . . . . . . . . . . . . . . . . . . . . . 10-52
Winter Tires . . . . . . . . . . . . . . . . 10-53
Run-Flat Tires . . . . . . . . . . . . . . 10-53
Low-Profile Tires . . . . . . . . . . . 10-54
Sport Cup Tires . . . . . . . . . . . . 10-55
Summer Tires . . . . . . . . . . . . . . 10-55
Tire Sidewall Labeling . . . . . . 10-55
Page 292 of 414
Black plate (30,1)Chevrolet Corvette Owner Manual - 2013 - crc2 - 11/8/12
10-30 Vehicle Care
WARNING (Continued)
SeeOverheated Engine
Protection Operating Mode on
page 10‑30 for information on
driving to a safe place in an
emergency.
If No Steam is Coming from
the Engine
If an engine overheat warning is
displayed but no steam can be seen
or heard, the problem may not be
too serious. Sometimes the engine
can get a little too hot when the
vehicle:
.Climbs a long hill on a hot day
.Stops after high-speed driving
.Idles for long periods in traffic
If the overheat warning is displayed
with no sign of steam:
1. Turn the air conditioning off. 2. Turn the heater on to the highest
temperature and to the highest
fan speed. Open the windows as
necessary.
3. If in a traffic jam, shift to N (Neutral) while stopped. If it is
safe to do so, pull off the road,
shift to P (Park) or N (Neutral)
and let the engine idle.
If the temperature overheat gauge is
no longer in the overheat zone or an
overheat warning no longer
displays, the vehicle can be driven.
Continue to drive the vehicle slowly
for about 10 minutes. Keep a safe
vehicle distance from the vehicle in
front. If the warning does not come
back on, continue to drive normally.
If the warning continues, pull over,
stop, and park the vehicle
right away.
If there is no sign of steam, idle the
engine for three minutes while
parked. If the warning is still
displayed, turn off the engine until it cools down. Also, see
“Overheated
Engine Protection Operating Mode”
next in this section.
Overheated Engine
Protection
Operating Mode
This emergency operating mode lets
the vehicle be driven to a safe
place, up to 80 km (50 mi), in an
emergency situation. If an
overheated engine condition exists
and the messages COOLANT
OVER TEMPERATURE and
REDUCED ENGINE POWER are
displayed, along with the check
engine light, an overheat protection
mode which alternates firing groups
of cylinders helps prevent engine
damage. In this mode, there is a
significant loss in power and engine
performance.
Driving extended distances in the
overheat protection mode should be
avoided.
Page 295 of 414
Black plate (33,1)Chevrolet Corvette Owner Manual - 2013 - crc2 - 11/8/12
Vehicle Care 10-33
{WARNING
The brake wear warning sound
means that soon the brakes will
not work well. That could lead to
a crash. When the brake wear
warning sound is heard, have the
vehicle serviced.
Notice: Continuing to drive with
worn-out brake pads could result
in costly brake repair.
Some driving conditions or climates
can cause a brake squeal when the
brakes are first applied or lightly
applied. This does not mean
something is wrong with the brakes.
Brake linings should always be
replaced as complete axle sets.
Brake Wear (Z06, ZR1, manual
transmission Grand Sport
Coupe, and 427 Convertible)
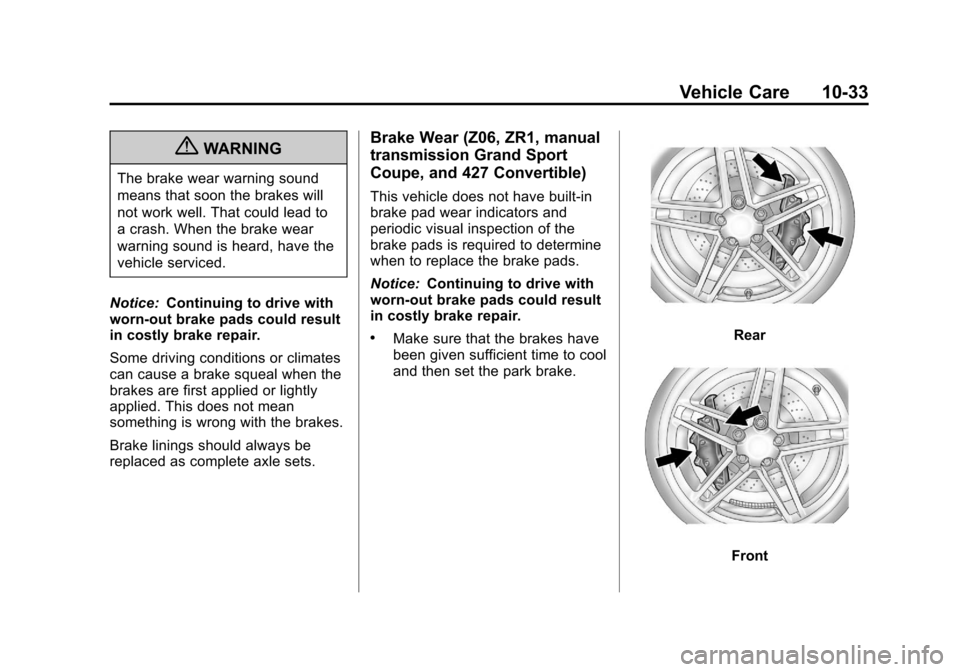
This vehicle does not have built-in
brake pad wear indicators and
periodic visual inspection of the
brake pads is required to determine
when to replace the brake pads.
Notice: Continuing to drive with
worn-out brake pads could result
in costly brake repair.
.Make sure that the brakes have
been given sufficient time to cool
and then set the park brake.Rear
Front
Page 296 of 414
Black plate (34,1)Chevrolet Corvette Owner Manual - 2013 - crc2 - 11/8/12
10-34 Vehicle Care
.Brake pads can be visually
inspected through the wheel by
inspecting the outer brake pads
at each wheel.
.Brake pads should be replaced
when worn to 2 mm of pad
thickness. New pads are 10 mm
thick.
.In addition, brake pad inspection
is required any time the tires are
removed.
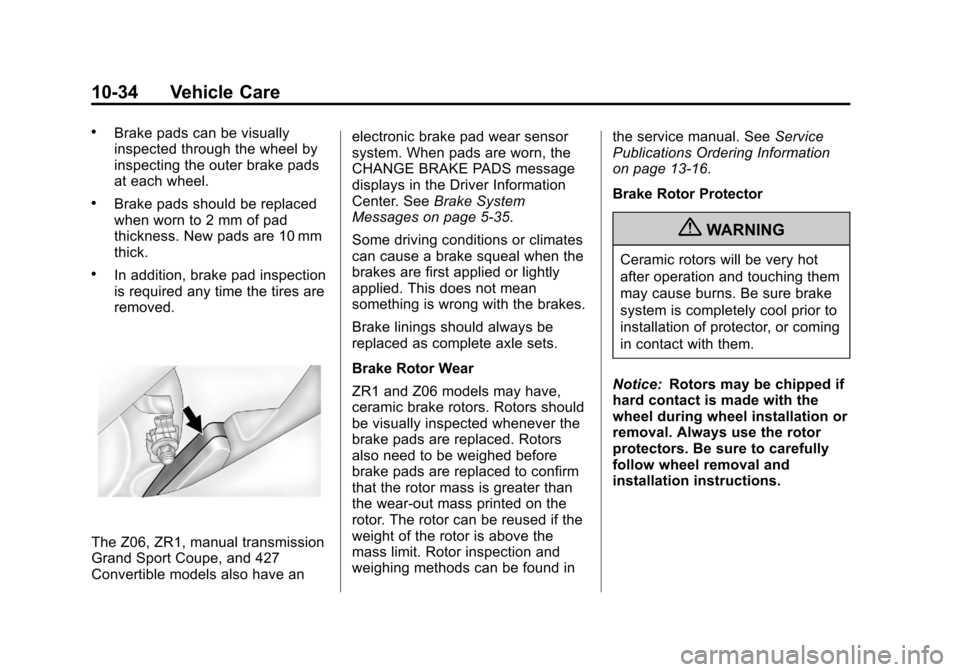
The Z06, ZR1, manual transmission
Grand Sport Coupe, and 427
Convertible models also have anelectronic brake pad wear sensor
system. When pads are worn, the
CHANGE BRAKE PADS message
displays in the Driver Information
Center. See
Brake System
Messages on page 5‑35.
Some driving conditions or climates
can cause a brake squeal when the
brakes are first applied or lightly
applied. This does not mean
something is wrong with the brakes.
Brake linings should always be
replaced as complete axle sets.
Brake Rotor Wear
ZR1 and Z06 models may have,
ceramic brake rotors. Rotors should
be visually inspected whenever the
brake pads are replaced. Rotors
also need to be weighed before
brake pads are replaced to confirm
that the rotor mass is greater than
the wear-out mass printed on the
rotor. The rotor can be reused if the
weight of the rotor is above the
mass limit. Rotor inspection and
weighing methods can be found in the service manual. See
Service
Publications Ordering Information
on page 13‑16.
Brake Rotor Protector
{WARNING
Ceramic rotors will be very hot
after operation and touching them
may cause burns. Be sure brake
system is completely cool prior to
installation of protector, or coming
in contact with them.
Notice: Rotors may be chipped if
hard contact is made with the
wheel during wheel installation or
removal. Always use the rotor
protectors. Be sure to carefully
follow wheel removal and
installation instructions.
Page 304 of 414
Black plate (42,1)Chevrolet Corvette Owner Manual - 2013 - crc2 - 11/8/12
10-42 Vehicle Care
High Intensity Discharge
(HID) Lighting
{WARNING
The high intensity discharge
lighting system operates at a very
high voltage. If you try to service
any of the system components,
you could be seriously injured.
Have your dealer or a qualified
technician service them.
The vehicle may have HID
headlamps. After an HID headlamp
bulb has been replaced, you may
notice that the beam is a slightly
different shade than it was originally.
This is normal.
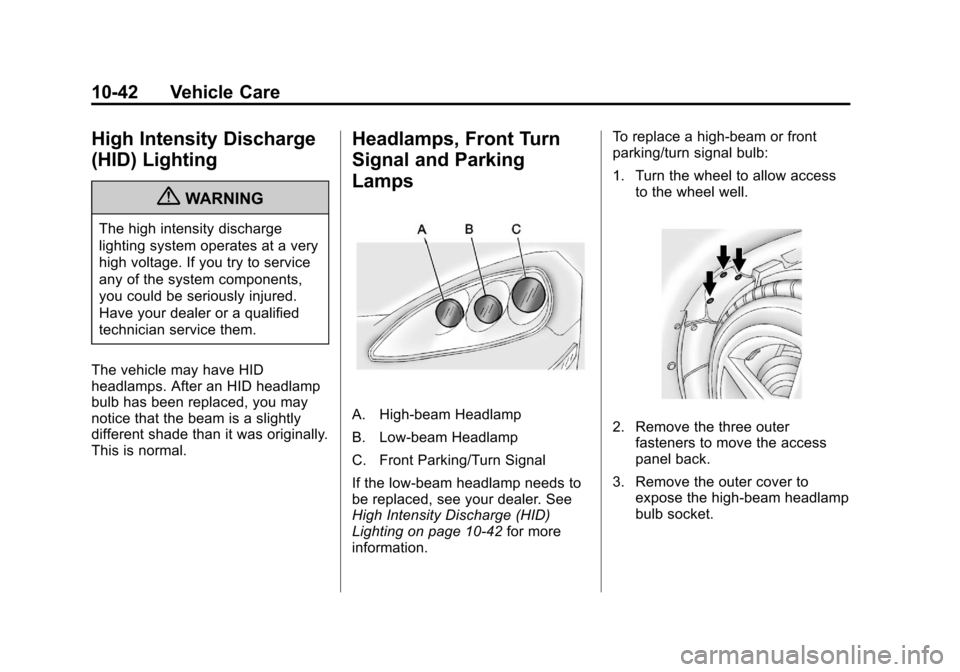
Headlamps, Front Turn
Signal and Parking
Lamps
A. High-beam Headlamp
B. Low-beam Headlamp
C. Front Parking/Turn Signal
If the low-beam headlamp needs to
be replaced, see your dealer. See
High Intensity Discharge (HID)
Lighting on page 10‑42 for more
information. To replace a high-beam or front
parking/turn signal bulb:
1. Turn the wheel to allow access
to the wheel well.2. Remove the three outerfasteners to move the access
panel back.
3. Remove the outer cover to expose the high-beam headlamp
bulb socket.