Page 268 of 414
Black plate (6,1)Chevrolet Corvette Owner Manual - 2013 - crc2 - 11/8/12
10-6 Vehicle Care
1. Locate the rear lifting points (A),according to the illustration
shown.
2. Be sure to place a block or pad between the jack and the
vehicle.3. Lift the vehicle with the jack,making sure the jack spans at
least two of the crossmember
ribs (B).
For more information, see Doing
Your Own Service Work on
page 10‑6.
Vehicle Checks
Doing Your Own
Service Work
{WARNING
It can be dangerous to work on
your vehicle if you do not have
the proper knowledge, service
manual, tools, or parts. Always
follow owner manual procedures
and consult the service manual
for your vehicle before doing any
service work.
If doing some of your own service
work, use the proper service
manual. It tells you much more
about how to service the vehicle
than this manual can. To order the
proper service manual, see Service
Publications Ordering Information
on page 13‑16.
Page 271 of 414

Black plate (9,1)Chevrolet Corvette Owner Manual - 2013 - crc2 - 11/8/12
Vehicle Care 10-9
A. Clutch Master CylinderReservoir (If Equipped). See
Hydraulic Clutch on page 10‑21.
B. Windshield Washer Fluid Reservoir. See “Adding Washer
Fluid” under Washer Fluid on
page 10‑32.
C. Brake Fluid Reservoir. See “Brake Fluid” underBrakes on
page 10‑32.
D. Coolant Surge Tank and Pressure Cap. See Engine
Coolant on page 10‑26.
E. Engine Air Cleaner/Filter on
page 10‑21.
F. Power Steering Fluid Reservoir. See Power Steering Fluid on
page 10‑31.
G. Engine Oil Fill Cap. See “When
to Add Engine Oil” underBrake
Fluid on page 10‑36.
H. Engine Oil Dipstick. See “Checking Engine Oil” under
Engine Oil on page 10‑13. I.
Engine Compartment Fuse
Block on page 10‑45.
J. Passenger Compartment Air Filter (Out of View). See
Passenger Compartment Air
Filter on page 8‑6.
K. Battery on page 10‑37.
If the vehicle has the 6.2L LS3
V8 engine (without the dry sump
engine oil tank) and you are facing
the front of the vehicle.
Page 273 of 414
Black plate (11,1)Chevrolet Corvette Owner Manual - 2013 - crc2 - 11/8/12
Vehicle Care 10-11
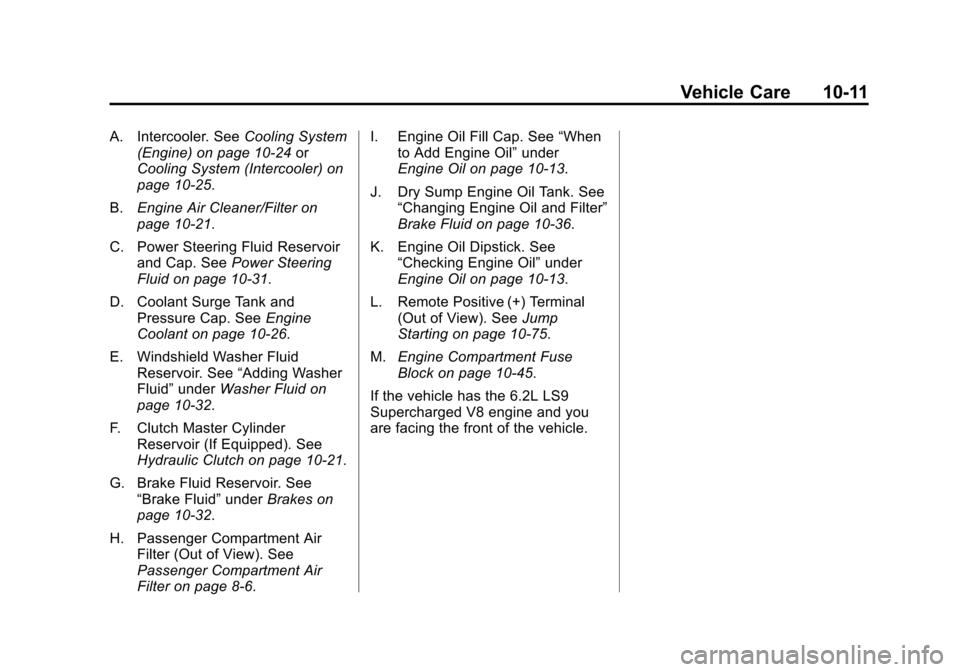
A. Intercooler. SeeCooling System
(Engine) on page 10‑24 or
Cooling System (Intercooler) on
page 10‑25.
B. Engine Air Cleaner/Filter on
page 10‑21.
C. Power Steering Fluid Reservoir and Cap. See Power Steering
Fluid on page 10‑31.
D. Coolant Surge Tank and Pressure Cap. See Engine
Coolant on page 10‑26.
E. Windshield Washer Fluid Reservoir. See “Adding Washer
Fluid” under Washer Fluid on
page 10‑32.
F. Clutch Master Cylinder Reservoir (If Equipped). See
Hydraulic Clutch on page 10‑21.
G. Brake Fluid Reservoir. See “Brake Fluid” underBrakes on
page 10‑32.
H. Passenger Compartment Air Filter (Out of View). See
Passenger Compartment Air
Filter on page 8‑6. I. Engine Oil Fill Cap. See
“When
to Add Engine Oil” under
Engine Oil on page 10‑13.
J. Dry Sump Engine Oil Tank. See “Changing Engine Oil and Filter”
Brake Fluid on page 10‑36.
K. Engine Oil Dipstick. See “Checking Engine Oil” under
Engine Oil on page 10‑13.
L. Remote Positive (+) Terminal (Out of View). See Jump
Starting on page 10‑75.
M. Engine Compartment Fuse
Block on page 10‑45.
If the vehicle has the 6.2L LS9
Supercharged V8 engine and you
are facing the front of the vehicle.
Page 275 of 414

Black plate (13,1)Chevrolet Corvette Owner Manual - 2013 - crc2 - 11/8/12
Vehicle Care 10-13
A.Engine Air Cleaner/Filter on
page 10‑21.
B. Power Steering Fluid Reservoir. See Power Steering Fluid on
page 10‑31.
C. Engine Compartment Fuse
Block on page 10‑45.
D. Remote Positive (+) Terminal (Out of View). See Jump
Starting on page 10‑75.
E. Engine Oil Dipstick. See “Checking Engine Oil” under
Engine Oil on page 10‑13.
F. Dry Sump Engine Oil Tank. See “Changing Engine Oil and Filter”
under Engine Oil on
page 10‑13.
G. Engine Oil Fill Cap. See “When
to Add Engine Oil” under
Engine Oil on page 10‑13.
H. Coolant Surge Tank and Pressure Cap. See Engine
Coolant on page 10‑26. I. Windshield Washer Fluid
Reservoir. See “Adding Washer
Fluid” under Washer Fluid on
page 10‑32.
J. Brake Fluid Reservoir. See “Brake Fluid” underBrake Fluid
on page 10‑36.
K. Clutch Master Cylinder Reservoir. See Hydraulic Clutch
on page 10‑21.
If the vehicle has the 6.2L LS3
V8 engine with the manual
transmission (with the dry sump
engine oil tank) or the 7.0L LS7
V8 engine and you are facing the
driver side of the vehicle.Engine Oil
To ensure proper engine
performance and long life, careful
attention must be paid to engine oil.
Following these simple, but
important steps will help protect
your investment:
.Always use engine oil approved
to the proper specification and of
the proper viscosity grade. See
“Selecting the Right Engine Oil”
in this section.
.Check the engine oil level
regularly and maintain the
proper oil level. See “Checking
Engine Oil” and“When to Add
Engine Oil” in this section.
.Change the engine oil at the
appropriate time. See Engine Oil
Life System on page 10‑19.
.Always dispose of engine oil
properly. See “What to Do with
Used Oil” in this section.
Page 284 of 414
Black plate (22,1)Chevrolet Corvette Owner Manual - 2013 - crc2 - 11/8/12
10-22 Vehicle Care
air cleaner, as shown in the
illustration, as this could damage
the vehicle's engine.
When to Inspect the Engine Air
Cleaner/Filter
Inspect the air cleaner/filter at the
scheduled maintenance intervals
and replace them at the first oil
change after each 80 000 km
(50,000 mi) interval. See
Maintenance Schedule on
page 11‑3. If driving in dusty/dirty
conditions, inspect the filter at each
engine oil change.
How to Inspect the Engine Air
Cleaner/Filter
To inspect the air cleaner/filter,
remove the filter from the vehicle
and lightly shake the filter to release
loose dust and dirt. If the filter
remains covered with dirt, a new
filter is required.
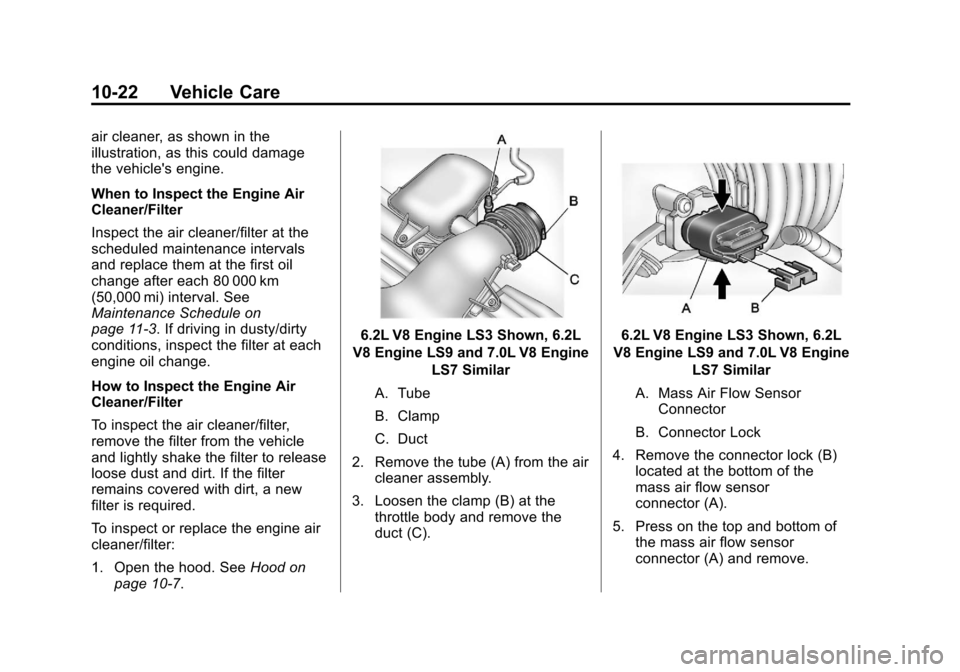
To inspect or replace the engine air
cleaner/filter:
1. Open the hood. SeeHood on
page 10‑7.
6.2L V8 Engine LS3 Shown, 6.2L
V8 Engine LS9 and 7.0L V8 Engine LS7 Similar
A. Tube
B. Clamp
C. Duct
2. Remove the tube (A) from the air cleaner assembly.
3. Loosen the clamp (B) at the throttle body and remove the
duct (C).6.2L V8 Engine LS3 Shown, 6.2L
V8 Engine LS9 and 7.0L V8 Engine LS7 Similar
A. Mass Air Flow Sensor Connector
B. Connector Lock
4. Remove the connector lock (B) located at the bottom of the
mass air flow sensor
connector (A).
5. Press on the top and bottom of the mass air flow sensor
connector (A) and remove.
Page 290 of 414
Black plate (28,1)Chevrolet Corvette Owner Manual - 2013 - crc2 - 11/8/12
10-28 Vehicle Care
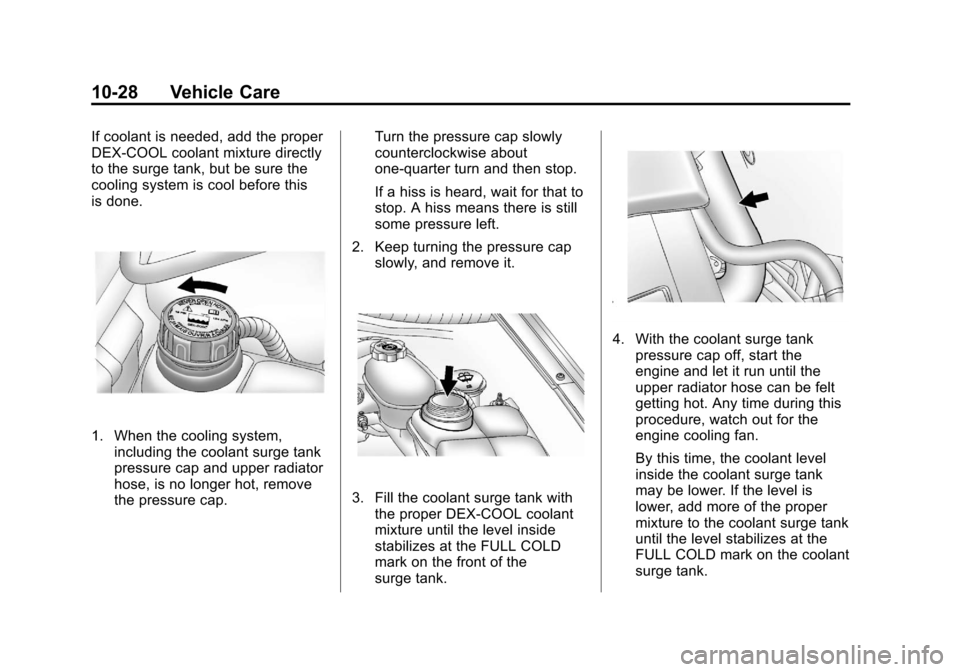
If coolant is needed, add the proper
DEX-COOL coolant mixture directly
to the surge tank, but be sure the
cooling system is cool before this
is done.
1. When the cooling system,including the coolant surge tank
pressure cap and upper radiator
hose, is no longer hot, remove
the pressure cap. Turn the pressure cap slowly
counterclockwise about
one-quarter turn and then stop.
If a hiss is heard, wait for that to
stop. A hiss means there is still
some pressure left.
2. Keep turning the pressure cap slowly, and remove it.
3. Fill the coolant surge tank withthe proper DEX-COOL coolant
mixture until the level inside
stabilizes at the FULL COLD
mark on the front of the
surge tank.
4. With the coolant surge tankpressure cap off, start the
engine and let it run until the
upper radiator hose can be felt
getting hot. Any time during this
procedure, watch out for the
engine cooling fan.
By this time, the coolant level
inside the coolant surge tank
may be lower. If the level is
lower, add more of the proper
mixture to the coolant surge tank
until the level stabilizes at the
FULL COLD mark on the coolant
surge tank.
Page 301 of 414
Black plate (39,1)Chevrolet Corvette Owner Manual - 2013 - crc2 - 11/8/12
Vehicle Care 10-39
2. Firmly apply both the parkingbrake and the regular brake.
See Parking Brake on
page 9‑33.
Do not use the accelerator
pedal, and be ready to turn off
the engine immediately if it
starts.
3. For automatic transmission vehicles, try to start the engine
in each gear. The vehicle should
start only in P (Park) or
N (Neutral). If the vehicle starts
in any other position, contact
your dealer for service.
For manual transmission
vehicles, put the shift lever in
Neutral, push the clutch pedal
down halfway, and try to start
the engine. The vehicle should
start only when the clutch pedal
is pushed down all the way to
the floor. If the vehicle starts
when the clutch pedal is not
pushed all the way down,
contact your dealer for service.Automatic Transmission
Shift Lock Control
Function Check
{WARNING
When you are doing this
inspection, the vehicle could
move suddenly. If the vehicle
moves, you or others could be
injured.
1. Before starting this check, be sure there is enough room
around the vehicle. It should be
parked on a level surface.
2. Firmly apply the parking brake. See Parking Brake on
page 9‑33.
Be ready to apply the regular
brake immediately if the vehicle
begins to move. 3. With the engine off, turn the
ignition on, but do not start the
engine. Without applying the
regular brake, try to move the
shift lever out of P (Park) with
normal effort. If the shift lever
moves out of P (Park), contact
your dealer for service.
Park Brake and P (Park)
Mechanism Check
{WARNING
When you are doing this check,
the vehicle could begin to move.
You or others could be injured
and property could be damaged.
Make sure there is room in front
of the vehicle in case it begins to
roll. Be ready to apply the regular
brake at once should the vehicle
begin to move.
Page 305 of 414
Black plate (43,1)Chevrolet Corvette Owner Manual - 2013 - crc2 - 11/8/12
Vehicle Care 10-43
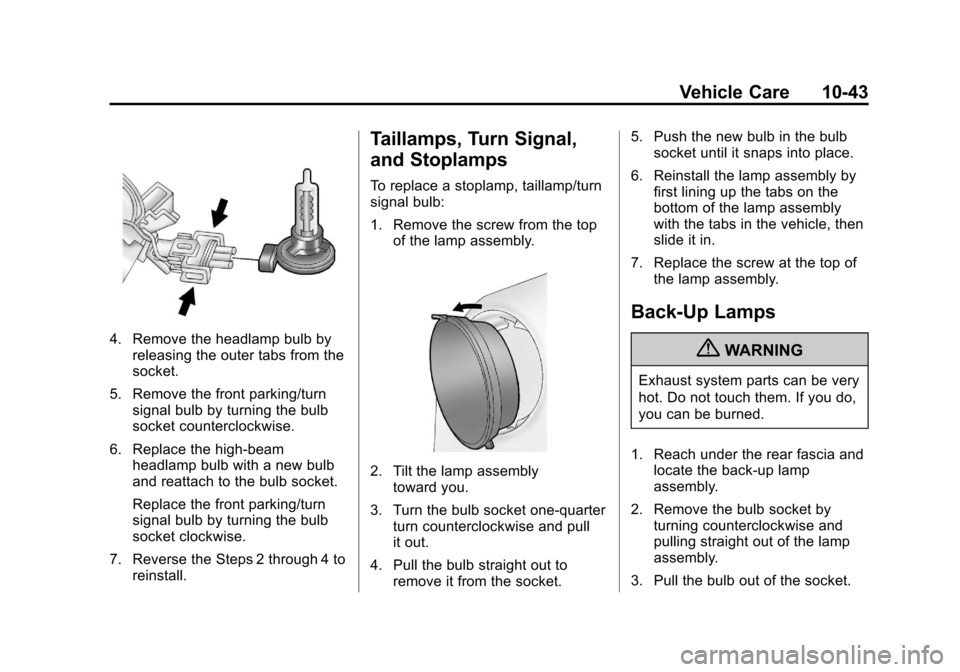
4. Remove the headlamp bulb byreleasing the outer tabs from the
socket.
5. Remove the front parking/turn signal bulb by turning the bulb
socket counterclockwise.
6. Replace the high-beam headlamp bulb with a new bulb
and reattach to the bulb socket.
Replace the front parking/turn
signal bulb by turning the bulb
socket clockwise.
7. Reverse the Steps 2 through 4 to reinstall.
Taillamps, Turn Signal,
and Stoplamps
To replace a stoplamp, taillamp/turn
signal bulb:
1. Remove the screw from the top
of the lamp assembly.
2. Tilt the lamp assemblytoward you.
3. Turn the bulb socket one-quarter turn counterclockwise and pull
it out.
4. Pull the bulb straight out to remove it from the socket. 5. Push the new bulb in the bulb
socket until it snaps into place.
6. Reinstall the lamp assembly by first lining up the tabs on the
bottom of the lamp assembly
with the tabs in the vehicle, then
slide it in.
7. Replace the screw at the top of the lamp assembly.
Back-Up Lamps
{WARNING
Exhaust system parts can be very
hot. Do not touch them. If you do,
you can be burned.
1. Reach under the rear fascia and locate the back-up lamp
assembly.
2. Remove the bulb socket by turning counterclockwise and
pulling straight out of the lamp
assembly.
3. Pull the bulb out of the socket.