2013 CHEVROLET CAPTIVA SPORT trunk
[x] Cancel search: trunkPage 34 of 374
Black plate (8,1)Chevrolet Captiva Sport Owner Manual - 2013 - crc - 11/12/12
2-8 Keys, Doors, and Windows
Doors Liftgate
{ WARNINGExhaust gases can enter the
vehicle if it is driven with the
liftgate, trunk/hatch open, or with
any objects that pass through the
seal between the body and the
trunk/hatch or liftgate. Engine
exhaust contains Carbon
Monoxide (CO) which cannot be
seen or smelled. It can cause
unconsciousness and even death.
If the vehicle must be driven with
the liftgate, or trunk/hatch open: .
Close all of the windows. .
Fully open the air outlets on
or under the instrument
panel.
(Continued) WARNING (Continued) .
Adjust the Climate Control
system to a setting that
brings in only outside air and
set the fan speed to the
highest setting. See Climate
Control System in the Index. .
If the vehicle is equipped with
a power liftgate, disable the
power liftgate function.
For more information about
carbon monoxide, see Engine
Exhaust on page 9 ‑ 19 .
Notice: To avoid damage to the
liftgate or liftgate glass, make
sure the area above and behind
the liftgate is clear before
opening it. To lock or unlock the liftgate from
outside the vehicle, press
Q or
Ktwice on the Remote Keyless
Entry (RKE) transmitter. See
Remote Keyless Entry (RKE)
System Operation on page 2 ‑ 2 .
To lock or unlock the liftgate from
inside the vehicle, press
Q or
K on
the power door lock switch. See
Power Door Locks on page 2 ‑ 6 .
To open the liftgate, press the touch
pad on the underside of the liftgate
handle and pull up.
To close the liftgate, pull down using
the handle and close until it latches.
Page 226 of 374
Black plate (38,1)Chevrolet Captiva Sport Owner Manual - 2013 - crc - 11/12/12
9-38 Driving and Operating The tethered fuel cap is located
behind a hinged fuel door on the
driver side of the vehicle. On some
vehicles with Remote Keyless Entry,
the fuel door is locked and unlocked
when the vehicle doors are locked
and unlocked.
To remove the fuel cap, turn it
slowly counterclockwise. The fuel
cap has a spring in it; if the cap is
released too soon, it will spring back
to the right. To avoid fuel contact on
the painted surface of the vehicle
when filling the fuel tank, place the
tethered cap on the fuel filler door.
Be careful not to spill fuel. Do not
top off or overfill the tank and wait a
few seconds after you have finished
pumping before removing the
nozzle. Clean fuel from painted
surfaces as soon as possible. See
Exterior Care on page 10 ‑ 72 .
When replacing the fuel cap, turn it
clockwise until it clicks. Make sure
the cap is fully installed. The
diagnostic system can determine if
the fuel cap has been left off or improperly installed. This would
allow fuel to evaporate into the
atmosphere. See Malfunction
Indicator Lamp on page 5 ‑ 14 .
{ WARNINGIf a fire starts while you are
refueling, do not remove the
nozzle. Shut off the flow of fuel by
shutting off the pump or by
notifying the station attendant.
Leave the area immediately.
Notice: If a new fuel cap is
needed, be sure to get the right
type of cap from your dealer. The
wrong type of fuel cap might not
fit properly, might cause the
malfunction indicator lamp to
light, and could damage the fuel
tank and emissions system. See
Malfunction Indicator Lamp on
page 5 ‑ 14 . Filling a Portable Fuel
Container
{ WARNINGFilling a portable fuel container
while it is in the vehicle can cause
fuel vapors that can ignite either
by static electricity or other
means. You or others could be
badly burned and the vehicle
could be damaged. Always: .
Use approved fuel
containers. .
Remove the container from
the vehicle, trunk, or pickup
bed before filling. .
Place the container on the
ground.
(Continued)
Page 227 of 374
Black plate (39,1)Chevrolet Captiva Sport Owner Manual - 2013 - crc - 11/12/12
Driving and Operating 9-39WARNING (Continued) .
Place the nozzle inside the fill
opening of the container
before dispensing fuel, and
keep it in contact with the fill
opening until filling is
complete. .
Fill the container no more
than 95% full to allow for
expansion. .
Do not smoke, light matches,
or use lighters while
pumping fuel. .
Avoid using cell phones or
other electronic devices. Towing General Towing
Information Only use towing equipment that has
been designed for the vehicle.
Contact your dealer or trailering
dealer for assistance with preparing
the vehicle for towing a trailer. Read
the entire section before towing a
trailer.
For towing a disabled vehicle, see
Towing the Vehicle on page 10 ‑ 69 .
For towing the vehicle behind
another vehicle such as a motor
home, see Recreational Vehicle
Towing on page 10 ‑ 69 .
Driving Characteristics
and Towing Tips Driving with a Trailer
When towing a trailer: .
Become familiar with the state
and local laws that apply
specifically to trailer towing. .
Do not tow a trailer during the
first 800 km (500 mi), to prevent
damage to the engine, axle or
other parts. .
Then, during the first 800 km
(500 mi) trailer towing, do not
drive over 80 km/h (50 mph) and
do not make starts at full throttle. .
The vehicle can tow in D (Drive)
but M (Manual Mode) is
recommended. See Manual
Mode on page 9 ‑ 22 . Use a lower
gear if the transmission shifts
too often.
{ WARNING
When towing a trailer, exhaust
gases may collect at the rear of
the vehicle and enter if the
liftgate, trunk/hatch, or rear-most
window is open.
When towing a trailer:
(Continued)
Page 228 of 374
Black plate (40,1)Chevrolet Captiva Sport Owner Manual - 2013 - crc - 11/12/12
9-40 Driving and Operating WARNING (Continued) .
Do not drive with the liftgate,
trunk/hatch, or rear-most
window open. .
Fully open the air outlets on
or under the instrument
panel. .
Also adjust the Climate
Control system to a setting
that brings in only outside air.
See “ Climate Control
Systems ” in the Index.
For more information about
Carbon Monoxide, see Engine
Exhaust on page 9 ‑ 19 .
Towing a trailer requires a certain
amount of experience. The
combination you are driving is
longer and not as responsive as the
vehicle itself. Get acquainted with
the handling and braking of the rig
before setting out for the open road. Before starting, check all trailer hitch
parts and attachments, safety
chains, electrical connectors, lamps,
tires and mirrors. If the trailer has
electric brakes, start the
combination moving and then apply
the trailer brake controller by hand
to be sure the brakes work.
During the trip, check occasionally
to be sure that the load is secure
and the lamps and any trailer
brakes still work.
Towing with a Stability Control
System When towing, the sound of the
stability control system might be
heard. The system is reacting to the
vehicle movement caused by the
trailer, which mainly occurs during
cornering. This is normal when
towing heavier trailers.
Following Distance
Stay at least twice as far behind the
vehicle ahead as you would when
driving the vehicle without a trailer. This can help to avoid situations
that require heavy braking and
sudden turns.
Passing More passing distance is needed
when towing a trailer. Because the
rig is longer, it is necessary to go
farther beyond the passed vehicle
before returning to the lane.
Backing Up Hold the bottom of the steering
wheel with one hand. To move the
trailer to the left, move your hand to
the left. To move the trailer to the
right, move your hand to the right.
Always back up slowly and,
if possible, have someone
guide you.
Making Turns
Notice: Making very sharp turns
while trailering could cause the
trailer to come in contact with the
vehicle. The vehicle could be
damaged. Avoid making very
sharp turns while trailering.
Page 297 of 374
Black plate (63,1)Chevrolet Captiva Sport Owner Manual - 2013 - crc - 11/12/12
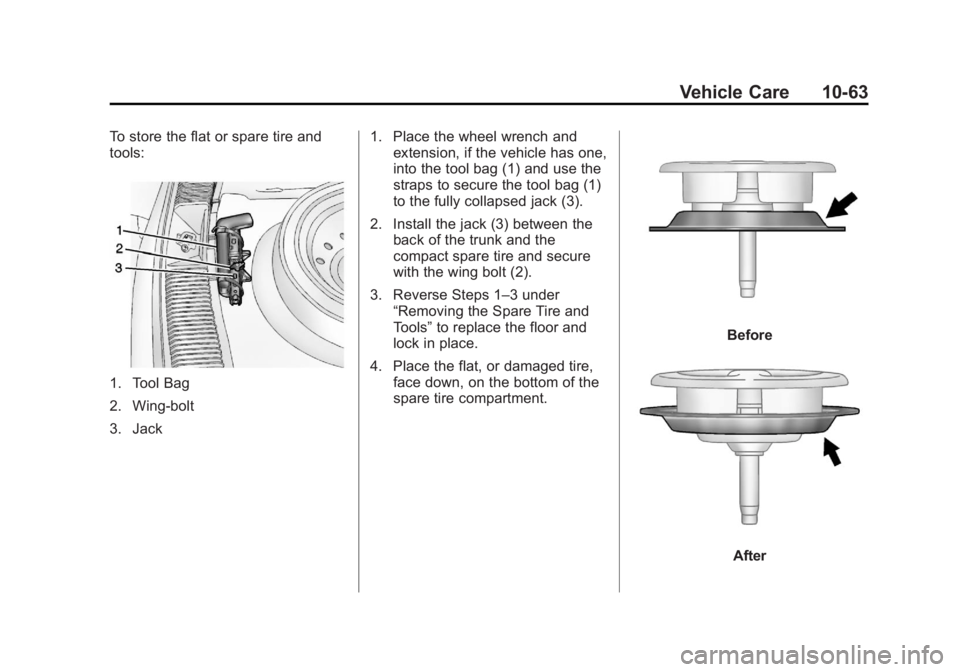
Vehicle Care 10-63To store the flat or spare tire and
tools:
1. Tool Bag
2. Wing-bolt
3. Jack 1. Place the wheel wrench and
extension, if the vehicle has one,
into the tool bag (1) and use the
straps to secure the tool bag (1)
to the fully collapsed jack (3).
2. Install the jack (3) between the
back of the trunk and the
compact spare tire and secure
with the wing bolt (2).
3. Reverse Steps 1 – 3 under
“ Removing the Spare Tire and
Tools ” to replace the floor and
lock in place.
4. Place the flat, or damaged tire,
face down, on the bottom of the
spare tire compartment. Before
After