2013 CHEVROLET CAPTIVA SPORT tow
[x] Cancel search: towPage 1 of 374

Black plate (1,1)Chevrolet Captiva Sport Owner Manual - 2013 - crc - 11/12/12
2013 Chevrolet Captiva Sport Owner Manual MIn Brief . . . . . . . . . . . . . . . . . . . . . . . . 1-1
Instrument Panel . . . . . . . . . . . . . . 1-2
Initial Drive Information . . . . . . . . 1-4
Vehicle Features . . . . . . . . . . . . . 1-16
Performance and
Maintenance . . . . . . . . . . . . . . . . 1-19
Keys, Doors, and
Windows . . . . . . . . . . . . . . . . . . . . 2-1
Keys and Locks . . . . . . . . . . . . . . . 2-1
Doors . . . . . . . . . . . . . . . . . . . . . . . . . . 2-8
Vehicle Security . . . . . . . . . . . . . . . . 2-9
Exterior Mirrors . . . . . . . . . . . . . . . 2-12
Interior Mirrors . . . . . . . . . . . . . . . . 2-13
Windows . . . . . . . . . . . . . . . . . . . . . 2-14
Roof . . . . . . . . . . . . . . . . . . . . . . . . . . 2-15
Seats and Restraints . . . . . . . . . 3-1
Head Restraints . . . . . . . . . . . . . . . 3-2
Front Seats . . . . . . . . . . . . . . . . . . . . 3-3
Rear Seats . . . . . . . . . . . . . . . . . . . . 3-8
Safety Belts . . . . . . . . . . . . . . . . . . . . 3-9
Airbag System . . . . . . . . . . . . . . . . 3-17
Child Restraints . . . . . . . . . . . . . . 3-32 Storage . . . . . . . . . . . . . . . . . . . . . . . 4-1
Storage Compartments . . . . . . . . 4-1
Additional Storage Features . . . 4-2
Roof Rack System . . . . . . . . . . . . . 4-3
Instruments and Controls . . . . 5-1
Controls . . . . . . . . . . . . . . . . . . . . . . . 5-2
Warning Lights, Gauges, and
Indicators . . . . . . . . . . . . . . . . . . . . 5-8
Information Displays . . . . . . . . . . 5-23
Vehicle Messages . . . . . . . . . . . . 5-28
Vehicle Personalization . . . . . . . 5-36
Universal Remote System . . . . 5-41
Lighting . . . . . . . . . . . . . . . . . . . . . . . 6-1
Exterior Lighting . . . . . . . . . . . . . . . 6-1
Interior Lighting . . . . . . . . . . . . . . . . 6-4
Lighting Features . . . . . . . . . . . . . . 6-6
Infotainment System . . . . . . . . . 7-1
Introduction . . . . . . . . . . . . . . . . . . . . 7-1
Radio . . . . . . . . . . . . . . . . . . . . . . . . . . 7-5
Audio Players . . . . . . . . . . . . . . . . 7-10
Phone . . . . . . . . . . . . . . . . . . . . . . . . 7-23 Climate Controls . . . . . . . . . . . . . 8-1
Climate Control Systems . . . . . . 8-1
Air Vents . . . . . . . . . . . . . . . . . . . . . . . 8-8
Maintenance . . . . . . . . . . . . . . . . . . . 8-8
Driving and Operating . . . . . . . . 9-1
Driving Information . . . . . . . . . . . . . 9-2
Starting and Operating . . . . . . . 9-14
Engine Exhaust . . . . . . . . . . . . . . 9-19
Automatic Transmission . . . . . . 9-20
Drive Systems . . . . . . . . . . . . . . . . 9-24
Brakes . . . . . . . . . . . . . . . . . . . . . . . 9-24
Ride Control Systems . . . . . . . . 9-27
Cruise Control . . . . . . . . . . . . . . . . 9-29
Object Detection Systems . . . . 9-31
Fuel . . . . . . . . . . . . . . . . . . . . . . . . . . 9-35
Towing . . . . . . . . . . . . . . . . . . . . . . . 9-39
Conversions and Add-Ons . . . 9-45
Vehicle Care . . . . . . . . . . . . . . . . . 10-1
General Information . . . . . . . . . . 10-2
Vehicle Checks . . . . . . . . . . . . . . . 10-3
Headlamp Aiming . . . . . . . . . . . 10-26
Bulb Replacement . . . . . . . . . . 10-26
Page 2 of 374

Black plate (2,1)Chevrolet Captiva Sport Owner Manual - 2013 - crc - 11/12/12
2013 Chevrolet Captiva Sport Owner Manual MElectrical System . . . . . . . . . . . . 10-30
Wheels and Tires . . . . . . . . . . . 10-36
Jump Starting . . . . . . . . . . . . . . . 10-65
Towing . . . . . . . . . . . . . . . . . . . . . . 10-69
Appearance Care . . . . . . . . . . . 10-72
Service and Maintenance . . . 11-1
General Information . . . . . . . . . . 11-1
Maintenance Schedule . . . . . . . 11-3
Special Application
Services . . . . . . . . . . . . . . . . . . . . 11-8
Additional Maintenance
and Care . . . . . . . . . . . . . . . . . . . . 11-9
Recommended Fluids . . . . . . . 11-12
Maintenance Records . . . . . . . 11-15 Technical Data . . . . . . . . . . . . . . . 12-1
Vehicle Identification . . . . . . . . . 12-1
Vehicle Data . . . . . . . . . . . . . . . . . . 12-2
Customer Information . . . . . . . 13-1
Customer Information . . . . . . . . 13-2
Reporting Safety Defects . . . . 13-17
Vehicle Data Recording and
Privacy . . . . . . . . . . . . . . . . . . . . 13-19
OnStar . . . . . . . . . . . . . . . . . . . . . . . 14-1
OnStar Overview . . . . . . . . . . . . . 14-1
OnStar Services . . . . . . . . . . . . . . 14-2
OnStar Additional
Information . . . . . . . . . . . . . . . . . . 14-5
Index . . . . . . . . . . . . . . . . . . . . . i-1
Page 15 of 374
Black plate (11,1)Chevrolet Captiva Sport Owner Manual - 2013 - crc - 11/12/12
In Brief 1-11
Mirror Adjustment Exterior Mirrors Power Outside Mirrors
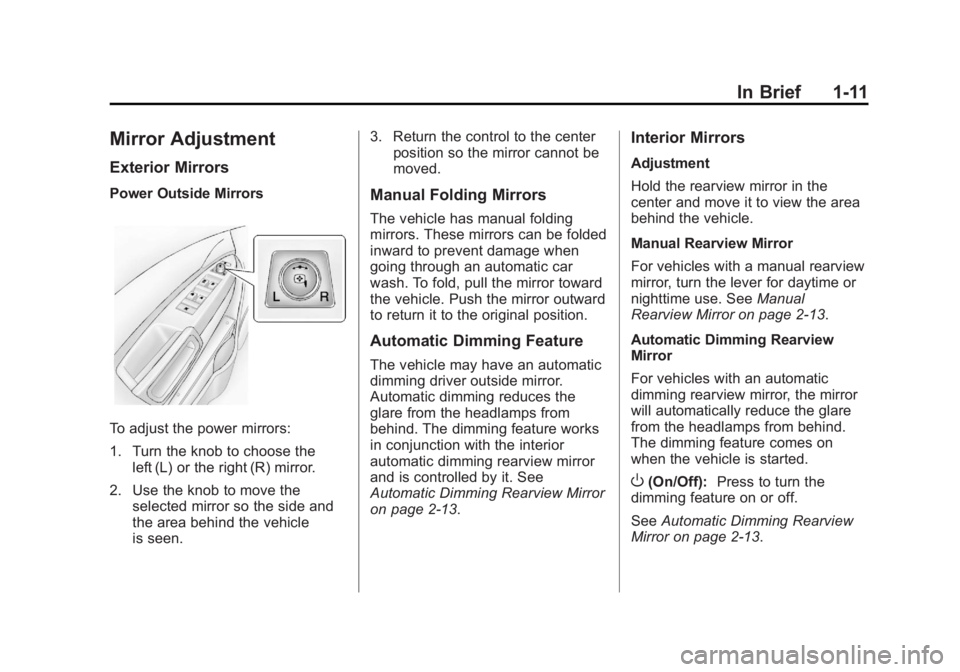
To adjust the power mirrors:
1. Turn the knob to choose the
left (L) or the right (R) mirror.
2. Use the knob to move the
selected mirror so the side and
the area behind the vehicle
is seen. 3. Return the control to the center
position so the mirror cannot be
moved.
Manual Folding Mirrors The vehicle has manual folding
mirrors. These mirrors can be folded
inward to prevent damage when
going through an automatic car
wash. To fold, pull the mirror toward
the vehicle. Push the mirror outward
to return it to the original position.
Automatic Dimming Feature The vehicle may have an automatic
dimming driver outside mirror.
Automatic dimming reduces the
glare from the headlamps from
behind. The dimming feature works
in conjunction with the interior
automatic dimming rearview mirror
and is controlled by it. See
Automatic Dimming Rearview Mirror
on page 2 ‑ 13 . Interior Mirrors Adjustment
Hold the rearview mirror in the
center and move it to view the area
behind the vehicle.
Manual Rearview Mirror
For vehicles with a manual rearview
mirror, turn the lever for daytime or
nighttime use. See Manual
Rearview Mirror on page 2 ‑ 13 .
Automatic Dimming Rearview
Mirror
For vehicles with an automatic
dimming rearview mirror, the mirror
will automatically reduce the glare
from the headlamps from behind.
The dimming feature comes on
when the vehicle is started.
O (On/Off): Press to turn the
dimming feature on or off.
See Automatic Dimming Rearview
Mirror on page 2 ‑ 13 .
Page 38 of 374
Black plate (12,1)Chevrolet Captiva Sport Owner Manual - 2013 - crc - 11/12/12
2-12 Keys, Doors, and Windows
Exterior Mirrors Convex Mirrors
{ WARNINGA convex mirror can make things,
like other vehicles, look farther
away than they really are. If you
cut too sharply into the right lane,
you could hit a vehicle on the
right. Check the inside mirror or
glance over your shoulder before
changing lanes.
The passenger side mirror is convex
shaped. A convex mirror's surface is
curved so more can be seen from
the driver seat. Power Mirrors
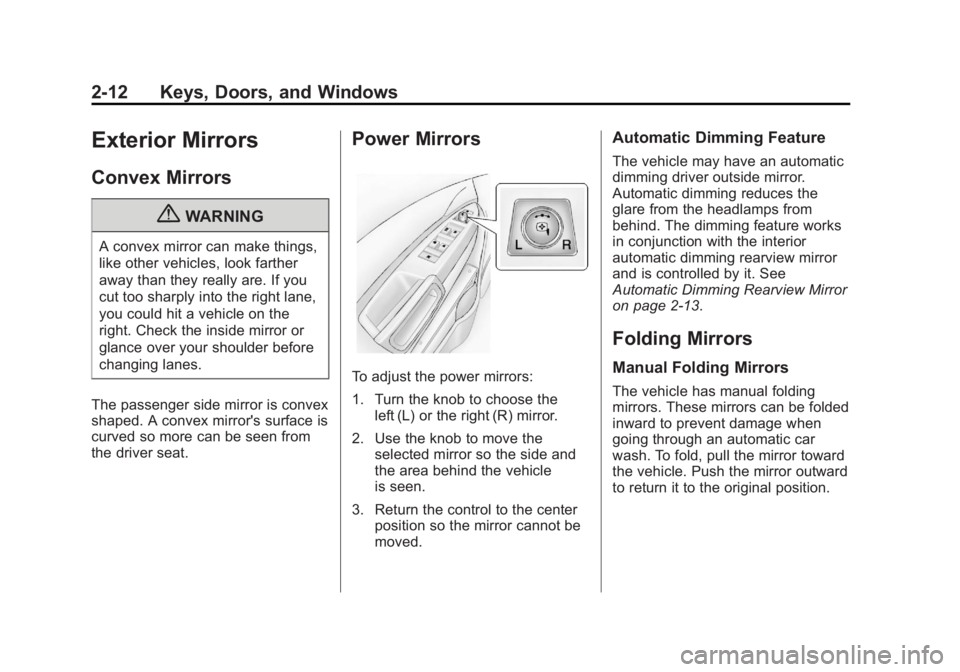
To adjust the power mirrors:
1. Turn the knob to choose the
left (L) or the right (R) mirror.
2. Use the knob to move the
selected mirror so the side and
the area behind the vehicle
is seen.
3. Return the control to the center
position so the mirror cannot be
moved. Automatic Dimming Feature The vehicle may have an automatic
dimming driver outside mirror.
Automatic dimming reduces the
glare from the headlamps from
behind. The dimming feature works
in conjunction with the interior
automatic dimming rearview mirror
and is controlled by it. See
Automatic Dimming Rearview Mirror
on page 2 ‑ 13 .
Folding Mirrors Manual Folding Mirrors The vehicle has manual folding
mirrors. These mirrors can be folded
inward to prevent damage when
going through an automatic car
wash. To fold, pull the mirror toward
the vehicle. Push the mirror outward
to return it to the original position.
Page 39 of 374
Black plate (13,1)Chevrolet Captiva Sport Owner Manual - 2013 - crc - 11/12/12
Keys, Doors, and Windows 2-13
Heated Mirrors The vehicle may have heated
mirrors.
= (Rear Window Defogger):
Press to heat the outside rearview
mirrors. See “ Rear Window
Defogger ” under Automatic Climate
Control System on page 8 ‑ 4 .
Interior Mirrors Manual Rearview Mirror Hold the rearview mirror in the
center and move it to view the area
behind the vehicle.
Reduce the glare of headlamps from
behind by turning the lever for
daytime or nighttime use.
The vehicle may have a rear vision
camera (RVC). See Rear Vision
Camera (RVC) on page 9 ‑ 33 .
Automatic Dimming
Rearview Mirror To adjust the inside rearview mirror,
hold the rearview mirror in the
center and move it to view the area
behind the vehicle. For vehicles with an automatic
dimming rearview mirror, the mirror
will automatically reduce the glare
from the headlamps from behind.
The dimming feature comes on
when the vehicle is started.
O (On/Off): Press to turn the
dimming feature on or off.
The vehicle may have a Rear Vision
Camera (RVC). See Rear Vision
Camera (RVC) on page 9 ‑ 33 .
If the vehicle has a RVC, the
O button for turning the dimming
feature on or off will not be
available.
Cleaning the Mirror Do not spray glass cleaner directly
on the mirror. Use a soft towel
dampened with water.
Page 49 of 374
Black plate (7,1)Chevrolet Captiva Sport Owner Manual - 2013 - crc - 11/12/12
Seats and Restraints 3-7The passenger seat may take
longer to heat up.
Folding Seatback The front passenger seatback may
fold flat.
{ WARNINGIf you fold the seatback forward to
carry longer objects, such as skis,
be sure any such cargo is not
near an airbag. In a crash, an
inflating airbag might force that
object toward a person. This
could cause severe injury or even
death. Secure objects away from
the area in which an airbag would
inflate. For more information, see
Where Are the Airbags? on
page 3 ‑ 20 and Vehicle Load
Limits on page 9 ‑ 10 .{ WARNINGThings you put on this seatback
can strike and injure people in a
sudden stop or turn, or in a crash.
Remove or secure all items
before driving.
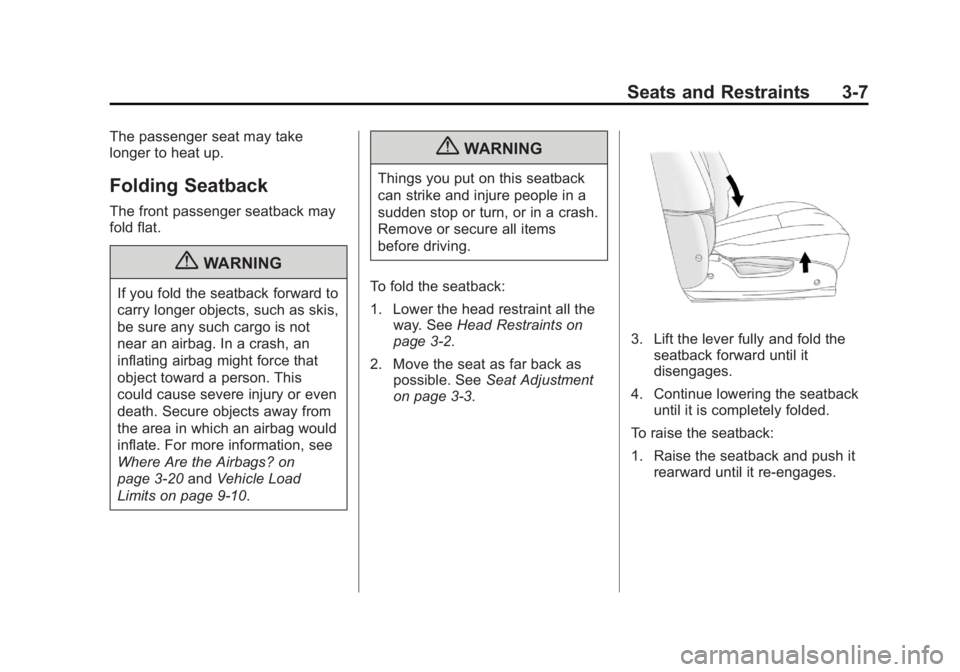
To fold the seatback:
1. Lower the head restraint all the
way. See Head Restraints on
page 3 ‑ 2 .
2. Move the seat as far back as
possible. See Seat Adjustment
on page 3 ‑ 3 . 3. Lift the lever fully and fold the
seatback forward until it
disengages.
4. Continue lowering the seatback
until it is completely folded.
To raise the seatback:
1. Raise the seatback and push it
rearward until it re-engages.
Page 50 of 374
Black plate (8,1)Chevrolet Captiva Sport Owner Manual - 2013 - crc - 11/12/12
3-8 Seats and Restraints
{ WARNINGIf either seatback is not locked, it
could move forward in a sudden
stop or crash. That could cause
injury to the person sitting there.
Always push and pull on the
seatbacks to be sure they are
locked.
2. Push and pull on the seatback to
make sure it is locked in place. Rear Seats Folding the Seatback
To fold a seatback:
Notice: Folding a rear seat with
the safety belts still fastened may
cause damage to the seat or the
safety belts. Always unbuckle the
safety belts and return them to
their normal stowed position
before folding a rear seat.
1. Unbuckle the rear safety belts
and put the front seatback in the
upright position. See Reclining
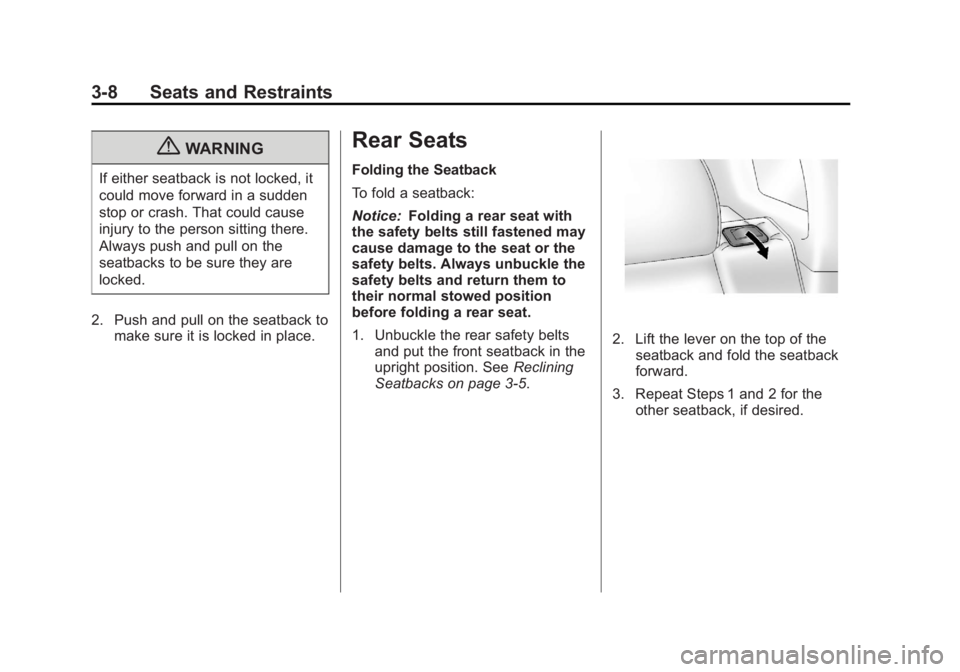
Seatbacks on page 3 ‑ 5 . 2. Lift the lever on the top of the
seatback and fold the seatback
forward.
3. Repeat Steps 1 and 2 for the
other seatback, if desired.
Page 55 of 374
Black plate (13,1)Chevrolet Captiva Sport Owner Manual - 2013 - crc - 11/12/12
Seats and Restraints 3-134. If equipped with a shoulder belt
height adjuster, move it to the
height that is right for you. See
“ Shoulder Belt Height Adjuster ”
later in this section for
instructions on use and
important safety information.
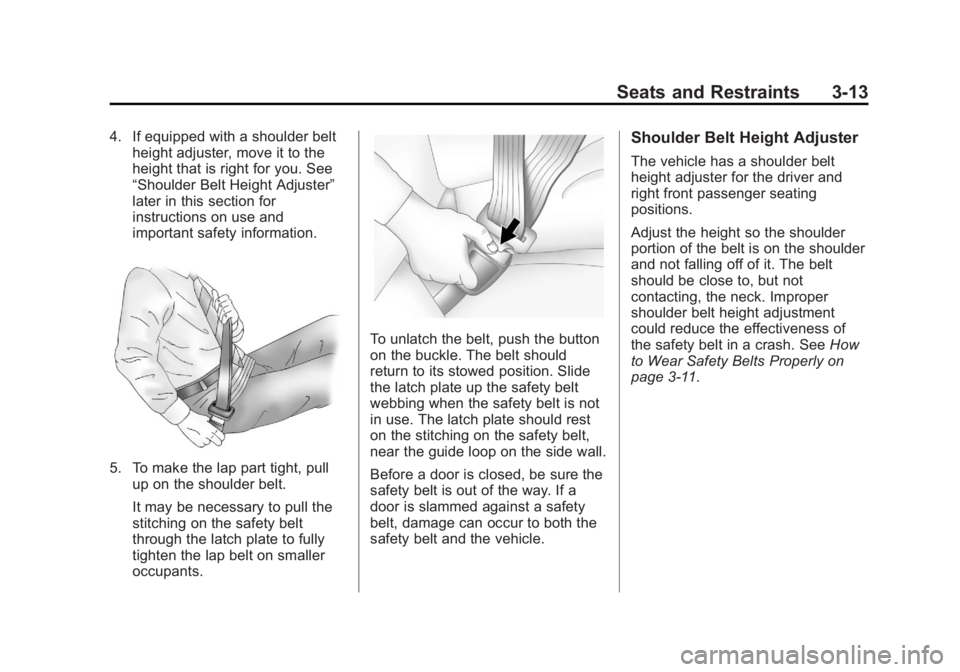
5. To make the lap part tight, pull
up on the shoulder belt.
It may be necessary to pull the
stitching on the safety belt
through the latch plate to fully
tighten the lap belt on smaller
occupants. To unlatch the belt, push the button
on the buckle. The belt should
return to its stowed position. Slide
the latch plate up the safety belt
webbing when the safety belt is not
in use. The latch plate should rest
on the stitching on the safety belt,
near the guide loop on the side wall.
Before a door is closed, be sure the
safety belt is out of the way. If a
door is slammed against a safety
belt, damage can occur to both the
safety belt and the vehicle. Shoulder Belt Height Adjuster The vehicle has a shoulder belt
height adjuster for the driver and
right front passenger seating
positions.
Adjust the height so the shoulder
portion of the belt is on the shoulder
and not falling off of it. The belt
should be close to, but not
contacting, the neck. Improper
shoulder belt height adjustment
could reduce the effectiveness of
the safety belt in a crash. See How
to Wear Safety Belts Properly on
page 3 ‑ 11 .