Page 264 of 374
Black plate (30,1)Chevrolet Captiva Sport Owner Manual - 2013 - crc - 11/12/12
10-30 Vehicle Care
Electrical System Electrical System
Overload The vehicle has fuses and circuit
breakers to protect against an
electrical system overload.
When the current electrical load is
too heavy, the circuit breaker opens
and closes, protecting the circuit
until the current load returns to
normal or the problem is fixed. This
greatly reduces the chance of circuit
overload and fire caused by
electrical problems.
Fuses and circuit breakers protect
power devices in the vehicle.
Replace a bad fuse with a new one
of the identical size and rating.
If there is a problem on the road and
a fuse needs to be replaced, the
same amperage fuse can be
borrowed. Choose some feature of
the vehicle that is not needed to use
and replace it as soon as possible. Headlamp Wiring An electrical overload may cause
the lamps to go on and off, or in
some cases to remain off. Have the
headlamp wiring checked right away
if the lamps go on and off or
remain off.
Windshield Wipers If the wiper motor overheats due to
heavy snow or ice, the windshield
wipers will stop until the motor cools
and will then restart.
Although the circuit is protected
from electrical overload, overload
due to heavy snow or ice may
cause wiper linkage damage.
Always clear ice and heavy snow
from the windshield before using the
windshield wipers.
If the overload is caused by an
electrical problem and not snow or
ice, be sure to get it fixed. Fuses and Circuit
Breakers The wiring circuits in the vehicle are
protected from short circuits by
fuses. This greatly reduces the
chance of circuit overload and fire
caused by electrical problems.
There are two fuse blocks — the
engine compartment fuse block, and
the instrument panel fuse block.
To identify and check fuses and
relays, refer to the Fuse Usage
Chart on the inside surface of the
fuse panel door or cover.
Engine Compartment
Fuse Block The engine compartment fuse block
is on the right side of the engine
compartment, near the battery.
Notice: Spilling liquid on any
electrical component on the
vehicle may damage it. Always
keep the covers on any electrical
component.
Page 265 of 374
Black plate (31,1)Chevrolet Captiva Sport Owner Manual - 2013 - crc - 11/12/12
Vehicle Care 10-31
The vehicle may not be equipped
with all of the fuses, relays, and
features shown.
Fuses Usage
ABS Antilock Brake
System Fuses Usage
A/C Heater, Ventilation,
and Air Conditioning
System
BATT1 Instrument Panel
Fuse Block Main
Feed 1 Fuses Usage
BATT2 Instrument Panel
Fuse Block Main
Feed 2
BATT3 Instrument Panel
Fuse Block Main
Feed 3
BCM Body Control
Module
ECM Engine Control
Module
ECM
PWR TRN Engine Control
Module/Powertrain
ENG SNSR Miscellaneous
Engine Sensors
EPB Electric Parking
Brake
FAN1 Cooling Fan 1
FAN3 Cooling Fan 3
FRT FOG Front Fog Lamps
FRT WPR Front Wiper Motor
Page 266 of 374
Black plate (32,1)Chevrolet Captiva Sport Owner Manual - 2013 - crc - 11/12/12
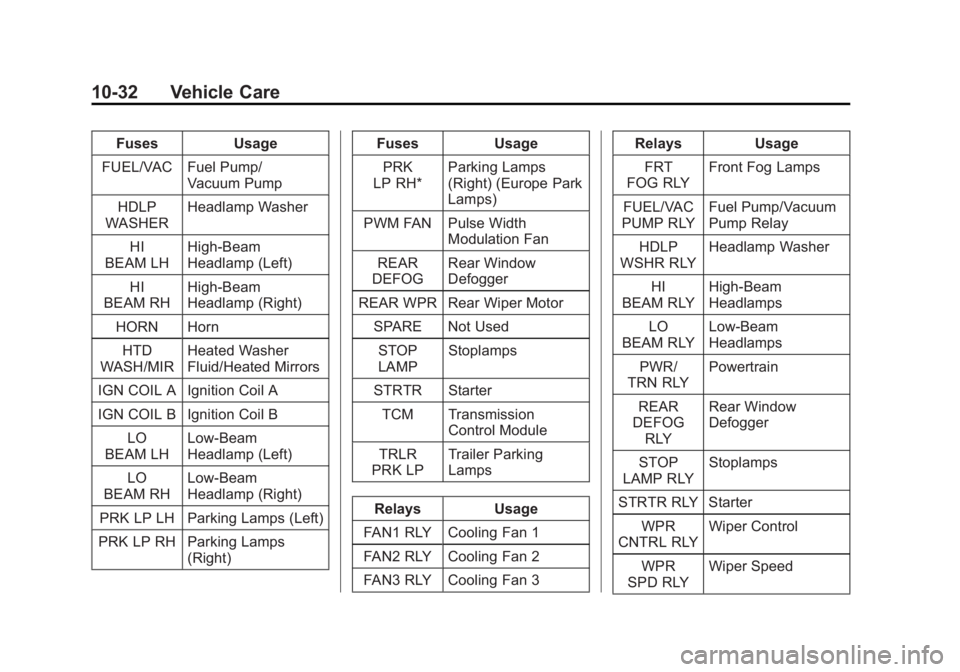
10-32 Vehicle Care Fuses Usage
FUEL/VAC Fuel Pump/
Vacuum Pump
HDLP
WASHER Headlamp Washer
HI
BEAM LH High-Beam
Headlamp (Left)
HI
BEAM RH High-Beam
Headlamp (Right)
HORN Horn
HTD
WASH/MIR Heated Washer
Fluid/Heated Mirrors
IGN COIL A Ignition Coil A
IGN COIL B Ignition Coil B
LO
BEAM LH Low-Beam
Headlamp (Left)
LO
BEAM RH Low-Beam
Headlamp (Right)
PRK LP LH Parking Lamps (Left)
PRK LP RH Parking Lamps
(Right) Fuses Usage
PRK
LP RH* Parking Lamps
(Right) (Europe Park
Lamps)
PWM FAN Pulse Width
Modulation Fan
REAR
DEFOG Rear Window
Defogger
REAR WPR Rear Wiper Motor
SPARE Not Used
STOP
LAMP Stoplamps
STRTR Starter
TCM Transmission
Control Module
TRLR
PRK LP Trailer Parking
Lamps
Relays Usage
FAN1 RLY Cooling Fan 1
FAN2 RLY Cooling Fan 2
FAN3 RLY Cooling Fan 3 Relays Usage
FRT
FOG RLY Front Fog Lamps
FUEL/VAC
PUMP RLY Fuel Pump/Vacuum
Pump Relay
HDLP
WSHR RLY Headlamp Washer
HI
BEAM RLY High-Beam
Headlamps
LO
BEAM RLY Low-Beam
Headlamps
PWR/
TRN RLY Powertrain
REAR
DEFOG
RLY Rear Window
Defogger
STOP
LAMP RLY Stoplamps
STRTR RLY Starter
WPR
CNTRL RLY Wiper Control
WPR
SPD RLY Wiper Speed
Page 267 of 374
Black plate (33,1)Chevrolet Captiva Sport Owner Manual - 2013 - crc - 11/12/12
Vehicle Care 10-33
Instrument Panel Fuse
Block The instrument panel fuse block is
on the passenger side of the lower
console.
Pull the latch of the fuse box cover
straight back to access the fuses.
The vehicle may not have all of the
fuses, relays, and features shown. Fuses Usage
AMP Amplifier
Page 268 of 374
Black plate (34,1)Chevrolet Captiva Sport Owner Manual - 2013 - crc - 11/12/12
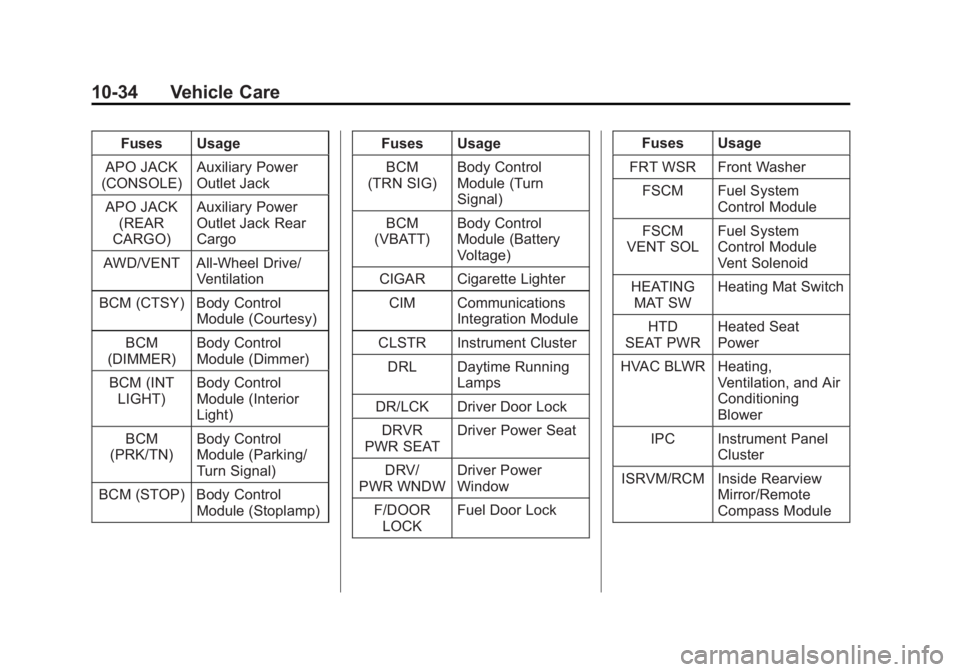
10-34 Vehicle Care Fuses Usage
APO JACK
(CONSOLE) Auxiliary Power
Outlet Jack
APO JACK
(REAR
CARGO) Auxiliary Power
Outlet Jack Rear
Cargo
AWD/VENT All-Wheel Drive/
Ventilation
BCM (CTSY) Body Control
Module (Courtesy)
BCM
(DIMMER) Body Control
Module (Dimmer)
BCM (INT
LIGHT) Body Control
Module (Interior
Light)
BCM
(PRK/TN) Body Control
Module (Parking/
Turn Signal)
BCM (STOP) Body Control
Module (Stoplamp) Fuses Usage
BCM
(TRN SIG) Body Control
Module (Turn
Signal)
BCM
(VBATT) Body Control
Module (Battery
Voltage)
CIGAR Cigarette Lighter
CIM Communications
Integration Module
CLSTR Instrument Cluster
DRL Daytime Running
Lamps
DR/LCK Driver Door Lock
DRVR
PWR SEAT Driver Power Seat
DRV/
PWR WNDW Driver Power
Window
F/DOOR
LOCK Fuel Door Lock Fuses Usage
FRT WSR Front Washer
FSCM Fuel System
Control Module
FSCM
VENT SOL Fuel System
Control Module
Vent Solenoid
HEATING
MAT SW Heating Mat Switch
HTD
SEAT PWR Heated Seat
Power
HVAC BLWR Heating,
Ventilation, and Air
Conditioning
Blower
IPC Instrument Panel
Cluster
ISRVM/RCM Inside Rearview
Mirror/Remote
Compass Module
Page 269 of 374
Black plate (35,1)Chevrolet Captiva Sport Owner Manual - 2013 - crc - 11/12/12
Vehicle Care 10-35Fuses Usage
KEY
CAPTURE Key Capture
L/GATE Liftgate
LOGISTIC
MODE Logistic Mode
OSRVM Outside Rearview
Mirror
PASS
PWR WNDW Passenger Power
Window
PWR DIODE Power Diode
PWR/
MODING Power Moding
RADIO Radio
RR FOG Rear Defogger
RUN 2 Power Battery Key
On Run
RUN/CRNK Run Crank
SDM (BATT) Safety Diagnosis
Module (Battery) Fuses Usage
SDM (IGN 1) Safety Diagnosis
Module (Ignition 1)
SPARE Spare
S/ROOF Sunroof
S/ROOF
BATT Sunroof Battery
SSPS Speed Sensitive
Power Steering
STR/
WHL SW Steering Wheel
Switch
TRLR Trailer
TRLR BATT Trailer Battery
XBCM Export Body
Control Module
XM/
HVAC/DLC SiriusXM Satellite
Radio (If
Equipped)/Heating,
Ventilation, and Air
Conditioning/Data
Link Connection Relays Usage
ACC/
RAP RLY Accessory/Run
Accessory Power
CIGAR
APO
JACK RLY Cigarette and
Auxiliary Power
Outlet
RUN/
CRNK RLY Run/Crank
RUN RLY Run
Page 300 of 374
Black plate (66,1)Chevrolet Captiva Sport Owner Manual - 2013 - crc - 11/12/12
10-66 Vehicle Care 3. Turn off the ignition on both
vehicles. Unplug unnecessary
accessories plugged into the
cigarette lighter or the accessory
power outlet. Turn off the radio
and all lamps that are not
needed. This will avoid sparks,
helping save both batteries and
the radio.
4. Open the hood on the other
vehicle and locate the
positive (+) and negative ( − )
terminal locations on that
vehicle.
Open the hood on your vehicle
and find the remote positive (+)
and remote negative ( − ) jump
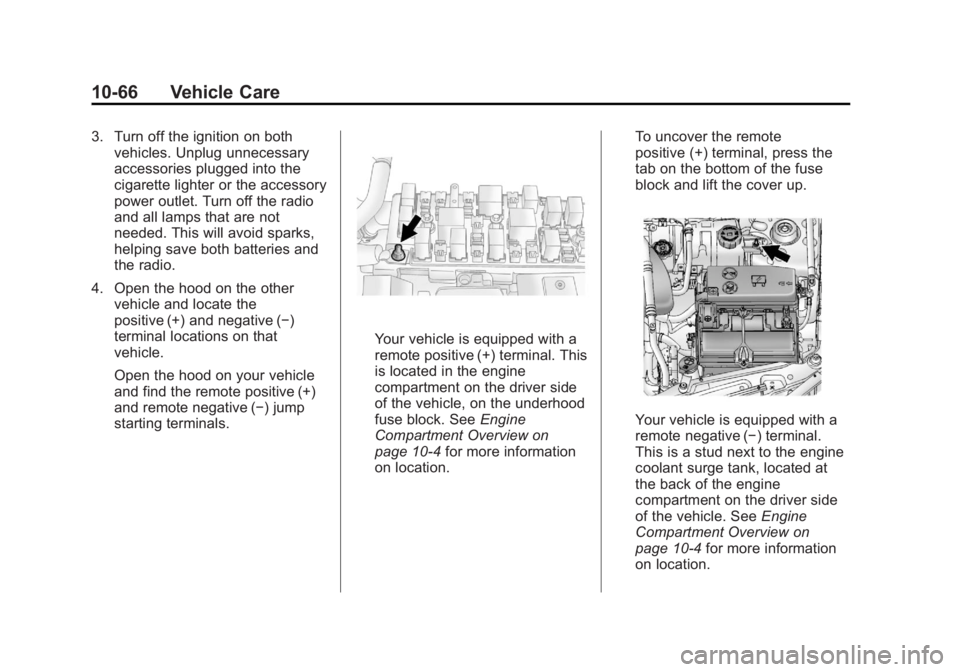
starting terminals. Your vehicle is equipped with a
remote positive (+) terminal. This
is located in the engine
compartment on the driver side
of the vehicle, on the underhood
fuse block. See Engine
Compartment Overview on
page 10 ‑ 4 for more information
on location. To uncover the remote
positive (+) terminal, press the
tab on the bottom of the fuse
block and lift the cover up.
Your vehicle is equipped with a
remote negative ( − ) terminal.
This is a stud next to the engine
coolant surge tank, located at
the back of the engine
compartment on the driver side
of the vehicle. See Engine
Compartment Overview on
page 10 ‑ 4 for more information
on location.
Page 304 of 374
Black plate (70,1)Chevrolet Captiva Sport Owner Manual - 2013 - crc - 11/12/12
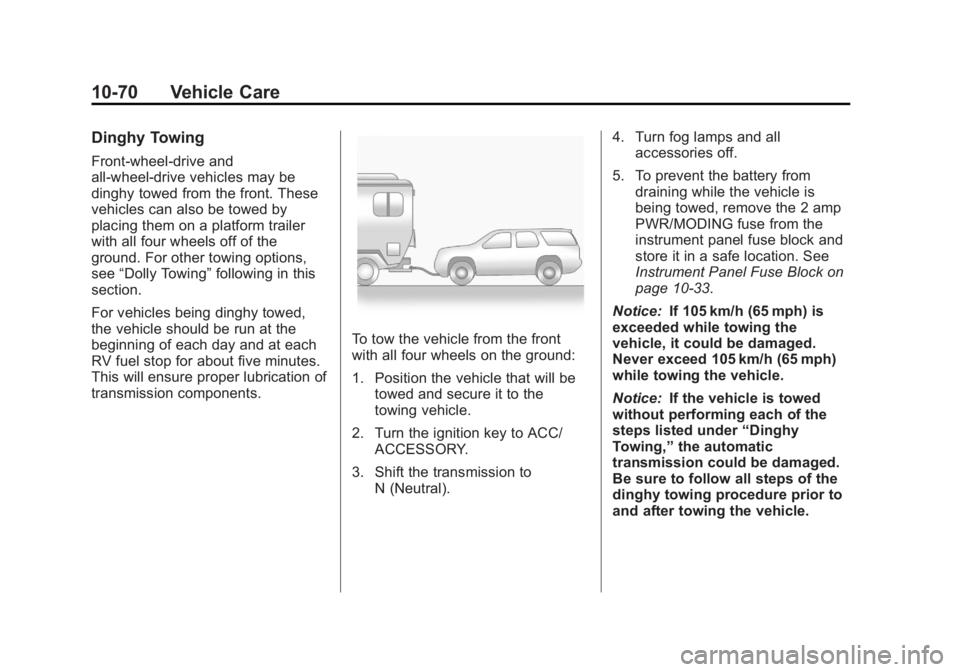
10-70 Vehicle Care Dinghy Towing Front-wheel-drive and
all-wheel-drive vehicles may be
dinghy towed from the front. These
vehicles can also be towed by
placing them on a platform trailer
with all four wheels off of the
ground. For other towing options,
see “ Dolly Towing ” following in this
section.
For vehicles being dinghy towed,
the vehicle should be run at the
beginning of each day and at each
RV fuel stop for about five minutes.
This will ensure proper lubrication of
transmission components. To tow the vehicle from the front
with all four wheels on the ground:
1. Position the vehicle that will be
towed and secure it to the
towing vehicle.
2. Turn the ignition key to ACC/
ACCESSORY.
3. Shift the transmission to
N (Neutral). 4. Turn fog lamps and all
accessories off.
5. To prevent the battery from
draining while the vehicle is
being towed, remove the 2 amp
PWR/MODING fuse from the
instrument panel fuse block and
store it in a safe location. See
Instrument Panel Fuse Block on
page 10 ‑ 33 .
Notice: If 105 km/h (65 mph) is
exceeded while towing the
vehicle, it could be damaged.
Never exceed 105 km/h (65 mph)
while towing the vehicle.
Notice: If the vehicle is towed
without performing each of the
steps listed under “ Dinghy
Towing, ” the automatic
transmission could be damaged.
Be sure to follow all steps of the
dinghy towing procedure prior to
and after towing the vehicle.