2013 CADILLAC XTS height adjustment
[x] Cancel search: height adjustmentPage 13 of 438

Black plate (7,1)Cadillac XTS Owner Manual - 2013 - 1st - 4/13/12
In Brief 1-7
.Press and hold the control
upward to raise or downward to
lower the height of the lumbar
support.
See Lumbar Adjustment on
page 3‑5.
Reclining Seatbacks
To adjust the seatback:
.Tilt the top of the control
rearward to recline.
.Tilt the top of the control forward
to raise. See
Reclining Seatbacks on
page 3‑6.
Memory Features
If available, the "1," "2," SET, andB(Exit) buttons on the driver door
are used to manually save and
recall memory settings for the driver
seat, outside mirrors, and power tilt
and telescoping steering column.
These manually stored positions are
referred to as Button Memory
positions. The vehicle will also automatically
save driver seat, outside mirror, and
power tilt and telescoping steering
column positions to the current
driver Remote Keyless Entry (RKE)
transmitter when the ignition is
placed in OFF/LOCK. These
automatically stored positions are
referred to as RKE Memory
positions.
See
Memory Seats on page 3‑7 and
Vehicle Personalization on
page 5‑44.
Second Row Seats
The rear seatbacks can be folded
down to increase cargo space.
See Rear Seats on page 3‑11.
Page 14 of 438

Black plate (8,1)Cadillac XTS Owner Manual - 2013 - 1st - 4/13/12
1-8 In Brief
Heated and Ventilated
Seats
Heated and Ventilated Seat
Buttons Shown, Heated Seat Buttons Similar
If equipped, the buttons are near the
climate controls on the center stack.
To operate, the ignition must be in
ON/RUN/START.
Press
M/JorL/zto heat the
driver or passenger seat cushion
and seatback. Press
Cor{to ventilate the driver
or passenger seat.
Press the button once for the
highest setting. With each press of
the button, the seat will change to
the next lower setting, and then to
the off setting. The indicator lights
next to the buttons indicate three for
the highest setting and one for the
lowest. If the front heated seats are
on high, the level may automatically
be lowered after approximately
30 minutes.
See Heated and Ventilated Front
Seats on page 3‑9.
Head Restraint
Adjustment
Do not drive until the head restraints
for all occupants are installed and
adjusted properly.
To achieve a comfortable seating
position, change the seatback
recline angle as little as necessary while keeping the seat and the head
restraint height in the proper
position.
See
Head Restraints on page 3‑2
and Power Seat Adjustment on
page 3‑4.
Safety Belts
Refer to the following sections for
important information on how to use
safety belts properly:
.Safety Belts on page 3‑14.
Page 60 of 438

Black plate (4,1)Cadillac XTS Owner Manual - 2013 - 1st - 4/13/12
3-4 Seats and Restraints
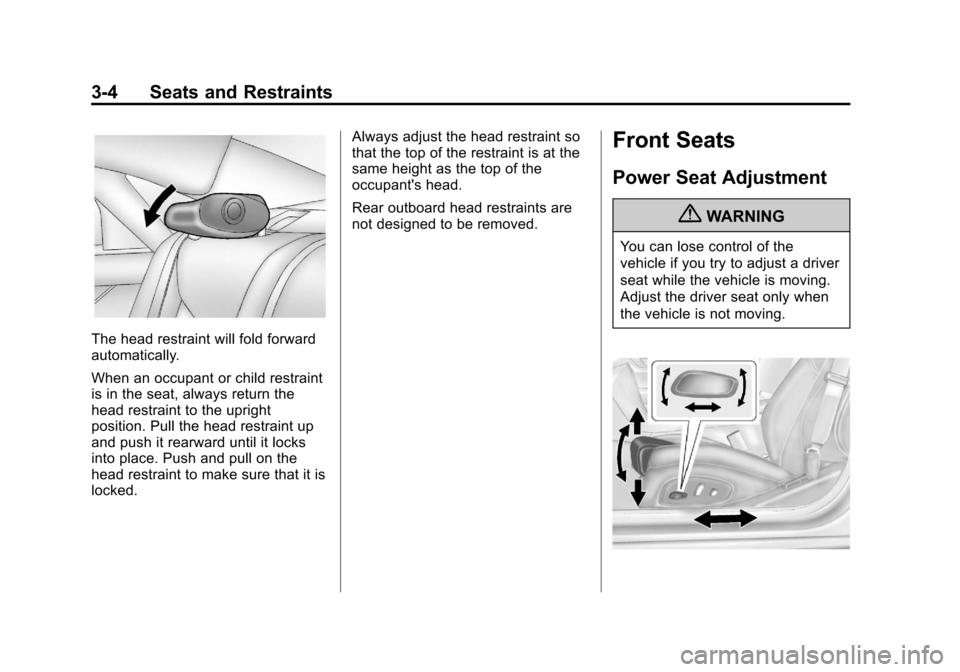
The head restraint will fold forward
automatically.
When an occupant or child restraint
is in the seat, always return the
head restraint to the upright
position. Pull the head restraint up
and push it rearward until it locks
into place. Push and pull on the
head restraint to make sure that it is
locked.Always adjust the head restraint so
that the top of the restraint is at the
same height as the top of the
occupant's head.
Rear outboard head restraints are
not designed to be removed.
Front Seats
Power Seat Adjustment
{WARNING
You can lose control of the
vehicle if you try to adjust a driver
seat while the vehicle is moving.
Adjust the driver seat only when
the vehicle is not moving.
Page 61 of 438

Black plate (5,1)Cadillac XTS Owner Manual - 2013 - 1st - 4/13/12
Seats and Restraints 3-5
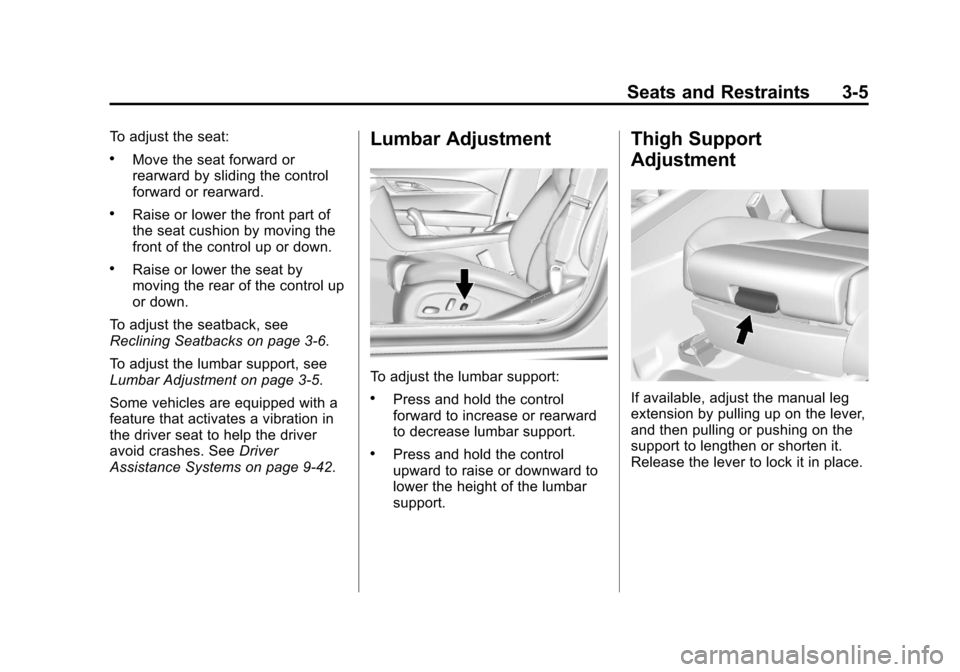
To adjust the seat:
.Move the seat forward or
rearward by sliding the control
forward or rearward.
.Raise or lower the front part of
the seat cushion by moving the
front of the control up or down.
.Raise or lower the seat by
moving the rear of the control up
or down.
To adjust the seatback, see
Reclining Seatbacks on page 3‑6.
To adjust the lumbar support, see
Lumbar Adjustment on page 3‑5.
Some vehicles are equipped with a
feature that activates a vibration in
the driver seat to help the driver
avoid crashes. See Driver
Assistance Systems on page 9‑42.
Lumbar Adjustment
To adjust the lumbar support:
.Press and hold the control
forward to increase or rearward
to decrease lumbar support.
.Press and hold the control
upward to raise or downward to
lower the height of the lumbar
support.
Thigh Support
Adjustment
If available, adjust the manual leg
extension by pulling up on the lever,
and then pulling or pushing on the
support to lengthen or shorten it.
Release the lever to lock it in place.
Page 74 of 438

Black plate (18,1)Cadillac XTS Owner Manual - 2013 - 1st - 4/13/12
3-18 Seats and Restraints
Adjust the guide so the shoulder
portion of the belt is on the shoulder
and not falling off of it. The belt
should be close to, but not
contacting, the neck. Improper
shoulder belt height adjustment
could reduce the effectiveness of
the safety belt in a crash. SeeHow
to Wear Safety Belts Properly on
page 3‑15.
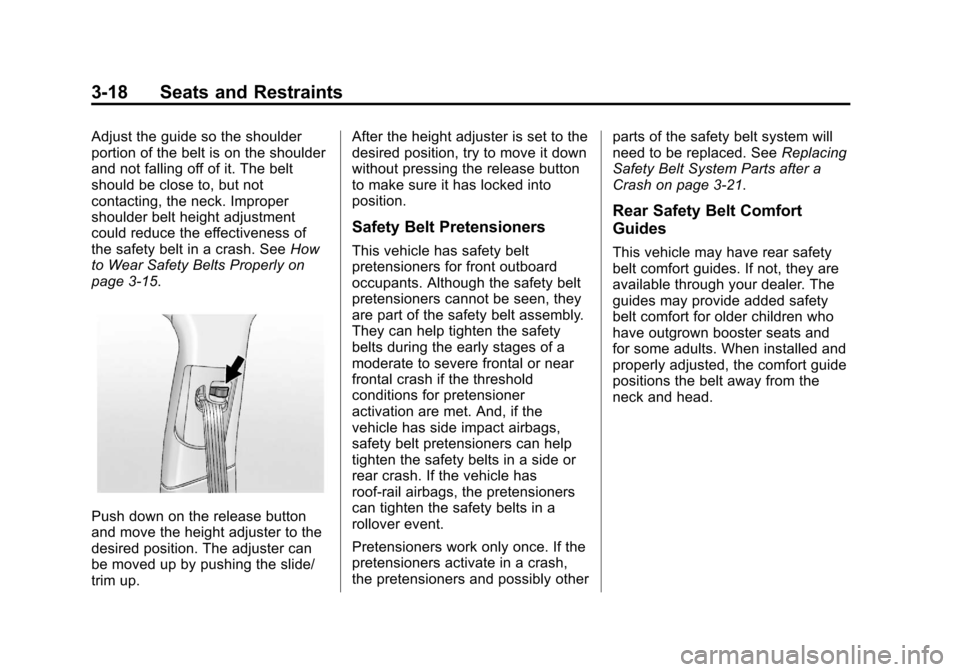
Push down on the release button
and move the height adjuster to the
desired position. The adjuster can
be moved up by pushing the slide/
trim up. After the height adjuster is set to the
desired position, try to move it down
without pressing the release button
to make sure it has locked into
position.
Safety Belt Pretensioners
This vehicle has safety belt
pretensioners for front outboard
occupants. Although the safety belt
pretensioners cannot be seen, they
are part of the safety belt assembly.
They can help tighten the safety
belts during the early stages of a
moderate to severe frontal or near
frontal crash if the threshold
conditions for pretensioner
activation are met. And, if the
vehicle has side impact airbags,
safety belt pretensioners can help
tighten the safety belts in a side or
rear crash. If the vehicle has
roof-rail airbags, the pretensioners
can tighten the safety belts in a
rollover event.
Pretensioners work only once. If the
pretensioners activate in a crash,
the pretensioners and possibly other
parts of the safety belt system will
need to be replaced. See
Replacing
Safety Belt System Parts after a
Crash on page 3‑21.
Rear Safety Belt Comfort
Guides
This vehicle may have rear safety
belt comfort guides. If not, they are
available through your dealer. The
guides may provide added safety
belt comfort for older children who
have outgrown booster seats and
for some adults. When installed and
properly adjusted, the comfort guide
positions the belt away from the
neck and head.
Page 312 of 438

Black plate (18,1)Cadillac XTS Owner Manual - 2013 - 1st - 4/13/12
10-18 Vehicle Care
.Do not use engine coolant
(antifreeze) in the windshield
washer. It can damage the
windshield washer system
and paint.
Brakes
This vehicle has disc brakes. Disc
brake pads have built-in wear
indicators that make a high-pitched
warning sound when the brake pads
are worn and new pads are needed.
The sound can come and go or be
heard all the time the vehicle is
moving, except when applying the
brake pedal firmly.
{WARNING
The brake wear warning sound
means that soon the brakes will
not work well. That could lead to
a crash. When the brake wear
warning sound is heard, have the
vehicle serviced.Notice:
Continuing to drive with
worn-out brake pads could result
in costly brake repair.
Some driving conditions or climates
can cause a brake squeal when the
brakes are first applied or lightly
applied. This does not mean
something is wrong with the brakes.
Properly torqued wheel nuts are
necessary to help prevent brake
pulsation. When tires are rotated,
inspect brake pads for wear and
evenly tighten wheel nuts in the
proper sequence to torque
specifications in Capacities and
Specifications on page 12‑2.
Brake linings should always be
replaced as complete axle sets.Brake Pedal Travel
See your dealer if the brake pedal
does not return to normal height,
or if there is a rapid increase in
pedal travel. This could be a sign
that brake service might be
required.
Brake Adjustment
Every time the brakes are applied,
with or without the vehicle moving,
the brakes adjust for wear.
Replacing Brake System Parts
The braking system on a vehicle is
complex. Its many parts have to be
of top quality and work well together
if the vehicle is to have really good
braking. The vehicle was designed
and tested with top-quality brake
parts. When parts of the braking
system are replaced, be sure to get
new, approved replacement parts.
If this is not done, the brakes might
not work properly. For example,
installing disc brake pads that are
wrong for the vehicle, can change
the balance between the front and
rear brakes —for the worse. The
braking performance expected can
change in many other ways if the
wrong replacement brake parts are
installed.
Page 348 of 438

Black plate (54,1)Cadillac XTS Owner Manual - 2013 - 1st - 4/13/12
10-54 Vehicle Care
performance on the laboratory
test wheel than the minimum
required by law. Warning: The
temperature grade for this tire is
established for a tire that is
properly inflated and not
overloaded. Excessive speed,
underinflation, or excessive
loading, either separately or in
combination, can cause heat
buildup and possible tire failure.
Wheel Alignment and Tire
Balance
The tires and wheels were aligned
and balanced at the factory to
provide the longest tire life and best
overall performance. Adjustments to
wheel alignment and tire balancing
will not be necessary on a regular
basis. However, check the
alignment if there is unusual tire
wear or if the vehicle is pulling to
one side or the other. If the vehicle
vibrates when driving on a smoothroad, the tires and wheels might
need to be rebalanced. See your
dealer for proper diagnosis.
Wheel Replacement
Replace any wheel that is bent,
cracked, or badly rusted or
corroded. If wheel nuts keep coming
loose, the wheel, wheel bolts, and
wheel nuts should be replaced.
If the wheel leaks air, replace it.
Some aluminum wheels can be
repaired. See your dealer if any of
these conditions exist.
Your dealer will know the kind of
wheel that is needed.
Each new wheel should have the
same load-carrying capacity,
diameter, width, offset, and be
mounted the same way as the one it
replaces.
Replace wheels, wheel bolts, wheel
nuts, or Tire Pressure Monitor
System (TPMS) sensors with new
GM original equipment parts.
{WARNING
Using the wrong replacement
wheels, wheel bolts, or wheel
nuts can be dangerous. It could
affect the braking and handling of
the vehicle. Tires can lose air,
and cause loss of control, causing
a crash. Always use the correct
wheel, wheel bolts, and wheel
nuts for replacement.
Notice: The wrong wheel can
also cause problems with bearing
life, brake cooling, speedometer
or odometer calibration,
headlamp aim, bumper height,
vehicle ground clearance, and tire
or tire chain clearance to the
body and chassis.
Professional vehicle wheels have a
unique offset and bolt hole diameter.
Professional vehicle wheels have
six wheel nuts. Non-professional
vehicle wheels have five wheel nuts.
See Tire Changing on page 10‑65.