2013 BMW X6M light
[x] Cancel search: lightPage 114 of 327

The system stores and maintains the speed.
Accelerating using the lever Accelerating slightly:
Press the lever to the resistance point, arrow 1,
until the desired speed is reached.
Accelerating significantly:
Press the lever beyond the resistance point,
arrow 1, until the desired speed is reached.
The vehicle accelerates without pressure on
the accelerator pedal. The system stores and
maintains the speed.
Decreasing speed
Repeatedly pull the lever to the resistance
point or beyond, arrow 2, until the desired
speed is displayed.▷Each time the lever is pulled to the resist‐
ance point, the desired speed is decreased
by approx. 1 mph/1 km/h.▷Each time the lever is pulled beyond the
resistance point, the desired speed is re‐
duced by up to 5 mph/10 km/h until the
minimum speed of 20 mph/30 km/h is ach‐
ieved.
The system stores and maintains the speed.
Interrupting the system
Press the lever up or down, arrow 3: dis‐
play 1 in the speedometer changes color, refer
to page 110.
In addition, the system is interrupted:
▷When the brakes are applied.▷When the transmission position D is disen‐
gaged.▷When DTC is activated or DSC is deacti‐
vated.▷When DSC or ABS is intervening.
Warning lamp
The warning lamp lights up if cruise
control has been deactivated auto‐
matically, e.g., by a control intervention of the
DSC. A message appears on the Control Dis‐
play.
Resuming cruising speed
Press button 4:
The stored speed is resumed and maintained.
Deactivating the system▷Press the lever upward or downward twice,
arrow 3.▷Switch off the ignition.
The stored speed is cleared.
Displays in the instrument cluster
1Stored desired speed▷Green: the system is active.▷Orange: the system is interrupted.2Selected desired speed appears briefly
If the display --- mph or --- km/h appears
briefly, conditions may not be adequate to op‐
erate the system.
Call up Check Control messages, refer to
page 77.
Malfunction The warning lamp lights up. The sys‐
tem is malfunctioning or has failed.
A message appears on the Control
Display. More information, refer to page 76.
Seite 110ControlsDriving comfort110
Online Edition for Part no. 01 40 2 910 876 - VII/13
Page 115 of 327

Park Distance Control PDCThe concept
In addition to the PDC Park Distance Control,
the backup camera, refer to page 113, can be
switched on.
PDC supports you when parking. A slow ap‐
proach to an object in front of or behind your
vehicle is announced by:▷Signal tones.▷Visual display.
Measurement
Measurements are made by ultrasound sen‐
sors in the bumpers.
The range is approx. 6 ft/2 m.
An acoustic warning is first given:
▷By the front sensors and two rear corner
sensors at approx. 24 in/60 cm.▷By the rear middle sensors at approx.
5 ft/1.50 m.
System limits
Check the traffic situation as well
PDC cannot serve as a substitute for the
driver's personal judgment of the traffic situa‐
tion. Check the traffic situation around the ve‐
hicle with your own eyes. Otherwise, an acci‐
dent could result from road users or objects
located outside of the PDC detection range.
Loud noises from outside and inside the vehi‐
cle may prevent you from hearing the PDC's
signal tone.◀
Avoid driving quickly with PDC
Avoid approaching an object quickly.
Avoid driving away quickly while PDC is not yet
active.
For technical reasons, the system may other‐
wise be too late in issuing a warning.◀
Limits of ultrasonic measurement
The detection of objects can reach the physi‐
cal limits of ultrasonic measurement, for in‐
stance:▷With tow bars and trailer hitches.▷With thin or wedge-shaped objects.▷With low objects.▷With objects with corners and sharp edges.
Low objects already displayed, e.g., curbs, can
move into the blind area of the sensors before
or after a continuous tone sounds.
High, protruding objects such as ledges may
not be detected.
False warnings
PDC may issue a warning under the following
conditions even though there is no obstacle
within the detection range:
▷In heavy rain.▷When sensors are very dirty or covered in
ice.▷When sensors are covered in snow.▷On rough road surfaces.▷In large buildings with right angles and
smooth walls, e.g., in underground ga‐
rages.▷In heavy exhaust.▷Due to other ultrasound sources, e.g.,
sweeping machines, high pressure steam
cleaners or neon lights.
Switching on automatically
With the engine running or the ignition
switched on, shift the selector lever into posi‐
tion R.
Switching off automatically when
driving forward
The system switches off when a certain dis‐
tance or speed is exceeded.
Switch on the system again if necessary.
Seite 111Driving comfortControls111
Online Edition for Part no. 01 40 2 910 876 - VII/13
Page 116 of 327

Switching on/off manually
Press the button.
▷On: the LED lights up.▷Off: the LED goes out.
Signal tonesWhen approaching an object, an intermittent
tone is sounded that indicates the position of
the object. For example, if an object is de‐
tected behind the vehicle, a signal tone sounds
from the rear speakers.
The shorter the distance to the object be‐
comes, the shorter the intervals.
If the distance to a detected object is less than
approx. 12 in/30 cm, a continuous tone is
sounded.
If objects are located both in front of and be‐
hind the vehicle, an alternating continuous sig‐
nal is sounded.
The intermittent tone is interrupted after ap‐
prox. 3 seconds:
▷If the vehicle stops in front of an object that
is detected by only one of the corner sen‐
sors.▷If moving parallel to a wall.
The signal tone is switched off:
▷When the vehicle moves away from an ob‐
ject by more than approx. 4 in/10 cm.▷When transmission position P is engaged.
Volume
You can set the volume of the PDC signal tone,
refer to page 181.
The setting is stored for the remote control
currently in use.
Visual warning
The approach to an object can be shown on
the Control Display. Objects that are farther
away are displayed on the Control Display be‐
fore a signal tone sounds.
The display appears as soon as PDC is acti‐
vated.
If the last image selected was the rearview
camera, this is displayed again. To switch to
PDC:
"Switch off rear view camera"
The setting is stored for the remote control
currently in use.
Image on the Control Display
Switching on the rear view camera
using iDrive
With PDC activated:
"Rear view camera"
The image of the rear view camera is dis‐
played. The setting is stored for the remote
control currently in use.
Seite 112ControlsDriving comfort112
Online Edition for Part no. 01 40 2 910 876 - VII/13
Page 117 of 327

Malfunction
A Check Control message, refer to page 76, is
displayed in the instrument cluster.
The areas in front of and behind the vehicle ap‐
pear in shaded form on the Control Display.
PDC has failed. Have the system checked.
To ensure full operability:
▷Keep the sensors clean and free of ice.▷When using high-pressure washers, do not
spray the sensors for long periods and
maintain a distance of at least 12 in/30 cm.
Surround View
The concept Surround View encompasses the following
systems:
▷Backup camera, refer to page 113.▷Top View, refer to page 115.▷Side View, refer to page 117.
It provides assistance when parking and ma‐
neuvering and at blind driveways and intersec‐
tions.
Rear view camera
The concept The rear view camera assists you when park‐
ing and maneuvering in reverse. To accom‐
plish this, the region behind your vehicle is
shown on the Control Display.
System limits
Check the traffic situation as well
Check the traffic situation around the ve‐
hicle with your own eyes. Otherwise, an acci‐
dent could result from road users or objects lo‐
cated outside the picture area of the backup
camera.◀
Detection of objects
High, protruding objects such as ledges
may not be detected by the backup camera.◀
Switching on automatically With the engine running or the ignition
switched on, shift the selector lever into posi‐
tion R.
The image of the rear view camera is displayed
when the system has been switched on using
iDrive.
Switching off automatically when
driving forward
The system switches off when a certain dis‐
tance or speed is exceeded.
Switch on the system again if necessary.
Switching on/off manually
Press the button.
Press the button.
▷On: the LED lights up.▷Off: the LED goes out.
If PDC is displayed, switch on the backup cam‐
era via the iDrive, refer to page 112.
Seite 113Driving comfortControls113
Online Edition for Part no. 01 40 2 910 876 - VII/13
Page 120 of 327

▷Approx. 7 ft/2 m to the side.▷Approx. 7 ft/2 m to the rear.
Obstacles up to the height of the exterior mir‐
rors are thus detected in a timely fashion.
System limits
Top View cannot be used in the following sit‐
uations:
▷With a door open.▷With the tailgate open.▷With an exterior mirror folded in.▷In poor light.
The arrows next to the vehicle are displayed in
a shaded form on the Control Display and a
symbol appears at the corresponding location
on the vehicle.
Check the traffic situation as well
Check the traffic situation around the ve‐
hicle with your own eyes. Otherwise, an acci‐
dent could result from road users or objects lo‐
cated outside the picture area of the
cameras.◀
Switching on automatically
Select transmission position R with the engine
running.
The images from Top View and PDC are dis‐
played when the system has been switched on
using iDrive.
Switching off automatically when
driving forward
The system switches off when a certain dis‐
tance or speed is exceeded.
Switch on the system again if necessary.
Switching on/off manually
Press the button.
▷On: the LED lights up.▷Off: the LED goes out.
If Top View is displayed, switch on the backup
camera via the iDrive, refer to page 115.
Visual warning
The approach to an object can be shown on
the Control Display.
When the distance to an object is small, the
PDC display correspondingly shows a red bar
in front of the vehicle.
The display appears as soon as Top View is
activated.
If the last image selected was the rearview
camera, this is displayed again. To switch to
Top View:
"Rear view camera" Select the symbol on
the Control Display.
The setting is stored for the remote control
currently in use.
Seite 116ControlsDriving comfort116
Online Edition for Part no. 01 40 2 910 876 - VII/13
Page 123 of 327

Switching on/offPress the button.
Display visibility The visibility of the displays in the Head-up
Display is influenced by:
▷Certain sitting positions.▷Objects on the cover of the Head-up Dis‐
play.▷Sunglasses with certain polarization filters.▷Wet roads.▷Unfavorable light conditions.
If the image is distorted, check the basic set‐
tings.
Display1Navigation instructions2Active Cruise Control with Stop & Go func‐
tion3Lane departure warning4Cruise control/desired speed5Current speed
The Check Control messages are displayed
briefly if needed.
Selecting displays in the Head-up
Display
1."Settings"2."Head-up display"3."Displayed information"4.Select the desired displays in the Head-up
Display.
The settings are stored for the remote control
currently in use.
Setting the brightness
The brightness is automatically adjusted to the
ambient light.
Seite 119Driving comfortControls119
Online Edition for Part no. 01 40 2 910 876 - VII/13
Page 124 of 327

The basic setting can be adjusted manually.1."Settings"2."Head-up display"3."Brightness"4.Turn the controller.
The brightness is adjusted.
With the low beams switched on, the bright‐
ness can also be adjusted with the thumb‐
wheel of the instrument lighting.
The setting is stored for the remote control
currently in use.
Height adjustment
1."Settings"2."Head-up display"3."Height"4.Turn the controller.
The height is adjusted.
The setting is stored for the remote control
currently in use.
Special windshield
The windshield is part of the system.
The shape of the windshield makes it possible
to display a precise image.
A film in the windshield prevents double im‐
ages from being displayed.
Therefore, have the special windshield re‐
placed by a service center only.
Seite 120ControlsDriving comfort120
Online Edition for Part no. 01 40 2 910 876 - VII/13
Page 132 of 327
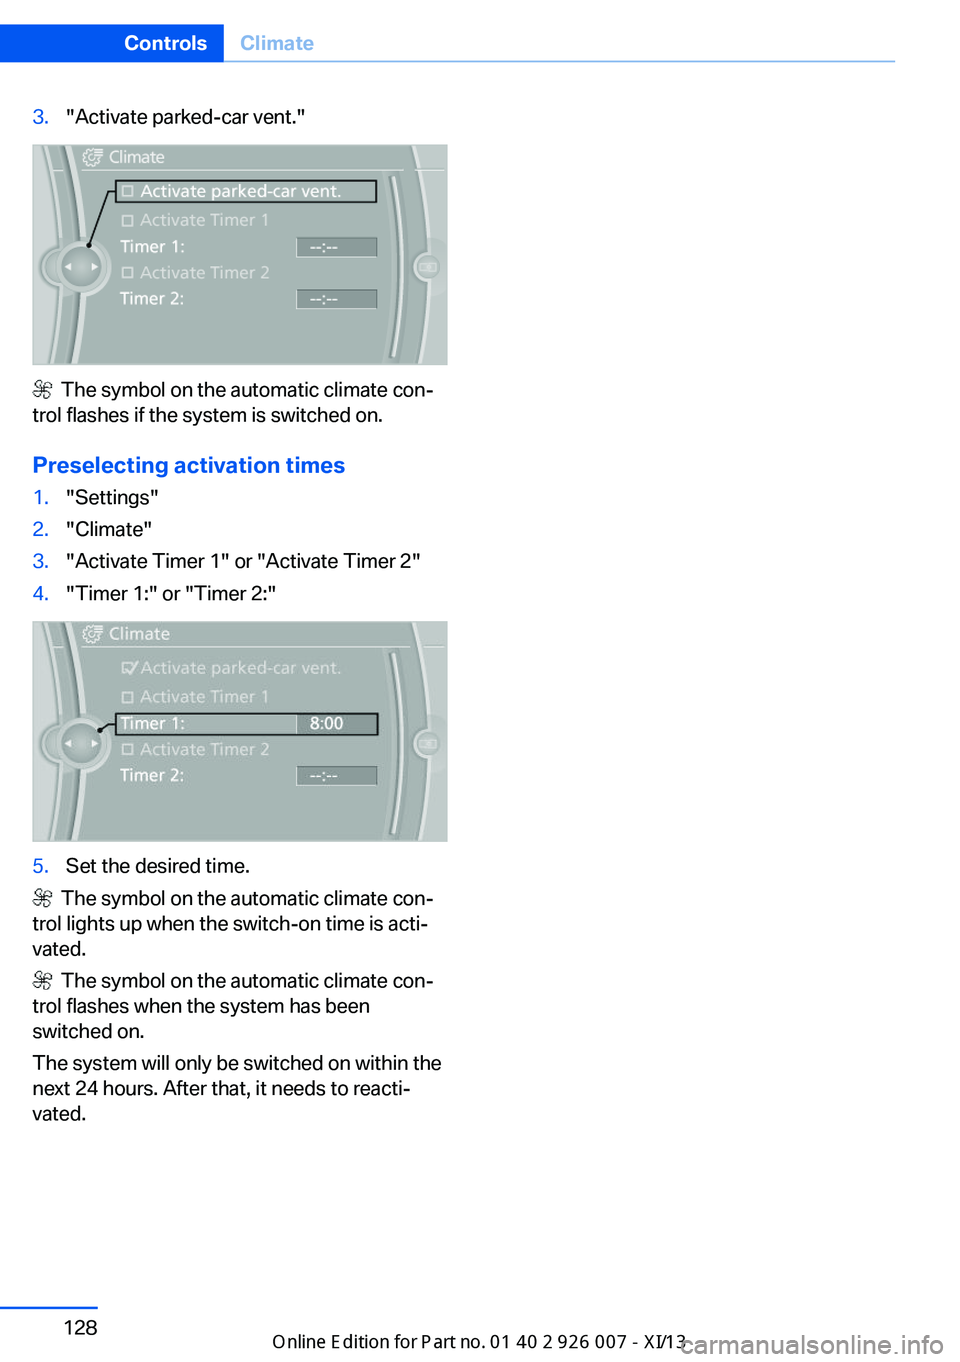
3."Activate parked-car vent."
The symbol on the automatic climate con‐
trol flashes if the system is switched on.
Preselecting activation times
1."Settings"2."Climate"3."Activate Timer 1" or "Activate Timer 2"4."Timer 1:" or "Timer 2:"5.Set the desired time.
The symbol on the automatic climate con‐
trol lights up when the switch-on time is acti‐
vated.
The symbol on the automatic climate con‐
trol flashes when the system has been
switched on.
The system will only be switched on within the
next 24 hours. After that, it needs to reacti‐
vated.
Seite 128ControlsClimate128
Online Edition for Part no. 01 40 2 910 876 - VII/13