2013 BMW X6M remote control
[x] Cancel search: remote controlPage 189 of 327
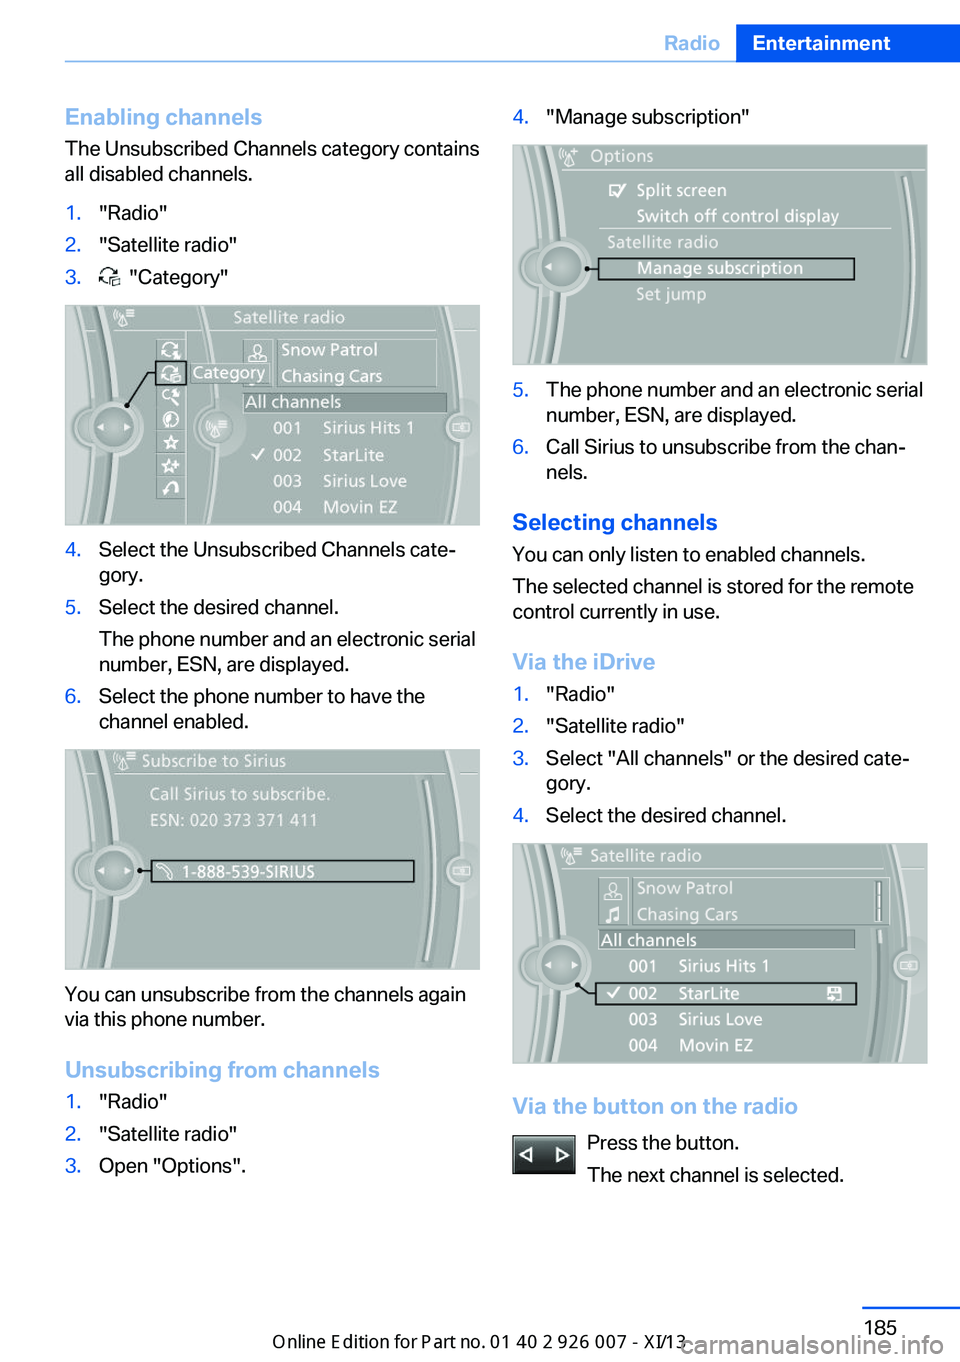
Enabling channels
The Unsubscribed Channels category contains
all disabled channels.1."Radio"2."Satellite radio"3. "Category"4.Select the Unsubscribed Channels cate‐
gory.5.Select the desired channel.
The phone number and an electronic serial
number, ESN, are displayed.6.Select the phone number to have the
channel enabled.
You can unsubscribe from the channels again
via this phone number.
Unsubscribing from channels
1."Radio"2."Satellite radio"3.Open "Options".4."Manage subscription"5.The phone number and an electronic serial
number, ESN, are displayed.6.Call Sirius to unsubscribe from the chan‐
nels.
Selecting channels
You can only listen to enabled channels.
The selected channel is stored for the remote
control currently in use.
Via the iDrive
1."Radio"2."Satellite radio"3.Select "All channels" or the desired cate‐
gory.4.Select the desired channel.
Via the button on the radio
Press the button.
The next channel is selected.
Seite 185RadioEntertainment185
Online Edition for Part no. 01 40 2 910 876 - VII/13
Page 190 of 327
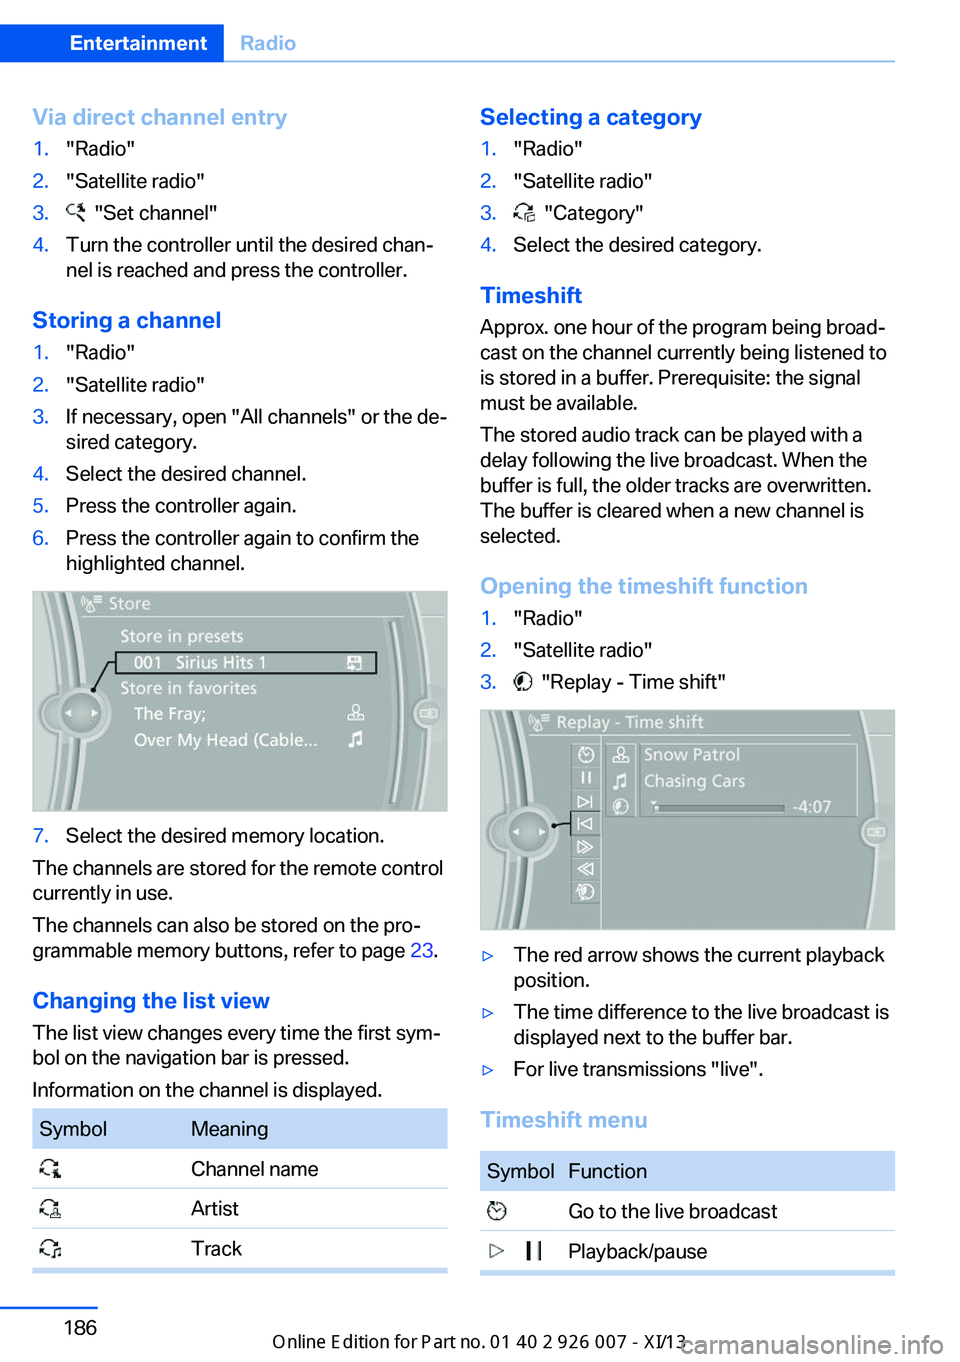
Via direct channel entry1."Radio"2."Satellite radio"3. "Set channel"4.Turn the controller until the desired chan‐
nel is reached and press the controller.
Storing a channel
1."Radio"2."Satellite radio"3.If necessary, open "All channels" or the de‐
sired category.4.Select the desired channel.5.Press the controller again.6.Press the controller again to confirm the
highlighted channel.7.Select the desired memory location.
The channels are stored for the remote control
currently in use.
The channels can also be stored on the pro‐
grammable memory buttons, refer to page 23.
Changing the list view
The list view changes every time the first sym‐
bol on the navigation bar is pressed.
Information on the channel is displayed.
SymbolMeaning Channel name Artist TrackSelecting a category1."Radio"2."Satellite radio"3. "Category"4.Select the desired category.
Timeshift
Approx. one hour of the program being broad‐
cast on the channel currently being listened to
is stored in a buffer. Prerequisite: the signal
must be available.
The stored audio track can be played with a
delay following the live broadcast. When the
buffer is full, the older tracks are overwritten.
The buffer is cleared when a new channel is
selected.
Opening the timeshift function
1."Radio"2."Satellite radio"3. "Replay - Time shift"▷The red arrow shows the current playback
position.▷The time difference to the live broadcast is
displayed next to the buffer bar.▷For live transmissions "live".
Timeshift menu
SymbolFunction Go to the live broadcast Playback/pauseSeite 186EntertainmentRadio186
Online Edition for Part no. 01 40 2 910 876 - VII/13
Page 192 of 327
If there is no message, the system changes to
the My Favorites category. All favorites cur‐
rently being broadcast can be selected from a
list.
Managing the favorites
Activating/deactivating the favorites
Favorites can be activated and deactivated
globally and individually.1."Satellite radio"2. "Manage favorites"3.Select "Activate alert" or the desired favor‐
ites.
The setting is stored for the remote control
currently in use.
Deleting favorites
1."Satellite radio"2. "Manage favorites"3.Highlight the desired favorite.4.Open "Options".5."Delete entry"
Traffic Jump Traffic and weather information for a selected
region is broadcast every few minutes.
Selecting a region
1."Radio"2."Satellite radio"3.Open "Options".4."Set jump"5.Select the desired region.
The region is stored for the remote control cur‐
rently in use.
Activating/deactivating the jump
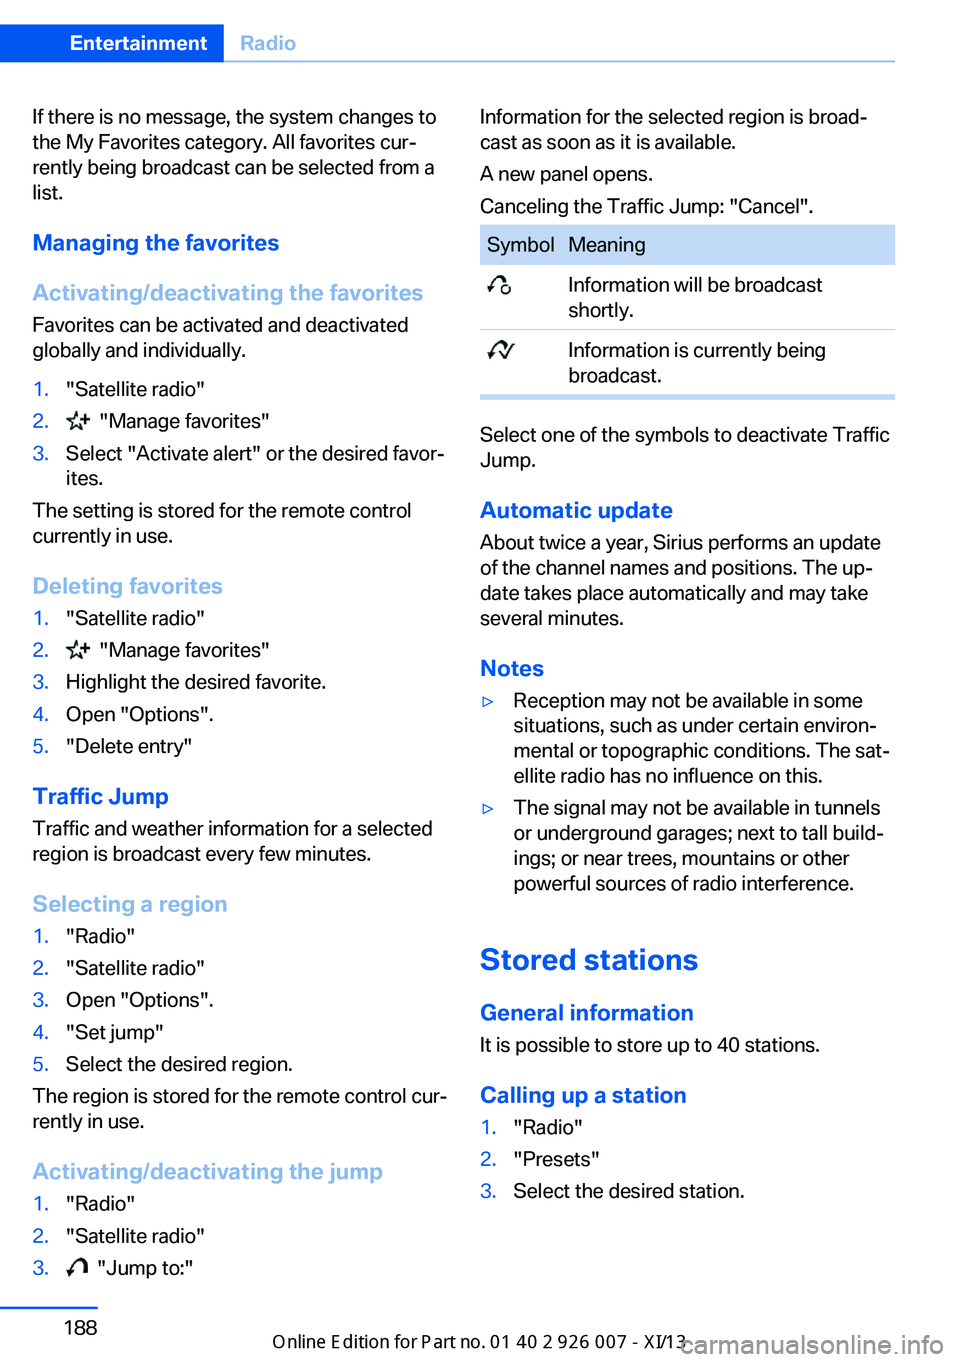
1."Radio"2."Satellite radio"3. "Jump to:"Information for the selected region is broad‐
cast as soon as it is available.
A new panel opens.
Canceling the Traffic Jump: "Cancel".SymbolMeaning Information will be broadcast
shortly. Information is currently being
broadcast.
Select one of the symbols to deactivate Traffic
Jump.
Automatic update
About twice a year, Sirius performs an update
of the channel names and positions. The up‐
date takes place automatically and may take
several minutes.
Notes
▷Reception may not be available in some
situations, such as under certain environ‐
mental or topographic conditions. The sat‐
ellite radio has no influence on this.▷The signal may not be available in tunnels
or underground garages; next to tall build‐
ings; or near trees, mountains or other
powerful sources of radio interference.
Stored stations
General information It is possible to store up to 40 stations.
Calling up a station
1."Radio"2."Presets"3.Select the desired station.Seite 188EntertainmentRadio188
Online Edition for Part no. 01 40 2 910 876 - VII/13
Page 214 of 327
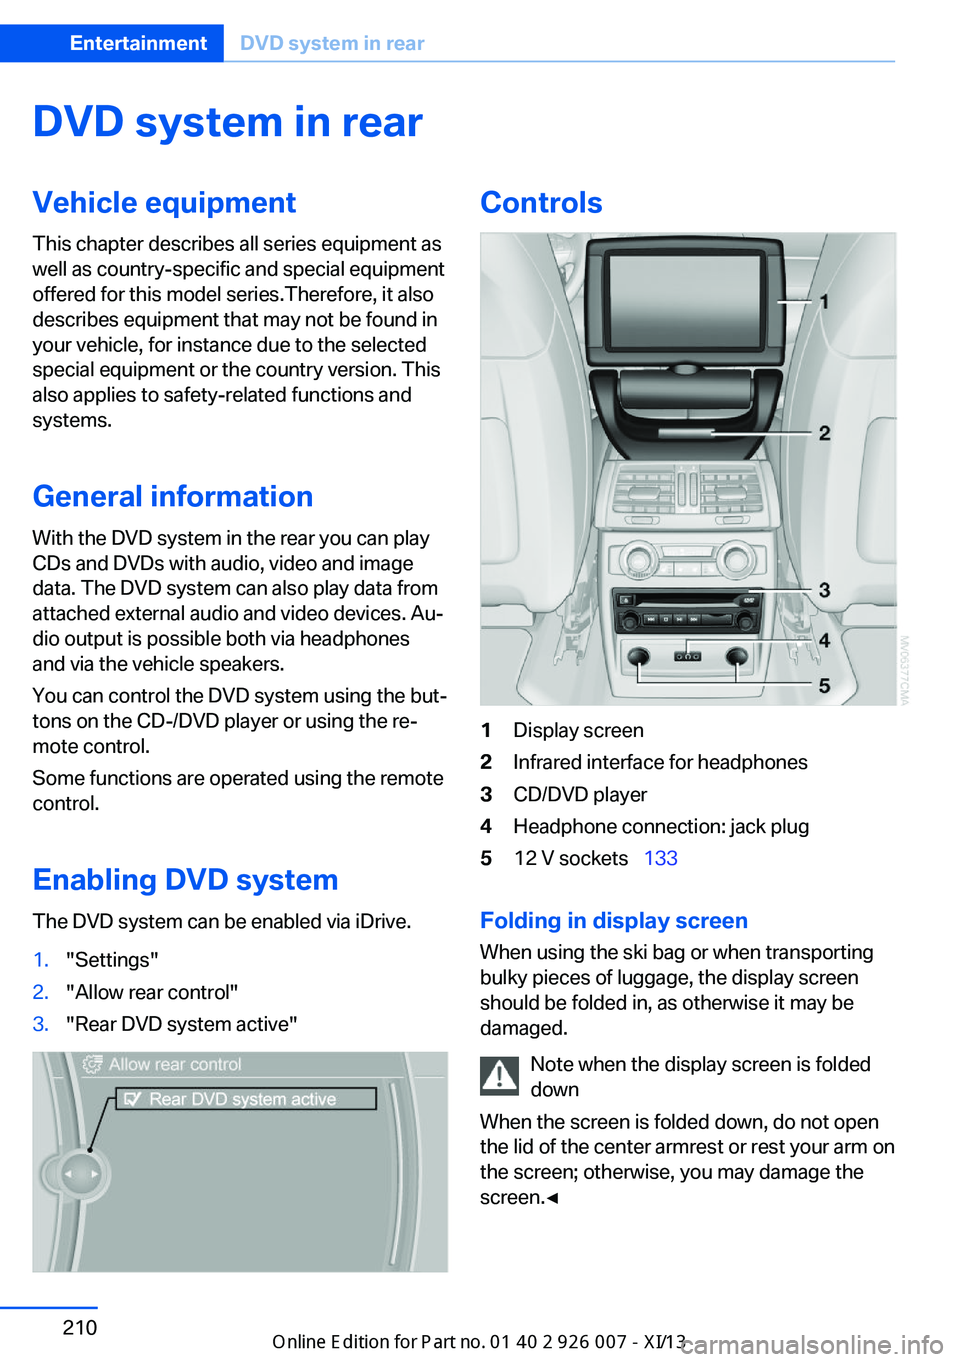
DVD system in rearVehicle equipmentThis chapter describes all series equipment as
well as country-specific and special equipment
offered for this model series.Therefore, it also
describes equipment that may not be found in
your vehicle, for instance due to the selected
special equipment or the country version. This
also applies to safety-related functions and
systems.
General information
With the DVD system in the rear you can play
CDs and DVDs with audio, video and image
data. The DVD system can also play data from
attached external audio and video devices. Au‐
dio output is possible both via headphones
and via the vehicle speakers.
You can control the DVD system using the but‐
tons on the CD-/DVD player or using the re‐
mote control.
Some functions are operated using the remote
control.
Enabling DVD system
The DVD system can be enabled via iDrive.1."Settings"2."Allow rear control"3."Rear DVD system active"Controls1Display screen2Infrared interface for headphones3CD/DVD player4Headphone connection: jack plug512 V sockets 133
Folding in display screen
When using the ski bag or when transporting
bulky pieces of luggage, the display screen
should be folded in, as otherwise it may be
damaged.
Note when the display screen is folded
down
When the screen is folded down, do not open
the lid of the center armrest or rest your arm on
the screen; otherwise, you may damage the
screen.◀
Seite 210EntertainmentDVD system in rear210
Online Edition for Part no. 01 40 2 910 876 - VII/13
Page 215 of 327
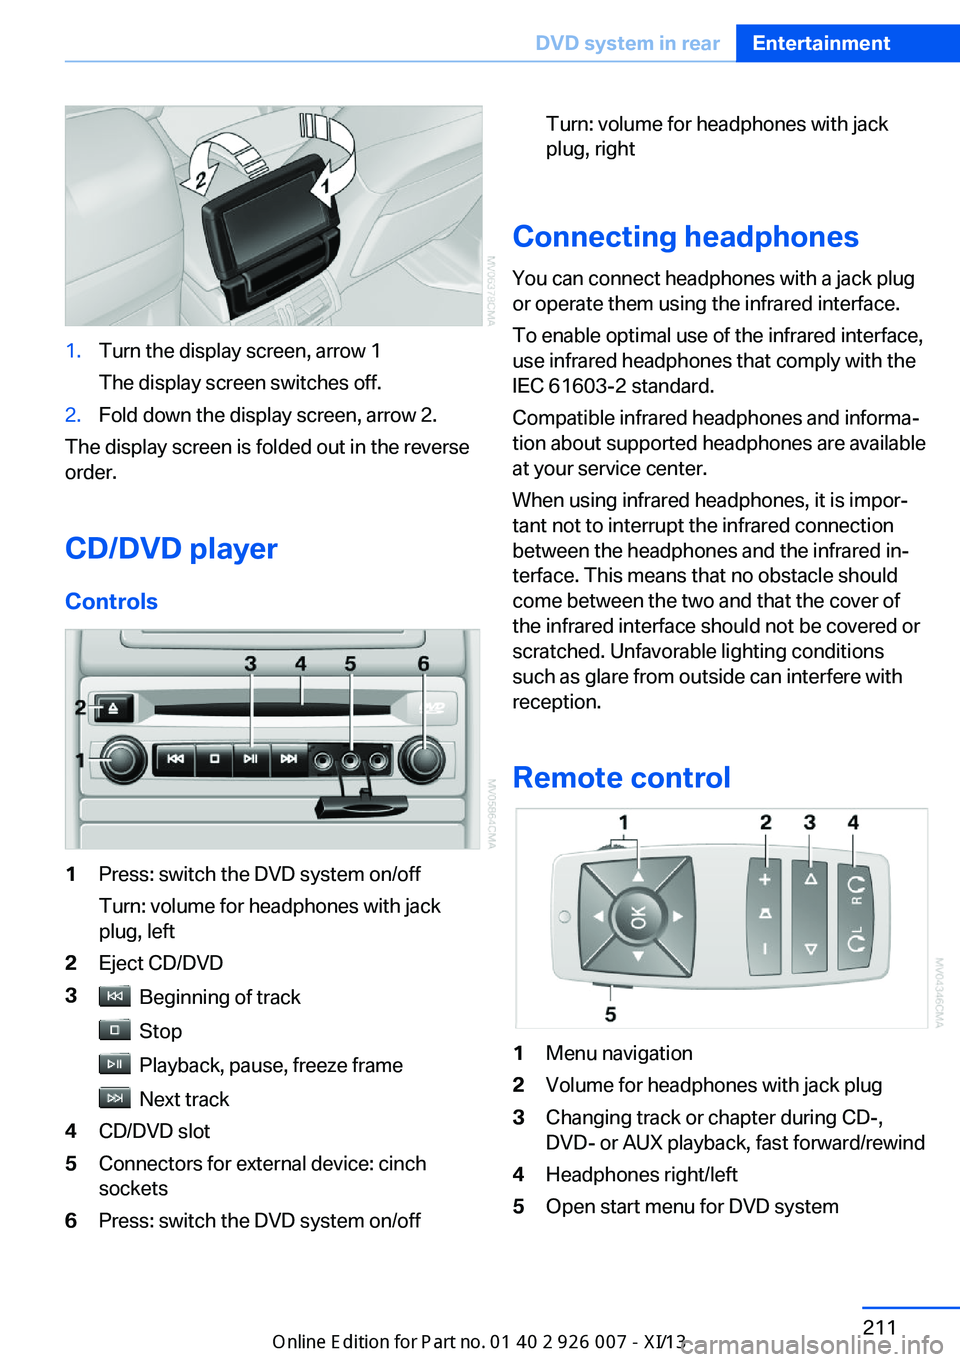
1.Turn the display screen, arrow 1
The display screen switches off.2.Fold down the display screen, arrow 2.
The display screen is folded out in the reverse
order.
CD/DVD player
Controls
1Press: switch the DVD system on/off
Turn: volume for headphones with jack
plug, left2Eject CD/DVD3 Beginning of track
Stop
Playback, pause, freeze frame
Next track
4CD/DVD slot5Connectors for external device: cinch
sockets6Press: switch the DVD system on/offTurn: volume for headphones with jack
plug, right
Connecting headphones
You can connect headphones with a jack plug
or operate them using the infrared interface.
To enable optimal use of the infrared interface,
use infrared headphones that comply with the
IEC 61603-2 standard.
Compatible infrared headphones and informa‐
tion about supported headphones are available
at your service center.
When using infrared headphones, it is impor‐
tant not to interrupt the infrared connection
between the headphones and the infrared in‐
terface. This means that no obstacle should
come between the two and that the cover of
the infrared interface should not be covered or
scratched. Unfavorable lighting conditions
such as glare from outside can interfere with
reception.
Remote control
1Menu navigation2Volume for headphones with jack plug3Changing track or chapter during CD-,
DVD- or AUX playback, fast forward/rewind4Headphones right/left5Open start menu for DVD systemSeite 211DVD system in rearEntertainment211
Online Edition for Part no. 01 40 2 910 876 - VII/13
Page 217 of 327
Playing videos from CDs/
DVDs
Country codes of DVDs
Your DVD player only plays DVDs with the
coding of your home region, e.g., Europe=2.
The country codes supported by your DVD are
contained in the information on your DVD.
An overview of the coding zones:CodeRegion1USA, Canada2Japan, Europe, Middle East, South Af‐
rica3Southeast Asia4Australia, Central and South America,
New Zealand5Northwest Asia, North Africa6China
DVDs with the code 0 can be played on all de‐
vices.
Starting playback
1.Push the CD/DVD into the drive with the la‐
beled side facing upward. The CD/DVD is
automatically pulled in.▷Playback begins automatically after a
few seconds.▷Otherwise: select "DVD".2.If the DVD control or the DVD-specific
menu is displayed when a DVD is inserted,
use the remote control buttons for menu
navigation to select the desired option.
Or:
Press the button on the CD/DVD
player.
You can control the playback with the buttons
on the CD/DVD player or the DVD control.
Video CDs (VCDs) and Super Video CDs
(SVCDs) can only be played if they do not have
a DVD-specific menu.
Eject CD/DVD
Press the button on the CD/DVD player.
The DVD emerges slightly from the drive.
DVD control With the DVD control, you can select the title
and chapter, open the DVD-specific menu, and
operate functions such as Language, Fast for‐
ward and Reverse or Freeze frame.
A DVD can briefly deactivate functions of the
DVD control, under certain circumstances
while the entire DVD is being played. It is not
possible to operate the DVD control under
these circumstances. In this case, try to make
the selection using the DVD-specific menu.
1. Press the button on the remote con‐
trol during playback.2.Press the buttons on the remote con‐
trol or turn the thumbwheel to select the
desired function.3. Press the button.SymbolFunction Exit DVD control"SET"Settings for playing DVDs. Start playback. Stop playback.Seite 213DVD system in rearEntertainment213
Online Edition for Part no. 01 40 2 910 876 - VII/13
Page 218 of 327
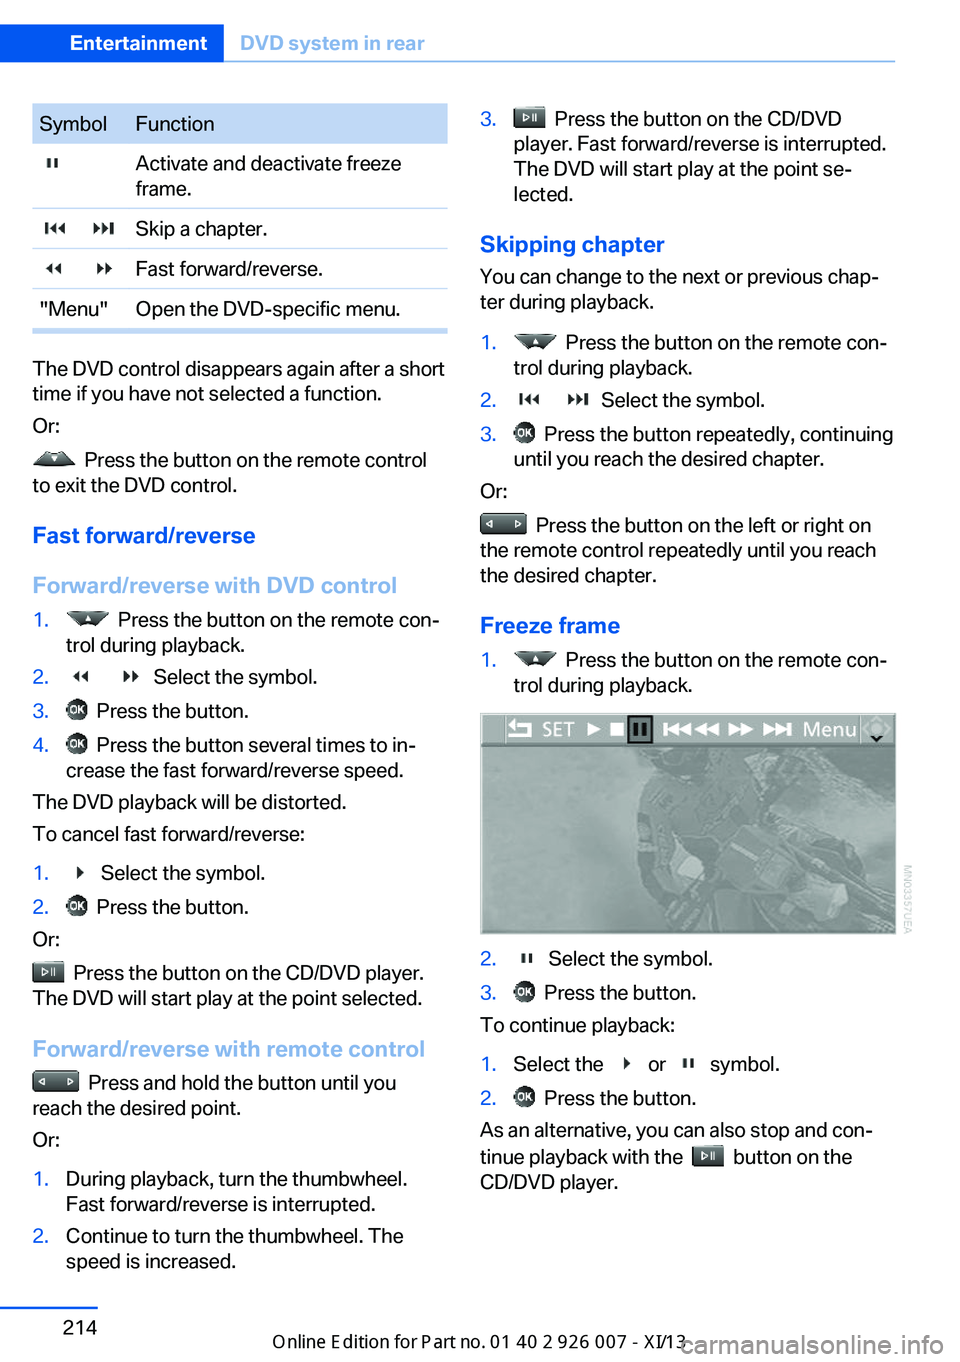
SymbolFunction Activate and deactivate freeze
frame. Skip a chapter. Fast forward/reverse."Menu"Open the DVD-specific menu.
The DVD control disappears again after a short
time if you have not selected a function.
Or:
Press the button on the remote control
to exit the DVD control.
Fast forward/reverse
Forward/reverse with DVD control
1. Press the button on the remote con‐
trol during playback.2. Select the symbol.3. Press the button.4. Press the button several times to in‐
crease the fast forward/reverse speed.
The DVD playback will be distorted.
To cancel fast forward/reverse:
1. Select the symbol.2. Press the button.
Or:
Press the button on the CD/DVD player.
The DVD will start play at the point selected.
Forward/reverse with remote control
Press and hold the button until you
reach the desired point.
Or:
1.During playback, turn the thumbwheel.
Fast forward/reverse is interrupted.2.Continue to turn the thumbwheel. The
speed is increased.3. Press the button on the CD/DVD
player. Fast forward/reverse is interrupted.
The DVD will start play at the point se‐
lected.
Skipping chapter
You can change to the next or previous chap‐
ter during playback.
1. Press the button on the remote con‐
trol during playback.2. Select the symbol.3. Press the button repeatedly, continuing
until you reach the desired chapter.
Or:
Press the button on the left or right on
the remote control repeatedly until you reach
the desired chapter.
Freeze frame
1. Press the button on the remote con‐
trol during playback.2. Select the symbol.3. Press the button.
To continue playback:
1.Select the or symbol.2. Press the button.
As an alternative, you can also stop and con‐
tinue playback with the
button on the
CD/DVD player.
Seite 214EntertainmentDVD system in rear214
Online Edition for Part no. 01 40 2 910 876 - VII/13
Page 219 of 327
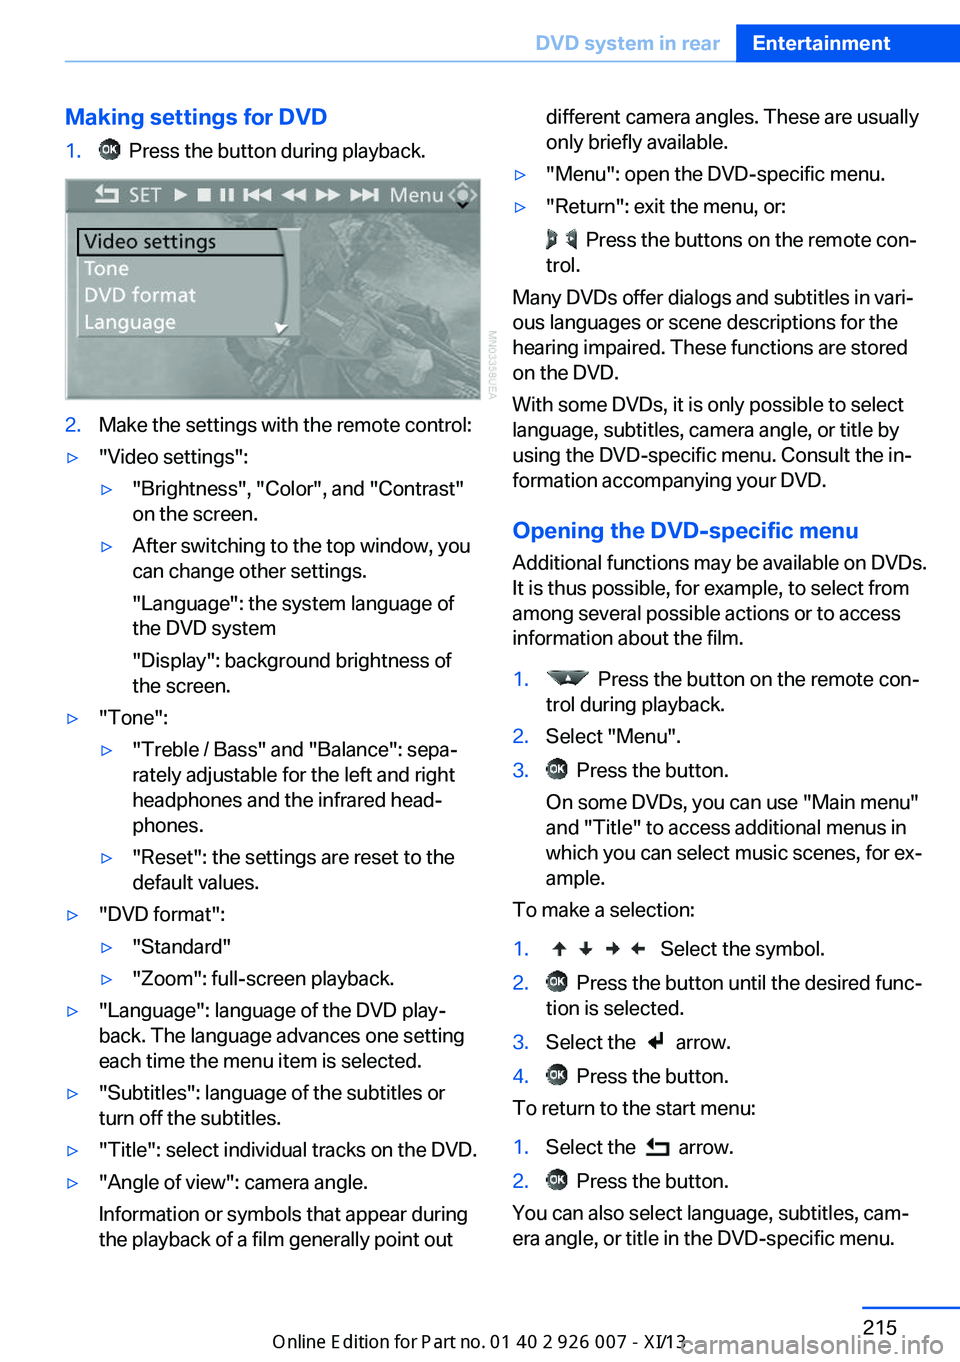
Making settings for DVD1. Press the button during playback.2.Make the settings with the remote control:▷"Video settings":▷"Brightness", "Color", and "Contrast"
on the screen.▷After switching to the top window, you
can change other settings.
"Language": the system language of
the DVD system
"Display": background brightness of
the screen.▷"Tone":▷"Treble / Bass" and "Balance": sepa‐
rately adjustable for the left and right
headphones and the infrared head‐
phones.▷"Reset": the settings are reset to the
default values.▷"DVD format":▷"Standard"▷"Zoom": full-screen playback.▷"Language": language of the DVD play‐
back. The language advances one setting
each time the menu item is selected.▷"Subtitles": language of the subtitles or
turn off the subtitles.▷"Title": select individual tracks on the DVD.▷"Angle of view": camera angle.
Information or symbols that appear during
the playback of a film generally point outdifferent camera angles. These are usually
only briefly available.▷"Menu": open the DVD-specific menu.▷"Return": exit the menu, or:
Press the buttons on the remote con‐
trol.
Many DVDs offer dialogs and subtitles in vari‐
ous languages or scene descriptions for the
hearing impaired. These functions are stored
on the DVD.
With some DVDs, it is only possible to select
language, subtitles, camera angle, or title by
using the DVD-specific menu. Consult the in‐
formation accompanying your DVD.
Opening the DVD-specific menu
Additional functions may be available on DVDs.
It is thus possible, for example, to select from
among several possible actions or to access
information about the film.
1. Press the button on the remote con‐
trol during playback.2.Select "Menu".3. Press the button.
On some DVDs, you can use "Main menu"
and "Title" to access additional menus in
which you can select music scenes, for ex‐
ample.
To make a selection:
1. Select the symbol.2. Press the button until the desired func‐
tion is selected.3.Select the arrow.4. Press the button.
To return to the start menu:
1.Select the arrow.2. Press the button.
You can also select language, subtitles, cam‐
era angle, or title in the DVD-specific menu.
Seite 215DVD system in rearEntertainment215
Online Edition for Part no. 01 40 2 910 876 - VII/13