2013 BMW X6M warning
[x] Cancel search: warningPage 120 of 327
▷Approx. 7 ft/2 m to the side.▷Approx. 7 ft/2 m to the rear.
Obstacles up to the height of the exterior mir‐
rors are thus detected in a timely fashion.
System limits
Top View cannot be used in the following sit‐
uations:
▷With a door open.▷With the tailgate open.▷With an exterior mirror folded in.▷In poor light.
The arrows next to the vehicle are displayed in
a shaded form on the Control Display and a
symbol appears at the corresponding location
on the vehicle.
Check the traffic situation as well
Check the traffic situation around the ve‐
hicle with your own eyes. Otherwise, an acci‐
dent could result from road users or objects lo‐
cated outside the picture area of the
cameras.◀
Switching on automatically
Select transmission position R with the engine
running.
The images from Top View and PDC are dis‐
played when the system has been switched on
using iDrive.
Switching off automatically when
driving forward
The system switches off when a certain dis‐
tance or speed is exceeded.
Switch on the system again if necessary.
Switching on/off manually
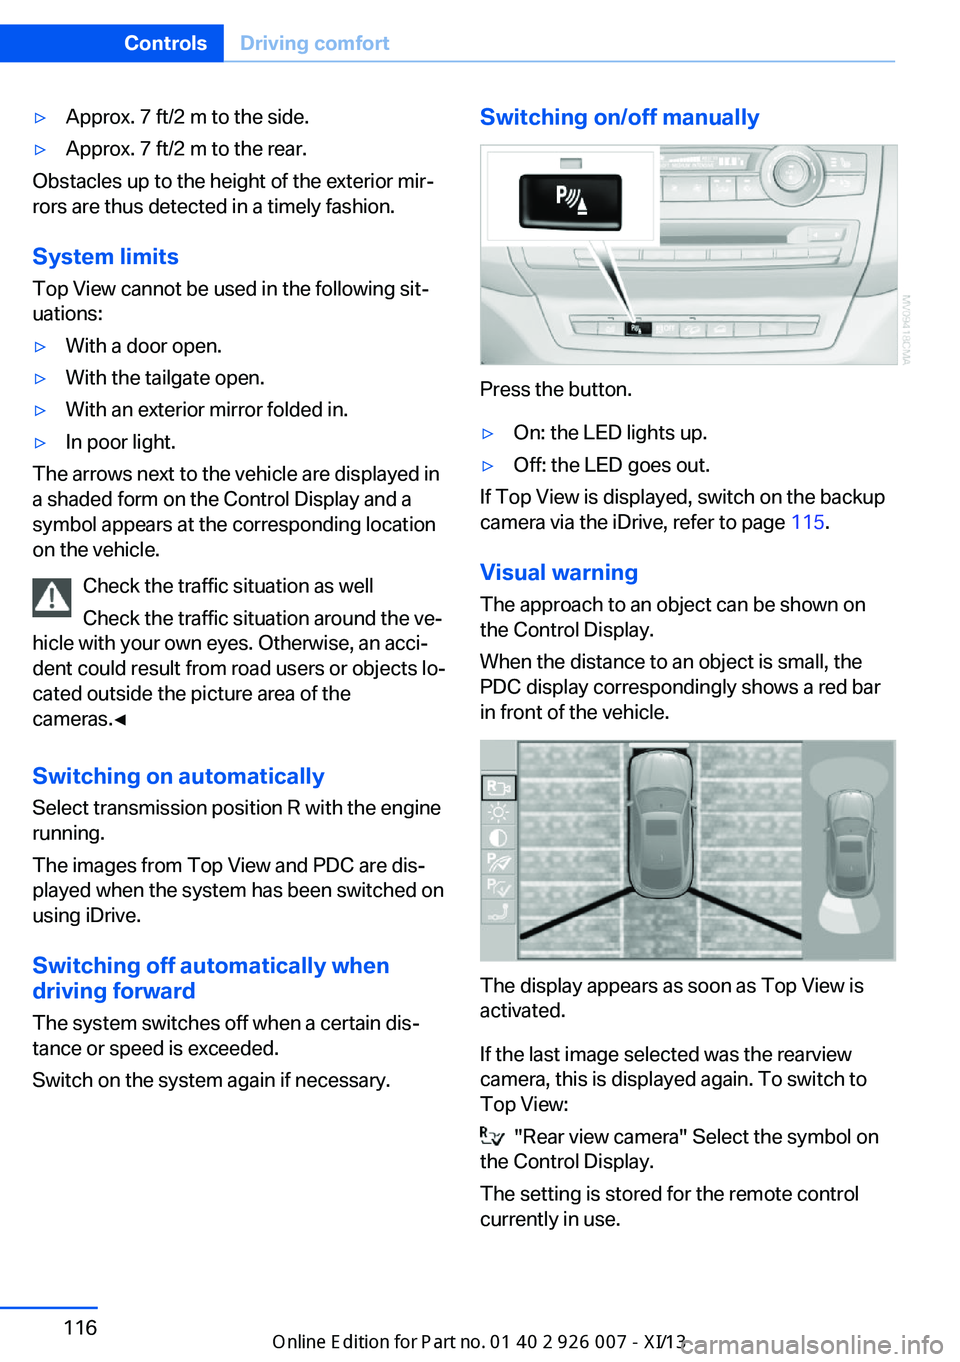
Press the button.
▷On: the LED lights up.▷Off: the LED goes out.
If Top View is displayed, switch on the backup
camera via the iDrive, refer to page 115.
Visual warning
The approach to an object can be shown on
the Control Display.
When the distance to an object is small, the
PDC display correspondingly shows a red bar
in front of the vehicle.
The display appears as soon as Top View is
activated.
If the last image selected was the rearview
camera, this is displayed again. To switch to
Top View:
"Rear view camera" Select the symbol on
the Control Display.
The setting is stored for the remote control
currently in use.
Seite 116ControlsDriving comfort116
Online Edition for Part no. 01 40 2 910 876 - VII/13
Page 123 of 327

Switching on/offPress the button.
Display visibility The visibility of the displays in the Head-up
Display is influenced by:
▷Certain sitting positions.▷Objects on the cover of the Head-up Dis‐
play.▷Sunglasses with certain polarization filters.▷Wet roads.▷Unfavorable light conditions.
If the image is distorted, check the basic set‐
tings.
Display1Navigation instructions2Active Cruise Control with Stop & Go func‐
tion3Lane departure warning4Cruise control/desired speed5Current speed
The Check Control messages are displayed
briefly if needed.
Selecting displays in the Head-up
Display
1."Settings"2."Head-up display"3."Displayed information"4.Select the desired displays in the Head-up
Display.
The settings are stored for the remote control
currently in use.
Setting the brightness
The brightness is automatically adjusted to the
ambient light.
Seite 119Driving comfortControls119
Online Edition for Part no. 01 40 2 910 876 - VII/13
Page 140 of 327
Locking the backrest
Before letting passengers ride in the rear,
engage the seat backrests, locking them in
place. Otherwise, there is the danger of an ac‐
cident due to unexpected seat movement.◀
Ensure that the lock is securely engagedWhen folding back the backrest, be sure
that it locks in place securely. The red warning
field in the control display disappears. If it is
not properly engaged, transported cargo could
enter the passenger compartment during brak‐
ing or evasive maneuvers and endanger the
vehicle occupants.◀
Observe the instructions concerning the
safety belt
Observe the instructions concerning the safety
belt, refer to page 47. Otherwise, personal pro‐
tection may be compromised.◀Seite 136ControlsInterior equipment136
Online Edition for Part no. 01 40 2 910 876 - VII/13
Page 276 of 327

▷"Measurement not possible at this time."▷"Measuring engine oil level..."
Duration with the engine running: ap‐
prox. 3 minutes.
Duration while driving: approx. 5 minutes.
If engine oil was added, it may take up to
30 minutes to obtain an oil level reading.▷"Engine oil level below minimum. Add 1
quart!"
Add a maximum quantity of 1 US quart/1 li‐
ter of engine oil at the next opportunity, re‐
fer also to Adding engine oil below.▷"Engine oil level too high! Have this
checked."
Too much engine oil
Have the vehicle checked immedi‐
ately; otherwise, surplus oil can lead to en‐
gine damage.◀▷"Measurement inactive. Have this
checked." Do not add engine oil. It is possi‐
ble to continue driving. Note the newly cal‐
culated remaining mileage until the next oil
service, refer to page 74. Have the system
checked as soon as possible.
Adding engine oil
Filler neck
Add a maximum quantity of 1 US quart/1 liter
of oil only after the corresponding message
appears on the Control Display.
Add oil promptly
Add oil within the next 125 miles/200 km;
otherwise, engine damage could result.◀
Too much engine oil
Have the vehicle checked immediately;
otherwise, surplus oil can lead to engine dam‐
age.◀
Protect children
Keep oil, grease, etc., out of reach of chil‐
dren and heed the warnings on the containers
to prevent health risks.◀
Oil types for refilling
Notes No oil additives
Do not use oil additives as these may
cause engine damage.◀
Viscosity classes of engine oils
When selecting an engine oil, ensure that
the engine oil belongs to one of the SAE vis‐
cosity classes 0W-40, 0W-30, 5W-40, or
5W-30, or malfunctions or engine damage may
occur.◀
The engine oil quality is critical for the life of
the engine.
Due to national regulations, some oil types are
not available in every country.
Approved oil typesGasoline engineBMW High Performance SAE 5W-30BMW Longlife-01BMW Longlife-01 FE
Further information on approved oil types can
be obtained from the service center.
Seite 272MobilityEngine compartment272
Online Edition for Part no. 01 40 2 910 876 - VII/13
Page 279 of 327
Maintenance and repair should be performed
by your service center. Make sure to have reg‐
ular maintenance procedures recorded in the
vehicle's Service and Warranty Information
Booklet for US models, and in the Warranty
and Service Guide Booklet for Canadian mod‐
els. These entries are proof of regular mainte‐
nance.
Socket for OBD Onboard
Diagnosis
Socket for Onboard Diagnosis
The socket for Onboard Diagnosis may
only be used by the service center, by work‐
shops that operate according to the specifica‐
tions of the vehicle manufacturer with appro‐
priately trained personnel, and by other
authorized persons. Otherwise, its use may
lead to vehicle malfunctions.◀
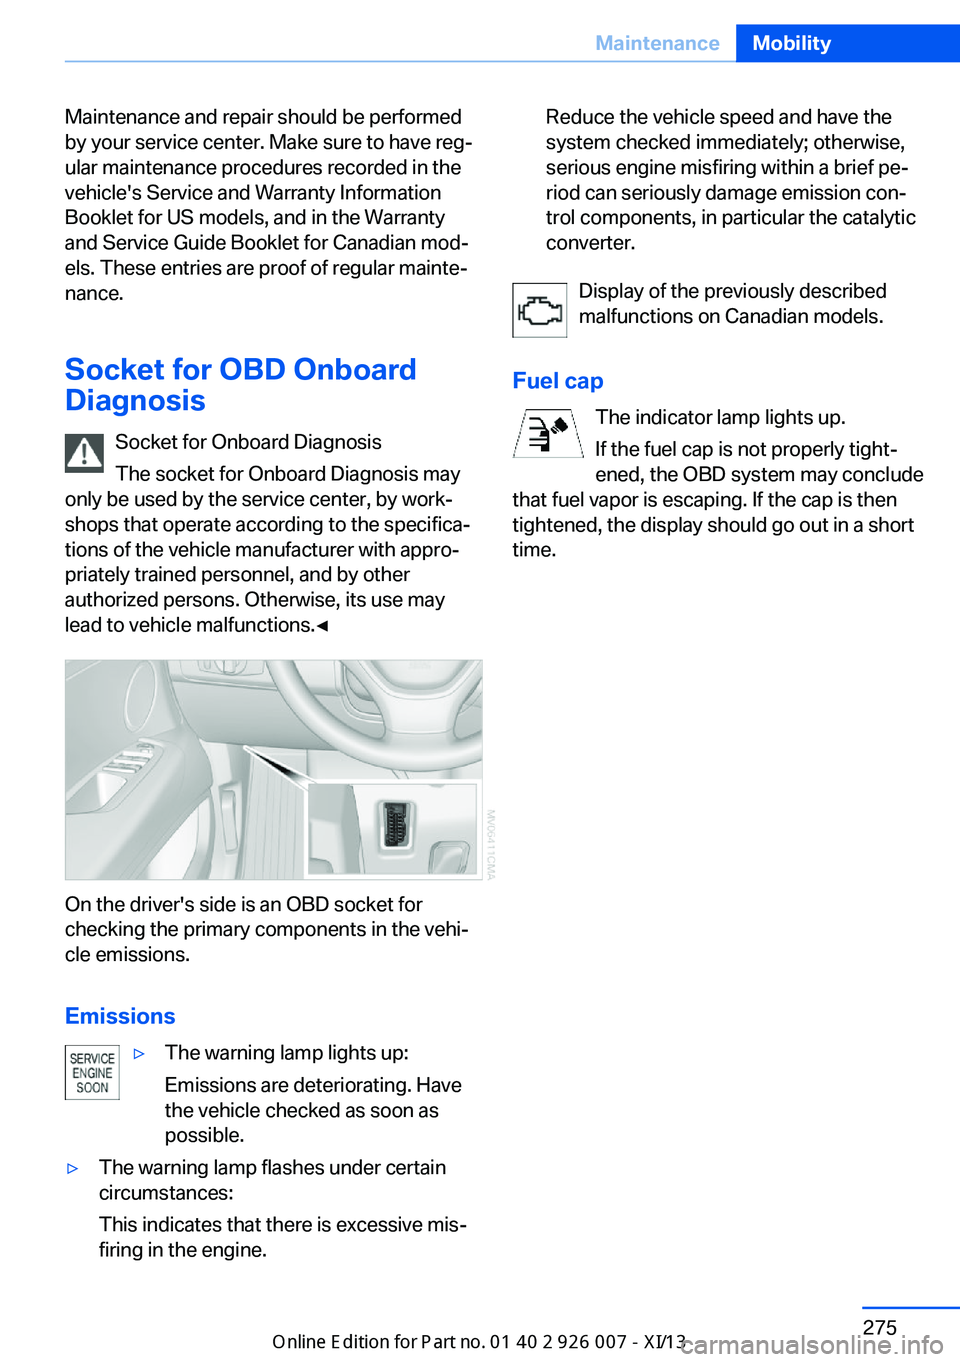
On the driver's side is an OBD socket for
checking the primary components in the vehi‐
cle emissions.
Emissions
▷The warning lamp lights up:
Emissions are deteriorating. Have
the vehicle checked as soon as
possible.▷The warning lamp flashes under certain
circumstances:
This indicates that there is excessive mis‐
firing in the engine.Reduce the vehicle speed and have the
system checked immediately; otherwise,
serious engine misfiring within a brief pe‐
riod can seriously damage emission con‐
trol components, in particular the catalytic
converter.
Display of the previously described
malfunctions on Canadian models.
Fuel cap The indicator lamp lights up.
If the fuel cap is not properly tight‐
ened, the OBD system may conclude
that fuel vapor is escaping. If the cap is then
tightened, the display should go out in a short
time.
Seite 275MaintenanceMobility275
Online Edition for Part no. 01 40 2 910 876 - VII/13
Page 283 of 327

Contact your service center in the event of a
malfunction.
Tail lamps▷Turn signal, backup lamp: 21-watt bulb,
H21W.▷Brake lamp, brake force display: 21-watt
bulb, P21W▷Tail lamp: LED technology.
Contact your service center in the event of
a malfunction.
Arrangement of tail lamps
1Tail lamps2Brake force display3Brake lamp4Backup lamp5Turn signal
Brake lamps
Follow the general instructions on lamps and
bulbs, refer to page 276.
1.Open the side panel in the cargo area.2.Remove the first aid kit and warning trian‐
gle if necessary.3.Rotate the relevant bulb socket to the left
and remove.4.Apply gentle pressure to the bulb while
turning it to the left for removal and re‐
placement.5.Install in the reverse order.
Turn signal
Follow the general instructions on lamps and
bulbs, refer to page 276.
1.Open the side panel in the cargo area.2.Remove the first aid kit and warning trian‐
gle if necessary.3.Remove bulb holder along with bulb and
replace.4.Install in the reverse order.
Backup lamp
Follow the general instructions on lamps and
bulbs, refer to page 276.
1.Open the side panel in the cargo area.2.Remove the first aid kit and warning trian‐
gle if necessary.Seite 279Replacing componentsMobility279
Online Edition for Part no. 01 40 2 910 876 - VII/13
Page 285 of 327
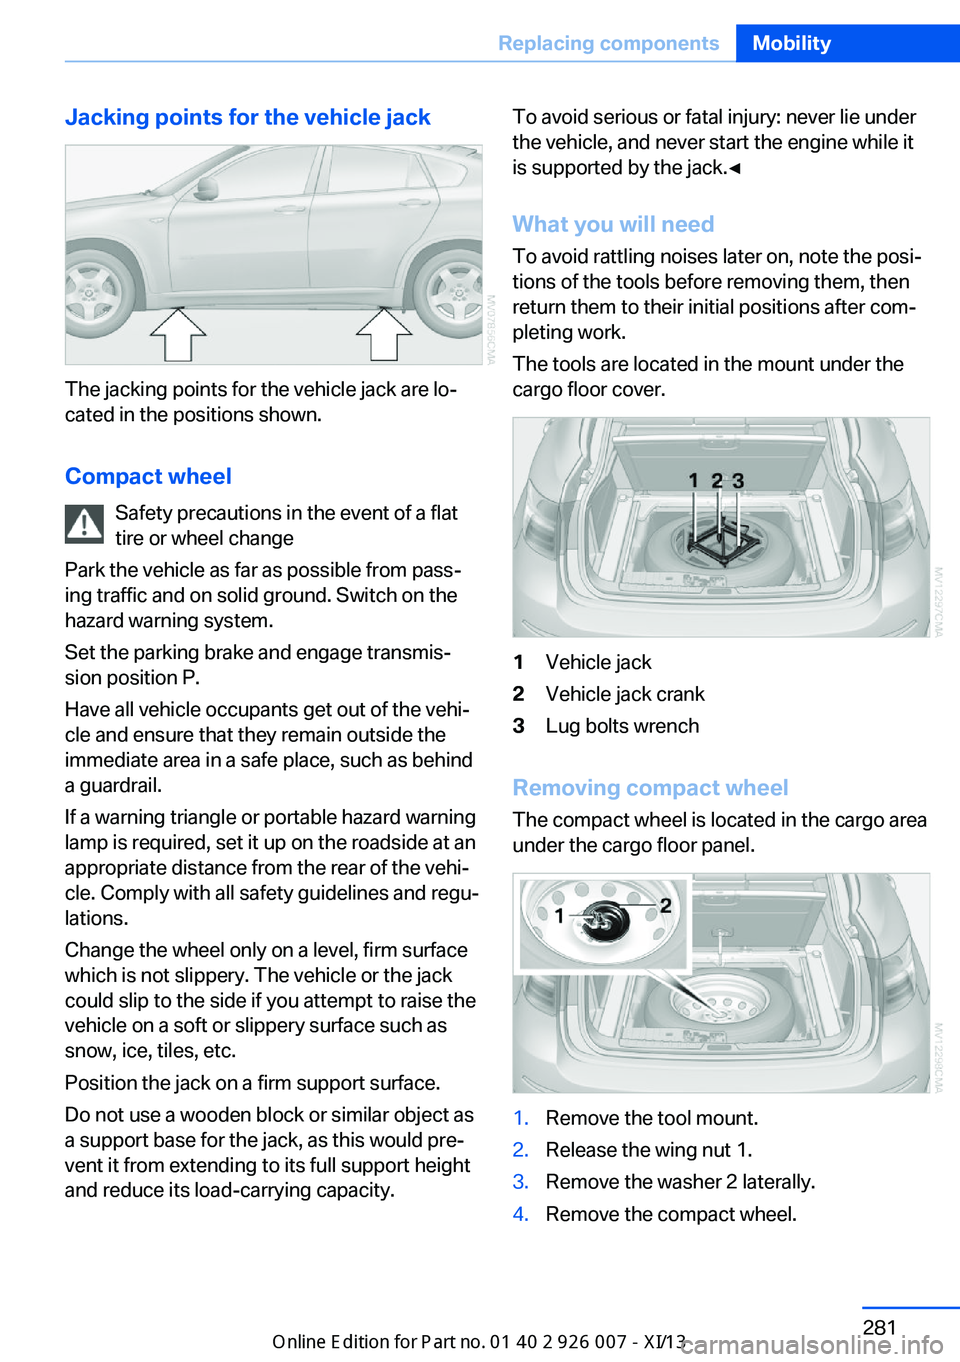
Jacking points for the vehicle jack
The jacking points for the vehicle jack are lo‐
cated in the positions shown.
Compact wheel Safety precautions in the event of a flat
tire or wheel change
Park the vehicle as far as possible from pass‐
ing traffic and on solid ground. Switch on the
hazard warning system.
Set the parking brake and engage transmis‐
sion position P.
Have all vehicle occupants get out of the vehi‐
cle and ensure that they remain outside the
immediate area in a safe place, such as behind
a guardrail.
If a warning triangle or portable hazard warning
lamp is required, set it up on the roadside at an
appropriate distance from the rear of the vehi‐
cle. Comply with all safety guidelines and regu‐
lations.
Change the wheel only on a level, firm surface
which is not slippery. The vehicle or the jack
could slip to the side if you attempt to raise the
vehicle on a soft or slippery surface such as
snow, ice, tiles, etc.
Position the jack on a firm support surface.
Do not use a wooden block or similar object as a support base for the jack, as this would pre‐
vent it from extending to its full support height
and reduce its load-carrying capacity.
To avoid serious or fatal injury: never lie under
the vehicle, and never start the engine while it
is supported by the jack.◀
What you will need
To avoid rattling noises later on, note the posi‐
tions of the tools before removing them, then
return them to their initial positions after com‐
pleting work.
The tools are located in the mount under the
cargo floor cover.1Vehicle jack2Vehicle jack crank3Lug bolts wrench
Removing compact wheel
The compact wheel is located in the cargo area
under the cargo floor panel.
1.Remove the tool mount.2.Release the wing nut 1.3.Remove the washer 2 laterally.4.Remove the compact wheel.Seite 281Replacing componentsMobility281
Online Edition for Part no. 01 40 2 910 876 - VII/13
Page 290 of 327
Breakdown assistanceVehicle equipment
This chapter describes all series equipment as
well as country-specific and special equipment
offered for this model series.Therefore, it also
describes equipment that may not be found in
your vehicle, for instance due to the selected
special equipment or the country version. This
also applies to safety-related functions and
systems.
Hazard warning flashers
The button for the hazard warning system is
located on the center console.
Emergency RequestRequirements
▷Equipment version with full preparation
package mobile phone.
An Emergency Request can be made, even
if no mobile phones are paired with the ve‐
hicle.▷BMW Assist is activated.▷Radio readiness is switched on.▷The BMW Assist system is logged in to a
wireless communications network sup‐
ported by BMW Assist.▷The Assist system is operable.Only press the SOS button in an emergency.
Emergency Request not guaranteed
For technical reasons, the Emergency
Request cannot be guaranteed under unfavor‐
able conditions.◀
Service contract▷After your contract with BMW Assist has
expired, the BMW Assist system can be
deactivated by the service center without
you having to visit a workshop.
After deactivation, an Emergency Request
is no longer possible.▷Under certain circumstances, the system
can be reactivated by a service center after
you sign a new contract.
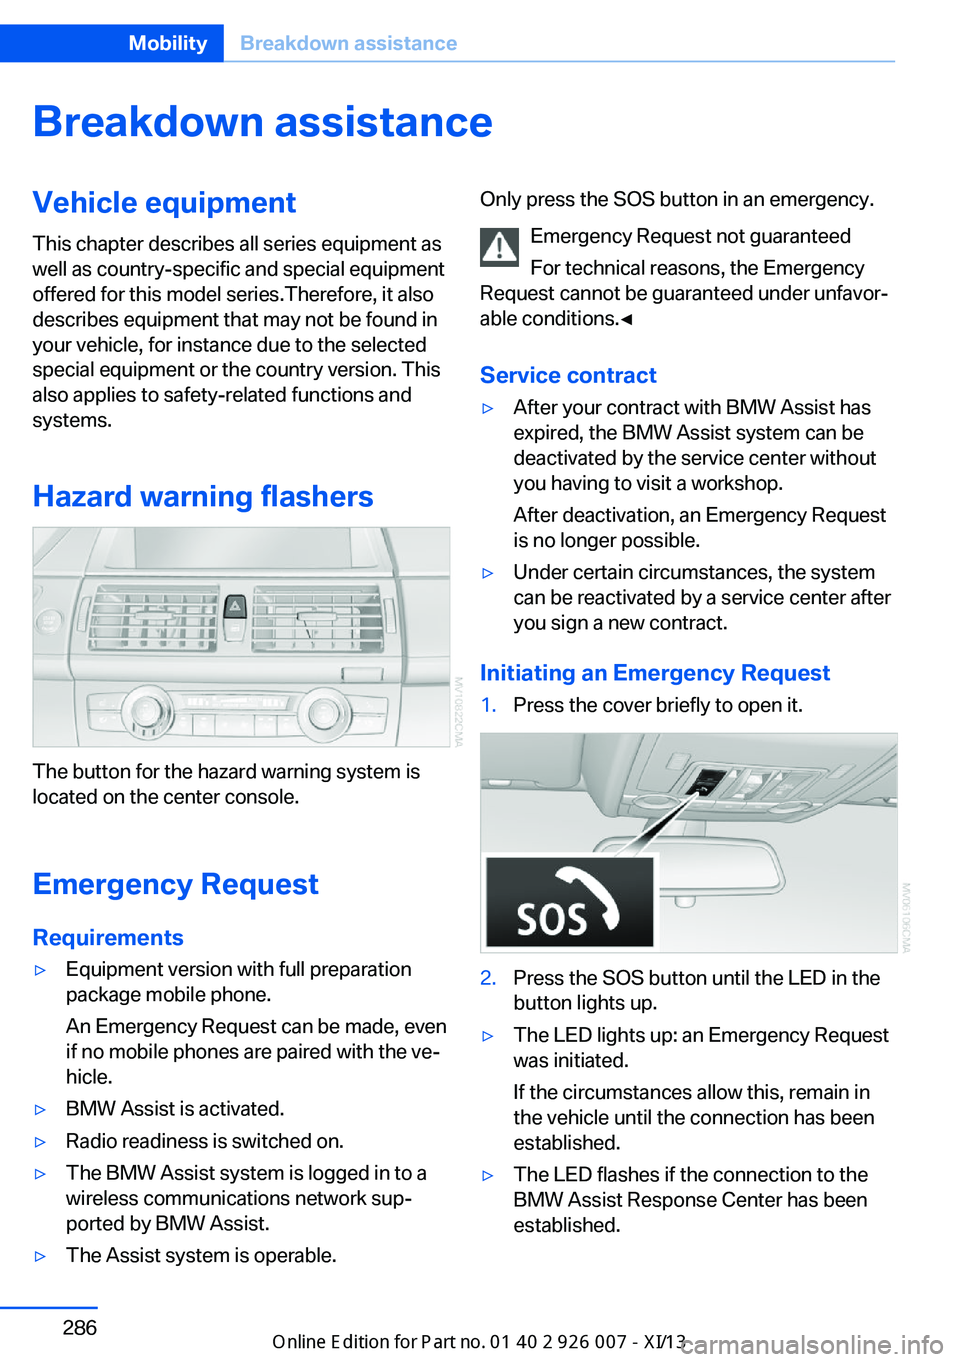
Initiating an Emergency Request
1.Press the cover briefly to open it.2.Press the SOS button until the LED in the
button lights up.▷The LED lights up: an Emergency Request
was initiated.
If the circumstances allow this, remain in
the vehicle until the connection has been
established.▷The LED flashes if the connection to the
BMW Assist Response Center has been
established.Seite 286MobilityBreakdown assistance286
Online Edition for Part no. 01 40 2 910 876 - VII/13