2013 BMW X6M tire pressure
[x] Cancel search: tire pressurePage 157 of 327

Saving fuelVehicle equipmentThis chapter describes all series equipment as
well as country-specific and special equipment
offered for this model series.Therefore, it also
describes equipment that may not be found in
your vehicle, for instance due to the selected
special equipment or the country version. This
also applies to safety-related functions and
systems.
General information
Your vehicle contains advanced technology for
the reduction of fuel consumption and emis‐
sions.
Fuel consumption depends on a number of dif‐
ferent factors.
The implementation of certain measures, driv‐
ing style and regular maintenance, refer to
page 274, can have an influence on fuel con‐
sumption and on the environmental impact.
Remove unnecessary cargo
Additional weight increases fuel consumption.
Remove attached parts
following use
Remove unneeded auxiliary mirrors, roof or
rear luggage racks after use.
Attached parts on the vehicle impair the aero‐
dynamics and increase the fuel consumption.Closing the windows and
glass sunroof
Driving with the glass sunroof or windows
open results in increased air resistance and
raises fuel consumption.
Check the tire inflation pressure regularly
Check and, if necessary, correct the tire infla‐
tion pressure, refer to page 262, at least twice
a month and before starting on a long trip.
Low tire inflation pressure increases rolling re‐
sistance and thus raises fuel consumption and
tire wear.
Drive away without delay
Do not wait for the engine to warm-up while
the vehicle remains stationary. Start driving
right away, but at moderate engine speeds.
This is the fastest way for the cold engine to
reach its operating temperature.
Look well ahead when
driving
Avoid unnecessary acceleration and braking.
By maintaining a suitable distance to the vehi‐
cle driving ahead of you.
Driving smoothly and looking ahead reduces
fuel consumption.
Avoid high engine speeds Driving at a low engine speed reduces fuel
consumption and minimizes wear.Seite 153Saving fuelDriving tips153
Online Edition for Part no. 01 40 2 910 876 - VII/13
Page 266 of 327

Wheels and tiresVehicle equipment
This chapter describes all series equipment as
well as country-specific and special equipment
offered for this model series.Therefore, it also
describes equipment that may not be found in
your vehicle, for instance due to the selected
special equipment or the country version. This
also applies to safety-related functions and
systems.
Tire inflation pressure
Safety information
It is not merely the tires' service life, but also
driving comfort and, to a great extent, driving
safety that depend on the condition of the tires
and the maintenance of the specified tire pres‐
sure.
Checking the pressure Only check the tire inflation pressure when the
tires are cold. This means after a maximum of
1.25 miles/2 km driving or when the vehicle
has been parked for at least 2 hours. When the
tires are warm, the tire inflation pressure is
higher.
Check the tire inflation pressure regularly
Check the tire inflation pressure regularly
and correct it if necessary, even in the compact
wheel: usually twice monthly or before em‐
barking on a long trip. If you fail to observe this
precaution, you may be driving on tires with in‐
correct tire pressures, a condition that may not
only compromise your vehicle's driving stabil‐
ity, but also lead to tire damage and the risk of
an accident.Do not drive with depressurized or flat tires,
except for run-flat tires. A flat tire will seriously
impair your vehicle's handling and braking re‐
sponse. Attempts to drive on a flat tire can lead
to a loss of control over the vehicle.◀
After adjusting the tire inflation pressure, reset
the Tire Pressure Monitor, refer to page 90, or
reinitialize the Flat Tire Monitor, refer to
page 88.
Pressure specifications The tables below provide all the correct infla‐
tion pressures for the specified tire sizes at
ambient temperature.
The inflation pressures apply to the tire sizes
approved and tire brands recommended by
BMW; a list of these is available from your
service center.
For correct identification of the right tire infla‐
tion pressures, observe the following:▷Tire sizes of your vehicle.▷Maximum allowable driving speed.
Tire inflation pressures for driving up
to 100 mph or 160 km/h
For normal driving up to 100 mph/160 km/h,
adjust pressures to the respective tire inflation
pressures listed on the following pages in the
column for traveling speeds up to 100 mph/
160 km/h to achieve optimum driving comfort.
These tire inflation pressures can also be
found on the driver's side door pillar when the
driver's door is open.
Seite 262MobilityWheels and tires262
Online Edition for Part no. 01 40 2 910 876 - VII/13
Page 267 of 327

Do not exceed the maximum permissible
speed
The maximum permissible speed for these tire
pressures is 100 mph/160 km/h. Do not ex‐
ceed this speed; otherwise, tire damage and
accidents may occur.◀
Tire inflation pressures for driving
above 100 mph or 160 km/h
Adjust the tire inflation pressures
To drive at maximum speeds in excess of
100 mph/160 km/h, adjust pressures to the re‐
spective tire inflation pressures listed on the
following pages in the column for traveling
speeds including those exceeding 100 mph or
160 km/h. Otherwise, tire damage and acci‐
dents could occur.◀
Observe all national and local maximum speed
limits; otherwise, violations of the laws could
occur.
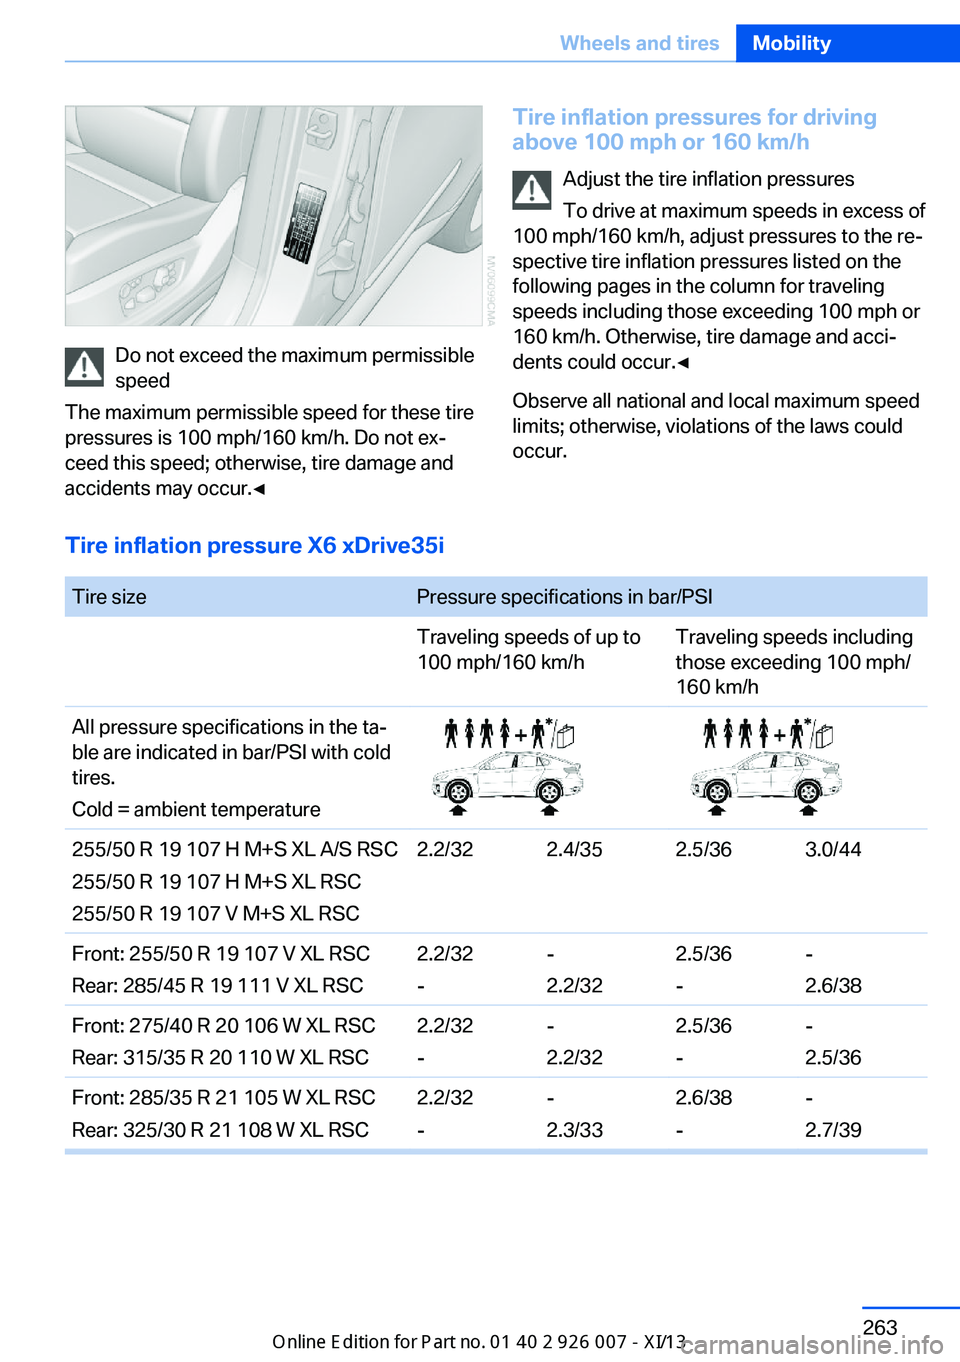
Tire inflation pressure X6 xDrive35i
Tire sizePressure specifications in bar/PSITraveling speeds of up to
100 mph/160 km/hTraveling speeds including
those exceeding 100 mph/
160 km/hAll pressure specifications in the ta‐
ble are indicated in bar/PSI with cold
tires.
Cold = ambient temperature255/50 R 19 107 H M+S XL A/S RSC
255/50 R 19 107 H M+S XL RSC
255/50 R 19 107 V M+S XL RSC2.2/322.4/352.5/363.0/44Front: 255/50 R 19 107 V XL RSC
Rear: 285/45 R 19 111 V XL RSC2.2/32
--
2.2/322.5/36
--
2.6/38Front: 275/40 R 20 106 W XL RSC
Rear: 315/35 R 20 110 W XL RSC2.2/32
--
2.2/322.5/36
--
2.5/36Front: 285/35 R 21 105 W XL RSC
Rear: 325/30 R 21 108 W XL RSC2.2/32
--
2.3/332.6/38
--
2.7/39Seite 263Wheels and tiresMobility263
Online Edition for Part no. 01 40 2 910 876 - VII/13
Page 268 of 327

Tire sizePressure specifications in bar/PSIFront: 275/40 R 20 106 V M+S XL
RSC
Rear: 315/35 R 20 110 V M+S XL
RSC2.2/32
--
2.2/322.5/36
--
2.7/39Compact wheel:
T 155/90 D 18 113 M
T 155/80 R 19 114 MSpeeds of up to 50 mph/80 km/h
4.2/60
Tire inflation pressures for X6 xDrive50i
Tire sizePressure specifications in bar/PSITraveling speeds of up to
100 mph/160 km/hTraveling speeds including
those exceeding 100 mph/
160 km/hAll pressure specifications in the ta‐
ble are indicated in bar/PSI with cold
tires.
Cold = ambient temperature255/50 R 19 107 H M+S XL A/S RSC
255/50 R 19 107 H M+S XL RSC
255/50 R 19 107 V M+S XL RSC2.3/332.5/362.8/413.0/44Front: 255/50 R 19 107 W XL RSC
Rear: 285/45 R 19 111 W XL RSC2.5/36
--
2.5/362.9/42
--
2.9/42Front: 275/40 R 20 106 W XL RSC
Rear: 315/35 R 20 110 W XL RSC2.5/36
--
2.5/363.0/44
--
3.0/44Front: 285/35 R 21 105 W XL RSC
Rear: 325/30 R 21 108 W XL RSC2.5/36
--
2.5/363.1/45
--
3.1/45Front: 275/40 R 20 106 V M+S XL
RSC
Rear: 315/35 R 20 110 V M+S XL
RSC2.5/36
--
2.5/363.0/44
--
3.0/44Compact wheel:
T 155/90 D 18 113 M
T 155/80 R 19 114 MSpeeds of up to 50 mph/80 km/h
4.2/60Seite 264MobilityWheels and tires264
Online Edition for Part no. 01 40 2 910 876 - VII/13
Page 271 of 327

Indications of tire damage or other vehicle de‐
fects:▷Unusual vibrations during driving.▷Unusual handling such as a strong ten‐
dency to pull to the left or right.
Damage can be caused by driving over curbs,
road damage and similar situations.
In case of tire damage
If there are indications of tire damage, re‐
duce your speed immediately and have the
wheels and tires checked right away; other‐
wise, there is the increased risk of an accident.
Drive carefully to the next service center or tire
shop.
If necessary, have the vehicle towed.
Otherwise, tire damage can present a life-
threatening hazard to vehicle occupants and
other road users.◀
Repair of tire damage
For safety reasons, the manufacturer of
your vehicle recommends that you do not have
damaged tires repaired; they should be re‐
placed. Otherwise, damage can occur as a re‐
sult.◀
Changing wheels and tires
Mounting Information on mounting tires
Have mounting and balancing performed
only by a service center or tire specialist.
If this work is not carried out properly, there is
the danger of subsequent damage and related
safety hazards.◀
Wheel and tire combination
Information on the right wheel and tire combi‐
nation and rim version for your vehicle can be
obtained from the service center.
Incorrect wheel and tire combinations impair
the function of a variety of systems such as
ABS or DSC.
To maintain good handling and vehicle re‐
sponse, use only tires with a single tread con‐
figuration from a single manufacturer.
Following tire damage, have the original wheel
and tire combination remounted on the vehicle
as soon as possible.
Approved wheels and tires
The manufacturer of your vehicle recom‐
mends that you use only wheels and tires that
have been approved for your particular vehicle
model.
For example, despite having the same official
size ratings, variations can lead to body con‐
tact and with it, the risk of severe accidents.
The manufacturer of your vehicle cannot eval‐
uate non-approved wheels and tires to deter‐
mine if they are suited for use, and therefore
cannot ensure the operating safety of the vehi‐
cle if they are mounted.◀
Wheels with electronics for TPM Tire
Pressure Monitor
When mounting new tires or changing from
summer to winter tires or vice versa, only use
wheels with TPM electronics; otherwise, the
Tire Pressure Monitor will not be able to detect
a flat tire, refer to page 90. Your service center
will be glad to advise you.Seite 267Wheels and tiresMobility267
Online Edition for Part no. 01 40 2 910 876 - VII/13
Page 273 of 327

The support of the sidewall allows the tire to
remain drivable to a restricted degree in the
event of a pressure loss.
Driving with a damaged tire:▷Flat Tire Monitor FTM, refer to page 88▷Tire Pressure Monitor TPM, refer to
page 90
Snow chains
Only certain fine-link snow chains have been
tested by BMW, classified as safe for use and
recommended. Consult your service center for
more information.
Use only in pairs on rear wheels of size
255/50 R 19.
Observe the manufacturer's instructions when
mounting snow chains. Do not exceed a speed
of 30 mph/50 km/h when using snow chains.
Do not initialize the Flat Tire Monitor if snow chains are mounted; otherwise, the instrument
might issue an incorrect reading.
When driving with snow chains, it can be bene‐
ficial to temporarily activate DTC, refer to
page 97.
Seite 269Wheels and tiresMobility269
Online Edition for Part no. 01 40 2 910 876 - VII/13
Page 284 of 327

3.Remove bulb holder along with bulb and
replace.4.Install in the reverse order.
Brake force display
Follow the general instructions on lamps and
bulbs, refer to page 276.
1.Carefully remove the cover in the tailgate
panel with a screwdriver.2.Rotate the bulb socket to the left and re‐
move.3.Apply gentle pressure to the bulb while
turning it to the left for removal and re‐
placement.4.Insert the bulb socket in the tailgate and
engage it.5.Replace the cover.
License plate lamps
Follow the general instructions on lamps and
bulbs, refer to page 276.
These lamps are made using LED technology.
Contact your service center in the event of a
malfunction.
Center brake lamp Follow the general instructions on lamps and
bulbs, refer to page 276.
This lamp uses LED technology for operation.
Contact your service center in the event of a
malfunction.
Changing wheels
Notes
Your vehicle is equipped with run-flat tires, re‐
fer to page 268, as standard equipment.
They do not need to be replaced immediately
in the event of a puncture.
When mounting new tires or changing from
summer to winter tires or vice versa, use run-
flat tires for your own safety.
Do not rotate the front wheels to the rear or
vice versa, as otherwise the handling charac‐
teristics will be negatively affected.
Suitable tools for changing the wheels are
available from the service center as an acces‐
sory.
Seite 280MobilityReplacing components280
Online Edition for Part no. 01 40 2 910 876 - VII/13
Page 286 of 327

Preparing wheel change1.Observe the safety precautions above.2.Loosen the lug bolts a half turn.
Jacking up vehicle
1.Position the vehicle jack at the jacking
point closest to the wheel so that the entire
surface of the jack base rests on the
ground perpendicularly beneath the jack‐
ing point.
The vehicle jack is designed for
changing wheels only.
The vehicle jack is designed for changing
wheels only. Do not attempt to raise an‐
other vehicle model with it or to raise any
load of any kind. To do so could cause ac‐
cidents and personal injury.◀2.Guide the jack head into the rectangular
recess of the jacking point when cranking
up, refer to illustration detail.3.Jack the vehicle up until the wheel you are
changing is raised from the ground.Mounting a wheel1.Unscrew the lug bolts and remove the
wheel.2.Remove accumulations of mud or dirt from
the mounting surfaces of the wheel and
hub. Also clean the lug bolts.3.Position the new wheel or compact wheel.
Secure the wheel by screwing at least two
lug bolts into opposite bolt holes.
When you mount wheels other than Genu‐
ine BMW light-alloy wheels, different lug
bolts may also be required.4.Screw in the remaining lug bolts. Tighten
all the bolts securely in a diagonal pattern.5.Lower the vehicle and remove the jack
from beneath the vehicle.
After mounting
1.Tighten the lug bolts in a diagonal pattern.
Checking that the lug bolts are tight
To ensure safety, always have the lug
bolts checked with a calibrated torque
wrench as soon as possible to ensure that
they are tightened to the specified torque.
Otherwise, incorrectly tightened lug bolts
are a hidden safety risk. The tightening tor‐
que equals 101 lb ft/140 Nm.◀2.Stow the defective wheel in the cargo area.
The defective wheel cannot be stored un‐
der the cargo floor cover due to its size.3.Check and correct the tire inflation pres‐
sure at the earliest opportunity.4.Initialize the Flat Tire Monitor, refer to
page 88, or reset the Tire Pressure Moni‐
tor, refer to page 90.5.Replace the damaged tire as soon as pos‐
sible and have the new wheel/tire bal‐
anced.Seite 282MobilityReplacing components282
Online Edition for Part no. 01 40 2 910 876 - VII/13