2013 BMW X6 XDRIVE 50I tow
[x] Cancel search: towPage 295 of 345
Replacing componentsVehicle equipmentThis chapter describes all series equipment as
well as country-specific and special equipment
offered for this model series.Therefore, it also
describes equipment that may not be found in
your vehicle, for instance due to the selected
special equipment or the country version. This
also applies to safety-related functions and
systems.
Tool kit
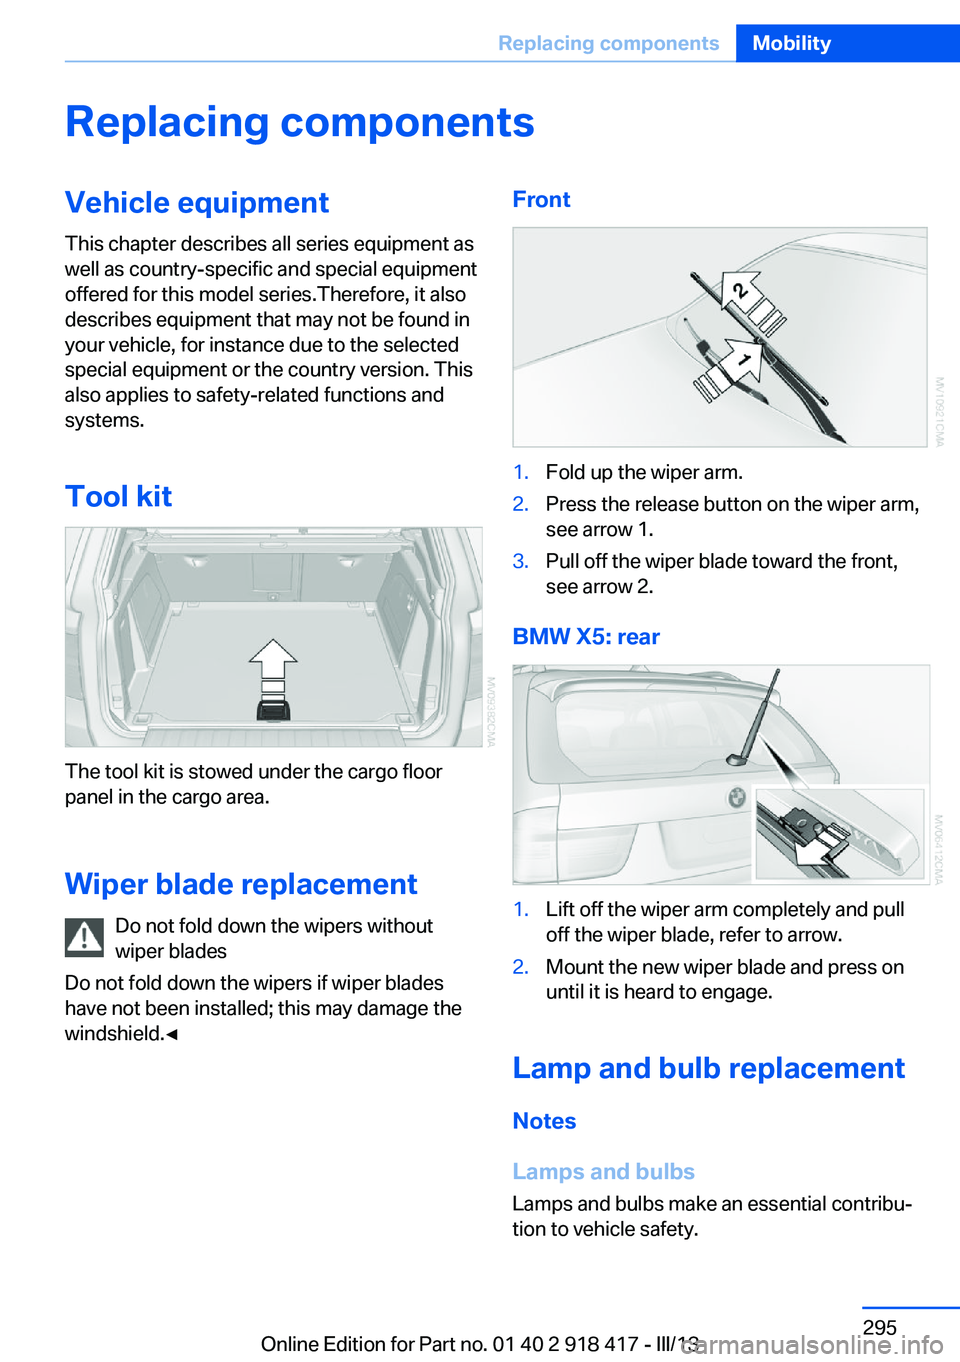
The tool kit is stowed under the cargo floor
panel in the cargo area.
Wiper blade replacement Do not fold down the wipers without
wiper blades
Do not fold down the wipers if wiper blades
have not been installed; this may damage the
windshield.◀
Front1.Fold up the wiper arm.2.Press the release button on the wiper arm,
see arrow 1.3.Pull off the wiper blade toward the front,
see arrow 2.
BMW X5: rear
1.Lift off the wiper arm completely and pull
off the wiper blade, refer to arrow.2.Mount the new wiper blade and press on
until it is heard to engage.
Lamp and bulb replacement
Notes
Lamps and bulbs
Lamps and bulbs make an essential contribu‐
tion to vehicle safety.
Seite 295Replacing componentsMobility295
Online Edition for Part no. 01 40 2 918 417 - III/13
Page 304 of 345

4.Screw in the remaining lug bolts. Tighten
all the bolts securely in a diagonal pattern.5.Lower the vehicle and remove the jack
from beneath the vehicle.
After mounting
1.Tighten the lug bolts in a diagonal pattern.
Checking that the lug bolts are tight
To ensure safety, always have the lug
bolts checked with a calibrated torque
wrench as soon as possible to ensure that
they are tightened to the specified torque.
Otherwise, incorrectly tightened lug bolts
are a hidden safety risk. The tightening tor‐
que equals 101 lb ft/140 Nm.◀2.Stow the defective wheel in the cargo area.
The defective wheel cannot be stored un‐
der the floor panel flap due to its size.3.Check and correct the tire inflation pres‐
sure at the earliest opportunity.4.Initialize the Flat Tire Monitor, refer to
page 97, or reset the Tire Pressure Moni‐
tor, refer to page 99.5.Replace the damaged tire as soon as pos‐
sible and have the new wheel/tire bal‐
anced.
Driving with compact wheel
Do not exceed a speed of
50 mph/80 km/h.
Drive conservatively and do not exceed a
speed of 50 mph/80 km/h. Otherwise, changes
in the driving characteristics could result, for
example reduced track stability on braking, ex‐ tended braking distance, and altered self-
steering characteristics in the limit range. In
conjunction with winter tires, these character‐
istics are more pronounced.◀
Only mount one compact wheel
Only one compact wheel may be
mounted. Restore the wheels and tires to their
original size as quickly as possible. Failure to
do so is a safety risk.◀
Vehicle battery
Maintenance
The battery is maintenance-free, i.e., the elec‐
trolyte will last for the life of the battery.
Your service center will be glad to advise you
on questions regarding the battery.
Battery replacement Use approved vehicle batteries
Only use vehicle batteries that have been
approved for your vehicle by the manufacturer;
otherwise, the vehicle could be damaged and
systems or functions may not be fully availa‐
ble.◀
After a battery replacement, have the battery
registered on the vehicle by your service cen‐
ter to ensure that all comfort functions are fully
available.
Charging the battery
Note Do not connect the charger to the socket
Do not connect the battery charger to
the socket installed in the vehicle at the factory as this could damage the battery.◀
General information Ensure that the battery is sufficiently charged
to achieve the full battery life.
It may be necessary to charge the battery in
the following cases:▷When the vehicle is frequently used to
drive short distances.Seite 304MobilityReplacing components304
Online Edition for Part no. 01 40 2 918 417 - III/13
Page 309 of 345
Bodywork contact between vehicles
There must not be any contact between
the bodies of the two vehicles, otherwise there
is a danger of shorting.◀
Starting aid terminals Connecting order
Connect the jumper cables in the correct
order; otherwise, there is the danger of injury
from sparking.◀
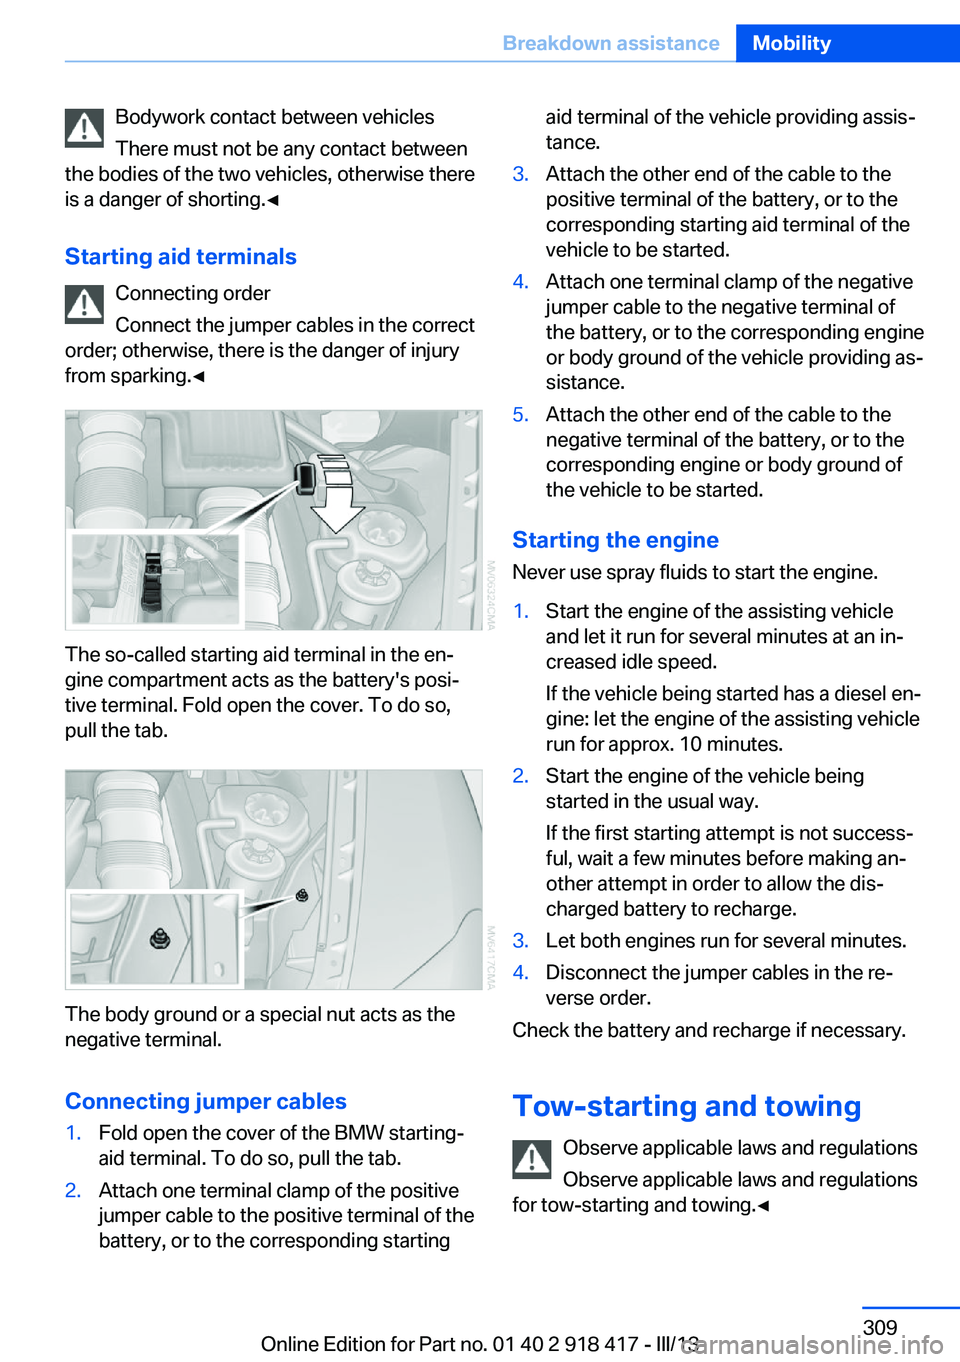
The so-called starting aid terminal in the en‐
gine compartment acts as the battery's posi‐
tive terminal. Fold open the cover. To do so,
pull the tab.
The body ground or a special nut acts as the
negative terminal.
Connecting jumper cables
1.Fold open the cover of the BMW starting-
aid terminal. To do so, pull the tab.2.Attach one terminal clamp of the positive
jumper cable to the positive terminal of the
battery, or to the corresponding startingaid terminal of the vehicle providing assis‐
tance.3.Attach the other end of the cable to the
positive terminal of the battery, or to the
corresponding starting aid terminal of the
vehicle to be started.4.Attach one terminal clamp of the negative
jumper cable to the negative terminal of
the battery, or to the corresponding engine
or body ground of the vehicle providing as‐
sistance.5.Attach the other end of the cable to the
negative terminal of the battery, or to the
corresponding engine or body ground of
the vehicle to be started.
Starting the engine
Never use spray fluids to start the engine.
1.Start the engine of the assisting vehicle
and let it run for several minutes at an in‐
creased idle speed.
If the vehicle being started has a diesel en‐
gine: let the engine of the assisting vehicle
run for approx. 10 minutes.2.Start the engine of the vehicle being
started in the usual way.
If the first starting attempt is not success‐
ful, wait a few minutes before making an‐
other attempt in order to allow the dis‐
charged battery to recharge.3.Let both engines run for several minutes.4.Disconnect the jumper cables in the re‐
verse order.
Check the battery and recharge if necessary.
Tow-starting and towing Observe applicable laws and regulations
Observe applicable laws and regulations
for tow-starting and towing.◀
Seite 309Breakdown assistanceMobility309
Online Edition for Part no. 01 40 2 918 417 - III/13
Page 310 of 345
No additional passengers
Do not transport any passengers other
than the driver in a vehicle that is being
towed.◀
Transporting your vehicle
Note Your vehicle is not permitted to be towed.
Therefore, contact a service center in the
event of a breakdown.
Do not have the vehicle towed
Have your vehicle transported on a load‐
ing platform only; otherwise, damage may oc‐
cur.◀
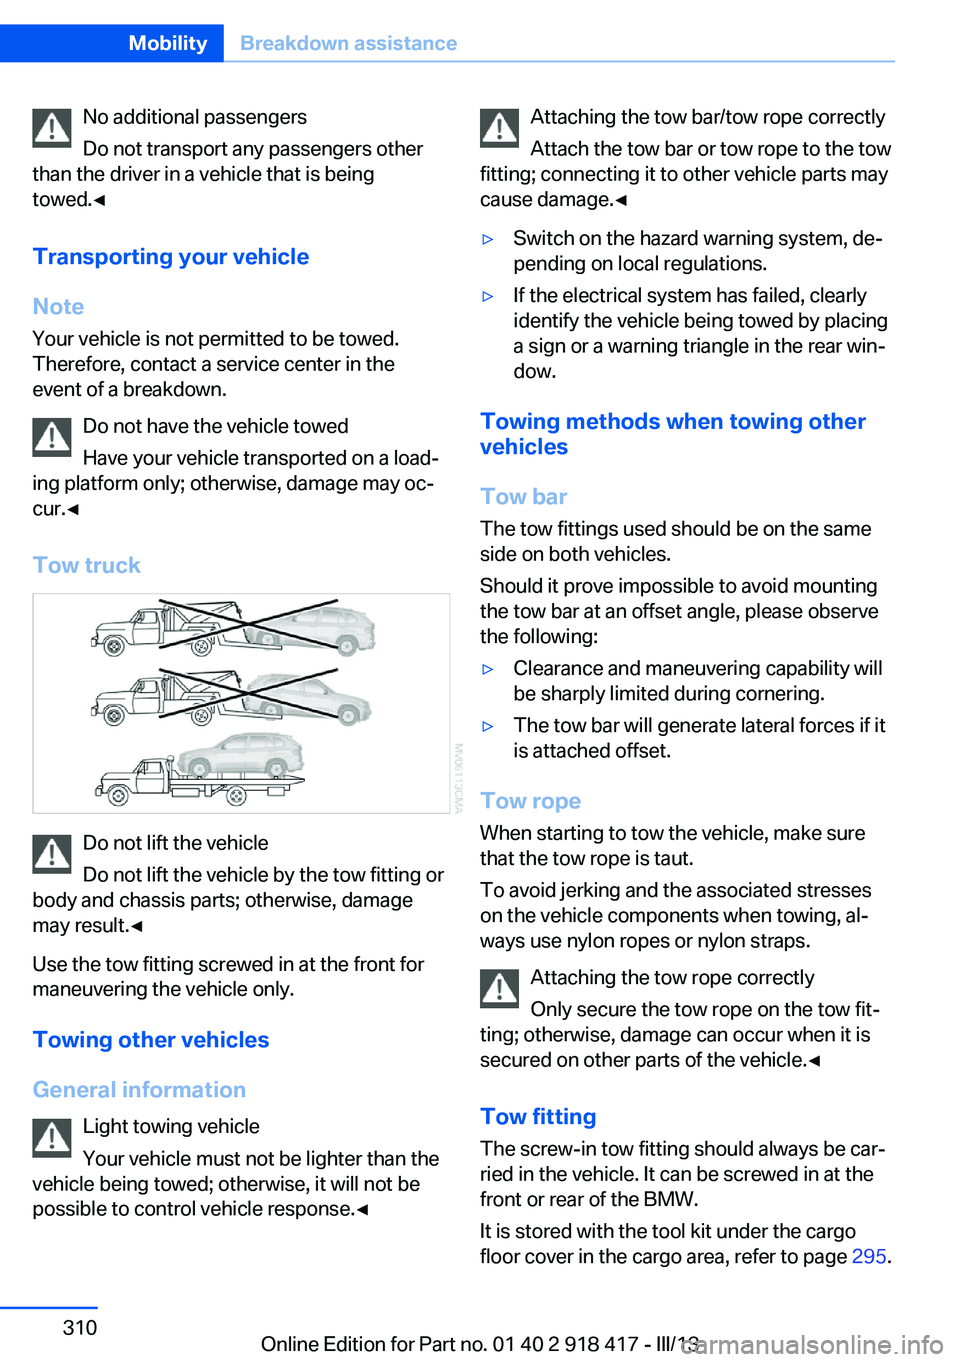
Tow truck
Do not lift the vehicle
Do not lift the vehicle by the tow fitting or
body and chassis parts; otherwise, damage
may result.◀
Use the tow fitting screwed in at the front for
maneuvering the vehicle only.
Towing other vehicles
General information Light towing vehicle
Your vehicle must not be lighter than the
vehicle being towed; otherwise, it will not be
possible to control vehicle response.◀
Attaching the tow bar/tow rope correctly
Attach the tow bar or tow rope to the tow
fitting; connecting it to other vehicle parts may
cause damage.◀▷Switch on the hazard warning system, de‐
pending on local regulations.▷If the electrical system has failed, clearly
identify the vehicle being towed by placing
a sign or a warning triangle in the rear win‐
dow.
Towing methods when towing other
vehicles
Tow bar The tow fittings used should be on the same
side on both vehicles.
Should it prove impossible to avoid mounting
the tow bar at an offset angle, please observe
the following:
▷Clearance and maneuvering capability will
be sharply limited during cornering.▷The tow bar will generate lateral forces if it
is attached offset.
Tow rope
When starting to tow the vehicle, make sure
that the tow rope is taut.
To avoid jerking and the associated stresses
on the vehicle components when towing, al‐
ways use nylon ropes or nylon straps.
Attaching the tow rope correctly
Only secure the tow rope on the tow fit‐
ting; otherwise, damage can occur when it is
secured on other parts of the vehicle.◀
Tow fitting
The screw-in tow fitting should always be car‐
ried in the vehicle. It can be screwed in at the
front or rear of the BMW.
It is stored with the tool kit under the cargo
floor cover in the cargo area, refer to page 295.
Seite 310MobilityBreakdown assistance310
Online Edition for Part no. 01 40 2 918 417 - III/13
Page 311 of 345
Tow fitting, information on use▷Use only the tow fitting provided with
the vehicle and screw it all the way in.▷Use the tow fitting for towing on paved
roads only.▷Avoid lateral loading of the tow fitting, e.g.,
do not lift the vehicle by the tow fitting.
Otherwise, damage to the tow fitting and the
vehicle can occur.◀
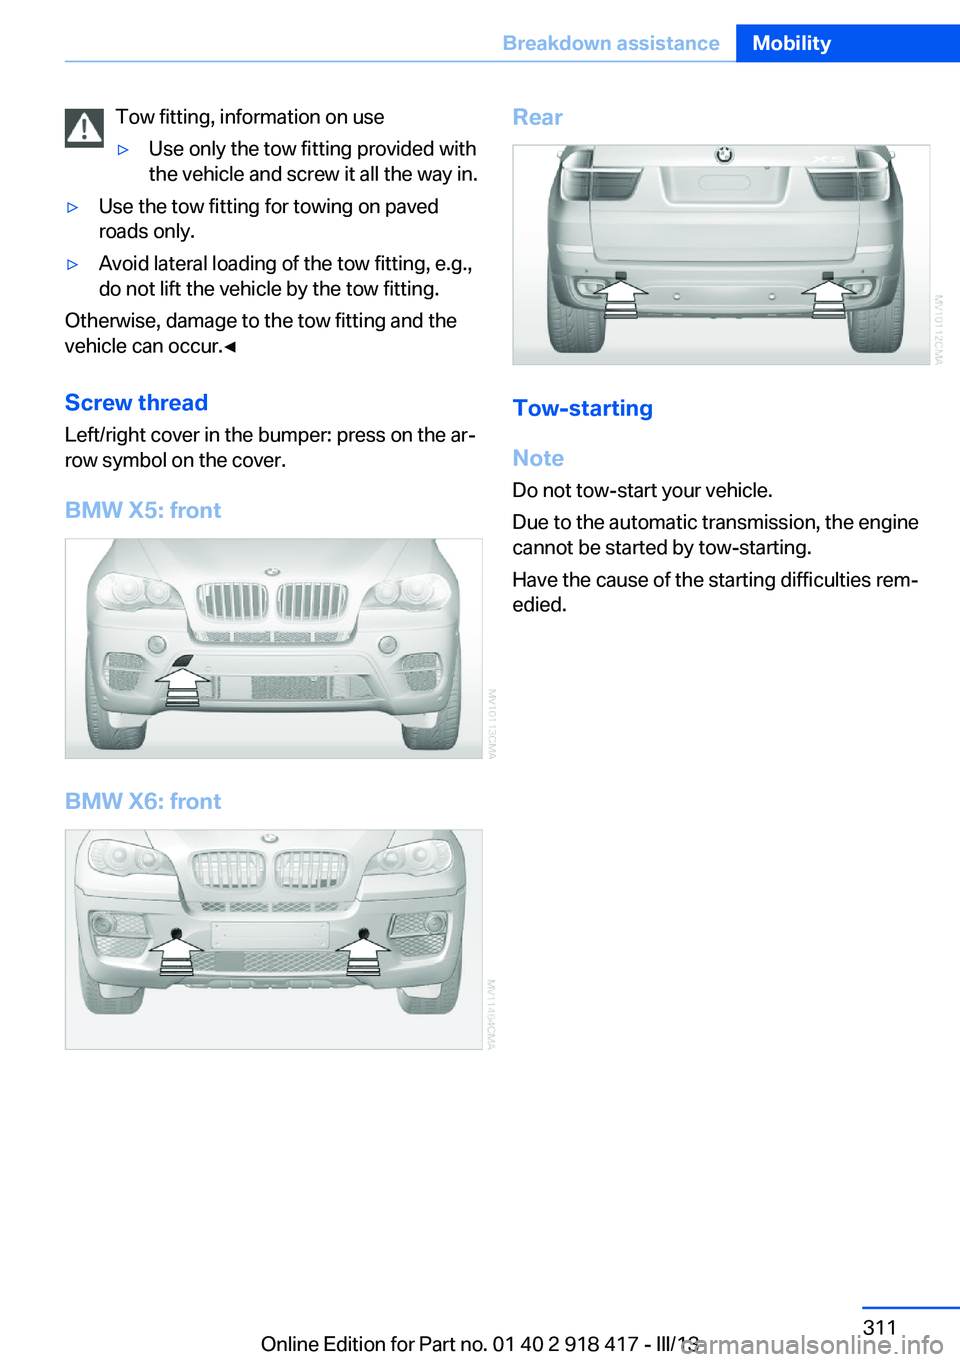
Screw thread Left/right cover in the bumper: press on the ar‐
row symbol on the cover.
BMW X5: front
BMW X6: front
Rear
Tow-starting
Note Do not tow-start your vehicle.
Due to the automatic transmission, the engine
cannot be started by tow-starting.
Have the cause of the starting difficulties rem‐
edied.
Seite 311Breakdown assistanceMobility311
Online Edition for Part no. 01 40 2 918 417 - III/13
Page 323 of 345
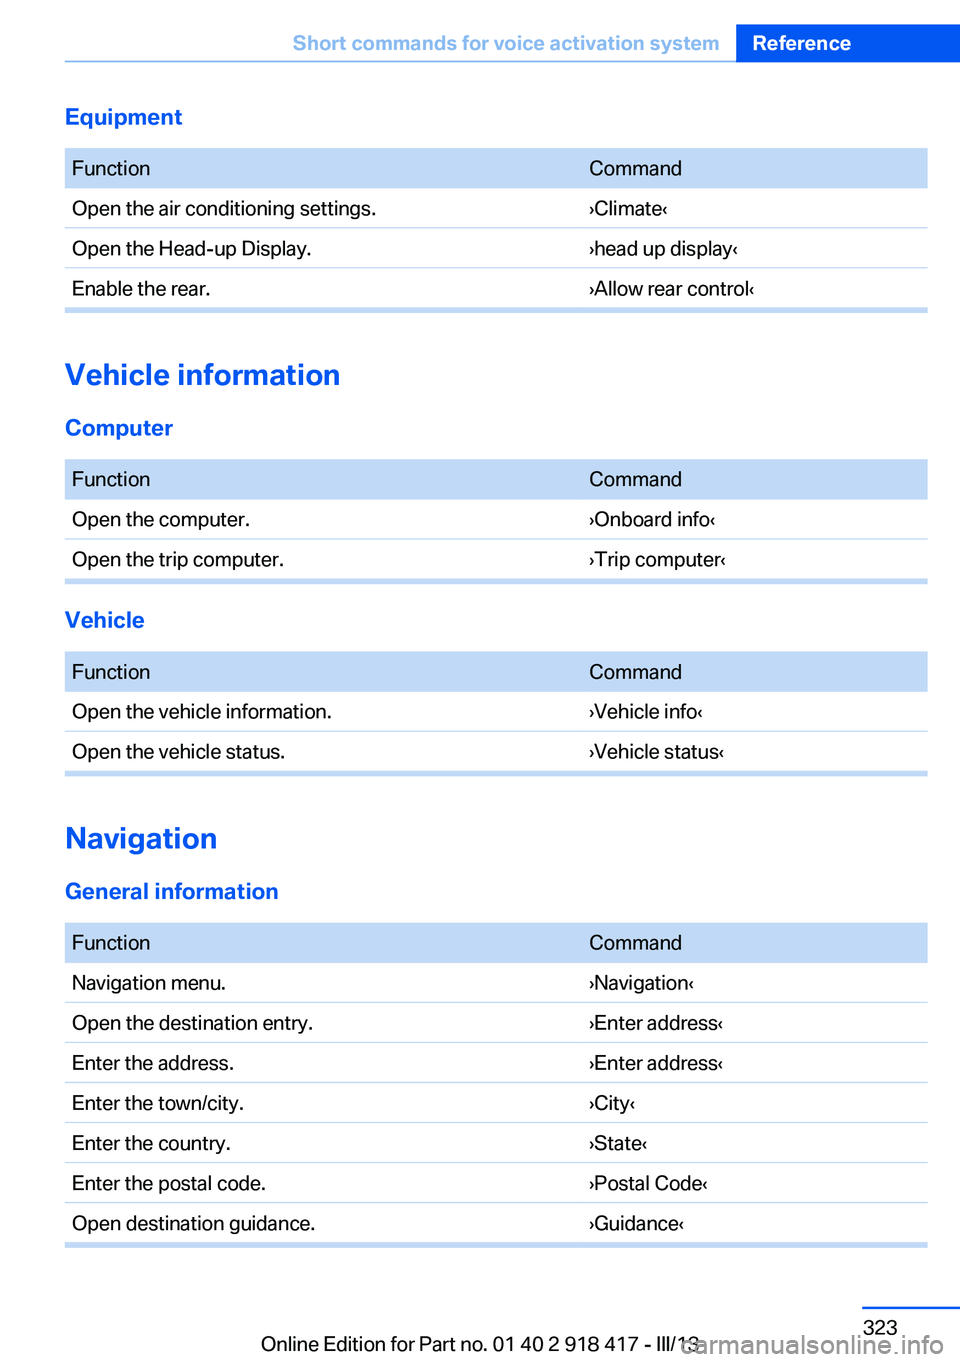
Equipment FunctionCommandOpen the air conditioning settings.›Climate‹Open the Head-up Display.›head up display‹Enable the rear.›Allow rear control‹
Vehicle information
Computer
FunctionCommandOpen the computer.›Onboard info‹Open the trip computer.›Trip computer‹
Vehicle
FunctionCommandOpen the vehicle information.›Vehicle info‹Open the vehicle status.›Vehicle status‹
Navigation
General information
FunctionCommandNavigation menu.›Navigation‹Open the destination entry.›Enter address‹Enter the address.›Enter address‹Enter the town/city.›City‹Enter the country.›State‹Enter the postal code.›Postal Code‹Open destination guidance.›Guidance‹Seite 323Short commands for voice activation systemReference323
Online Edition for Part no. 01 40 2 918 417 - III/13
Page 335 of 345
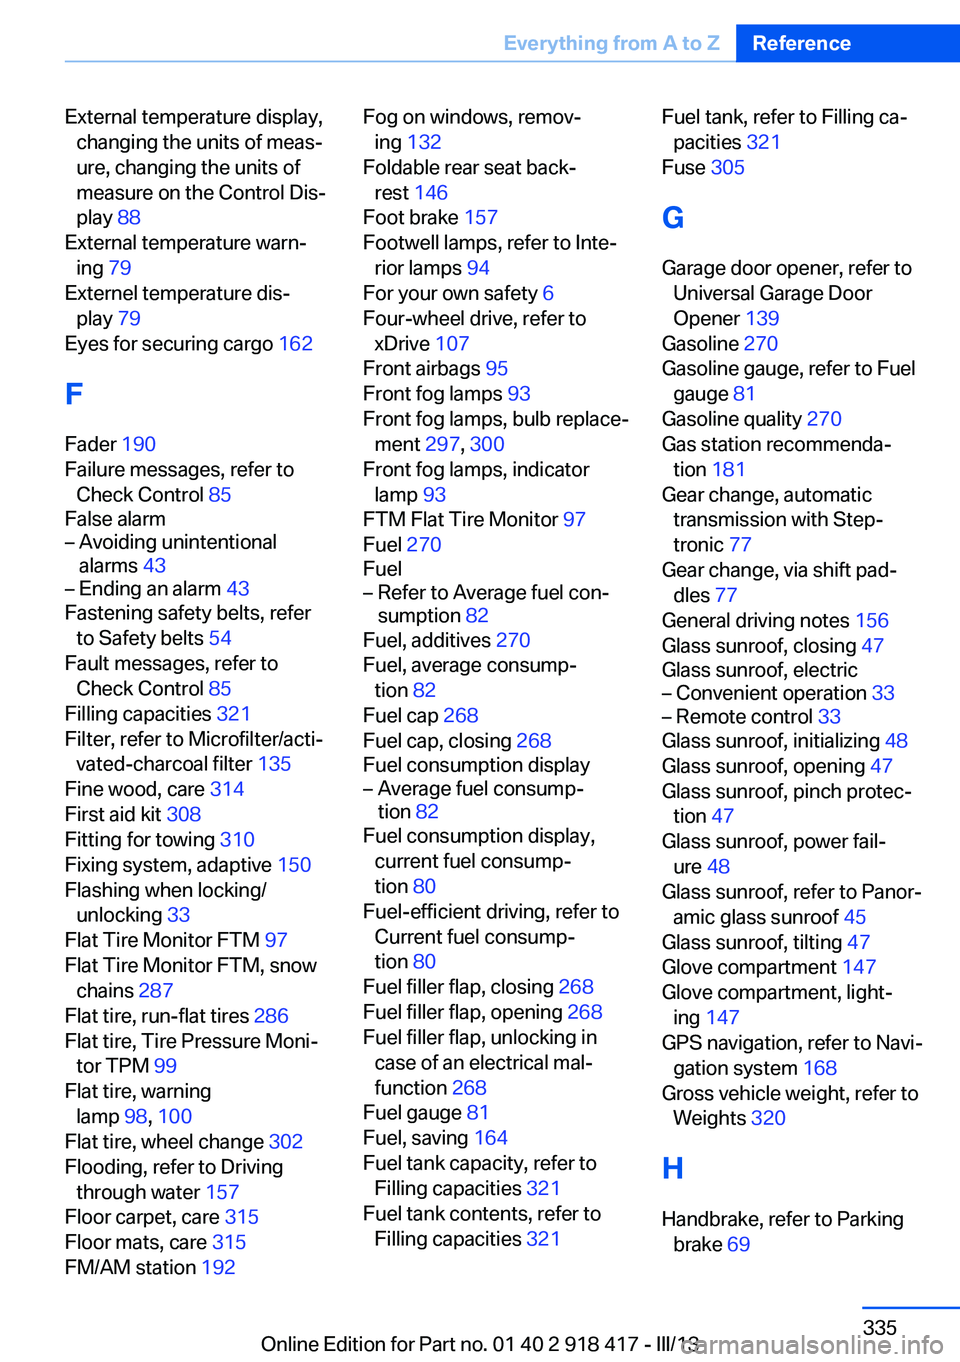
External temperature display,changing the units of meas‐
ure, changing the units of
measure on the Control Dis‐
play 88
External temperature warn‐ ing 79
Externel temperature dis‐ play 79
Eyes for securing cargo 162
F
Fader 190
Failure messages, refer to Check Control 85
False alarm– Avoiding unintentional
alarms 43– Ending an alarm 43
Fastening safety belts, refer
to Safety belts 54
Fault messages, refer to Check Control 85
Filling capacities 321
Filter, refer to Microfilter/acti‐ vated-charcoal filter 135
Fine wood, care 314
First aid kit 308
Fitting for towing 310
Fixing system, adaptive 150
Flashing when locking/ unlocking 33
Flat Tire Monitor FTM 97
Flat Tire Monitor FTM, snow chains 287
Flat tire, run-flat tires 286
Flat tire, Tire Pressure Moni‐ tor TPM 99
Flat tire, warning lamp 98, 100
Flat tire, wheel change 302
Flooding, refer to Driving through water 157
Floor carpet, care 315
Floor mats, care 315
FM/AM station 192
Fog on windows, remov‐
ing 132
Foldable rear seat back‐ rest 146
Foot brake 157
Footwell lamps, refer to Inte‐ rior lamps 94
For your own safety 6
Four-wheel drive, refer to xDrive 107
Front airbags 95
Front fog lamps 93
Front fog lamps, bulb replace‐ ment 297, 300
Front fog lamps, indicator lamp 93
FTM Flat Tire Monitor 97
Fuel 270
Fuel– Refer to Average fuel con‐
sumption 82
Fuel, additives 270
Fuel, average consump‐ tion 82
Fuel cap 268
Fuel cap, closing 268
Fuel consumption display
– Average fuel consump‐
tion 82
Fuel consumption display,
current fuel consump‐
tion 80
Fuel-efficient driving, refer to Current fuel consump‐
tion 80
Fuel filler flap, closing 268
Fuel filler flap, opening 268
Fuel filler flap, unlocking in case of an electrical mal‐
function 268
Fuel gauge 81
Fuel, saving 164
Fuel tank capacity, refer to Filling capacities 321
Fuel tank contents, refer to Filling capacities 321
Fuel tank, refer to Filling ca‐
pacities 321
Fuse 305
G
Garage door opener, refer to Universal Garage Door
Opener 139
Gasoline 270
Gasoline gauge, refer to Fuel gauge 81
Gasoline quality 270
Gas station recommenda‐ tion 181
Gear change, automatic transmission with Step‐
tronic 77
Gear change, via shift pad‐ dles 77
General driving notes 156
Glass sunroof, closing 47
Glass sunroof, electric– Convenient operation 33– Remote control 33
Glass sunroof, initializing 48
Glass sunroof, opening 47
Glass sunroof, pinch protec‐ tion 47
Glass sunroof, power fail‐ ure 48
Glass sunroof, refer to Panor‐ amic glass sunroof 45
Glass sunroof, tilting 47
Glove compartment 147
Glove compartment, light‐ ing 147
GPS navigation, refer to Navi‐ gation system 168
Gross vehicle weight, refer to Weights 320
H
Handbrake, refer to Parking brake 69
Seite 335Everything from A to ZReference335
Online Edition for Part no. 01 40 2 918 417 - III/13
Page 336 of 345
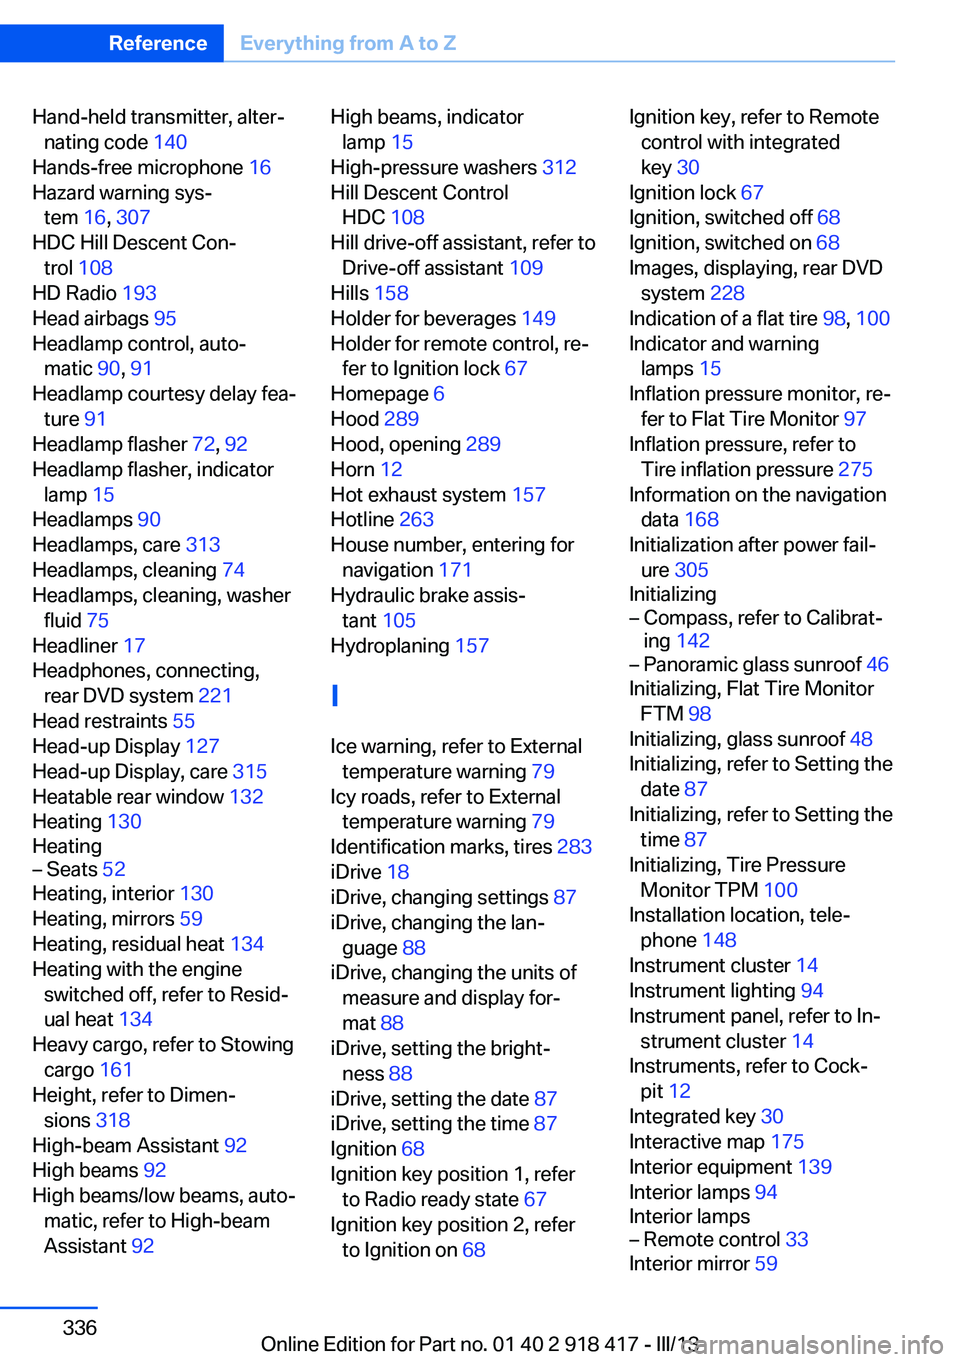
Hand-held transmitter, alter‐nating code 140
Hands-free microphone 16
Hazard warning sys‐ tem 16, 307
HDC Hill Descent Con‐ trol 108
HD Radio 193
Head airbags 95
Headlamp control, auto‐ matic 90, 91
Headlamp courtesy delay fea‐ ture 91
Headlamp flasher 72, 92
Headlamp flasher, indicator lamp 15
Headlamps 90
Headlamps, care 313
Headlamps, cleaning 74
Headlamps, cleaning, washer fluid 75
Headliner 17
Headphones, connecting, rear DVD system 221
Head restraints 55
Head-up Display 127
Head-up Display, care 315
Heatable rear window 132
Heating 130
Heating– Seats 52
Heating, interior 130
Heating, mirrors 59
Heating, residual heat 134
Heating with the engine switched off, refer to Resid‐
ual heat 134
Heavy cargo, refer to Stowing cargo 161
Height, refer to Dimen‐ sions 318
High-beam Assistant 92
High beams 92
High beams/low beams, auto‐ matic, refer to High-beam
Assistant 92
High beams, indicator
lamp 15
High-pressure washers 312
Hill Descent Control HDC 108
Hill drive-off assistant, refer to Drive-off assistant 109
Hills 158
Holder for beverages 149
Holder for remote control, re‐ fer to Ignition lock 67
Homepage 6
Hood 289
Hood, opening 289
Horn 12
Hot exhaust system 157
Hotline 263
House number, entering for navigation 171
Hydraulic brake assis‐ tant 105
Hydroplaning 157
I Ice warning, refer to External temperature warning 79
Icy roads, refer to External temperature warning 79
Identification marks, tires 283
iDrive 18
iDrive, changing settings 87
iDrive, changing the lan‐ guage 88
iDrive, changing the units of measure and display for‐
mat 88
iDrive, setting the bright‐ ness 88
iDrive, setting the date 87
iDrive, setting the time 87
Ignition 68
Ignition key position 1, refer to Radio ready state 67
Ignition key position 2, refer to Ignition on 68 Ignition key, refer to Remote
control with integrated
key 30
Ignition lock 67
Ignition, switched off 68
Ignition, switched on 68
Images, displaying, rear DVD system 228
Indication of a flat tire 98, 100
Indicator and warning lamps 15
Inflation pressure monitor, re‐ fer to Flat Tire Monitor 97
Inflation pressure, refer to Tire inflation pressure 275
Information on the navigation data 168
Initialization after power fail‐ ure 305
Initializing– Compass, refer to Calibrat‐
ing 142– Panoramic glass sunroof 46
Initializing, Flat Tire Monitor
FTM 98
Initializing, glass sunroof 48
Initializing, refer to Setting the date 87
Initializing, refer to Setting the time 87
Initializing, Tire Pressure Monitor TPM 100
Installation location, tele‐ phone 148
Instrument cluster 14
Instrument lighting 94
Instrument panel, refer to In‐ strument cluster 14
Instruments, refer to Cock‐ pit 12
Integrated key 30
Interactive map 175
Interior equipment 139
Interior lamps 94
Interior lamps
– Remote control 33
Interior mirror 59
Seite 336ReferenceEverything from A to Z336
Online Edition for Part no. 01 40 2 918 417 - III/13