2013 BMW X5M warning
[x] Cancel search: warningPage 301 of 345
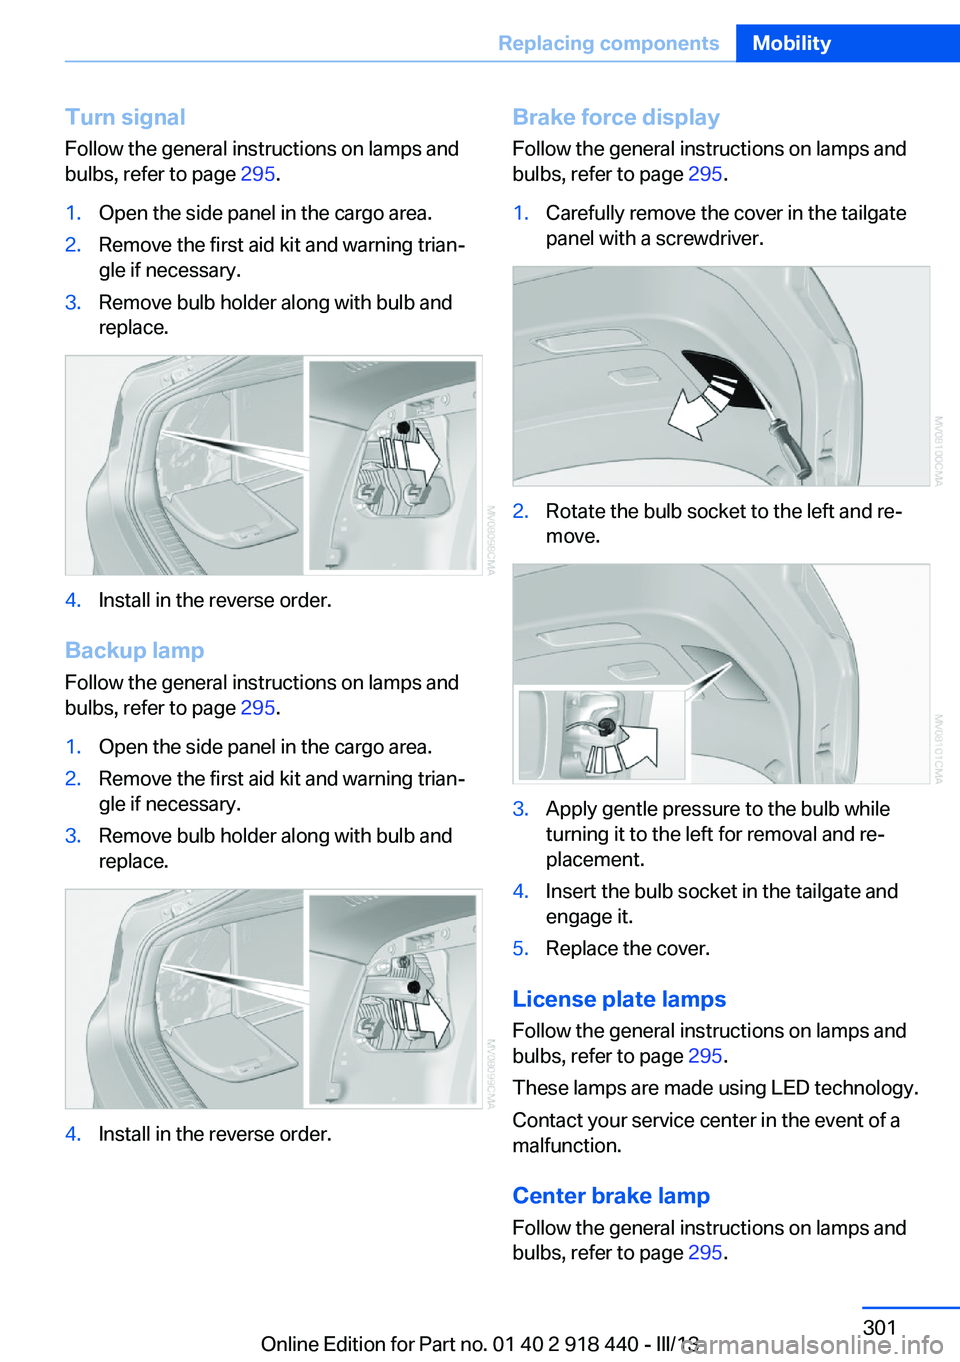
Turn signal
Follow the general instructions on lamps and
bulbs, refer to page 295.1.Open the side panel in the cargo area.2.Remove the first aid kit and warning trian‐
gle if necessary.3.Remove bulb holder along with bulb and
replace.4.Install in the reverse order.
Backup lamp
Follow the general instructions on lamps and
bulbs, refer to page 295.
1.Open the side panel in the cargo area.2.Remove the first aid kit and warning trian‐
gle if necessary.3.Remove bulb holder along with bulb and
replace.4.Install in the reverse order.Brake force display
Follow the general instructions on lamps and
bulbs, refer to page 295.1.Carefully remove the cover in the tailgate
panel with a screwdriver.2.Rotate the bulb socket to the left and re‐
move.3.Apply gentle pressure to the bulb while
turning it to the left for removal and re‐
placement.4.Insert the bulb socket in the tailgate and
engage it.5.Replace the cover.
License plate lamps
Follow the general instructions on lamps and
bulbs, refer to page 295.
These lamps are made using LED technology.
Contact your service center in the event of a
malfunction.
Center brake lamp Follow the general instructions on lamps and
bulbs, refer to page 295.
Seite 301Replacing componentsMobility301
Online Edition for Part no. 01 40 2 918 440 - III/13
Page 302 of 345

This lamp uses LED technology for operation.
Contact your service center in the event of a
malfunction.
Changing wheels
Notes Your vehicle is equipped with run-flat tires, re‐
fer to page 286, as standard equipment.
They do not need to be replaced immediately
in the event of a puncture.
When mounting new tires or changing from
summer to winter tires or vice versa, use run-
flat tires for your own safety.
BMW X6: do not rotate the front wheels to the
rear or vice versa, as otherwise the handling
characteristics will be negatively affected.
Suitable tools for changing the wheels are
available from the service center as an acces‐
sory.
Jacking points for the vehicle jack
The jacking points for the vehicle jack are lo‐
cated in the positions shown.
Compact wheel Safety precautions in the event of a flat
tire or wheel change
Park the vehicle as far as possible from pass‐
ing traffic and on solid ground. Switch on the
hazard warning system.
Set the parking brake and engage transmis‐
sion position P.
Have all vehicle occupants get out of the vehi‐
cle and ensure that they remain outside the
immediate area in a safe place, such as behind
a guardrail.
If a warning triangle or portable hazard warning
lamp is required, set it up on the roadside at an
appropriate distance from the rear of the vehi‐
cle. Comply with all safety guidelines and regu‐
lations.
Change the wheel only on a level, firm surface
which is not slippery. The vehicle or the jack
could slip to the side if you attempt to raise the
vehicle on a soft or slippery surface such as
snow, ice, tiles, etc.
Position the jack on a firm support surface.
Do not use a wooden block or similar object as
a support base for the jack, as this would pre‐
vent it from extending to its full support height
and reduce its load-carrying capacity.
To avoid serious or fatal injury: never lie under
the vehicle, and never start the engine while it
is supported by the jack.◀
What you will need
To avoid rattling noises later on, note the posi‐
tions of the tools before removing them, then
return them to their initial positions after com‐
pleting work.
The tools are located in the mount under the
floor panel flap.Seite 302MobilityReplacing components302
Online Edition for Part no. 01 40 2 918 440 - III/13
Page 307 of 345
Breakdown assistanceVehicle equipment
This chapter describes all series equipment as
well as country-specific and special equipment
offered for this model series.Therefore, it also
describes equipment that may not be found in
your vehicle, for instance due to the selected
special equipment or the country version. This
also applies to safety-related functions and
systems.
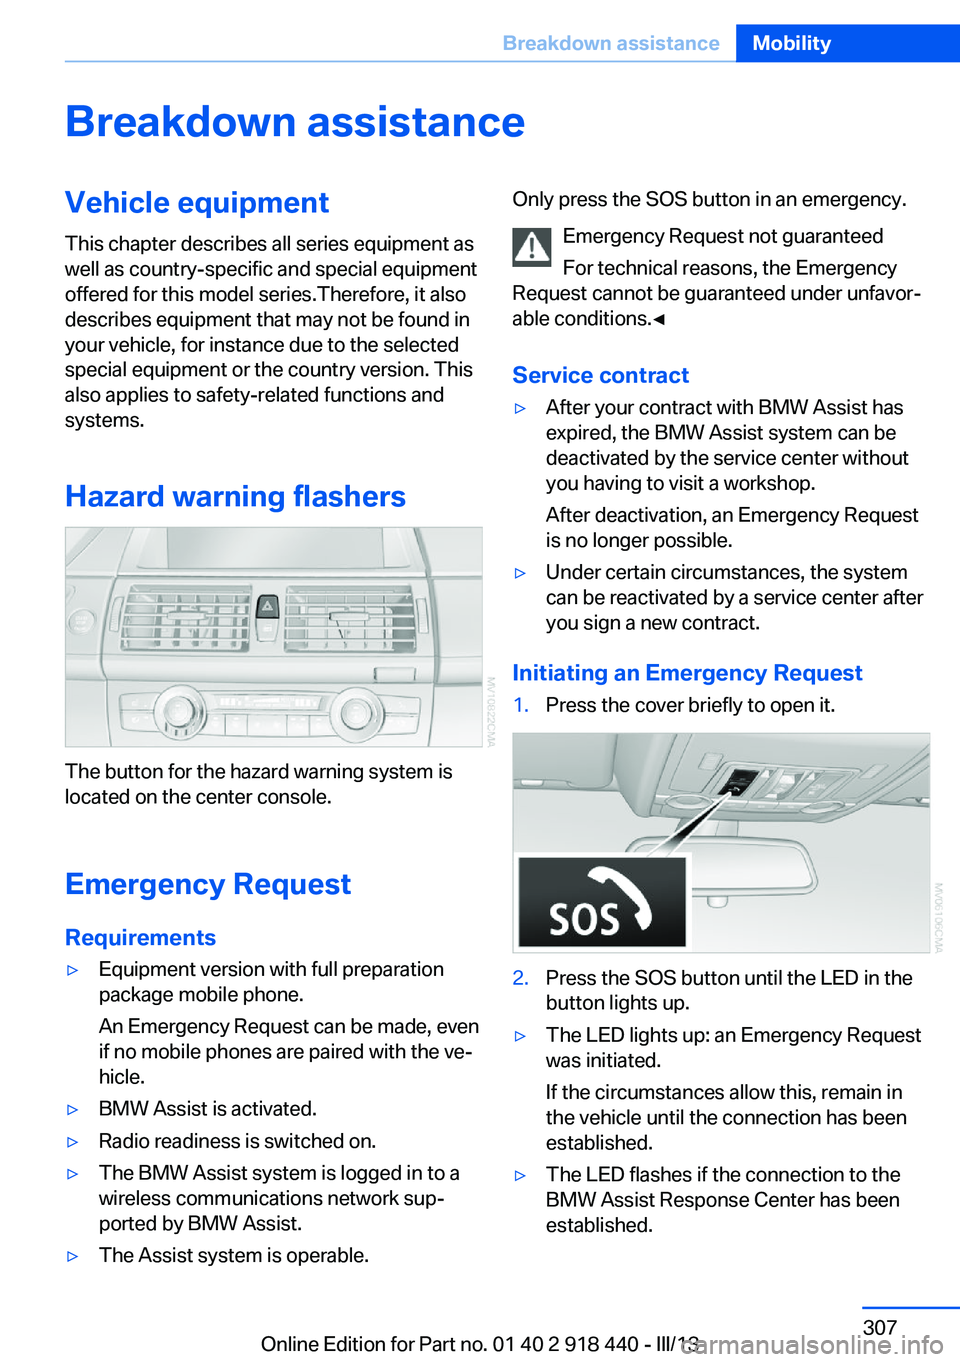
Hazard warning flashers
The button for the hazard warning system is
located on the center console.
Emergency RequestRequirements
▷Equipment version with full preparation
package mobile phone.
An Emergency Request can be made, even
if no mobile phones are paired with the ve‐
hicle.▷BMW Assist is activated.▷Radio readiness is switched on.▷The BMW Assist system is logged in to a
wireless communications network sup‐
ported by BMW Assist.▷The Assist system is operable.Only press the SOS button in an emergency.
Emergency Request not guaranteed
For technical reasons, the Emergency
Request cannot be guaranteed under unfavor‐
able conditions.◀
Service contract▷After your contract with BMW Assist has
expired, the BMW Assist system can be
deactivated by the service center without
you having to visit a workshop.
After deactivation, an Emergency Request
is no longer possible.▷Under certain circumstances, the system
can be reactivated by a service center after
you sign a new contract.
Initiating an Emergency Request
1.Press the cover briefly to open it.2.Press the SOS button until the LED in the
button lights up.▷The LED lights up: an Emergency Request
was initiated.
If the circumstances allow this, remain in
the vehicle until the connection has been
established.▷The LED flashes if the connection to the
BMW Assist Response Center has been
established.Seite 307Breakdown assistanceMobility307
Online Edition for Part no. 01 40 2 918 440 - III/13
Page 308 of 345

Once the BMW Response Center has re‐
ceived your Emergency Request, the BMW
Response Center contacts you and takes
further steps to help you.
Even if you are unable to respond, the
BMW Response Center can take further
steps to help you under certain circum‐
stances.
For this purpose, data that are used to de‐
termine the necessary rescue measures,
such as the current position of the vehicle
if it can be established, are transmitted to
the BMW Response Center.▷If the LED is flashing but the BMW Re‐
sponse Center cannot be heard on the
hands-free system, the hands-free system
may be malfunctioning. However, the
BMW Response Center may still be able to
hear you.
Initiating an Emergency Request
automatically
Under certain conditions, an Emergency Re‐
quest is automatically initiated immediately af‐
ter a severe accident. Automatic Collision Noti‐
fication is not affected by pressing the SOS
button.
Roadside Assistance
Service availability Roadside Assistance can be reached around
the clock in many countries. You can obtain as‐
sistance there in the event of a vehicle break‐
down.
Roadside Assistance The Roadside Assistance, refer to page 262,
phone number can be viewed on the iDrive or a
connection to Roadside Assistance can be es‐
tablished directly.
Warning triangle
The warning triangle is located in the cargo
area.
First aid kit
The first aid kit is located in a storage compart‐
ment on the right side in the cargo area.
Some of the articles contained in the first aid
pouch have a limited service life.
Check the expiration dates of the contents
regularly and replace any items promptly.
Jump-starting
Notes
If the battery is discharged, an engine can be started using the battery of another vehicle
and two jumper cables. Only use jumper ca‐ bles with fully insulated clamp handles.
To prevent personal injury or damage to both
vehicles, adhere strictly to the following proce‐
dure.
Do not touch live parts
To avoid the risk of potentially fatal in‐
jury, always avoid all contact with electrical
components while the engine is running.◀
Preparation1.Check whether the battery of the other ve‐
hicle has a voltage of 12 volts and approxi‐
mately the same capacitance in Ah. This
information can be found on the battery.2.Switch off the engine of the assisting vehi‐
cle.3.Switch off any electronic systems/power
consumers in both vehicles.Seite 308MobilityBreakdown assistance308
Online Edition for Part no. 01 40 2 918 440 - III/13
Page 310 of 345
No additional passengers
Do not transport any passengers other
than the driver in a vehicle that is being
towed.◀
Transporting your vehicle
Note Your vehicle is not permitted to be towed.
Therefore, contact a service center in the
event of a breakdown.
Do not have the vehicle towed
Have your vehicle transported on a load‐
ing platform only; otherwise, damage may oc‐
cur.◀
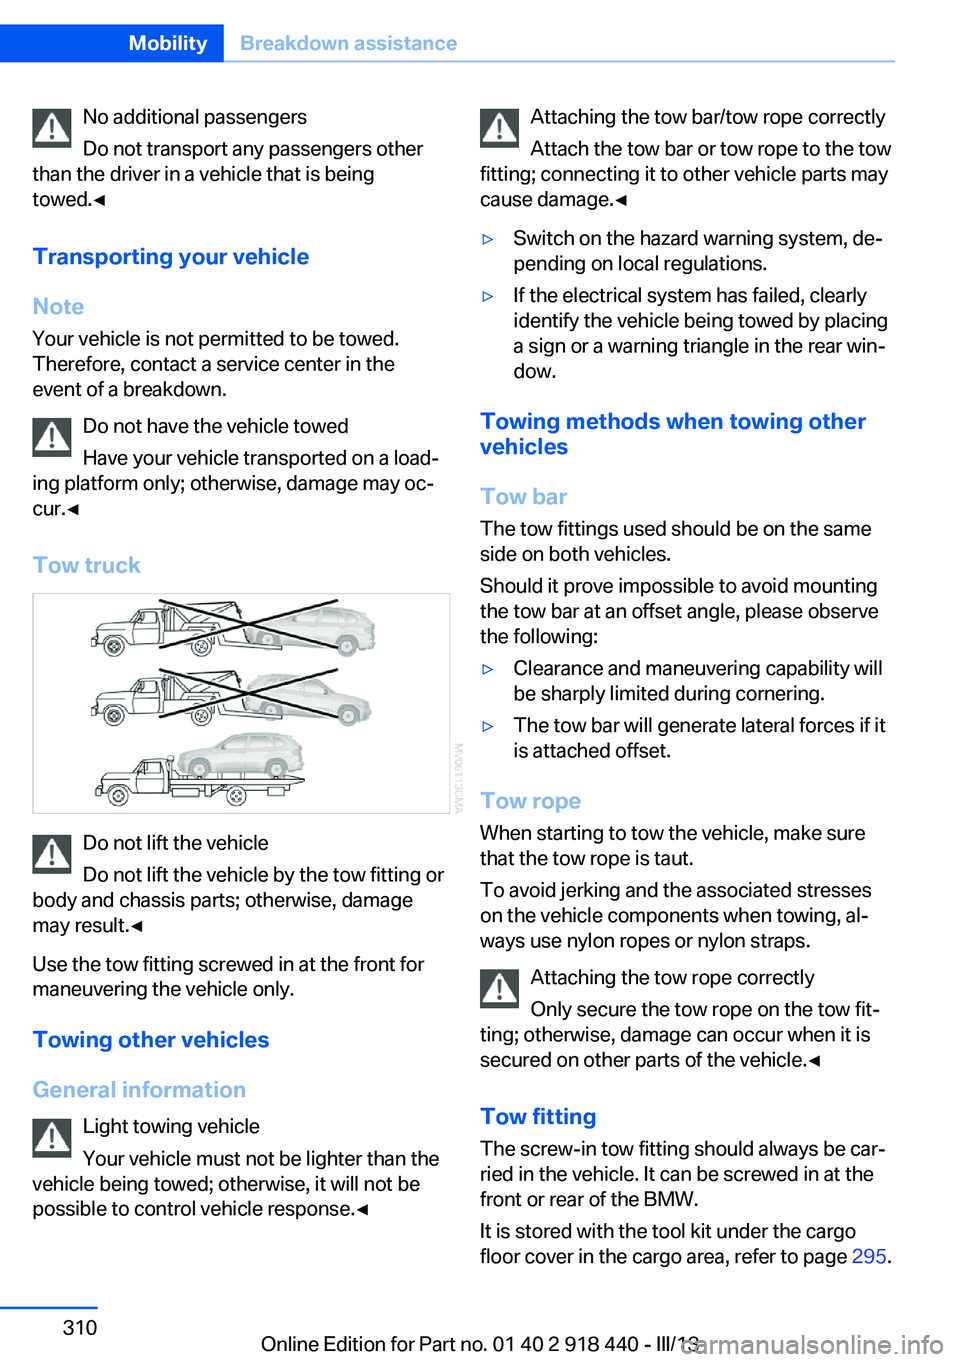
Tow truck
Do not lift the vehicle
Do not lift the vehicle by the tow fitting or
body and chassis parts; otherwise, damage
may result.◀
Use the tow fitting screwed in at the front for
maneuvering the vehicle only.
Towing other vehicles
General information Light towing vehicle
Your vehicle must not be lighter than the
vehicle being towed; otherwise, it will not be
possible to control vehicle response.◀
Attaching the tow bar/tow rope correctly
Attach the tow bar or tow rope to the tow
fitting; connecting it to other vehicle parts may
cause damage.◀▷Switch on the hazard warning system, de‐
pending on local regulations.▷If the electrical system has failed, clearly
identify the vehicle being towed by placing
a sign or a warning triangle in the rear win‐
dow.
Towing methods when towing other
vehicles
Tow bar The tow fittings used should be on the same
side on both vehicles.
Should it prove impossible to avoid mounting
the tow bar at an offset angle, please observe
the following:
▷Clearance and maneuvering capability will
be sharply limited during cornering.▷The tow bar will generate lateral forces if it
is attached offset.
Tow rope
When starting to tow the vehicle, make sure
that the tow rope is taut.
To avoid jerking and the associated stresses
on the vehicle components when towing, al‐
ways use nylon ropes or nylon straps.
Attaching the tow rope correctly
Only secure the tow rope on the tow fit‐
ting; otherwise, damage can occur when it is
secured on other parts of the vehicle.◀
Tow fitting
The screw-in tow fitting should always be car‐
ried in the vehicle. It can be screwed in at the
front or rear of the BMW.
It is stored with the tool kit under the cargo
floor cover in the cargo area, refer to page 295.
Seite 310MobilityBreakdown assistance310
Online Edition for Part no. 01 40 2 918 440 - III/13
Page 330 of 345
Everything from A to Z
Index0-9 3rd row seats 51
A ABS, Antilock Brake Sys‐ tem 105
ACC Active Cruise Con‐ trol 111
Access to 3rd row seats 51
Accident, refer to Emergency Request, initiating 307
Acoustic signal, refer to Check Control 85
Activated-charcoal filter 135
Active Cruise Control ACC 111
Active cruise control, indica‐ tor lamp 115
Active Cruise Control, radar sensor 115
Active Cruise Control, select‐ ing the distance 113
Active Cruise Control, warn‐ ing lamps 115
Active seat 54
Active seat ventilation 53
Active steering 110
Adaptive brake lights, refer to Brake force display 104
Adaptive Drive 109
Adaptive fixing system 150
Adaptive Light Control 91
Additional telephone 236
Additives, coolant 292
Additives, engine oil 291
After washing vehicle 313
Airbags 95
Airbags, indicator/warning light 97 Air circulation, refer to Recir‐
culated air mode 133
Air distribution, auto‐ matic 131, 136
Air distribution, manual 133
Air drying, refer to Cooling function 133
Air flow rate 132
Air flow rate, blower, refer to Air volume 136
Airing, refer to Ventila‐ tion 134
Air pressure, refer to Tire in‐ flation pressure 275
Air vents 130
Air vents, refer to Ventila‐ tion 134
Alarm system 42
Alarm system– Avoiding unintentional
alarms 43– Ending an alarm 43– Interior motion sensor 43– Tilt alarm sensor 43
All around the headliner 17
All-season tires, refer to Win‐ ter tires 286
All-wheel drive, refer to xDrive 107
Alternating-code hand-held transmitter 140
AM/FM station 192
Announcement, navigation, refer to Spoken instruc‐
tions 181
Antifreeze, coolant 292
Antifreeze, washer fluid 75
Antilock Brake System, ABS 105
Anti-slip control, refer to Dy‐
namic Stability Control
DSC 105
Anti-theft protection 32
Appointments 254
Approved axle loads, refer to Weights 320
Approved engine oils 291
Approved gross vehicle weight, refer to
Weights 320
Armrest, refer to Center arm‐ rest 148
Arrival time, refer to Com‐ puter 82
Ashtray 143
Ashtray, front 143
Ashtray, rear 143
Assistance, Roadside Assis‐ tance 308
Assistance with driving off, refer to Drive-off assis‐
tant 109
Assistance with starting en‐ gine, refer to Jump-start‐
ing 308
Audio CD with rear DVD sys‐ tem 226
Audio device, external 148
Audio playback 201
Audio playback, Blue‐ tooth 215
Automatic, air distribu‐ tion 131, 136
Automatic air distribu‐ tion 136
Automatic, air flow rate 131
Automatic car wash 312
Automatic climate con‐ trol 130 Seite 330ReferenceEverything from A to Z330
Online Edition for Part no. 01 40 2 918 440 - III/13
Page 332 of 345
Bulb replacement, refer toLamp and bulb replace‐
ment 295
Button for starting the engine, refer to Start/Stop but‐
ton 67
C
Calendar 254
Calibration, driver's seat 55
California Proposition 65 Warning 7
Camera, care 315
Camera, refer to Backup cam‐ era 122
Camera, Side View 127
Camera, Top View 126
Can holder, refer to Cu‐ pholder 149
Car battery, refer to Vehicle battery 304
Car care products 313
Care 312
Care, displays 315
Care, vehicle 313
Cargo 160
Cargo area– Comfort Access 41
Cargo area, capacities 320
Cargo area, enlarging 146
Cargo area lamp, refer to Inte‐ rior lamps 94
Cargo area lid, refer to Tail‐ gate 36, 38
Cargo area, opening/closing, refer to Lower tailgate 38
Cargo area, opening/closing, refer to Tailgate 36, 38
Cargo area, opening from the inside 36
Cargo area, opening from the outside 36
Cargo area, refer to Cargo area 145
Cargo cover, refer to Luggage
compartment roller
cover 145
Cargo, securing with ski bag, refer to Securing cargo 152
Cargo straps, securing cargo 162
Car key, refer to Integrated key/remote control 30
Carpet, care 315
Car phone, installation loca‐ tion, refer to Center arm‐
rest 148
Car phone, refer to Tele‐ phone 236
Car vacuum cleaner, connect‐ ing, refer to Connecting
electrical devices 143
Car wash 312
Catalytic converter, refer to Hot exhaust system 157
CBC, refer to Cornering Brake Control 105
CBS Condition Based Serv‐ ice 293
CD/DVD 200
CD/DVD changer 204
CD/DVD in rear 221
CD/DVD notes 206
CD, refer to Playing audio tracks, rear DVD sys‐
tem 226
CDs, storing 207
Cell phone 236
Cell phone, installation loca‐ tion, refer to Center arm‐
rest 148
Center armrest, front 148
Center armrest, rear 148
Center brake lamp 298, 301
Center console, refer to Around the center con‐
sole 16 Central locking– Comfort Access 40– From the inside 35– Setting the unlocking char‐
acteristics 32
Central locking system
– From the outside 32– Principle 32
Central screen, refer to Con‐
trol Display 19
Changes, technical, refer to Safety 6
Changing wheels/tires 285
Chassis number, refer to En‐ gine compartment 288
Check Control 85
Children, transporting 61
Child restraint fixing system LATCH 62
Child restraint fixing sys‐ tems 61
Child restraint fixing systems, mounting 61
Child safety locks 66
Child seat, mounting 61
Child seats, refer to Trans‐ porting children safely 61
Chrome parts, care 314
Cigarette lighter, connecting electrical devices 143
Cigarette lighter, refer to Lighter 143
Cigarette lighter socket 143
Circulation of air, refer to Re‐ circulated air mode 133
Cleaning, displays 315
Cleaning your BMW, refer to Care 312
Clock 79
Clock, 12h/24h mode 87
Closing
– From the inside 35– From the outside 32
Clothes hooks 149
Cockpit 12
Cold start, refer to Starting the engine 68
Seite 332ReferenceEverything from A to Z332
Online Edition for Part no. 01 40 2 918 440 - III/13
Page 333 of 345

Combination instrument, referto Instrument cluster 14
Combination switch, refer to Turn signal/high beams/
headlamp flasher 72
Combination switch, refer to Washer/wiper system 73
Comfort Access– Battery replacement 42
Comfort area, refer to Around
the center console 16
Compact wheel, inflation pressure 275, 276
Compartment for remote control, refer to Ignition
lock 67
Compartments, refer to Stor‐ age compart‐
ments 147, 148
Compass, digital 141
Computer 81
Computer, displaying infor‐ mation 81
Computer, displays on the Control Display 82
Concierge service 261
Condensation on windows, removing 132
Condensation under the vehi‐ cle 158
Condition Based Service CBS 293
Confirmation signals for lock‐ ing/unlocking the vehicle 33
Connecting, mobile phone, refer to Pairing the mobile
phone 237
Consumption, refer to Aver‐ age fuel consumption 82
Contacts 250, 258
Control Display 19
Control Display, care 315
Control Display, setting the brightness 88
Controller, refer to Con‐ trols 18
Controls and displays 12
Controls, rear DVD sys‐
tem 220
Control systems, driving sta‐ bility 105
Convenient operation– Glass sunroof 33– Window 33
Coolant 292
Coolant, checking the level 292
Coolant temperature 80
Cooling function, switching on and off 133
Cooling, maximum 133
Cooling system, refer to Cool‐ ant 292
Cornering Brake Control CBC 105
Corrosion on brake discs 158
Courtesy lamps, refer to Inte‐ rior lamps 94
Cradle for telephone or mo‐ bile phone, refer to Snap-in
adapter 247
Cruise control 118
Cruise control
– Malfunction 119
Cruise control, active 111
Cupholder 149
Curb weight, refer to Weights 320
Current fuel consumption 80
Current location, storing 172
Curve lights, refer to Adaptive Light Control 91
D
Dashboard lighting, refer to Instrument lighting 94
Dashboard, refer to Cock‐ pit 12
Data, technical 318
Date 79
Date, display format 88
Date, retrieving 79
Date, setting 87
Daytime running lights 91
Defroster, rear window 132
Defrosting windows 132
Defrost setting, refer to De‐ frosting windows 132
Destination entry via the ad‐ dress book 172
Destination guidance 179
Destination guidance with in‐ termediate destinations 177
Destination input, naviga‐ tion 170
Diesel exhaust fluid, at low temperatures 272
Diesel exhaust fluid, at mini‐ mum 272
Diesel exhaust fluid, having refilled 272
Diesel exhaust fluid, refilling yourself 272
Diesel particulate filter 157
Digital clock 79
Digital compass 141
Digital radio 193
Dimming mirrors 59
Directional indicators, refer to Turn signals 72
Display in front wind‐ shield 127
Display lighting, refer to In‐ strument lighting 94
Displays and controls 12
Displays, care 315
Displays, cleaning 315
Displays, refer to Instrument cluster 14
Disposal, coolant 292
Disposal, vehicle battery 305
Distance control, refer to Ac‐ tive Cruise Control 111
Distance, selecting, with Ac‐ tive Cruise Control 113
Distance warning, refer to Park Distance Control
PDC 120 Seite 333Everything from A to ZReference333
Online Edition for Part no. 01 40 2 918 440 - III/13