2013 BMW X3 XDRIVE 28I remote start
[x] Cancel search: remote startPage 60 of 211
▷When the ignition is switched off: press ON/
OFF button on the radio.▷When the engine is running: press the Start/
Stop button.
Some electronic systems/power consumers re‐
main ready for operation.
Radio ready state switches off automatically:
▷After approx. 8 minutes.▷When the vehicle is locked using the central
locking system.▷Shortly before the battery is discharged
completely, so that the engine can still be
started.
Starting the engine
General information Enclosed areas
Do not let the engine run in enclosed
areas; otherwise, breathing of exhaust fumes
may lead to loss of consciousness and death.
The exhaust gases contain carbon monoxide, an
odorless and colorless but highly toxic gas.◀
Unattended vehicle
Do not leave the vehicle unattended with
the engine running; doing so poses a risk of dan‐
ger.
Before leaving the vehicle with the engine run‐
ning, set the parking brake and place the trans‐
mission in position P or neutral to prevent the
vehicle from moving.◀
Repeated starting in quick succession
Avoid repeated unsuccessful attempts to
start the vehicle or starting the vehicle several
times in quick succession. Otherwise, the fuel is
not burned or is inadequately burned, posing a
risk of overheating and damage to the catalytic
converter.◀
Do not wait for the engine to warm up while the
vehicle remains stationary. Start driving at mod‐
erate engine speeds.
Automatic transmission
Starting the engine1.Depress the brake pedal.2.Press the Start/Stop button.
The ignition is activated automatically for a cer‐
tain time and is stopped as soon as the engine
starts.
Engine stop
General information Take the remote control with you
Take the remote control with you when
leaving the vehicle so that children, for example,
cannot start the engine.◀
Set the parking brake and further secure
the vehicle as required
Set the parking brake firmly when parking; oth‐
erwise, the vehicle could roll. On steep upward
and downward inclines, further secure the vehi‐
cle, for example, by turning the steering wheel in
the direction of the curb. ◀
Before driving into a car wash
In order for the vehicle to be able to roll into a car
wash, heed the information regarding Washing
in automatic car washes, refer to page 183.
Automatic transmission
Switching off the engine
1.Engage transmission position P with the ve‐
hicle stopped.2.Press the Start/Stop button.
The engine is switched off.
The radio ready state is switched on.Seite 60ControlsDriving60
Online Edition for Part no. 01 40 2 903 813 - 07 12 490
Page 65 of 211
Before driving into a car wash
Deactivate Automatic Hold; otherwise, the
parking brake will be set when the vehicle is sta‐
tionary and the vehicle will no longer be able to
roll.◀
Parking
The parking brake is automatically set if the en‐
gine is switched off while the vehicle is being
held by Automatic Hold.
The indicator lamp changes from green
to red.
The parking brake is not set if the engine
is switched off while the vehicle is coast‐
ing to a halt. Automatic Hold is deacti‐
vated.
Lower lamp: indicator lamp in Canadian models
Automatic Hold remains activated during an en‐
gine stop brought about by the Auto Start/Stop
function.
Take the remote control with you
Take the remote control with you when
leaving the vehicle so that children, for example,
cannot release the parking brake.◀
Malfunction
In the event of a failure or malfunction of the
parking brake, secure the vehicle against rolling
using a wheel chock, for example, when leaving
it.Turn signal, high beams,
headlamp flasher
Turn signal
Using turn signals
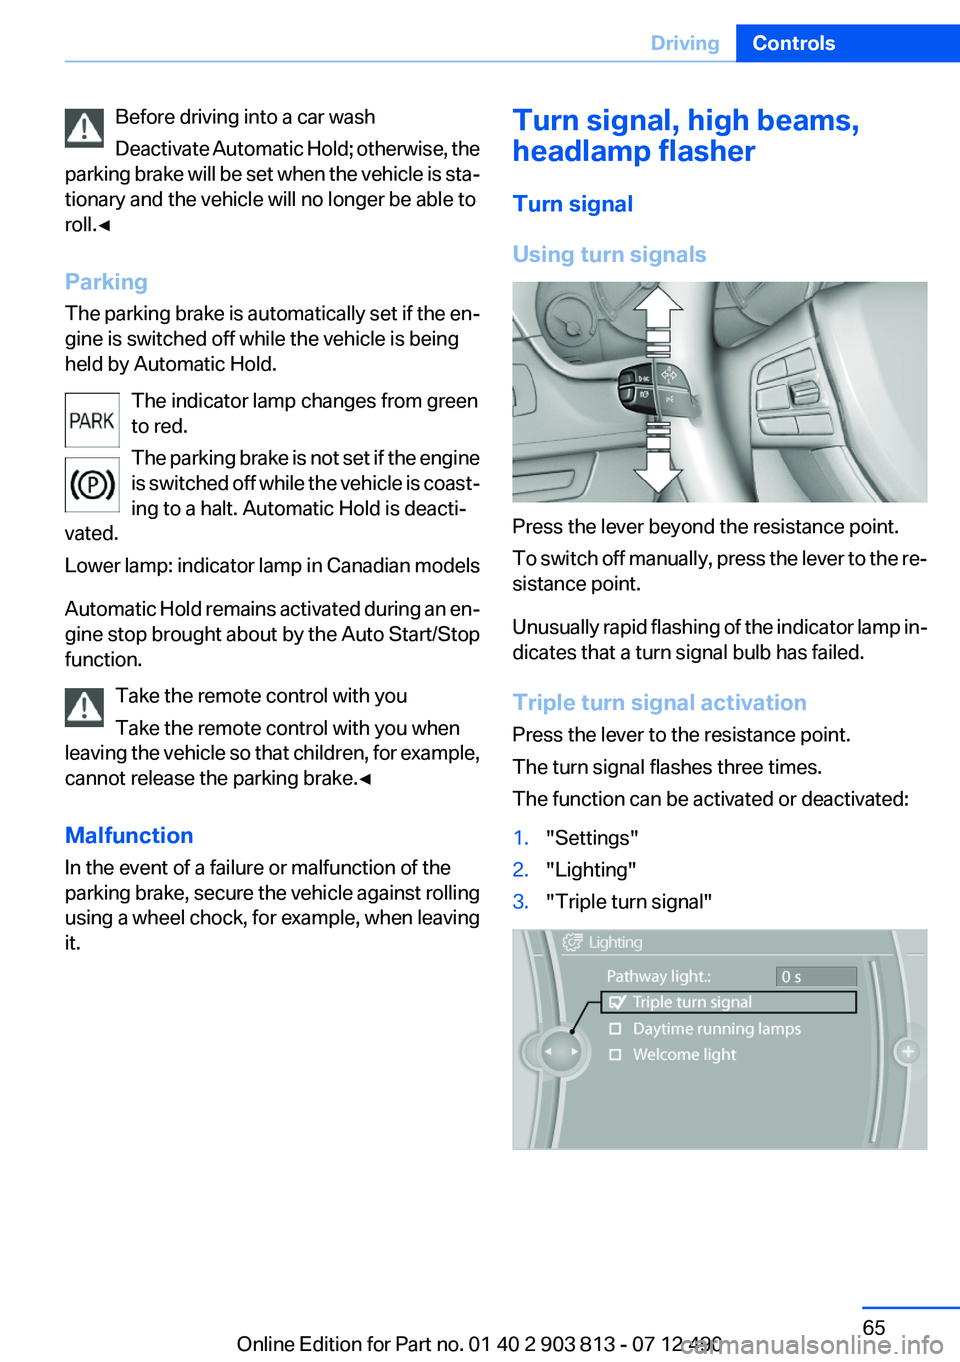
Press the lever beyond the resistance point.
To switch off manually, press the lever to the re‐
sistance point.
Unusually rapid flashing of the indicator lamp in‐
dicates that a turn signal bulb has failed.
Triple turn signal activation
Press the lever to the resistance point.
The turn signal flashes three times.
The function can be activated or deactivated:
1."Settings"2."Lighting"3."Triple turn signal"Seite 65DrivingControls65
Online Edition for Part no. 01 40 2 903 813 - 07 12 490
Page 86 of 211
LampsVehicle equipment
All standard, country-specific and optional
equipment that is offered in the model series is
described in this chapter. Therefore, equipment
is also described that is not available in a vehicle,
e. g., because of the selected optional equip‐
ment or country variant. This also applies for
safety-related functions and systems.
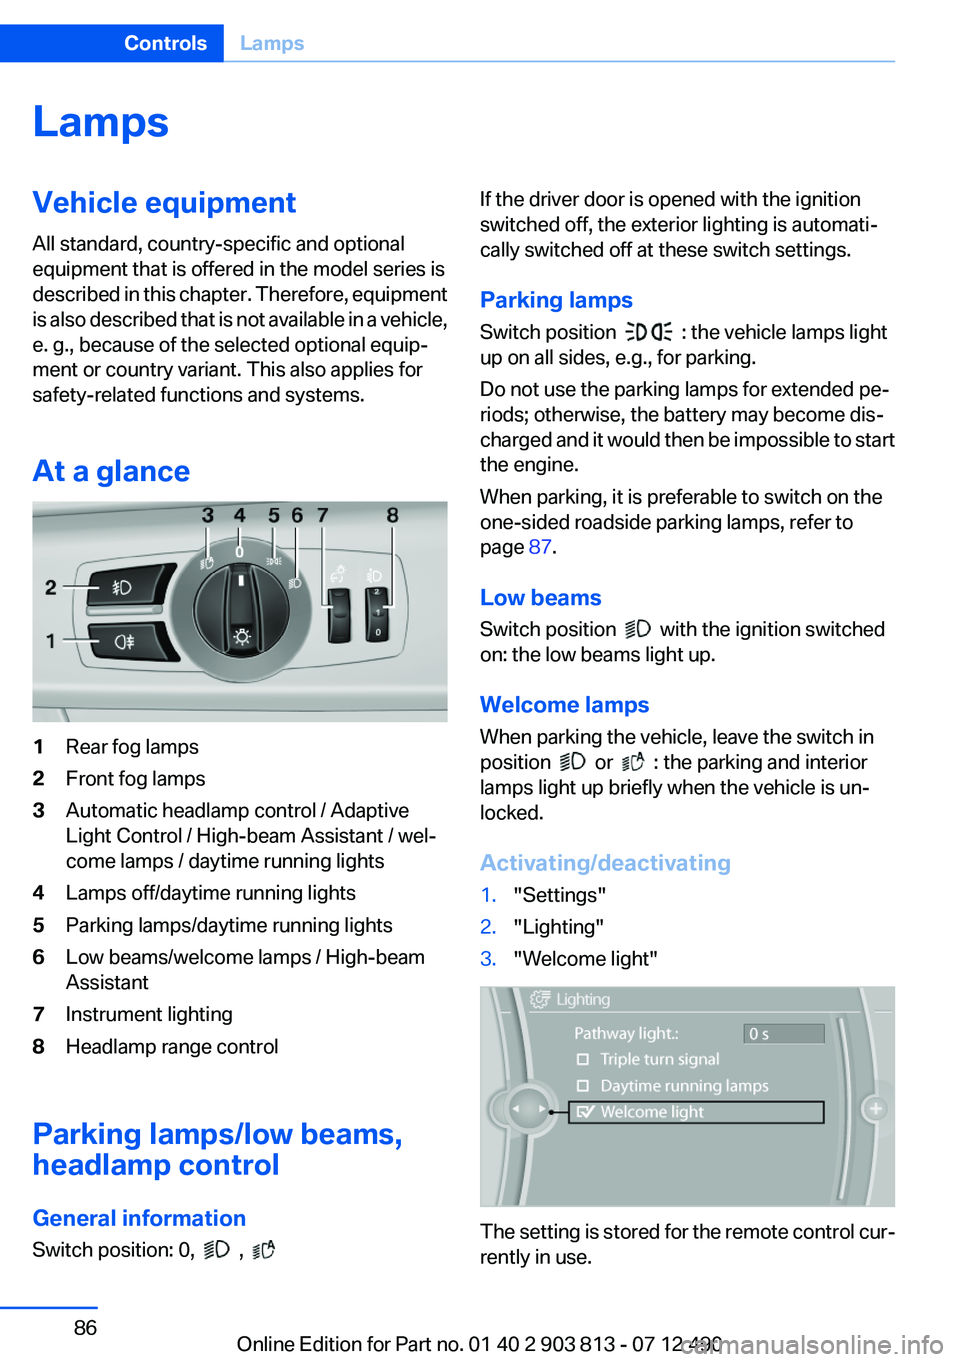
At a glance1Rear fog lamps2Front fog lamps3Automatic headlamp control / Adaptive
Light Control / High-beam Assistant / wel‐
come lamps / daytime running lights4Lamps off/daytime running lights5Parking lamps/daytime running lights6Low beams/welcome lamps / High-beam
Assistant7Instrument lighting8Headlamp range control
Parking lamps/low beams,
headlamp control
General information
Switch position: 0,
,
If the driver door is opened with the ignition
switched off, the exterior lighting is automati‐
cally switched off at these switch settings.
Parking lamps
Switch position
: the vehicle lamps light
up on all sides, e.g., for parking.
Do not use the parking lamps for extended pe‐
riods; otherwise, the battery may become dis‐
charged and it would then be impossible to start
the engine.
When parking, it is preferable to switch on the
one-sided roadside parking lamps, refer to
page 87.
Low beams
Switch position
with the ignition switched
on: the low beams light up.
Welcome lamps
When parking the vehicle, leave the switch in
position
or : the parking and interior
lamps light up briefly when the vehicle is un‐
locked.
Activating/deactivating
1."Settings"2."Lighting"3."Welcome light"
The setting is stored for the remote control cur‐
rently in use.
Seite 86ControlsLamps86
Online Edition for Part no. 01 40 2 903 813 - 07 12 490
Page 128 of 211
rearview mirror. The required distance de‐
pends on the manual transmitter.4.Simultaneously press and hold the button of
the desired function on the hand-held trans‐
mitter and the button to be programmed on
the interior rearview mirror. The LED on the
interior rearview mirror will begin flashing
slowly.5.Release both buttons as soon as the LED
flashes more rapidly. When the LED is flash‐
ing faster, this indicates that the button on
the interior rearview mirror has been pro‐
grammed.
If the LED does not flash faster after at least
60 seconds, change the distance between
the interior rearview mirror and the hand-
held transmitter and repeat the step. Several
more attempts at different distances may be
necessary. Wait at least 15 seconds be‐
tween attempts.
Canada: if programming with the hand-held
transmitter was interrupted, hold down the
interior rearview mirror button and repeat‐
edly press and release the hand-held trans‐
mitter button for 2 seconds.6.To program other functions on other but‐
tons, repeat steps 3 to 5.
The systems can be controlled using the interior
rearview mirror buttons.
Special feature of the alternating-code
wireless system
If you are unable to operate the system after re‐
peated programming, please check if the sys‐
tem to be controlled features an alternating-
code system.
Read the system's operating manual, or press
the programmed button on the interior rearview
mirror longer. If the LED on the interior rearview
mirror starts flashing rapidly and then stays lit
constantly for 2 seconds, the system features
an alternating-code system. Flashing and con‐
tinuous illumination of the LED will repeat for
approximately 20 seconds.
For systems with an alternating-code system,
the integrated universal remote control and the
system also have to be synchronized.
Please read the operating manual of the system
being set up for information on how to syn‐
chronize the system.
Synchronizing is easier with the aid of a second
person.
To synchronize:1.Park the vehicle within range of the remote-
controlled system.2.Program the relevant button on the interior
rearview mirror as described.3.Locate and press the synchronizing button
on the system being programmed. You have
approx. 30 seconds for the next step.4.Hold down the programmed button on the
interior rearview mirror for approximately
3 seconds and then release it. If necessary,
repeat this work step up to three times in or‐
der to finish synchronization. Once synchro‐
nization is complete, the programmed func‐
tion will be carried out.
Reprogramming individual buttons
1.Switch on the ignition.2.Press and hold the interior rearview mirror
button to be programmed.3.As soon as the interior rearview mirror LED
starts flashing slowly, hold the hand-held
transmitter for the system to be controlled
approx. 1 to 3 in/2.5 to 8 cm away from the
buttons on the interior rearview mirror. The
required distance depends on the manual
transmitter.4.Likewise, press and hold the button of the
desired function on the hand-held transmit‐
ter.5.Release both buttons as soon as the interior
rearview mirror LED flashes more rapidly.
When the LED is flashing faster, this indi‐
cates that the button on the interior rearview
mirror has been programmed. The systemSeite 128ControlsInterior equipment128
Online Edition for Part no. 01 40 2 903 813 - 07 12 490
Page 129 of 211
can then be controlled by the button on the
interior rearview mirror.
If the LED does not flash faster after at least
60 seconds, change the distance and repeat
the step. Several more attempts at different
distances may be necessary. Wait at least
15 seconds between attempts.
Canada: if programming with the hand-held
transmitter was interrupted, hold down the
interior rearview mirror button and repeat‐
edly press and release the hand-held trans‐
mitter button for 2 seconds.
Controls
Before operation
Before operating a system using the
integrated universal remote control, ensure that
there are no people, animals, or objects within
the range of movement of the remote-controlled
system; otherwise, there is a risk of injury or
damage.
Also follow the safety instructions of the hand-
held transmitter.◀
The system, such as the garage door, can be
operated using the button on the interior rear‐
view mirror while the engine is running or when
the ignition is started. To do this, hold down the
button within receiving range of the system until
the function is activated. The interior rearview
mirror LED stays lit while the wireless signal is
being transmitted.
Deleting stored functions
Press and hold the left and right button on the
interior rearview mirror simultaneously for ap‐
proximately 20 seconds until the LED flashes
rapidly. All stored functions are deleted. The
functions cannot be deleted individually.
Connecting electrical devices
Note Do not plug the charger into the socket
Do not connect battery chargers to the
factory-installed sockets in the vehicle. Doing so
may result in damage to the vehicle.◀
Sockets
Sockets can be used for the operation of elec‐
trical devices with the engine running or with the
ignition switched on. The total load of all sockets
must not exceed 140 watts at 12 volts.
Do not damage the socket by using unsuitable
connectors.
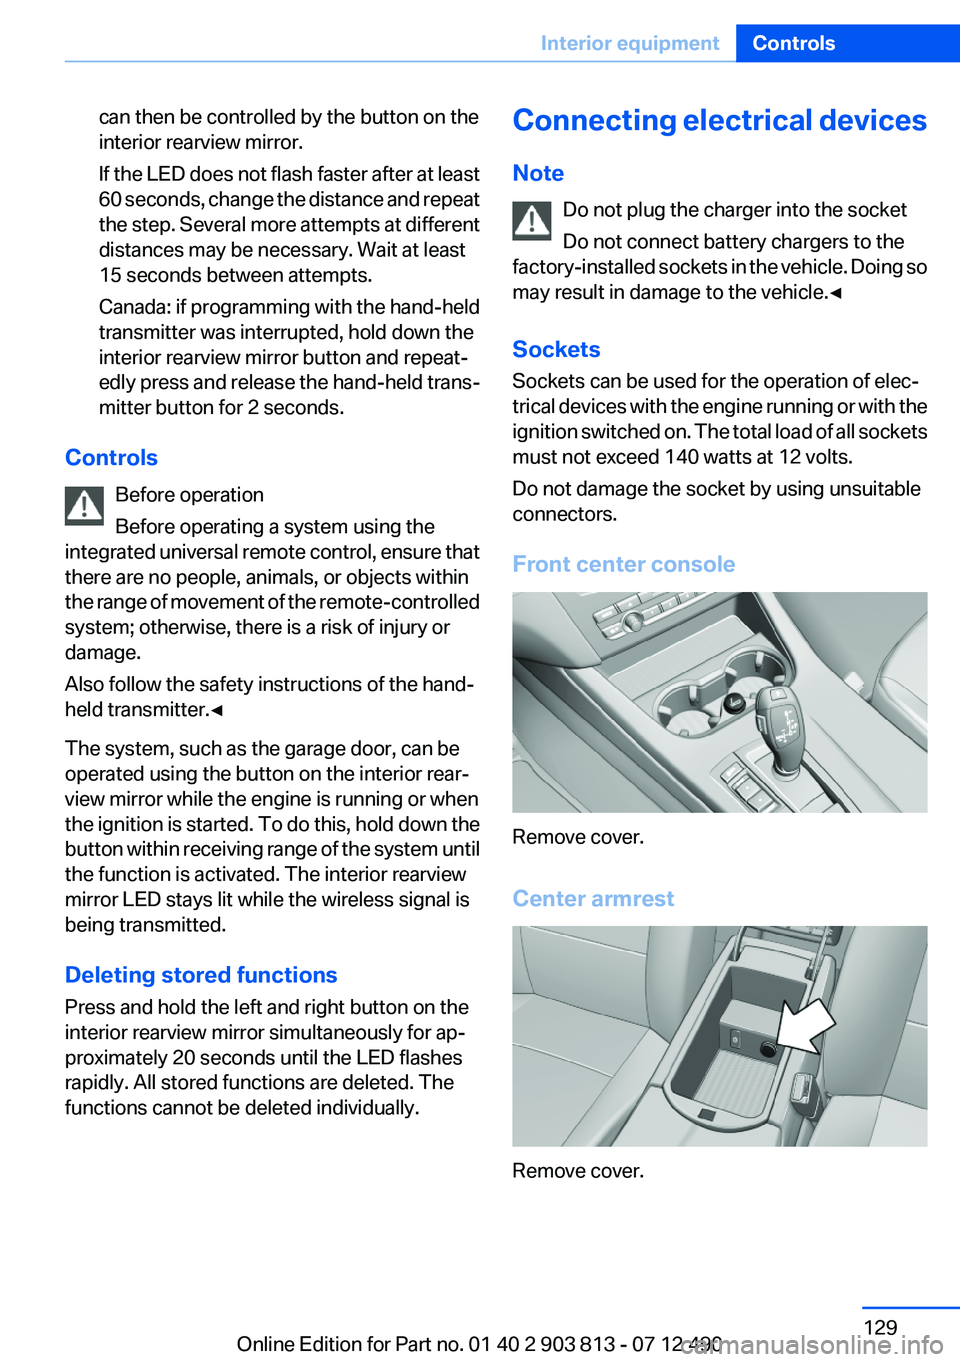
Front center console
Remove cover.
Center armrest
Remove cover.
Seite 129Interior equipmentControls129
Online Edition for Part no. 01 40 2 903 813 - 07 12 490
Page 202 of 211
Everything from A to Z
IndexA
ABS, Antilock Brake Sys‐ tem 102
Activated-charcoal filter 125
Adaptive brake lights, refer to Brake force display 101
Adaptive light control 88
Additives, oil 166
Adjustments, seats/head re‐ straints 46
After washing vehicle 184
Airbags 91
Airbags, indicator/warning light 92
Air circulation, refer to Recir‐ culated-air mode 121, 124
Air, dehumidifying, refer to Cooling function 121, 124
Air distribution, manual 120, 123
Air flow, automatic climate control 124
Air pressure, tires 155
Air vents, refer to Ventila‐ tion 125
Air volume, automatic climate control 121
Alarm system 40
Alarm, unintentional 42
All around the center con‐ sole 14
All around the headliner 15
All around the steering wheel 12
ALL program, automatic cli‐ mate control 124
All-season tires, refer to Win‐ ter tires 161
All-wheel-drive 103 Alternating-code hand-held
transmitter 128
Alternative oil types 166
Ambient light 90
Antifreeze, washer fluid 68
Antilock Brake System, ABS 102
Anti-slip control, refer to DSC 102
Approved axle load 191
Approved engine oils 166
Armrest, refer to Center arm‐ rest 135
Arrival time 82
Assistance, Roadside Assis‐ tance 179
AUTO H button, refer to Auto‐ matic Hold 64
AUTO intensity 123
Automatic car wash 183
Automatic climate con‐ trol 120
Automatic climate control with enhanced features 122
Automatic Curb Monitor 53
Automatic deactivation, front passenger airbags 93
Automatic headlamp con‐ trol 87
Automatic Hold 64
Automatic locking 37
Automatic recirculated-air control 124
Automatic tailgate 38
Automatic transmission with Steptronic 68
AUTO program, automatic cli‐ mate control 123
AUTO program, climate con‐ trol 121
AUTO program, intensity 123 Auto Start/Stop function 61
Average fuel consumption 82
Average speed 82
Axle loads, weights 191
B
Backrest curvature, refer to Lumbar support 48
Backrest, width 48
Backup camera 114
Band-aids, refer to First aid kit 179
Bar for tow-starting/tow‐ ing 181
Battery replacement, vehicle battery 176
Battery replacement, vehicle remote control 30
Battery, vehicle 176
Belts, safety belts 49
Beverage holder, cu‐ pholder 135
Blinds, sun protection 43
BMW Assist, see user's manual for Navigation, Enter‐
tainment and Communica‐
tion
BMW Homepage 6
BMW Internet page 6
BMW Maintenance Sys‐ tem 168
Bottle holder, refer to Cu‐ pholder 135
Brake assistant 102
Brake discs, breaking in 140
Brake force display 101
Brake lamps, brake force dis‐ play 101
Brake lights, adaptive 101
Brake pads, breaking in 140 Seite 202ReferenceEverything from A to Z202
Online Edition for Part no. 01 40 2 903 813 - 07 12 490
Page 203 of 211
Braking, notes 141
Breakdown assis‐ tance 178, 179
Breaking in 140
Brightness of Control Dis‐ play 85
Bulb replacement 172
Bulb replacement, front 172
Bulb replacement, rear 175
Bulbs and lamps 172
Button, Start/Stop 59
Bypassing, refer to Jump- starting 179
C
California Proposition 65 Warning 7
Camera, backup camera 114
Camera, care 186
Camera, Top View 117
Can holder, refer to Cu‐ pholder 135
Car battery 176
Car care products 184
Care, displays 186
Care, vehicle 184
Cargo 143
Cargo area 131
Cargo area, enlarging 131
Cargo area lid 37
Cargo area, storage compart‐ ments 136
Cargo cover 131
Cargo straps, securing cargo 144
Car key, refer to Remote con‐ trol 30
Carpet, care 185
Car wash 183
Catalytic converter, refer to Hot exhaust system 140
CBS Condition Based Serv‐ ice 168
CD/Multimedia, see user's manual for Navigation, Enter‐tainment and Communica‐
tion
Center armrest 135
Center console 14
Central locking system 33
Central screen, refer to Control Display 16
Changes, technical, refer to Safety 7
Changing parts 171
Changing wheels 176
Changing wheels/tires 160
Check Control 74
Children, seating position 55
Children, transporting safely 55
Child restraint fixing sys‐ tem 55
Child restraint fixing system LATCH 56
Child restraint fixing systems, mounting 55
Child safety locks 58
Child seat, mounting 55
Child seats 55
Chrome parts, care 185
Cleaning, displays 186
Climate control 120, 122
Clock 77
Closing/opening from in‐ side 37
Closing/opening via door lock 36
Closing/opening with remote control 34
Clothes hooks 136
Collision warning 108
Combination switch, refer to Turn signals 65
Combination switch, refer to Wiper system 66
Comfort Access 39
COMFORT program, Dynamic Driving Control 106
Compartments in the doors 135 Computer 81
Condensation on win‐ dows 121, 124
Condensation under the vehi‐ cle 142
Condition Based Service CBS 168
Confirmation signal 35
ConnectedDrive, see user's manual for Navigation, Enter‐
tainment and Communica‐
tion
Control Display 16
Control Display, settings 83
Controller 16, 17
Control systems, driving sta‐ bility 102
Convenient opening 34
Coolant 167
Coolant temperature 76
Cooling function 121, 124
Cooling, maximum 123
Cooling system 167
Corrosion on brake discs 142
Cruise control 109
Cruising range 77
Cupholder 135
Current fuel consumption 78
D
Damage, tires 160
Damping control, dy‐ namic 104
Data, technical 190
Date 77
Daytime running lights 87
Defrosting, refer to Windows, defrosting 121, 124
Dehumidifying, air 121, 124
Destination distance 82
Digital clock 77
Dimensions 190
Dimmable exterior mirrors 53
Dimmable interior rearview mirror 54 Seite 203Everything from A to ZReference203
Online Edition for Part no. 01 40 2 903 813 - 07 12 490
Page 204 of 211

Direction indicator, refer toTurn signals 65
Display, electronic, instrument cluster 73
Display in windshield 118
Display lighting, refer to Instru‐ ment lighting 89
Displays 72
Displays, cleaning 186
Disposal, coolant 167
Disposal, vehicle battery 177
Distance control, refer to PDC 112
Distance to destination 82
Divided screen view, split screen 21
Door lock, refer to Remote control 30
Downhill control 103
Drive-off assistant, refer to DSC 102
Driving experience switch 105
Driving instructions, breaking in 140
Driving mode 105
Driving notes, general 140
Driving stability control sys‐ tems 102
Driving tips 140
DSC Dynamic Stability Con‐ trol 102
DTC Dynamic Traction Con‐ trol 103
Dynamic Damping Con‐ trol 104
Dynamic Stability Control DSC 102
Dynamic Traction Control DTC 103
E
ECO PRO 147
ECO PRO display 147
ECO PRO mode 147 EfficientDynamics 148
Electronic displays, instru‐ ment cluster 73
Electronic Stability Program ESP, refer to DSC 102
Emergency detection, remote control 31
Emergency release, door lock 36
Emergency release, fuel filler flap 152
Emergency Request 178
Emergency service, refer to Roadside Assistance 179
Emergency start function, en‐ gine start 31
Energy Control 78
Energy recovery 78
Engine, automatic Start/Stop function 61
Engine, automatic switch- off 61
Engine compartment 163
Engine compartment, working in 163
Engine coolant 167
Engine oil 165
Engine oil, adding 166
Engine oil additives 166
Engine oil change 166
Engine oil filler neck 166
Engine oil temperature 76
Engine oil types, alterna‐ tive 166
Engine oil types, ap‐ proved 166
Engine start during malfunc‐ tion 31
Engine start, jump-start‐ ing 179
Engine start, refer to Starting the engine 60
Engine stop 60
Engine temperature 76
Entering a car wash 183
Equipment, interior 127 ESP Electronic Stability Pro‐
gram, refer to DSC 102
Exchanging wheels/tires 160
Exhaust system 140
Exterior mirror, automatic dim‐ ming feature 53
Exterior mirrors 52
External start 179
External temperature dis‐ play 77
External temperature warn‐ ing 77
Eyes for securing cargo 144
F
Failure message, refer to Check Control 74
False alarm, refer to Uninten‐ tional alarm 42
Fan, refer to Air flow 124
Fan, refer to Air volume 121
Fault displays, refer to Check Control 74
Filler neck for engine oil 166
Fine wood, care 185
First aid kit 179
Fitting for towing, refer to Tow fitting 182
Flat tire, changing wheels 176
Flat Tire Monitor FTM 97
Flat tire, Tire Pressure Monitor TPM 94
Flat tire, warning lamp 95, 98
Flooding 141
Floor carpet, care 185
Floor mats, care 185
Fold-out position, windshield wipers 68
Foot brake 141
Front airbags 91
Front fog lamps 89
Front fog lamps, front, bulb re‐ placement 174
Front lamps 172 Seite 204ReferenceEverything from A to Z204
Online Edition for Part no. 01 40 2 903 813 - 07 12 490