2013 BMW X1 XDRIVE 35I hood open
[x] Cancel search: hood openPage 13 of 291

High-beam Assistant 82Roadside parking lamps 82Computer 70Settings and information about
the vehicle 71Instrument lighting 836Steering wheel buttons, leftTelephone 192VolumeActivate/deactivate the voice acti‐
vation system 257Shift paddles 648Instrument cluster 149Steering wheel buttons, rightChange the radio station
Stopping a traffic announcement
Select a music track
Scroll through the redial listNext entertainment sourceRecirculated air mode 10710Start/stop the engine and switch
the ignition on/off 5411Steering column stalk, rightWindshield wipers 59Rain sensor 60Rear window wiper 6112Ignition lock 5413Steering wheel heating 4914Horn, the entire surface15Adjust the steering wheel 4916Cruise control 9817Opening tailgate 3518Releasing the hood 238Seite 13CockpitAt a glance13
Online Edition for Part no. 01 40 2 914 595 - VI/12
Page 38 of 291

To switch the engine off with transmission po‐
sition N engaged, insert the remote control in
the ignition lock.
Malfunction
The Comfort Access functions can be disturbed
by local radio waves, such as by a mobile phone
in the immediate vicinity of the remote control or
when a mobile phone is being charged in the
vehicle.
If this occurs, open or close the vehicle using the
buttons on the remote control or use the
integrated key in the door lock.
To start the engine afterward, insert the remote
control into the ignition switch.
Warning lamps The warning lamp in the instrument
cluster lights up when you attempt to
start the engine: the engine cannot be
started.
The remote control is not in the vehicle or has a
malfunction. Take the remote control with you
inside the vehicle or have it checked. If neces‐
sary, insert another remote control into the ig‐
nition switch.
The warning lamp in the instrument
cluster lights up while the engine is
running: the remote control is no lon‐
ger inside the vehicle.
After switching off the engine, the engine can
only be started again within approx. 10 seconds
if no door has been opened.
The indicator lamp in the instrument
cluster comes on and a message ap‐
pears on the Control Display: replace
the remote control battery.Replacing the battery
The remote control for Comfort Access con‐
tains a battery that will need to be replaced from
time to time.1.Take the integrated key out of the remote
control, refer to page 30.2.Remove the cover.3.Insert a new battery of the same type with
the positive side facing upwards.4.Press the cover closed.
Return used battery to a recycling collec‐
tion point or to your service center.
Alarm system
The concept
The vehicle alarm system responds to:
▷Opening of a door, the hood or the tailgate.▷Movements in the vehicle: interior motion
sensor, refer to page 39.▷Changes in the vehicle tilt, e.g., during at‐
tempts to steal a wheel or tow the car.▷Interruptions in battery voltage.
The alarm system briefly indicates tampering:
▷By sounding an acoustic alarm.▷By switching on the hazard warning system.▷By flashing the high beams.Seite 38ControlsOpening and closing38
Online Edition for Part no. 01 40 2 914 595 - VI/12
Page 39 of 291

Arming and disarming the alarm
system
General information
When you lock or unlock the vehicle, either with
the remote control or at the door lock, the alarm
system is armed or disarmed at the same time.
Door lock and armed alarm system
Unlocking via the door lock will trigger the alarm
on some market-specific versions.
To stop this alarm, unlock the vehicle with the
remote control or switch on the ignition.
Tailgate and armed alarm system
The tailgate can be opened using the remote
control, even if the alarm system is armed.
Press the button on the remote control.
After the tailgate is closed, it is locked and moni‐
tored again by the alarm system. The hazard
warning system flashes once.
In some market-specific versions, the tailgate
can only be opened using the remote control if
the vehicle was unlocked first.
Switching off the alarm
▷Unlock the vehicle using the remote control,
refer to page 32.▷Insert the remote control all the way into the
ignition lock.
Indicator lamp on the interior rearview
mirror
▷The indicator lamp flashes briefly every
2 seconds:
The system is armed.▷The indicator lamp flashes after locking:
The doors, hood or tailgate is not closed
properly, but the rest of the vehicle is se‐
cured.
The indicator lamp flashes continuously af‐
ter approx. 10 seconds. The interior motion
sensor is not active.▷The indicator lamp goes out after unlocking:
The vehicle has not been tampered with.▷If the indicator lamp flashes after unlocking
until the remote control is inserted in the ig‐
nition, but for no longer than approx. 5 mi‐
nutes:
An alarm has been triggered.
Panic mode
In dangerous situations, trigger the alarm sys‐
tem:
Press the button on the remote control for at
least 3 seconds.
To switch off the alarm: press any button.
Tilt alarm sensor
The tilt of the vehicle is monitored.
The alarm system responds in situations such
as attempts to steal a wheel or tow the car.
Interior motion sensor
For the sensor to function properly, the windows
and panoramic glass sunroof must be closed.
Avoiding unintentional alarms
The tilt alarm sensor and interior motion sensor
can be switched off together, such as in the fol‐
lowing situations:
▷In duplex garages.▷During transport on car-carrying trains, at
sea or on a trailer.Seite 39Opening and closingControls39
Online Edition for Part no. 01 40 2 914 595 - VI/12
Page 57 of 291

Parking the vehicle during an
automatic engine stop
The vehicle can be parked safely during an au‐
tomatic engine stop, such as when you wish to
leave the vehicle.1.Press the Start/Stop button. The ignition is
switched off. The Auto Start/Stop function
is deactivated.
Automatic transmission: transmission posi‐
tion P is engaged automatically.2.Set the handbrake.
Start the engine as usual using the Start/Stop
button.
Automatic engine start
The engine starts automatically under the fol‐
lowing conditions to enable the driver to drive
away:
▷Automatic transmission:
The brake pedal is released.
After the engine starts, accelerate as usual.
Safety mode
The engine does not start by itself after it is
switched off automatically if any of the following
conditions are fulfilled:
▷The driver's safety belt is unfastened or the
driver's door is open.▷Hood was unlocked.
The indicator lamp lights up. A mes‐
sage appears on the Control Display.
The engine can only be started via the
Start/Stop button.
Note
Even if you do not wish to drive away, the stop‐
ped engine still starts automatically in the fol‐
lowing situations:
▷The interior has heated up strongly with the
cooling function switched on.▷The steering wheel is turned.▷The vehicle begins to roll.▷Automatic transmission: the transmission
position is changed from D to N, R or M/S.▷Automatic transmission: the transmission
position is changed from P to N, D, R or M/
S.▷Fogging of the windows when the automatic
climate control is switched on.▷Vehicle battery charge is very low.▷The interior has cooled down strongly with
the heating switched on.▷Low braking pressure, such as from de‐
pressing the brake pedal a number of times
consecutively.
Preventing automatic engine stop with
an automatic transmission
The concept
To permit the driver to drive away especially
quickly, such as at intersections, the automatic
engine stop can be actively prevented.
Preventing the engine stop using the
brake pedal
The engine stop can be actively prevented
within one second after the vehicle comes to a
standstill.
▷Depress the brake pedal briefly and force‐
fully immediately after the vehicle comes to
a standstill.▷Then continue depressing the brake pedal
with normal braking force.Seite 57DrivingControls57
Online Edition for Part no. 01 40 2 914 595 - VI/12
Page 238 of 291

Engine compartmentVehicle equipment
This chapter describes all series equipment as
well as country-specific and special equipment
offered for this model series.Therefore, it alsodescribes equipment that may not be found in
your vehicle, for instance due to the selected
special equipment or the country version. This
also applies to safety-related functions and sys‐
tems.
Important features in the engine compartment
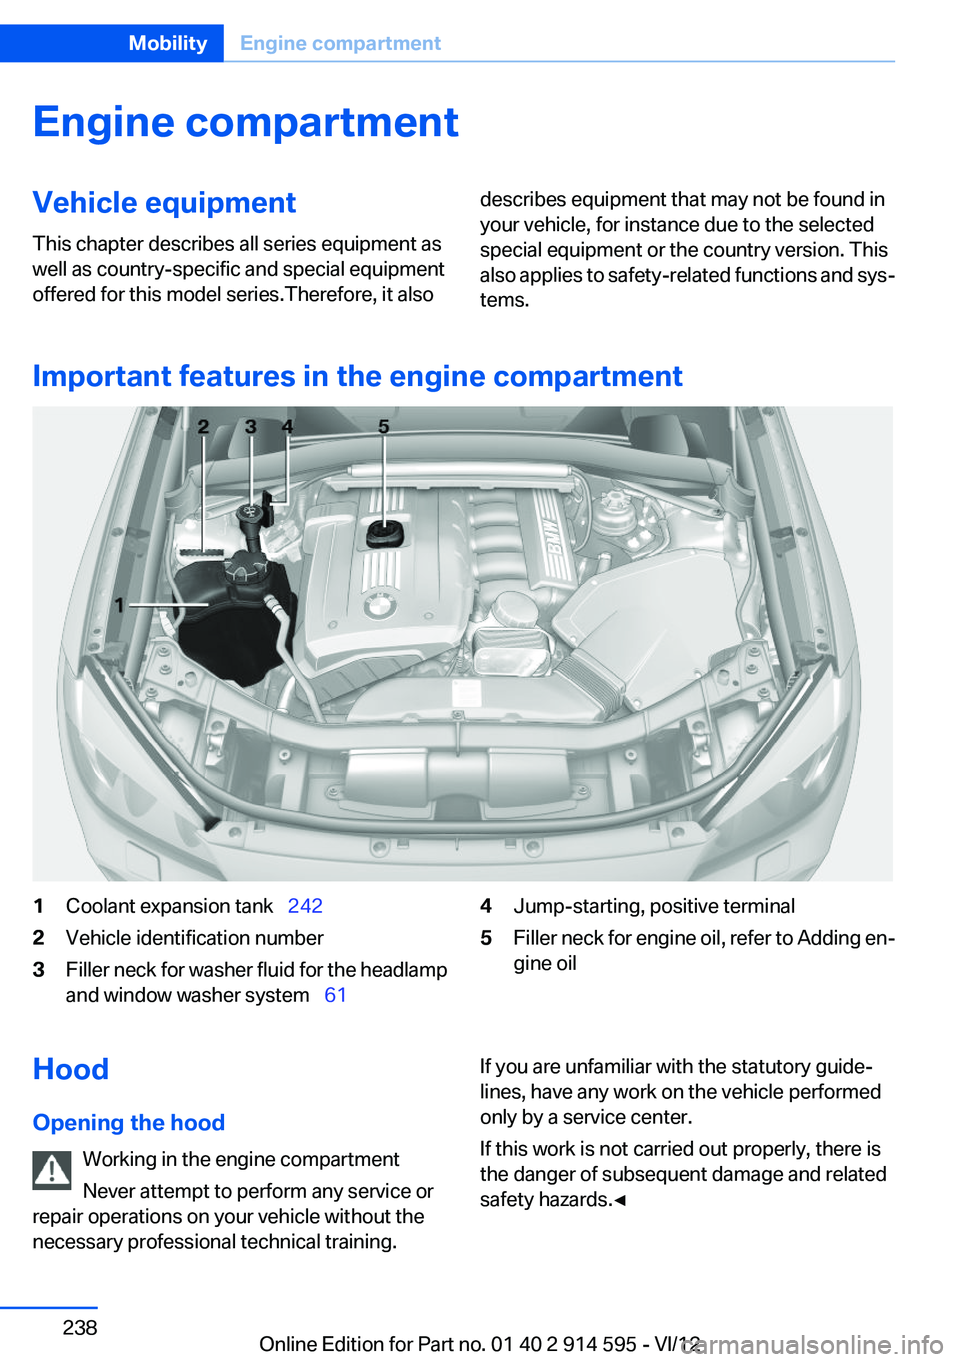
1Coolant expansion tank 2422Vehicle identification number3Filler neck for washer fluid for the headlamp
and window washer system 614Jump-starting, positive terminal5Filler neck for engine oil, refer to Adding en‐
gine oilHood
Opening the hood Working in the engine compartment
Never attempt to perform any service or
repair operations on your vehicle without the
necessary professional technical training.If you are unfamiliar with the statutory guide‐
lines, have any work on the vehicle performed
only by a service center.
If this work is not carried out properly, there is
the danger of subsequent damage and related
safety hazards.◀Seite 238MobilityEngine compartment238
Online Edition for Part no. 01 40 2 914 595 - VI/12
Page 239 of 291

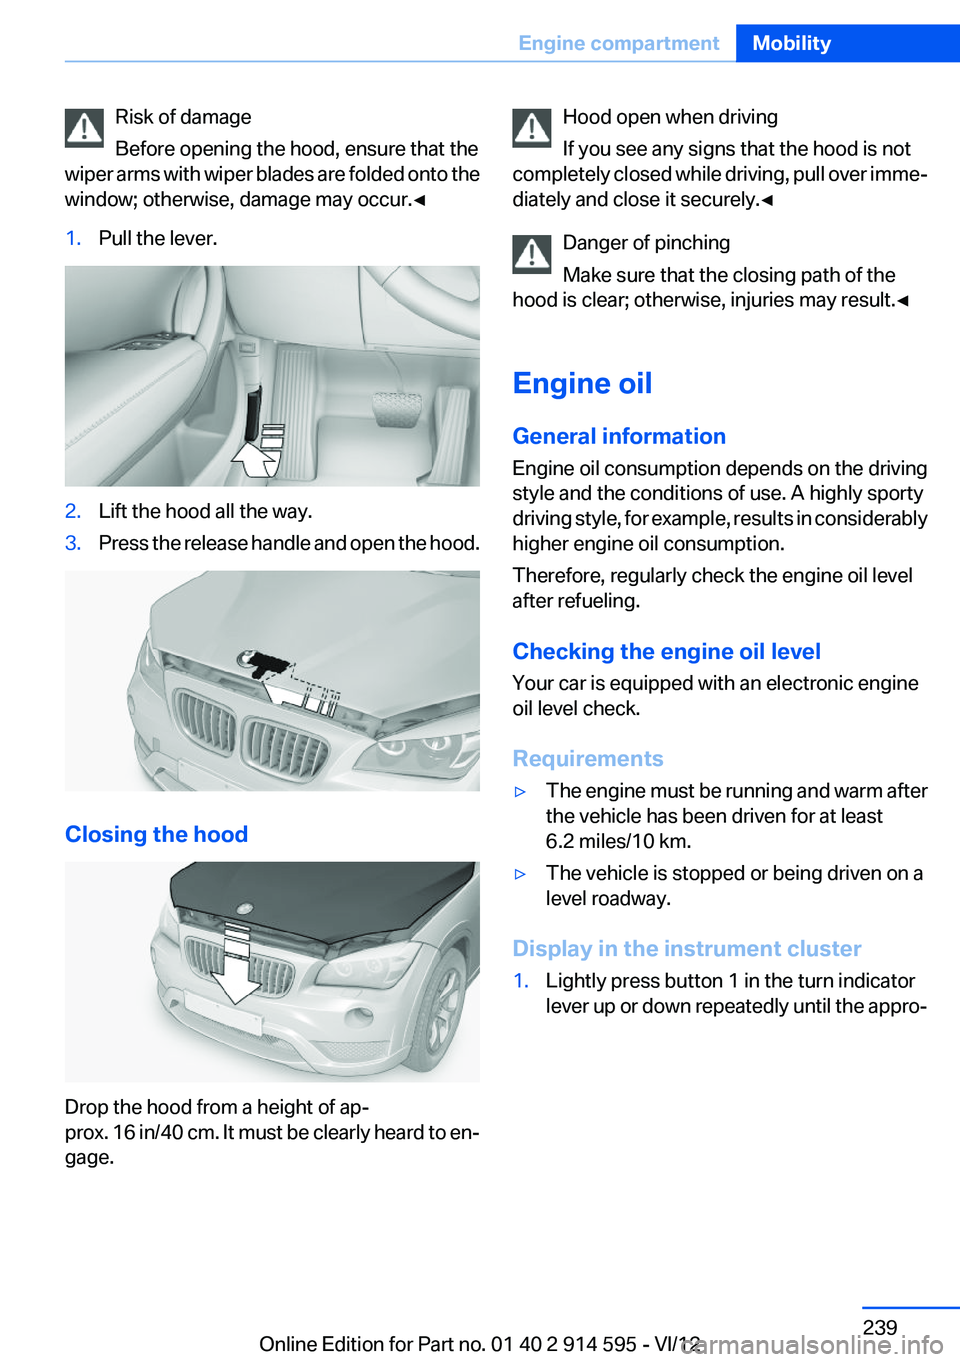
Risk of damage
Before opening the hood, ensure that the
wiper arms with wiper blades are folded onto the
window; otherwise, damage may occur.◀1.Pull the lever.2.Lift the hood all the way.3.Press the release handle and open the hood.
Closing the hood
Drop the hood from a height of ap‐
prox. 16 in/40 cm. It must be clearly heard to en‐
gage.
Hood open when driving
If you see any signs that the hood is not
completely closed while driving, pull over imme‐
diately and close it securely.◀
Danger of pinching
Make sure that the closing path of the
hood is clear; otherwise, injuries may result.◀
Engine oil
General information
Engine oil consumption depends on the driving
style and the conditions of use. A highly sporty
driving style, for example, results in considerably
higher engine oil consumption.
Therefore, regularly check the engine oil level
after refueling.
Checking the engine oil level
Your car is equipped with an electronic engine
oil level check.
Requirements▷The engine must be running and warm after
the vehicle has been driven for at least
6.2 miles/10 km.▷The vehicle is stopped or being driven on a
level roadway.
Display in the instrument cluster
1.Lightly press button 1 in the turn indicator
lever up or down repeatedly until the appro‐Seite 239Engine compartmentMobility239
Online Edition for Part no. 01 40 2 914 595 - VI/12
Page 242 of 291

Oil change
An oil change should be carried out by the serv‐
ice center only.
Coolant
General information Danger of burns from hot engine
Do not open the cooling system while the
engine is hot; otherwise, escaping coolant may
cause burns.◀
Suitable additives
Only use suitable additives; otherwise, en‐
gine damage may occur. The additives are
harmful to your health.◀
Coolant consists of water and additives.
Not all commercially available additives are suit‐
able for your vehicle. Ask your service center for
suitable additives.
Checking the coolant level
1.Do not open the hood until the engine has
cooled down.2.Turn the expansion tank cap counterclock‐
wise slightly to allow any accumulated pres‐
sure to escape; then continue turning to
open.3.The coolant level is correct if it is between
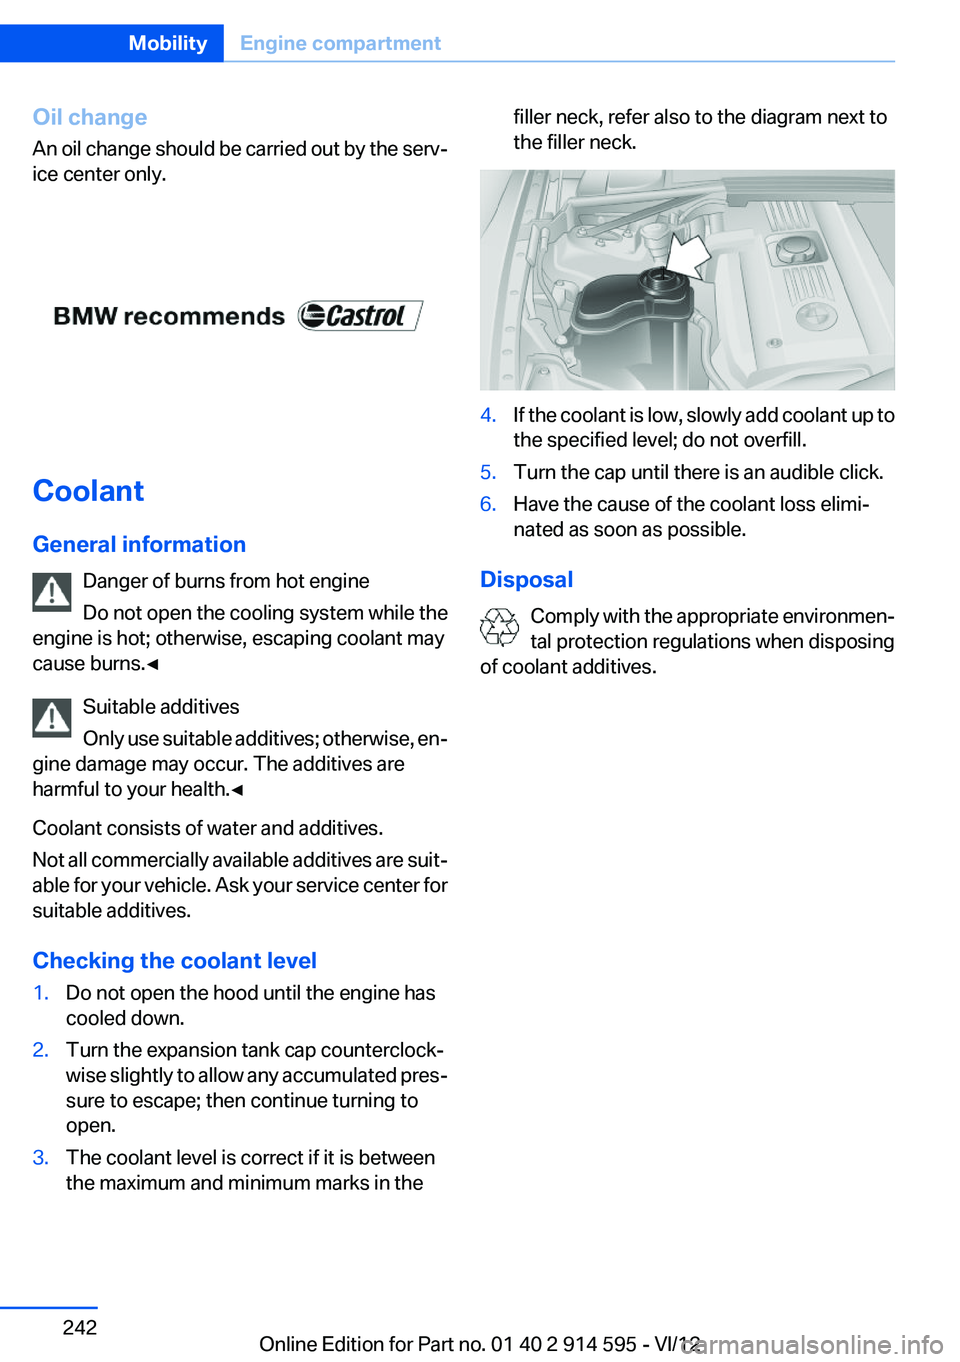
the maximum and minimum marks in thefiller neck, refer also to the diagram next to
the filler neck.4.If the coolant is low, slowly add coolant up to
the specified level; do not overfill.5.Turn the cap until there is an audible click.6.Have the cause of the coolant loss elimi‐
nated as soon as possible.
Disposal
Comply with the appropriate environmen‐
tal protection regulations when disposing
of coolant additives.
Seite 242MobilityEngine compartment242
Online Edition for Part no. 01 40 2 914 595 - VI/12
Page 245 of 291

Replacing componentsVehicle equipment
This chapter describes all series equipment as
well as country-specific and special equipment
offered for this model series.Therefore, it also
describes equipment that may not be found in
your vehicle, for instance due to the selected
special equipment or the country version. This
also applies to safety-related functions and sys‐
tems.
Tool kit
The tool kit is stowed under the cargo floor panel
and storage compartment in the cargo area.
Wiper blade replacement Do not fold down the wipers without wiper
blades
Do not fold down the wipers if wiper blades have
not been installed; this may damage the wind‐
shield.◀
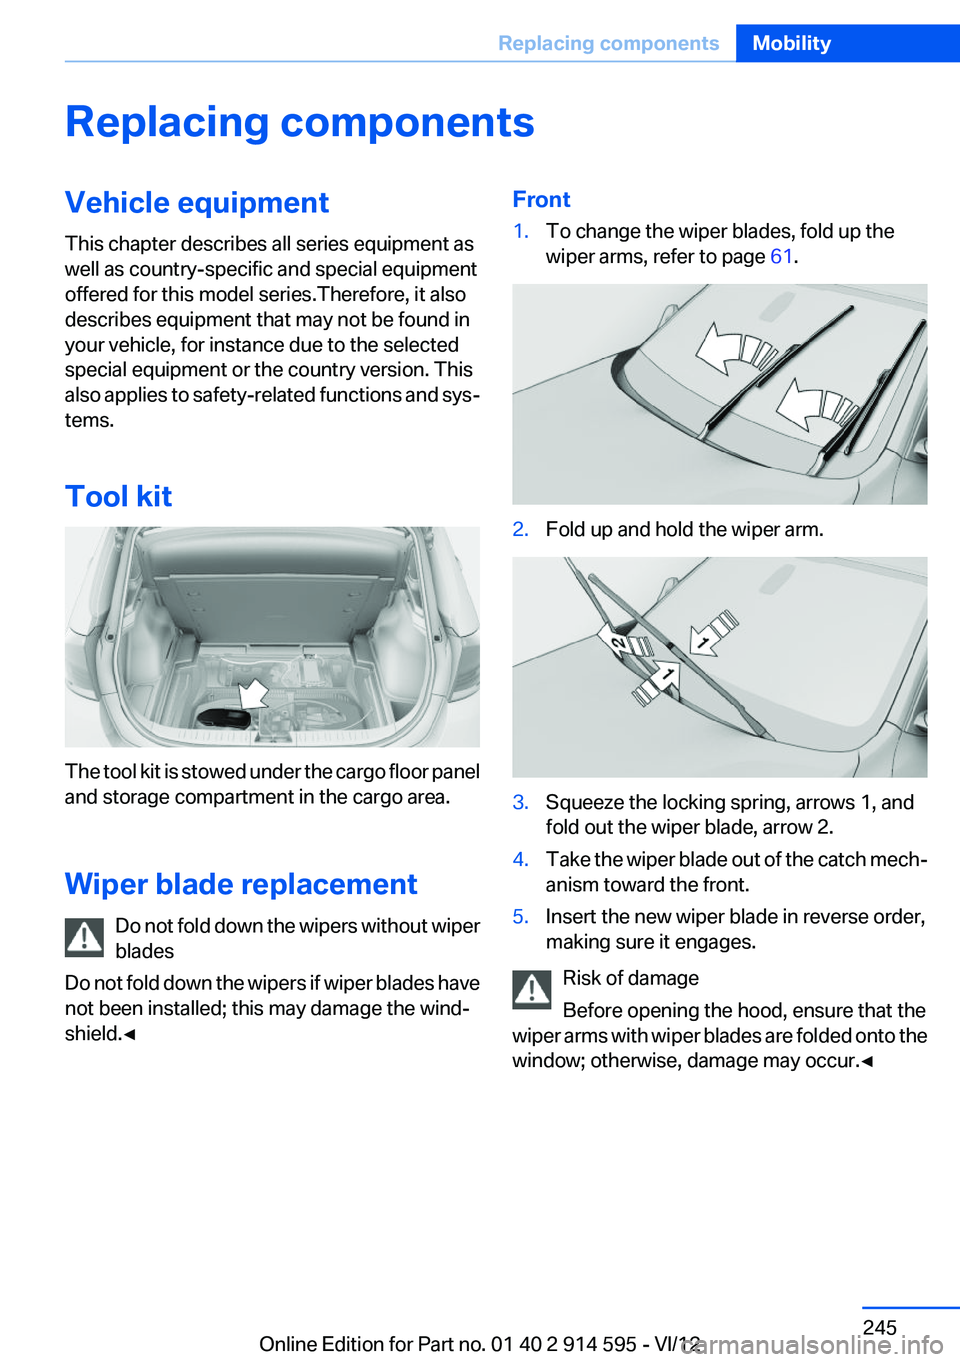
Front1.To change the wiper blades, fold up the
wiper arms, refer to page 61.2.Fold up and hold the wiper arm.3.Squeeze the locking spring, arrows 1, and
fold out the wiper blade, arrow 2.4.Take the wiper blade out of the catch mech‐
anism toward the front.5.Insert the new wiper blade in reverse order,
making sure it engages.
Risk of damage
Before opening the hood, ensure that the
wiper arms with wiper blades are folded onto the
window; otherwise, damage may occur.◀
Seite 245Replacing componentsMobility245
Online Edition for Part no. 01 40 2 914 595 - VI/12