2013 BMW X1 XDRIVE 35I brake
[x] Cancel search: brakePage 135 of 291
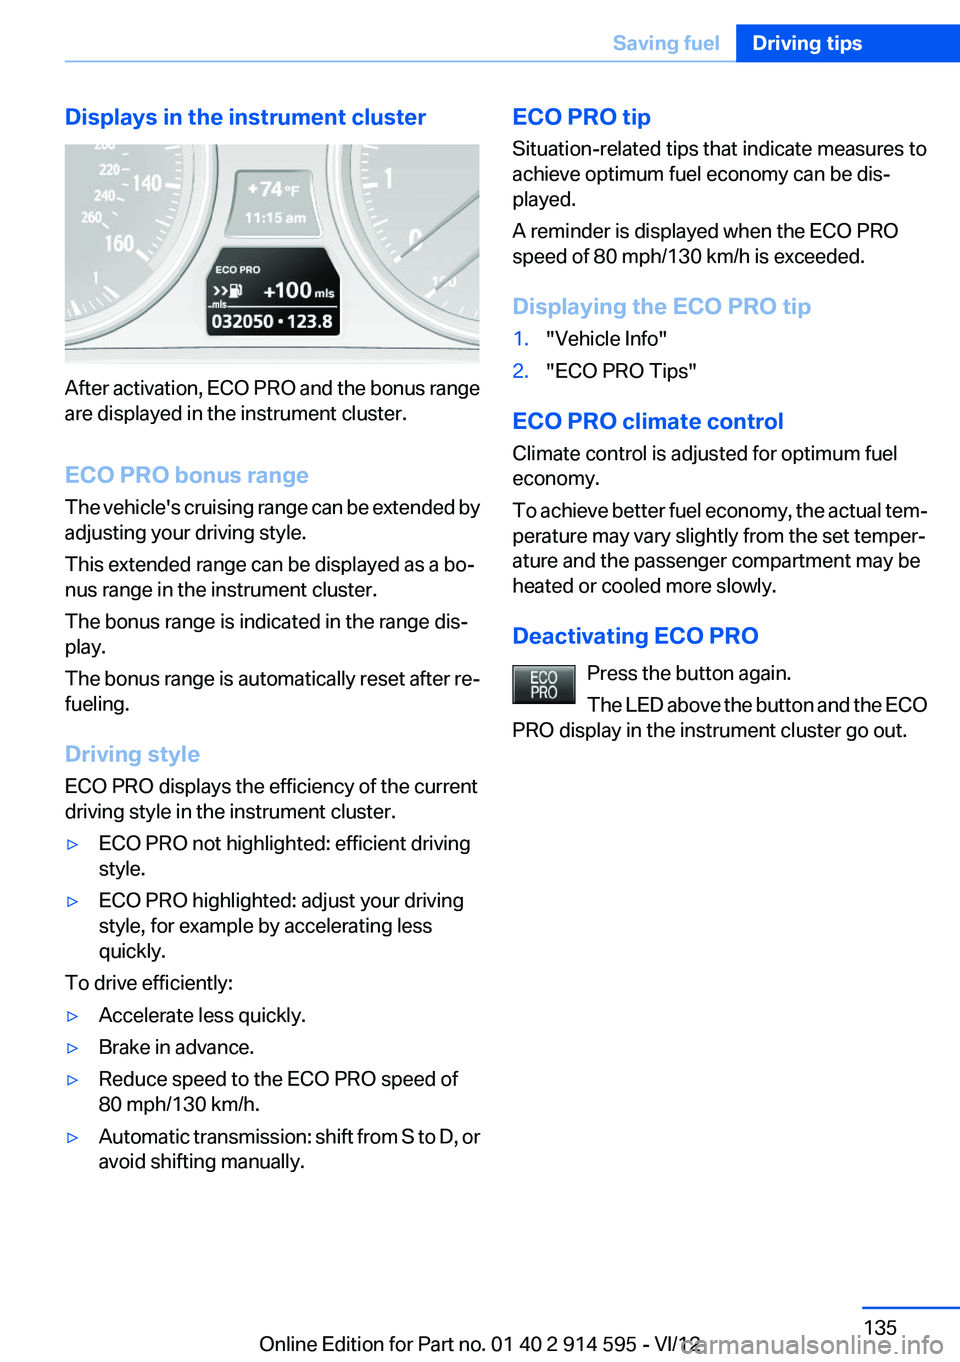
Displays in the instrument cluster
After activation, ECO PRO and the bonus range
are displayed in the instrument cluster.
ECO PRO bonus range
The vehicle's cruising range can be extended by
adjusting your driving style.
This extended range can be displayed as a bo‐
nus range in the instrument cluster.
The bonus range is indicated in the range dis‐
play.
The bonus range is automatically reset after re‐
fueling.
Driving style
ECO PRO displays the efficiency of the current
driving style in the instrument cluster.
▷ECO PRO not highlighted: efficient driving
style.▷ECO PRO highlighted: adjust your driving
style, for example by accelerating less
quickly.
To drive efficiently:
▷Accelerate less quickly.▷Brake in advance.▷Reduce speed to the ECO PRO speed of
80 mph/130 km/h.▷Automatic transmission: shift from S to D, or
avoid shifting manually.ECO PRO tip
Situation-related tips that indicate measures to
achieve optimum fuel economy can be dis‐
played.
A reminder is displayed when the ECO PRO
speed of 80 mph/130 km/h is exceeded.
Displaying the ECO PRO tip1."Vehicle Info"2."ECO PRO Tips"
ECO PRO climate control
Climate control is adjusted for optimum fuel
economy.
To achieve better fuel economy, the actual tem‐
perature may vary slightly from the set temper‐
ature and the passenger compartment may be
heated or cooled more slowly.
Deactivating ECO PRO Press the button again.
The LED above the button and the ECO
PRO display in the instrument cluster go out.
Seite 135Saving fuelDriving tips135
Online Edition for Part no. 01 40 2 914 595 - VI/12
Page 172 of 291
4.Open "Options".5."Random"
CDs/DVDs with compressed audio files: all
tracks within the selected directory are played in
random order.
Random mode is switched off when the audio
source is changed and the ignition is switched
off.
Fast forward/reverse Press and hold the button.
Video playback
Country codes
Only DVDs with the code of the home region can
be played back; also refer to the information on
the DVD.
CodeRegion1USA, Canada2Japan, Europe, Middle East, South Af‐
rica3Southeast Asia4Australia, Central and South America,
New Zealand5Northwest Asia, North Africa6China0All regionsPlayback
The video image is displayed on the Control Dis‐
play up to a speed of approx. 2 mph/3 km/h; in
some countries, it is only displayed while the
handbrake is set or the automatic transmission
is in position P.
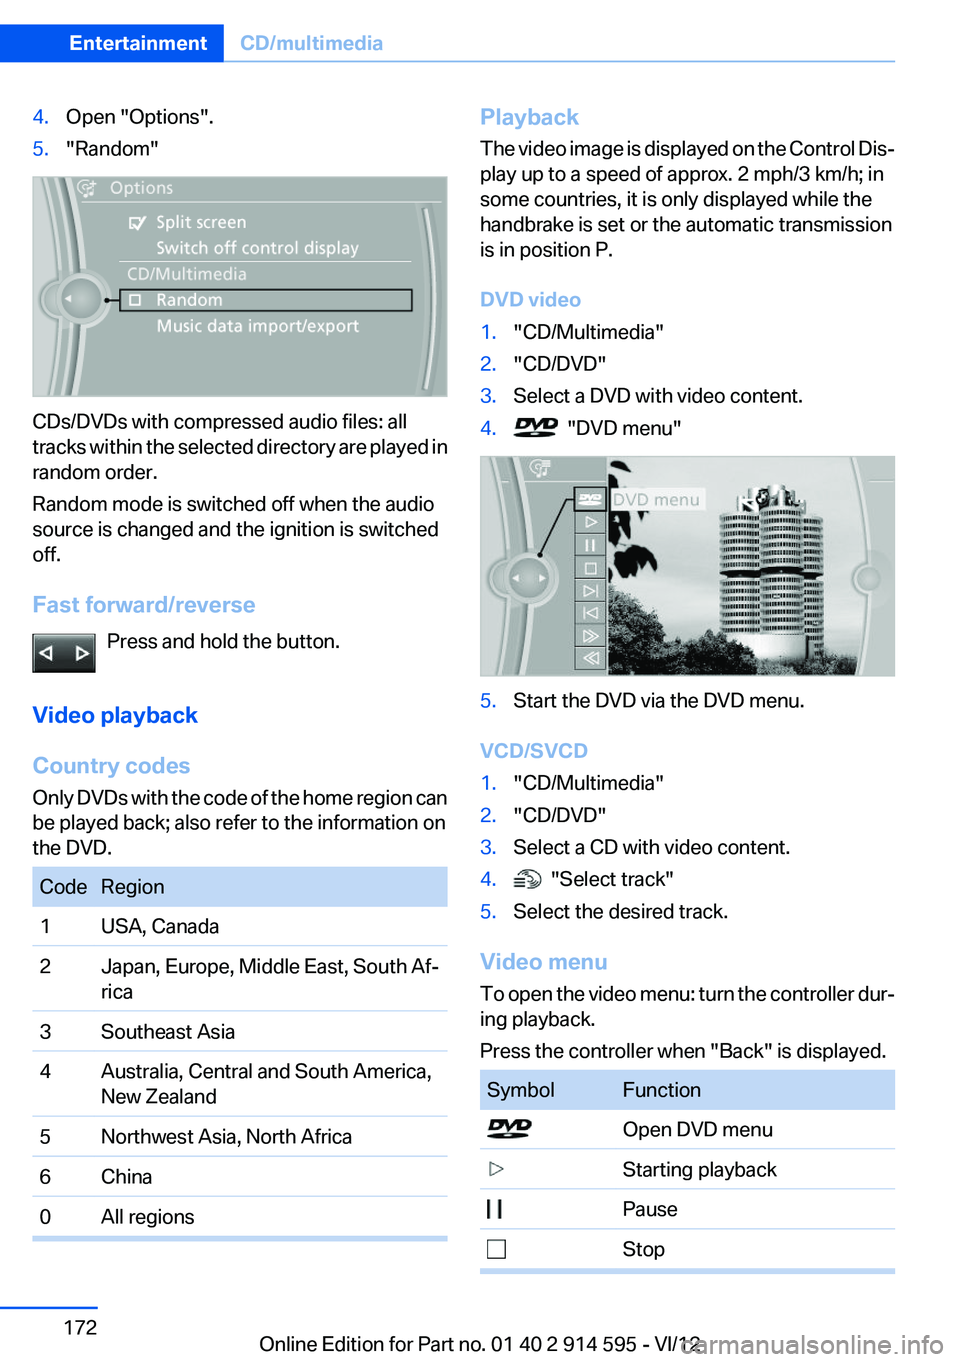
DVD video1."CD/Multimedia"2."CD/DVD"3.Select a DVD with video content.4. "DVD menu"5.Start the DVD via the DVD menu.
VCD/SVCD
1."CD/Multimedia"2."CD/DVD"3.Select a CD with video content.4. "Select track"5.Select the desired track.
Video menu
To open the video menu: turn the controller dur‐
ing playback.
Press the controller when "Back" is displayed.
SymbolFunction Open DVD menu Starting playback Pause StopSeite 172EntertainmentCD/multimedia172
Online Edition for Part no. 01 40 2 914 595 - VI/12
Page 184 of 291
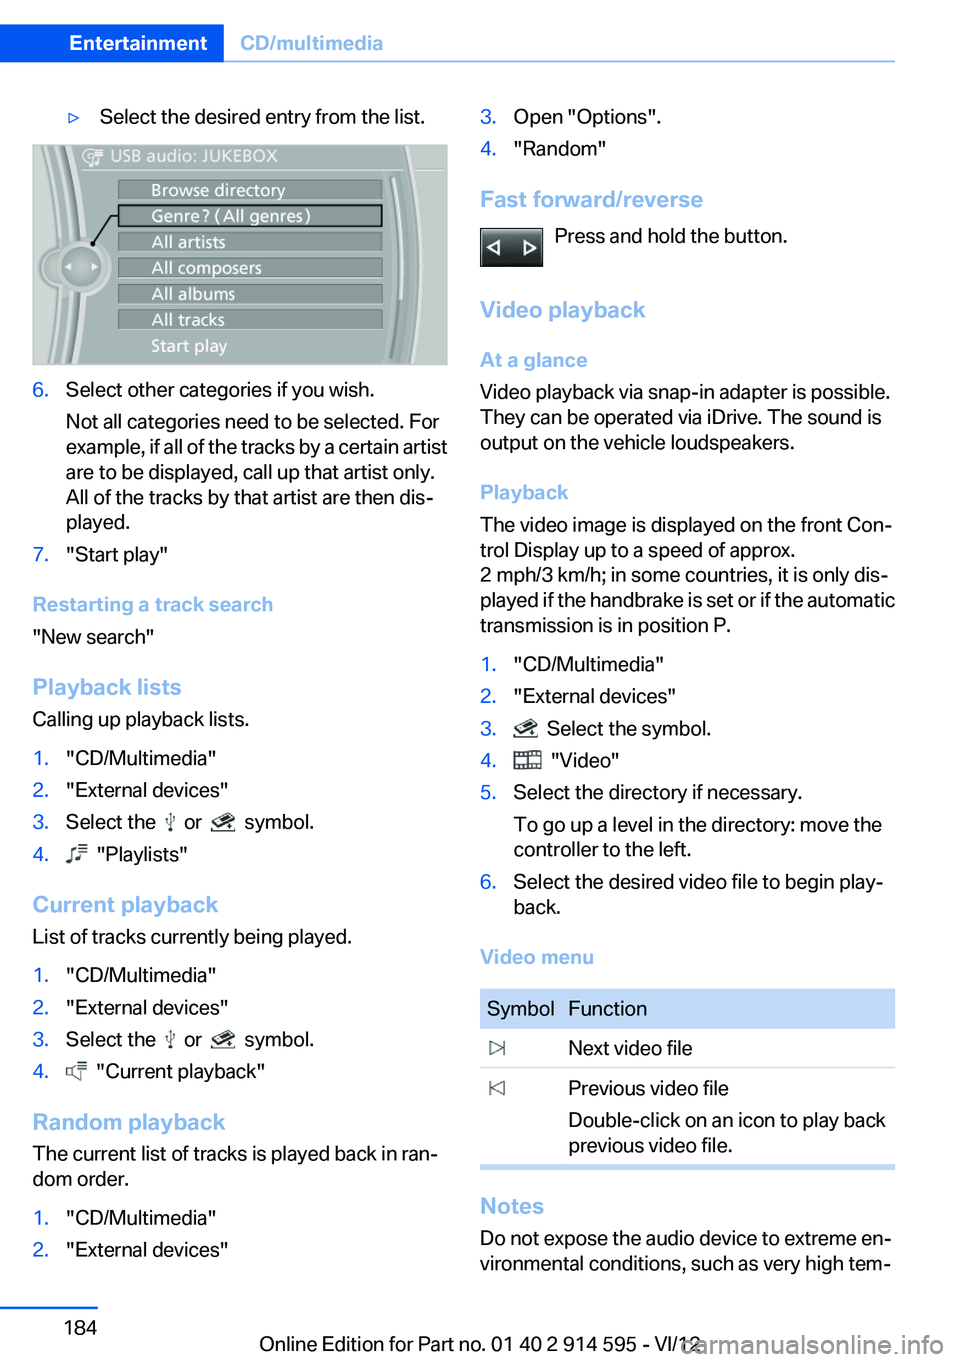
▷Select the desired entry from the list.6.Select other categories if you wish.
Not all categories need to be selected. For
example, if all of the tracks by a certain artist
are to be displayed, call up that artist only.
All of the tracks by that artist are then dis‐
played.7."Start play"
Restarting a track search
"New search"
Playback lists
Calling up playback lists.
1."CD/Multimedia"2."External devices"3.Select the or symbol.4. "Playlists"
Current playback
List of tracks currently being played.
1."CD/Multimedia"2."External devices"3.Select the or symbol.4. "Current playback"
Random playback
The current list of tracks is played back in ran‐
dom order.
1."CD/Multimedia"2."External devices"3.Open "Options".4."Random"
Fast forward/reverse
Press and hold the button.
Video playback
At a glance
Video playback via snap-in adapter is possible.
They can be operated via iDrive. The sound is
output on the vehicle loudspeakers.
Playback
The video image is displayed on the front Con‐
trol Display up to a speed of approx.
2 mph/3 km/h; in some countries, it is only dis‐
played if the handbrake is set or if the automatic
transmission is in position P.
1."CD/Multimedia"2."External devices"3. Select the symbol.4. "Video"5.Select the directory if necessary.
To go up a level in the directory: move the
controller to the left.6.Select the desired video file to begin play‐
back.
Video menu
SymbolFunction Next video file Previous video file
Double-click on an icon to play back
previous video file.
Notes
Do not expose the audio device to extreme en‐
vironmental conditions, such as very high tem‐
Seite 184EntertainmentCD/multimedia184
Online Edition for Part no. 01 40 2 914 595 - VI/12
Page 243 of 291
MaintenanceVehicle equipment
This chapter describes all series equipment as
well as country-specific and special equipment
offered for this model series.Therefore, it also
describes equipment that may not be found in
your vehicle, for instance due to the selected
special equipment or the country version. This
also applies to safety-related functions and sys‐
tems.
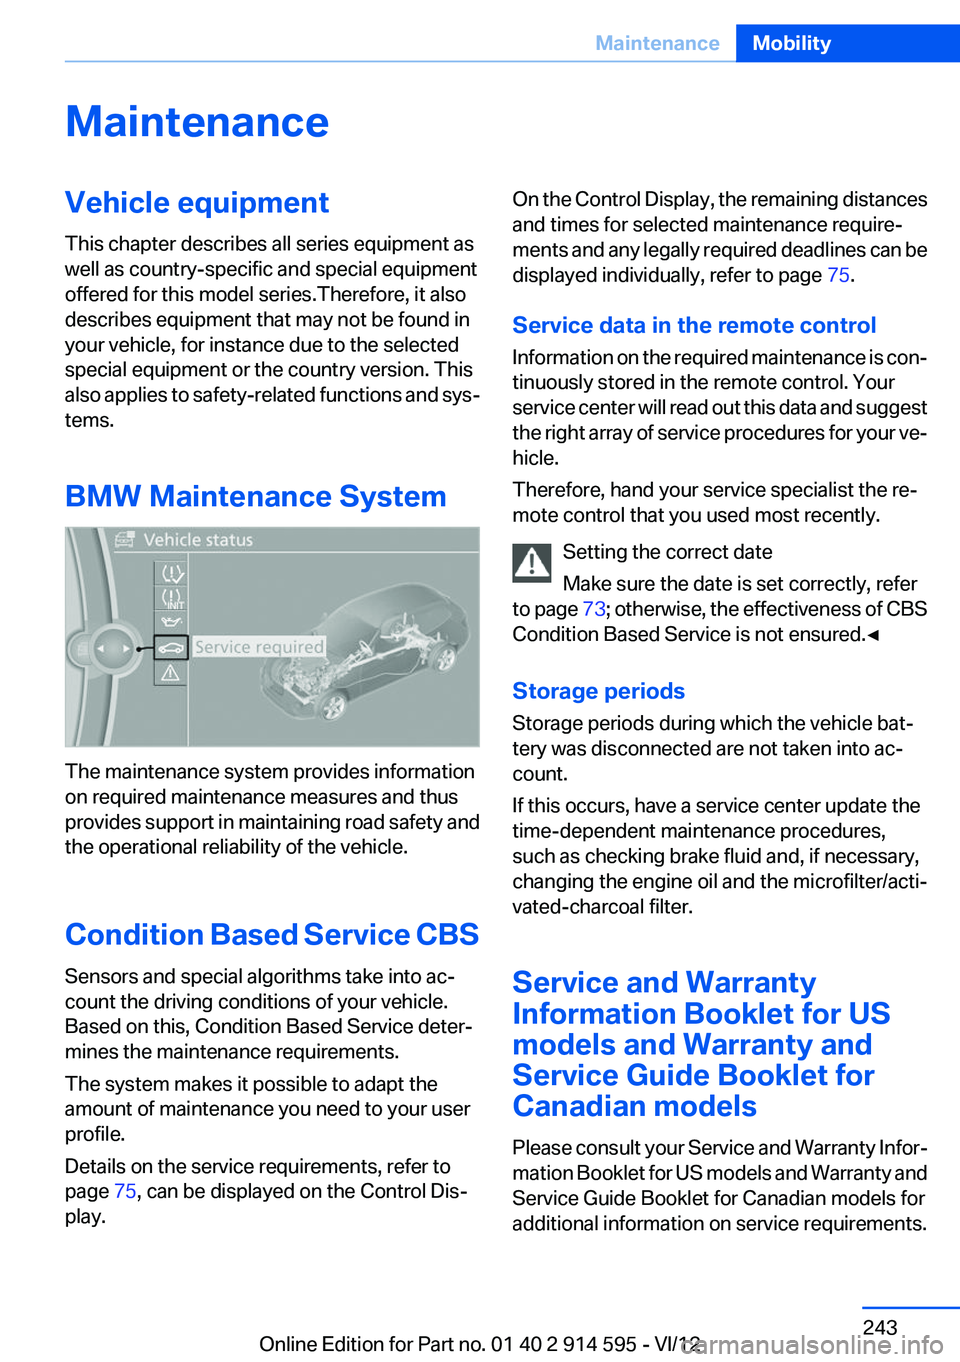
BMW Maintenance System
The maintenance system provides information
on required maintenance measures and thus
provides support in maintaining road safety and
the operational reliability of the vehicle.
Condition Based Service CBS
Sensors and special algorithms take into ac‐
count the driving conditions of your vehicle.
Based on this, Condition Based Service deter‐
mines the maintenance requirements.
The system makes it possible to adapt the
amount of maintenance you need to your user
profile.
Details on the service requirements, refer to
page 75, can be displayed on the Control Dis‐
play.
On the Control Display, the remaining distances
and times for selected maintenance require‐
ments and any legally required deadlines can be
displayed individually, refer to page 75.
Service data in the remote control
Information on the required maintenance is con‐
tinuously stored in the remote control. Your
service center will read out this data and suggest
the right array of service procedures for your ve‐
hicle.
Therefore, hand your service specialist the re‐
mote control that you used most recently.
Setting the correct date
Make sure the date is set correctly, refer
to page 73; otherwise, the effectiveness of CBS
Condition Based Service is not ensured.◀
Storage periods
Storage periods during which the vehicle bat‐
tery was disconnected are not taken into ac‐
count.
If this occurs, have a service center update the
time-dependent maintenance procedures,
such as checking brake fluid and, if necessary,
changing the engine oil and the microfilter/acti‐
vated-charcoal filter.
Service and Warranty
Information Booklet for US
models and Warranty and
Service Guide Booklet for
Canadian models
Please consult your Service and Warranty Infor‐
mation Booklet for US models and Warranty and
Service Guide Booklet for Canadian models for
additional information on service requirements.Seite 243MaintenanceMobility243
Online Edition for Part no. 01 40 2 914 595 - VI/12
Page 249 of 291
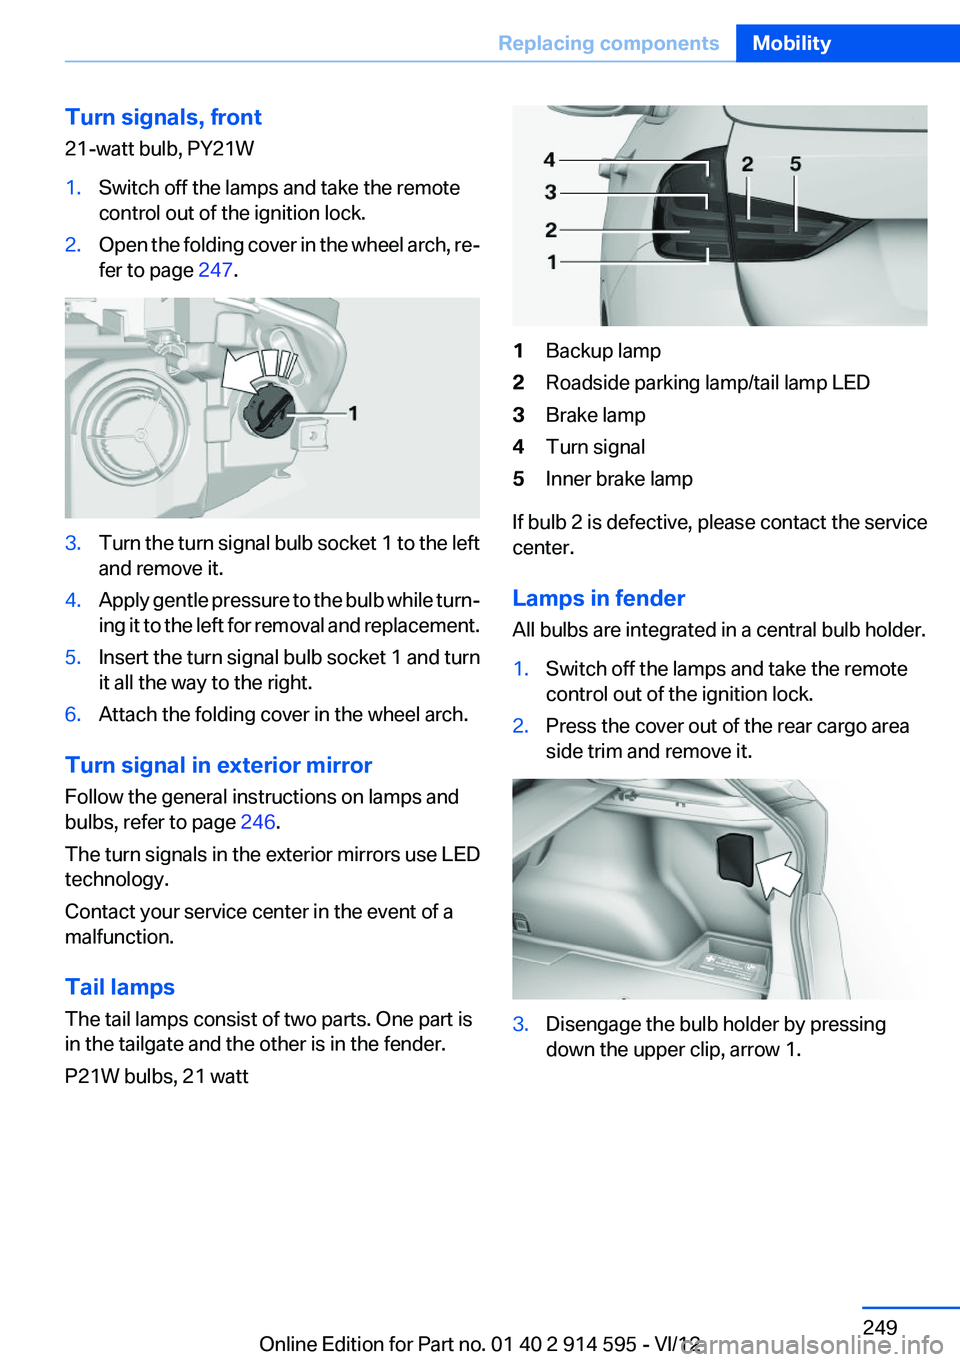
Turn signals, front
21-watt bulb, PY21W1.Switch off the lamps and take the remote
control out of the ignition lock.2.Open the folding cover in the wheel arch, re‐
fer to page 247.3.Turn the turn signal bulb socket 1 to the left
and remove it.4.Apply gentle pressure to the bulb while turn‐
ing it to the left for removal and replacement.5.Insert the turn signal bulb socket 1 and turn
it all the way to the right.6.Attach the folding cover in the wheel arch.
Turn signal in exterior mirror
Follow the general instructions on lamps and
bulbs, refer to page 246.
The turn signals in the exterior mirrors use LED
technology.
Contact your service center in the event of a
malfunction.
Tail lamps
The tail lamps consist of two parts. One part is
in the tailgate and the other is in the fender.
P21W bulbs, 21 watt
1Backup lamp2Roadside parking lamp/tail lamp LED3Brake lamp4Turn signal5Inner brake lamp
If bulb 2 is defective, please contact the service
center.
Lamps in fender
All bulbs are integrated in a central bulb holder.
1.Switch off the lamps and take the remote
control out of the ignition lock.2.Press the cover out of the rear cargo area
side trim and remove it.3.Disengage the bulb holder by pressing
down the upper clip, arrow 1.Seite 249Replacing componentsMobility249
Online Edition for Part no. 01 40 2 914 595 - VI/12
Page 250 of 291
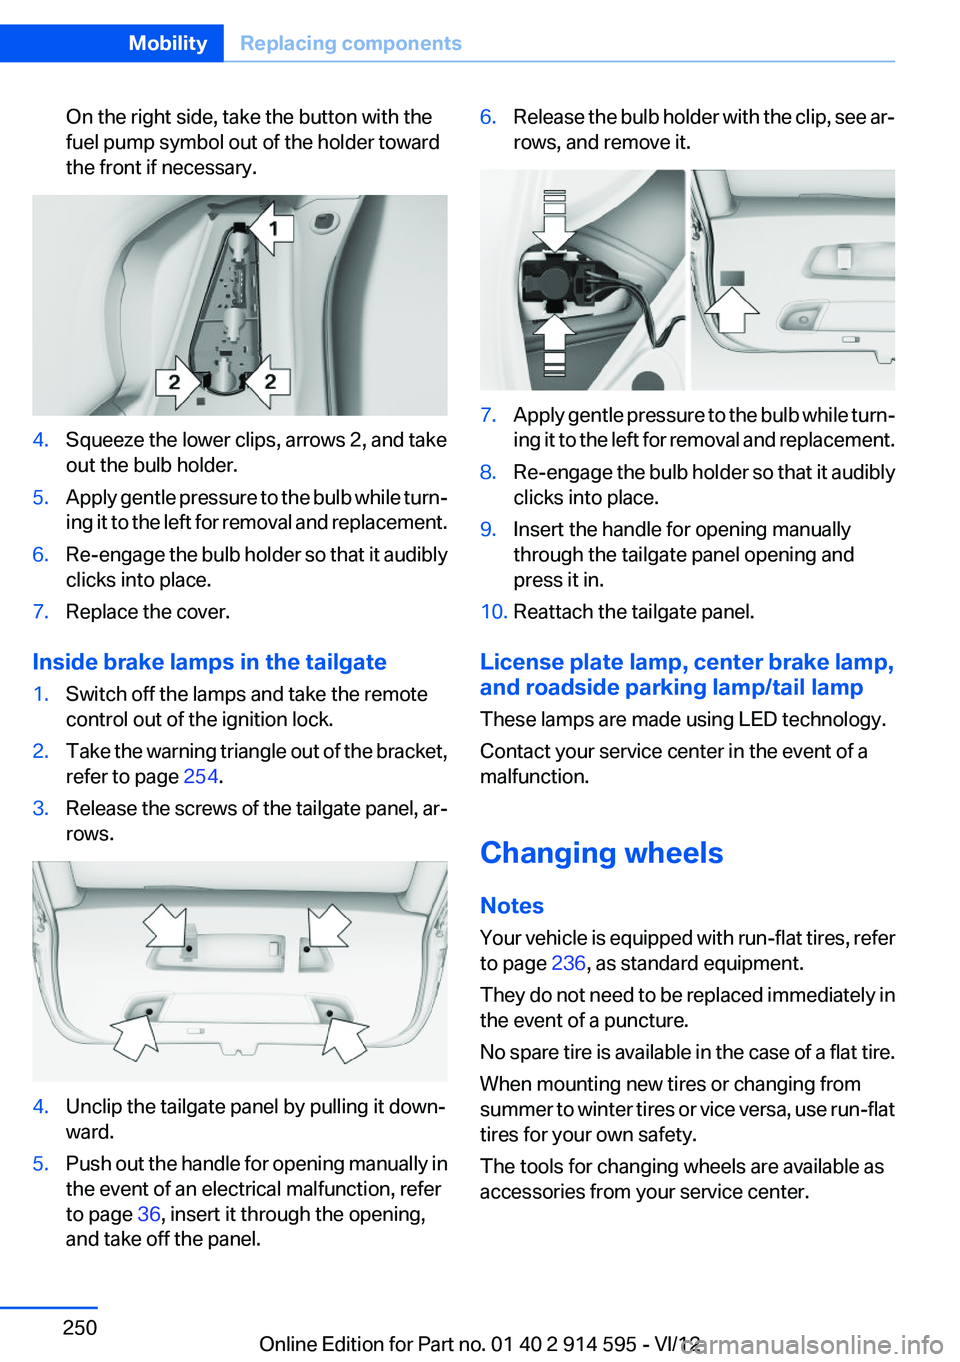
On the right side, take the button with the
fuel pump symbol out of the holder toward
the front if necessary.4.Squeeze the lower clips, arrows 2, and take
out the bulb holder.5.Apply gentle pressure to the bulb while turn‐
ing it to the left for removal and replacement.6.Re-engage the bulb holder so that it audibly
clicks into place.7.Replace the cover.
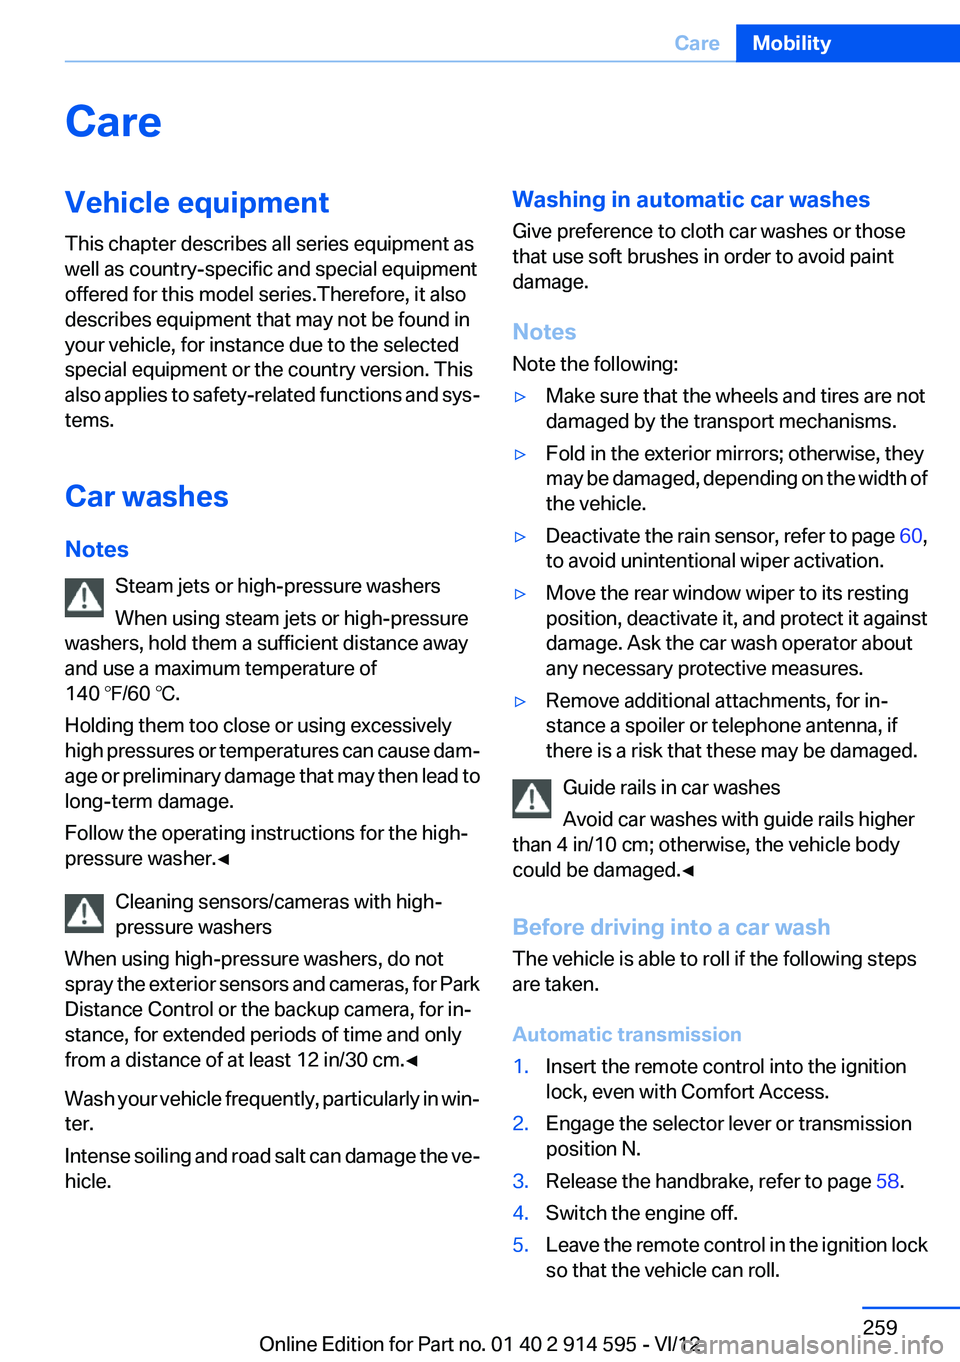
Inside brake lamps in the tailgate
1.Switch off the lamps and take the remote
control out of the ignition lock.2.Take the warning triangle out of the bracket,
refer to page 254.3.Release the screws of the tailgate panel, ar‐
rows.4.Unclip the tailgate panel by pulling it down‐
ward.5.Push out the handle for opening manually in
the event of an electrical malfunction, refer
to page 36, insert it through the opening,
and take off the panel.6.Release the bulb holder with the clip, see ar‐
rows, and remove it.7.Apply gentle pressure to the bulb while turn‐
ing it to the left for removal and replacement.8.Re-engage the bulb holder so that it audibly
clicks into place.9.Insert the handle for opening manually
through the tailgate panel opening and
press it in.10.Reattach the tailgate panel.
License plate lamp, center brake lamp,
and roadside parking lamp/tail lamp
These lamps are made using LED technology.
Contact your service center in the event of a
malfunction.
Changing wheels
Notes
Your vehicle is equipped with run-flat tires, refer
to page 236, as standard equipment.
They do not need to be replaced immediately in
the event of a puncture.
No spare tire is available in the case of a flat tire.
When mounting new tires or changing from
summer to winter tires or vice versa, use run-flat
tires for your own safety.
The tools for changing wheels are available as
accessories from your service center.
Seite 250MobilityReplacing components250
Online Edition for Part no. 01 40 2 914 595 - VI/12
Page 259 of 291
CareVehicle equipment
This chapter describes all series equipment as
well as country-specific and special equipment
offered for this model series.Therefore, it also
describes equipment that may not be found in
your vehicle, for instance due to the selected
special equipment or the country version. This
also applies to safety-related functions and sys‐
tems.
Car washes
Notes Steam jets or high-pressure washers
When using steam jets or high-pressure
washers, hold them a sufficient distance away
and use a maximum temperature of
140 ℉/60 ℃.
Holding them too close or using excessively
high pressures or temperatures can cause dam‐
age or preliminary damage that may then lead to
long-term damage.
Follow the operating instructions for the high-
pressure washer.◀
Cleaning sensors/cameras with high-
pressure washers
When using high-pressure washers, do not
spray the exterior sensors and cameras, for Park
Distance Control or the backup camera, for in‐
stance, for extended periods of time and only
from a distance of at least 12 in/30 cm.◀
Wash your vehicle frequently, particularly in win‐
ter.
Intense soiling and road salt can damage the ve‐
hicle.Washing in automatic car washes
Give preference to cloth car washes or those
that use soft brushes in order to avoid paint
damage.
Notes
Note the following:▷Make sure that the wheels and tires are not
damaged by the transport mechanisms.▷Fold in the exterior mirrors; otherwise, they
may be damaged, depending on the width of
the vehicle.▷Deactivate the rain sensor, refer to page 60,
to avoid unintentional wiper activation.▷Move the rear window wiper to its resting
position, deactivate it, and protect it against
damage. Ask the car wash operator about
any necessary protective measures.▷Remove additional attachments, for in‐
stance a spoiler or telephone antenna, if
there is a risk that these may be damaged.
Guide rails in car washes
Avoid car washes with guide rails higher
than 4 in/10 cm; otherwise, the vehicle body
could be damaged.◀
Before driving into a car wash
The vehicle is able to roll if the following steps
are taken.
Automatic transmission
1.Insert the remote control into the ignition
lock, even with Comfort Access.2.Engage the selector lever or transmission
position N.3.Release the handbrake, refer to page 58.4.Switch the engine off.5.Leave the remote control in the ignition lock
so that the vehicle can roll.Seite 259CareMobility259
Online Edition for Part no. 01 40 2 914 595 - VI/12
Page 260 of 291
In 8-gear automatic transmissions, transmis‐
sion position P is engaged automatically.▷Automatically after approx. 30 minutes.▷When the remote control is removed from
the ignition lock.
Headlamps
▷Do not rub dry and do not use abrasive or
caustic cleansers.▷Soak areas that have been soiled e.g. due to
insects, with shampoo and wash off with
water.▷Thaw ice with de-icing spray; do not use an
ice scraper.
After washing the vehicle
After washing the vehicle, apply the brakes
briefly to dry them; otherwise, braking action can
be reduced and corrosion of the brake discs can
occur.
Fully remove an residue from the windows; oth‐
erwise, streaking may occur when the wind‐
shield wipers are activated, impairing your view
and causing wiper noise.
Vehicle care
Car care products
BMW recommends using cleaning and care
products from BMW, since these have been
tested and approved.
Car care and cleaning products
Follow the instructions on the container.
When cleaning the interior, open the doors or
windows.
Only use products intended for cleaning vehi‐
cles.
Cleansers can contain substances that are dan‐
gerous and harmful to your health.◀
Vehicle paint
Regular care contributes to driving safety and
value retention. Environmental influences in
areas with high air pollution or natural contami‐
nants, such as tree resin or pollen, can have an
impact on the vehicle paint. Tailor the frequency
and extent of your car care to these influences.
Immediately remove aggressive substances,
such as spilled fuel, oil, grease, or bird drop‐
pings, to prevent damage to or discoloration of
the paintwork.
Leather care
Remove dust from the leather often, using a
cloth or vacuum cleaner.
Otherwise, particles of dust and road grime
chafe in pores and folds, and lead to increased
wear and premature degradation of the leather
surface.
To guard against discoloration, such as from
clothing, provide leather care roughly every two
months.
Clean light-colored leather more frequently as
dust and dirt are more noticeable.
Use leather care products; otherwise, dirt and
grease will gradually break down the protective
layer of the leather surface.
Suitable care products are available from the
service center.
Upholstery material care
Vacuum regularly with a vacuum cleaner.
If they are very dirty, e.g., beverage stains, use a
soft sponge or microfiber cloth with a suitable
interior cleaner.
Clean the upholstery down to the seams using
large sweeping motions. Avoid rubbing the ma‐
terial vigorously.
Damage from Velcro® fasteners
Open Velcro® fasteners on pants or other
articles of clothing can damage the seat covers.
Ensure that any Velcro® fasteners are closed. ◀Seite 260MobilityCare260
Online Edition for Part no. 01 40 2 914 595 - VI/12