2013 BMW X1 XDRIVE 35I tow
[x] Cancel search: towPage 146 of 291
Destination entry by voice
General information▷Instructions for voice activation system, re‐
fer to page 25.▷When making a destination entry by voice,
you can change between voice operation
and iDrive.▷To have the available spoken instructions
read out loud: ›Voice commands‹.
Saying the entries
▷The town/city, street, and house number
can be entered using a single command.▷Countries, towns and cities, streets, and in‐
tersections can be said as whole words or
spelled in the language of the system, refer
to page 74.
Example: to enter a destination in a US state
as a whole word, the system language must
be English.▷Spell the entry if the spoken language and
the language of the system differ.▷Say the letters smoothly, and avoid exag‐
gerating the pronunciation and inserting
lengthy pauses between the letters.▷The methods of entry depend on the navi‐
gation data in use and the country and lan‐
guage settings.
Entering the address in a command
1. Press the button on the steering
wheel.2.›Enter address‹3.Wait for a request from the system.4.Say the address in the suggested order.5.Continue making the entry as prompted by
the system.
If necessary, individually name the separate
components of the address, e.g., the town/
city.Entering a town/city separately
The town/city can be said as a complete word.
With the destination entry menu displayed:1. Press the button on the steering
wheel.2.›City‹ or ›Spell city‹3.Wait for the system to prompt you for the
town/city.4.Say the name of the town/city, or name at
least the first three letters.
Depending on the entry, up to 20 towns/cit‐
ies may be suggested.5.Select a location:▷Select a recommended town/city: › Yes‹.▷Select a different town/city: ›New entry‹.▷Select an entry: ›Entry ...‹, for instance,
entry 2.▷Spell an entry: ›Spell city‹.6.Continue making the entry as prompted by
the system.
If there are several towns/cities with the same
name:
Towns/cities of the same name are grouped in a
list and displayed as one location followed by an
ellipsis.
1.Select an entry: ›Yes‹ or ›Entry ...‹, e. g., En‐
try 2.2.Select the desired town/city.
Entering a street or intersection
separately
Enter a street and intersection in the same way
as you would enter a town/city.
Entering a house number separately
Depending on the data in the navigation system,
house numbers up to number 2,000 can be en‐
tered.
1.›House number‹Seite 146NavigationDestination entry146
Online Edition for Part no. 01 40 2 914 595 - VI/12
Page 157 of 291
What to do if...Vehicle equipment
This chapter describes all series equipment as
well as country-specific and special equipment
offered for this model series.Therefore, it also
describes equipment that may not be found in
your vehicle, for instance due to the selected
special equipment or the country version. This
also applies to safety-related functions and sys‐
tems.
What to do if...▷The current transmission position cannot be
displayed?
The vehicle is located in an unrecognized
region, is in a poor reception area, or the
system is currently determining the posi‐
tion. Reception is usually best when you
have an unobstructed view of the sky.▷The destination without street information is
not used for route guidance?
When city has been input, no downtown can
be determined. Input any street in the se‐
lected city and start destination guidance.▷The destination is not used for route guid‐
ance?
The destination data are not contained in the
navigation data. Select a destination that is
as close as possible to the original.▷Letters for destination input cannot be se‐
lected?
The stored data do not contain the data of
the destination. Select a goal that is as close
as possible to the original.▷Is the map displayed in shades of gray?
"Traffic conditions/gray map" active:
The Control Display changes to a black and
white display. This enables a better view of
the traffic bulletins.▷Spoken instructions are no longer output
during route guidance in front of intersec‐
tions?
The area has not yet been fully recorded, or
you have left the recommended route and
the system requires a few seconds to cal‐
culate a new route suggestion.Seite 157What to do if...Navigation157
Online Edition for Part no. 01 40 2 914 595 - VI/12
Page 203 of 291
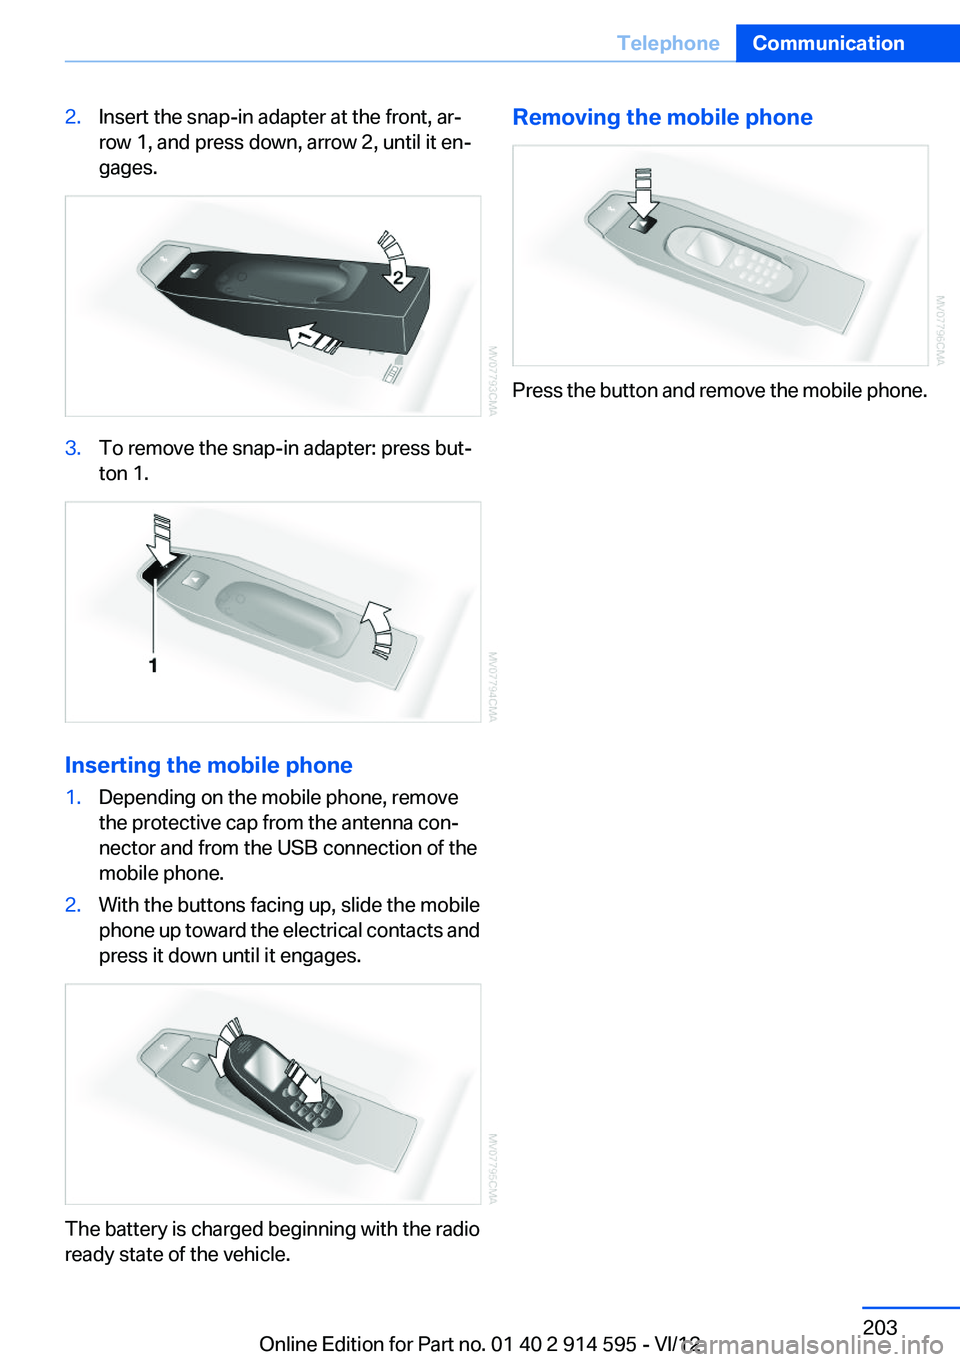
2.Insert the snap-in adapter at the front, ar‐
row 1, and press down, arrow 2, until it en‐
gages.3.To remove the snap-in adapter: press but‐
ton 1.
Inserting the mobile phone
1.Depending on the mobile phone, remove
the protective cap from the antenna con‐
nector and from the USB connection of the
mobile phone.2.With the buttons facing up, slide the mobile
phone up toward the electrical contacts and
press it down until it engages.
The battery is charged beginning with the radio
ready state of the vehicle.
Removing the mobile phone
Press the button and remove the mobile phone.
Seite 203TelephoneCommunication203
Online Edition for Part no. 01 40 2 914 595 - VI/12
Page 225 of 291
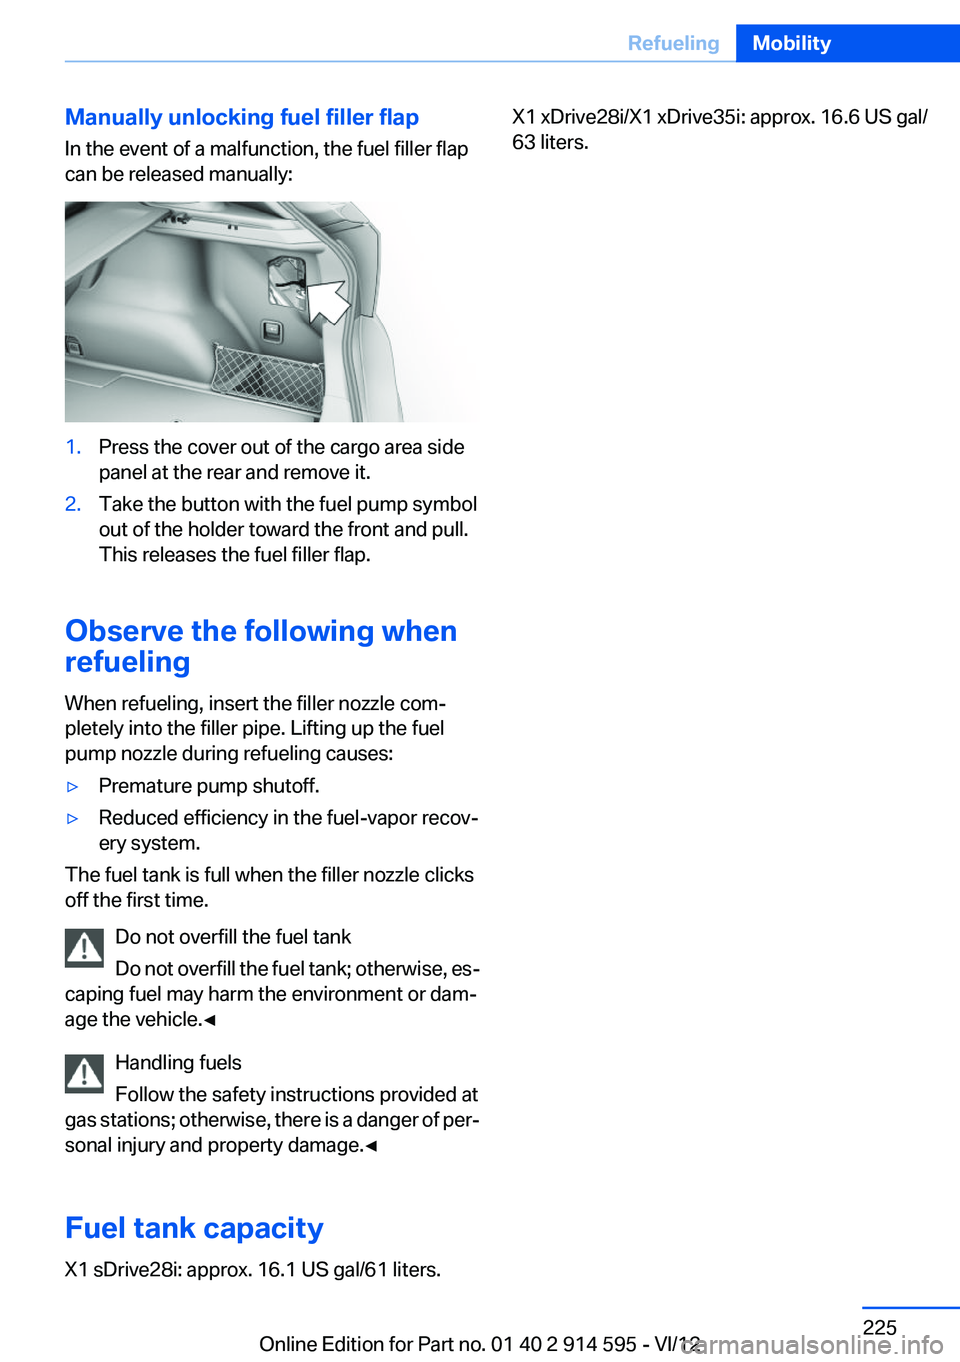
Manually unlocking fuel filler flap
In the event of a malfunction, the fuel filler flap
can be released manually:1.Press the cover out of the cargo area side
panel at the rear and remove it.2.Take the button with the fuel pump symbol
out of the holder toward the front and pull.
This releases the fuel filler flap.
Observe the following when
refueling
When refueling, insert the filler nozzle com‐
pletely into the filler pipe. Lifting up the fuel
pump nozzle during refueling causes:
▷Premature pump shutoff.▷Reduced efficiency in the fuel-vapor recov‐
ery system.
The fuel tank is full when the filler nozzle clicks
off the first time.
Do not overfill the fuel tank
Do not overfill the fuel tank; otherwise, es‐
caping fuel may harm the environment or dam‐
age the vehicle.◀
Handling fuels
Follow the safety instructions provided at
gas stations; otherwise, there is a danger of per‐
sonal injury and property damage.◀
Fuel tank capacity
X1 sDrive28i: approx. 16.1 US gal/61 liters.
X1 xDrive28i/X1 xDrive35i: approx. 16.6 US gal/
63 liters.Seite 225RefuelingMobility225
Online Edition for Part no. 01 40 2 914 595 - VI/12
Page 235 of 291
Tire damage
General information
Inspect your tires often for damage, foreign ob‐
jects lodged in the tread, and tread wear.
Notes
Driving over rough or damaged road surfaces, as
well as debris, curbs and other obstacles can
cause serious damage to wheels, tires and sus‐
pension parts. This is more likely to occur with
low-profile tires, which provide less cushioning
between the wheel and the road. Be careful to
avoid road hazards and reduce your speed, es‐
pecially if your vehicle is equipped with low-pro‐
file tires.
Indications of tire damage or other vehicle de‐
fects:▷Unusual vibrations during driving.▷Unusual handling such as a strong tendency
to pull to the left or right.
Damage can be caused by driving over curbs,
road damage and similar situations.
In case of tire damage
If there are indications of tire damage, re‐
duce your speed immediately and have the
wheels and tires checked right away; otherwise,
there is the increased risk of an accident.
Drive carefully to the next service center or tire
shop.
If necessary, have the vehicle towed.
Otherwise, tire damage can present a life-
threatening hazard to vehicle occupants and
other road users.◀
Repair of tire damage
For safety reasons, the manufacturer of
your vehicle recommends that you do not have
damaged tires repaired; they should be re‐
placed. Otherwise, damage can occur as a re‐
sult.◀
Changing wheels and tires
Mounting Information on mounting tires
Have mounting and balancing performed
only by a service center or tire specialist.
If this work is not carried out properly, there is
the danger of subsequent damage and related
safety hazards.◀
Wheel and tire combination
Information on the right wheel and tire combi‐
nation and rim version for your vehicle can be
obtained from the service center.
Incorrect wheel and tire combinations impair the
function of a variety of systems such as ABS or
DSC.
To maintain good handling and vehicle re‐
sponse, use only tires with a single tread con‐
figuration from a single manufacturer.
Following tire damage, have the original wheel
and tire combination remounted on the vehicle
as soon as possible.
Approved wheels and tires
The manufacturer of your vehicle recom‐
mends that you use only wheels and tires that
have been approved for your particular vehicle
model.
For example, despite having the same official
size ratings, variations can lead to body contact
and with it, the risk of severe accidents.
The manufacturer of your vehicle cannot evalu‐
ate non-approved wheels and tires to determine
if they are suited for use, and therefore cannot
ensure the operating safety of the vehicle if they
are mounted.◀
Wheels with electronics for TPM Tire
Pressure Monitor
When mounting new tires or changing from
summer to winter tires or vice versa, only use
wheels with TPM electronics; otherwise, theSeite 235Wheels and tiresMobility235
Online Edition for Part no. 01 40 2 914 595 - VI/12
Page 245 of 291
Replacing componentsVehicle equipment
This chapter describes all series equipment as
well as country-specific and special equipment
offered for this model series.Therefore, it also
describes equipment that may not be found in
your vehicle, for instance due to the selected
special equipment or the country version. This
also applies to safety-related functions and sys‐
tems.
Tool kit
The tool kit is stowed under the cargo floor panel
and storage compartment in the cargo area.
Wiper blade replacement Do not fold down the wipers without wiper
blades
Do not fold down the wipers if wiper blades have
not been installed; this may damage the wind‐
shield.◀
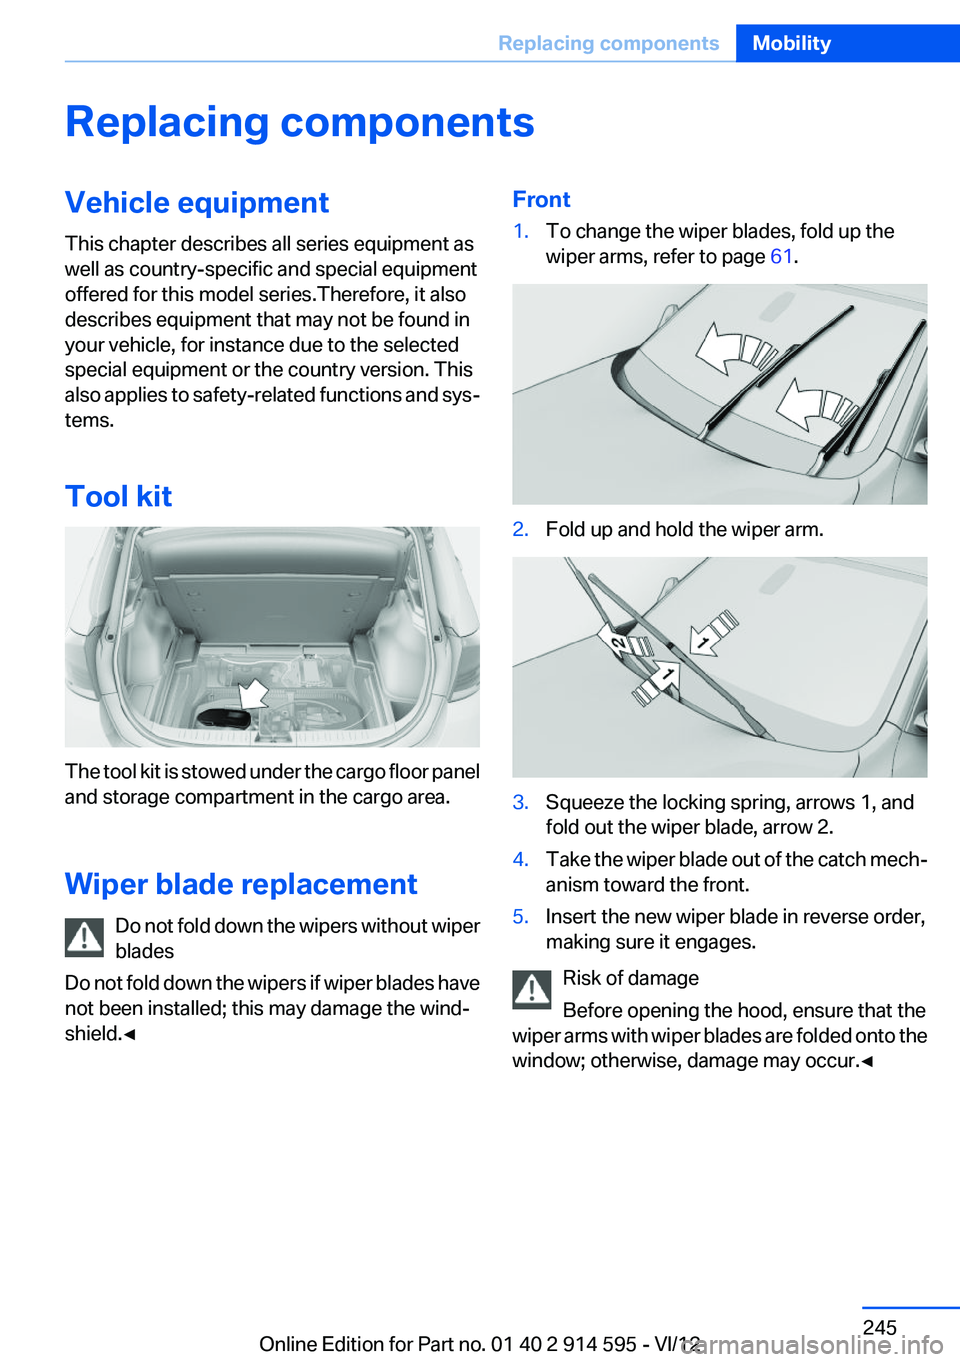
Front1.To change the wiper blades, fold up the
wiper arms, refer to page 61.2.Fold up and hold the wiper arm.3.Squeeze the locking spring, arrows 1, and
fold out the wiper blade, arrow 2.4.Take the wiper blade out of the catch mech‐
anism toward the front.5.Insert the new wiper blade in reverse order,
making sure it engages.
Risk of damage
Before opening the hood, ensure that the
wiper arms with wiper blades are folded onto the
window; otherwise, damage may occur.◀
Seite 245Replacing componentsMobility245
Online Edition for Part no. 01 40 2 914 595 - VI/12
Page 246 of 291
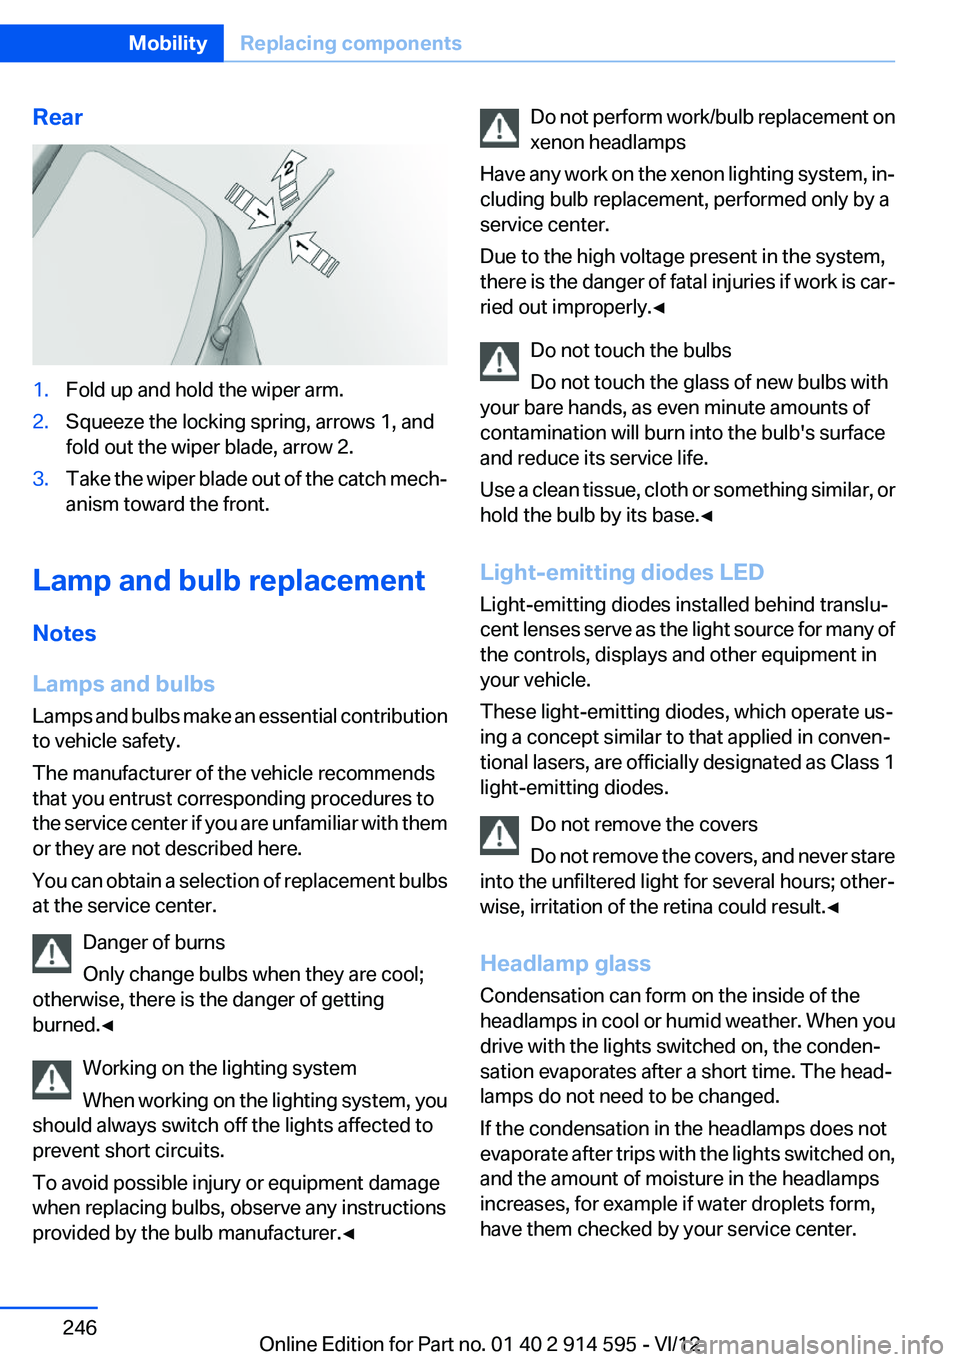
Rear1.Fold up and hold the wiper arm.2.Squeeze the locking spring, arrows 1, and
fold out the wiper blade, arrow 2.3.Take the wiper blade out of the catch mech‐
anism toward the front.
Lamp and bulb replacement
Notes
Lamps and bulbs
Lamps and bulbs make an essential contribution
to vehicle safety.
The manufacturer of the vehicle recommends
that you entrust corresponding procedures to
the service center if you are unfamiliar with them
or they are not described here.
You can obtain a selection of replacement bulbs
at the service center.
Danger of burns
Only change bulbs when they are cool;
otherwise, there is the danger of getting
burned.◀
Working on the lighting system
When working on the lighting system, you
should always switch off the lights affected to
prevent short circuits.
To avoid possible injury or equipment damage
when replacing bulbs, observe any instructions
provided by the bulb manufacturer.◀
Do not perform work/bulb replacement on
xenon headlamps
Have any work on the xenon lighting system, in‐
cluding bulb replacement, performed only by a
service center.
Due to the high voltage present in the system,
there is the danger of fatal injuries if work is car‐
ried out improperly.◀
Do not touch the bulbs
Do not touch the glass of new bulbs with
your bare hands, as even minute amounts of
contamination will burn into the bulb's surface
and reduce its service life.
Use a clean tissue, cloth or something similar, or
hold the bulb by its base.◀
Light-emitting diodes LED
Light-emitting diodes installed behind translu‐
cent lenses serve as the light source for many of
the controls, displays and other equipment in
your vehicle.
These light-emitting diodes, which operate us‐
ing a concept similar to that applied in conven‐
tional lasers, are officially designated as Class 1
light-emitting diodes.
Do not remove the covers
Do not remove the covers, and never stare
into the unfiltered light for several hours; other‐
wise, irritation of the retina could result.◀
Headlamp glass
Condensation can form on the inside of the
headlamps in cool or humid weather. When you
drive with the lights switched on, the conden‐
sation evaporates after a short time. The head‐
lamps do not need to be changed.
If the condensation in the headlamps does not
evaporate after trips with the lights switched on,
and the amount of moisture in the headlamps
increases, for example if water droplets form,
have them checked by your service center.Seite 246MobilityReplacing components246
Online Edition for Part no. 01 40 2 914 595 - VI/12
Page 250 of 291
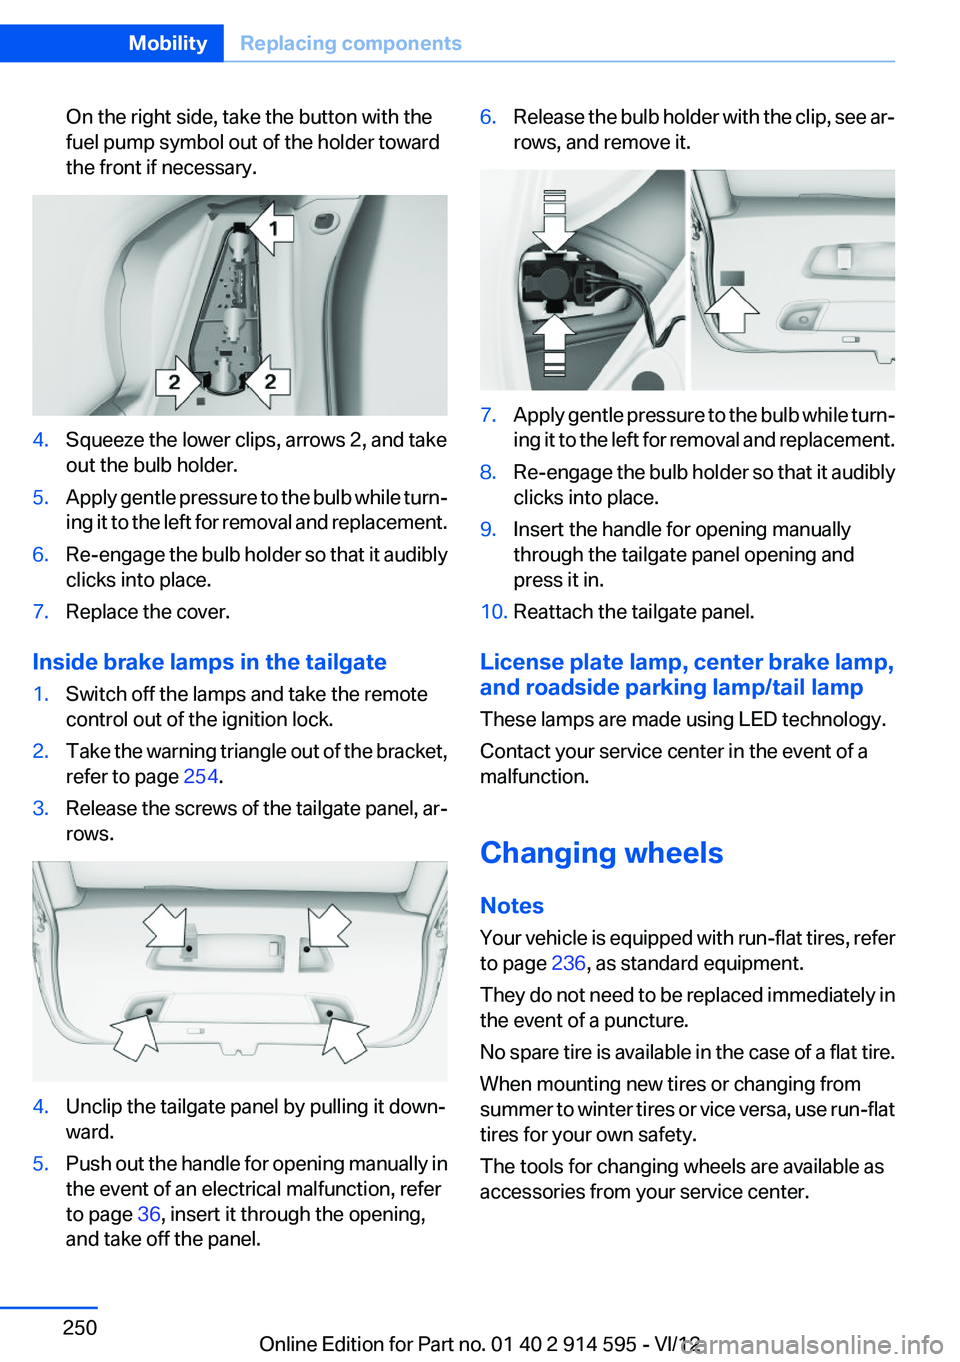
On the right side, take the button with the
fuel pump symbol out of the holder toward
the front if necessary.4.Squeeze the lower clips, arrows 2, and take
out the bulb holder.5.Apply gentle pressure to the bulb while turn‐
ing it to the left for removal and replacement.6.Re-engage the bulb holder so that it audibly
clicks into place.7.Replace the cover.
Inside brake lamps in the tailgate
1.Switch off the lamps and take the remote
control out of the ignition lock.2.Take the warning triangle out of the bracket,
refer to page 254.3.Release the screws of the tailgate panel, ar‐
rows.4.Unclip the tailgate panel by pulling it down‐
ward.5.Push out the handle for opening manually in
the event of an electrical malfunction, refer
to page 36, insert it through the opening,
and take off the panel.6.Release the bulb holder with the clip, see ar‐
rows, and remove it.7.Apply gentle pressure to the bulb while turn‐
ing it to the left for removal and replacement.8.Re-engage the bulb holder so that it audibly
clicks into place.9.Insert the handle for opening manually
through the tailgate panel opening and
press it in.10.Reattach the tailgate panel.
License plate lamp, center brake lamp,
and roadside parking lamp/tail lamp
These lamps are made using LED technology.
Contact your service center in the event of a
malfunction.
Changing wheels
Notes
Your vehicle is equipped with run-flat tires, refer
to page 236, as standard equipment.
They do not need to be replaced immediately in
the event of a puncture.
No spare tire is available in the case of a flat tire.
When mounting new tires or changing from
summer to winter tires or vice versa, use run-flat
tires for your own safety.
The tools for changing wheels are available as
accessories from your service center.
Seite 250MobilityReplacing components250
Online Edition for Part no. 01 40 2 914 595 - VI/12