2013 BMW X1 XDRIVE 35I automatic transmission
[x] Cancel search: automatic transmissionPage 184 of 291
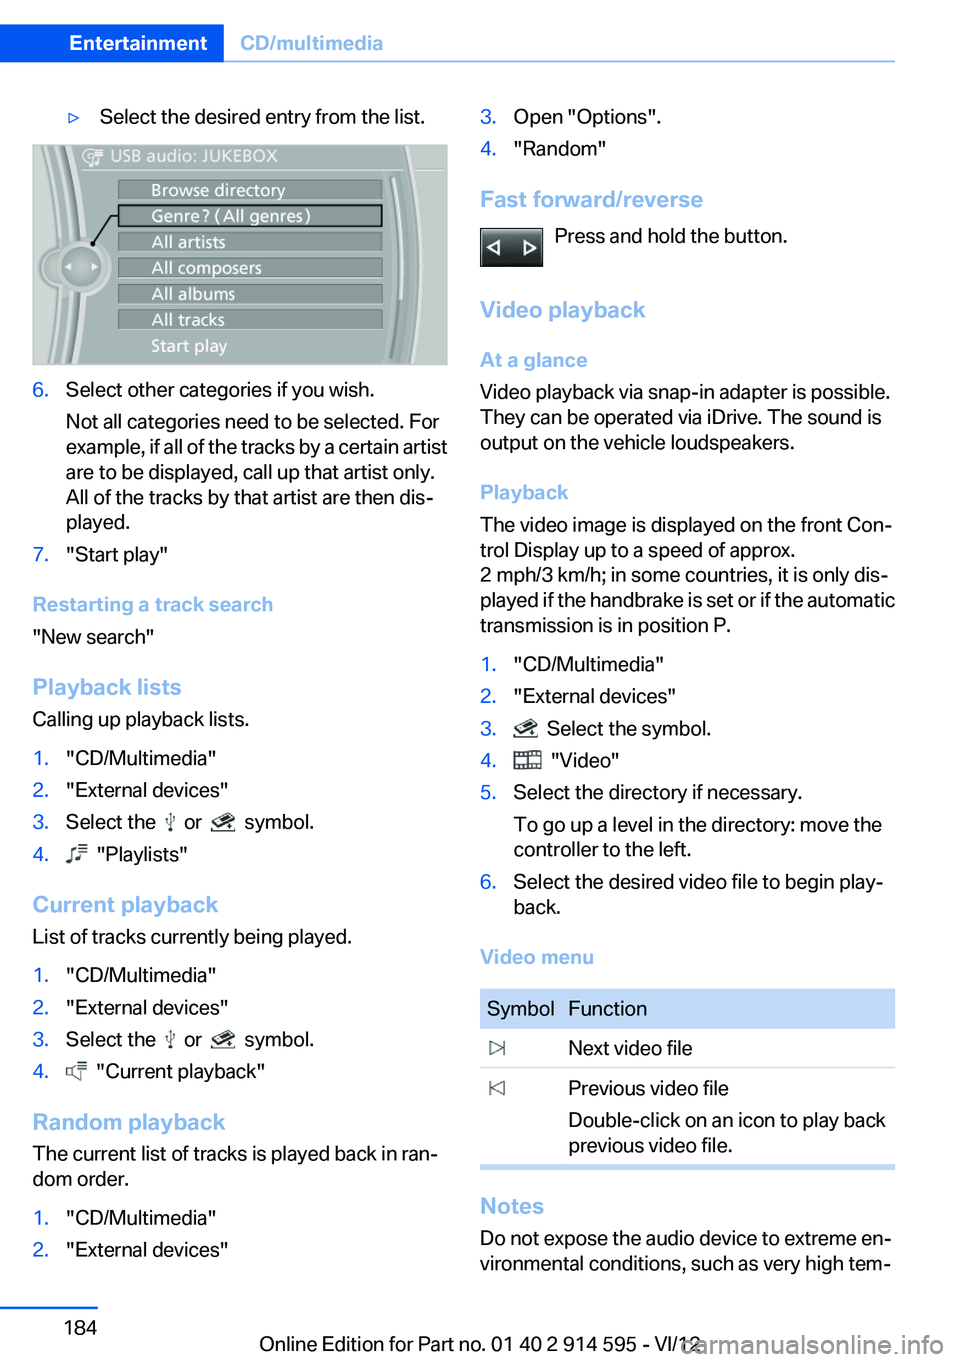
▷Select the desired entry from the list.6.Select other categories if you wish.
Not all categories need to be selected. For
example, if all of the tracks by a certain artist
are to be displayed, call up that artist only.
All of the tracks by that artist are then dis‐
played.7."Start play"
Restarting a track search
"New search"
Playback lists
Calling up playback lists.
1."CD/Multimedia"2."External devices"3.Select the or symbol.4. "Playlists"
Current playback
List of tracks currently being played.
1."CD/Multimedia"2."External devices"3.Select the or symbol.4. "Current playback"
Random playback
The current list of tracks is played back in ran‐
dom order.
1."CD/Multimedia"2."External devices"3.Open "Options".4."Random"
Fast forward/reverse
Press and hold the button.
Video playback
At a glance
Video playback via snap-in adapter is possible.
They can be operated via iDrive. The sound is
output on the vehicle loudspeakers.
Playback
The video image is displayed on the front Con‐
trol Display up to a speed of approx.
2 mph/3 km/h; in some countries, it is only dis‐
played if the handbrake is set or if the automatic
transmission is in position P.
1."CD/Multimedia"2."External devices"3. Select the symbol.4. "Video"5.Select the directory if necessary.
To go up a level in the directory: move the
controller to the left.6.Select the desired video file to begin play‐
back.
Video menu
SymbolFunction Next video file Previous video file
Double-click on an icon to play back
previous video file.
Notes
Do not expose the audio device to extreme en‐
vironmental conditions, such as very high tem‐
Seite 184EntertainmentCD/multimedia184
Online Edition for Part no. 01 40 2 914 595 - VI/12
Page 196 of 291
▷Is the ambient temperature too high or low?
Do not expose the mobile phone to extreme
environmental conditions.
The telephone functions are not available.
▷Is the mobile phone paired as an additional
telephone and is the additional telephone
function deactivated? Activate the function.▷Is an outgoing call not possible? Connect
the mobile phone as a telephone.
No phone book entries or only some phone book
entries are displayed, or they are incomplete.
▷Transmission of the phone book entries is
not yet complete.▷It is possible that only the phone book en‐
tries of the mobile phone or the SIM card are
transmitted.▷It may not be possible to display phone book
entries with special characters.▷The number of phone book entries to be
stored is too high.▷Is the data volume of the contact too large,
e. g., due to stored information such as
notes? Reduce the data volume of the con‐
tact.▷Is the mobile phone connected as an audio
source or additional telephone? The mobile
phone must be connected as a telephone.
The phone connection quality is poor.
▷The strength of the Bluetooth signal on the
mobile phone can be adjusted, depending
on the mobile phone.▷Insert the mobile phone into the snap-in
adapter or place it in the area of the center
console.▷Adjust the volume of the microphone and
loudspeakers separately.
If all points in this list have been checked and the
required function is still not available, contact
Customer Relations or the service center.
Controls
Adjusting the volume
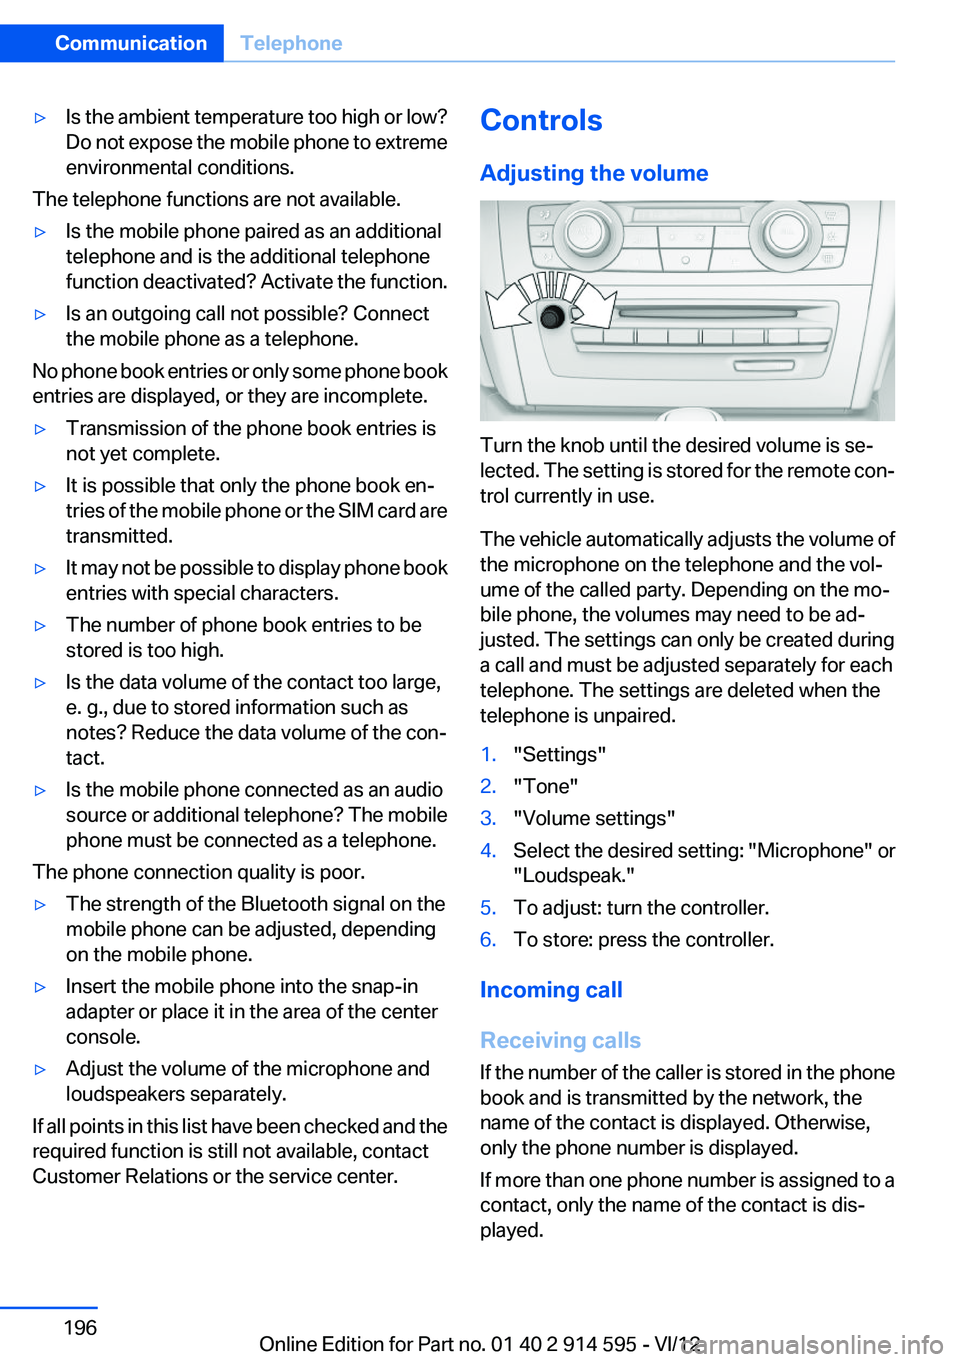
Turn the knob until the desired volume is se‐
lected. The setting is stored for the remote con‐
trol currently in use.
The vehicle automatically adjusts the volume of
the microphone on the telephone and the vol‐
ume of the called party. Depending on the mo‐
bile phone, the volumes may need to be ad‐
justed. The settings can only be created during
a call and must be adjusted separately for each
telephone. The settings are deleted when the
telephone is unpaired.
1."Settings"2."Tone"3."Volume settings"4.Select the desired setting: "Microphone" or
"Loudspeak."5.To adjust: turn the controller.6.To store: press the controller.
Incoming call
Receiving calls
If the number of the caller is stored in the phone
book and is transmitted by the network, the
name of the contact is displayed. Otherwise,
only the phone number is displayed.
If more than one phone number is assigned to a
contact, only the name of the contact is dis‐
played.
Seite 196CommunicationTelephone196
Online Edition for Part no. 01 40 2 914 595 - VI/12
Page 215 of 291
ConnectedDriveVehicle equipment
This chapter describes all series equipment as
well as country-specific and special equipment
offered for this model series.Therefore, it also
describes equipment that may not be found in
your vehicle, for instance due to the selected
special equipment or the country version. This
also applies to safety-related functions and sys‐
tems.
BMW Assist
General information
BMW Assist provides you with certain services,
e.g., transmission of the position data of your
vehicle to the BMW Assist Response Center if
an Emergency Request has been initiated.
Many BMW Assist services depend on the indi‐
vidually agreed upon contract.
After your contract has expired, the BMW Assist
system will be deactivated by the BMW Assist
Response Center without your having to visit a
service center. After the BMW Assist system
has been deactivated, no BMW Assist services
will be available. The BMW Assist system can be
reactivated by a service center after you sign a
new contract.
Requirements▷The installed BMW Assist system is logged
in to a wireless communications network.
This network must be capable of transmit‐
ting the services.▷To transmit position data, the vehicle must
be able to determine the current position.▷The BMW Assist service contract was
signed with your service center or with the
BMW Assist Response Center. Enabling
must have been completed.▷BMW Assist is activated.
Services offered
▷Emergency Request: when you press the
SOS button, a connection to the BMW As‐
sist Response Center is established. The
BMW Assist Response Center then speaks
with you and takes further steps to help you.▷Automatic Collision Notification: under cer‐
tain conditions, a connection is established
to the BMW Assist Response Center after a
serious accident. If possible, the BMW As‐
sist Response Center then speaks with you
and takes further steps to help you.▷Enhanced Roadside Assistance: BMW
Roadside Assistance can be contacted if as‐
sistance is needed in the event of a break‐
down. If possible, the vehicle and position
data are transmitted in the process.▷Customer Relations: connection with Cus‐
tomer Relations for information on all as‐
pects of your vehicle.▷TeleService: data on your vehicle's service
status or required inspections are transmit‐
ted to your service center, either automati‐
cally before a service due date or when you
request a BMW service appointment.▷Remote Door Unlock: the BMW Assist Re‐
sponse Center provides assistance if, for ex‐
ample, the remote control is not available
and the vehicle needs to be opened.▷Stolen Vehicle Recovery: after you report
that your vehicle was stolen to the police, the
BMW Assist Response Center can deter‐
mine its position.▷In addition to these services, the optional
Convenience Plan offers Concierge service
and information for route planning, traffic,
and weather. A limited number of calls can
be made via the BMW Assist Response
Center with Critical Calling if, for example,Seite 215ConnectedDriveCommunication215
Online Edition for Part no. 01 40 2 914 595 - VI/12
Page 217 of 291
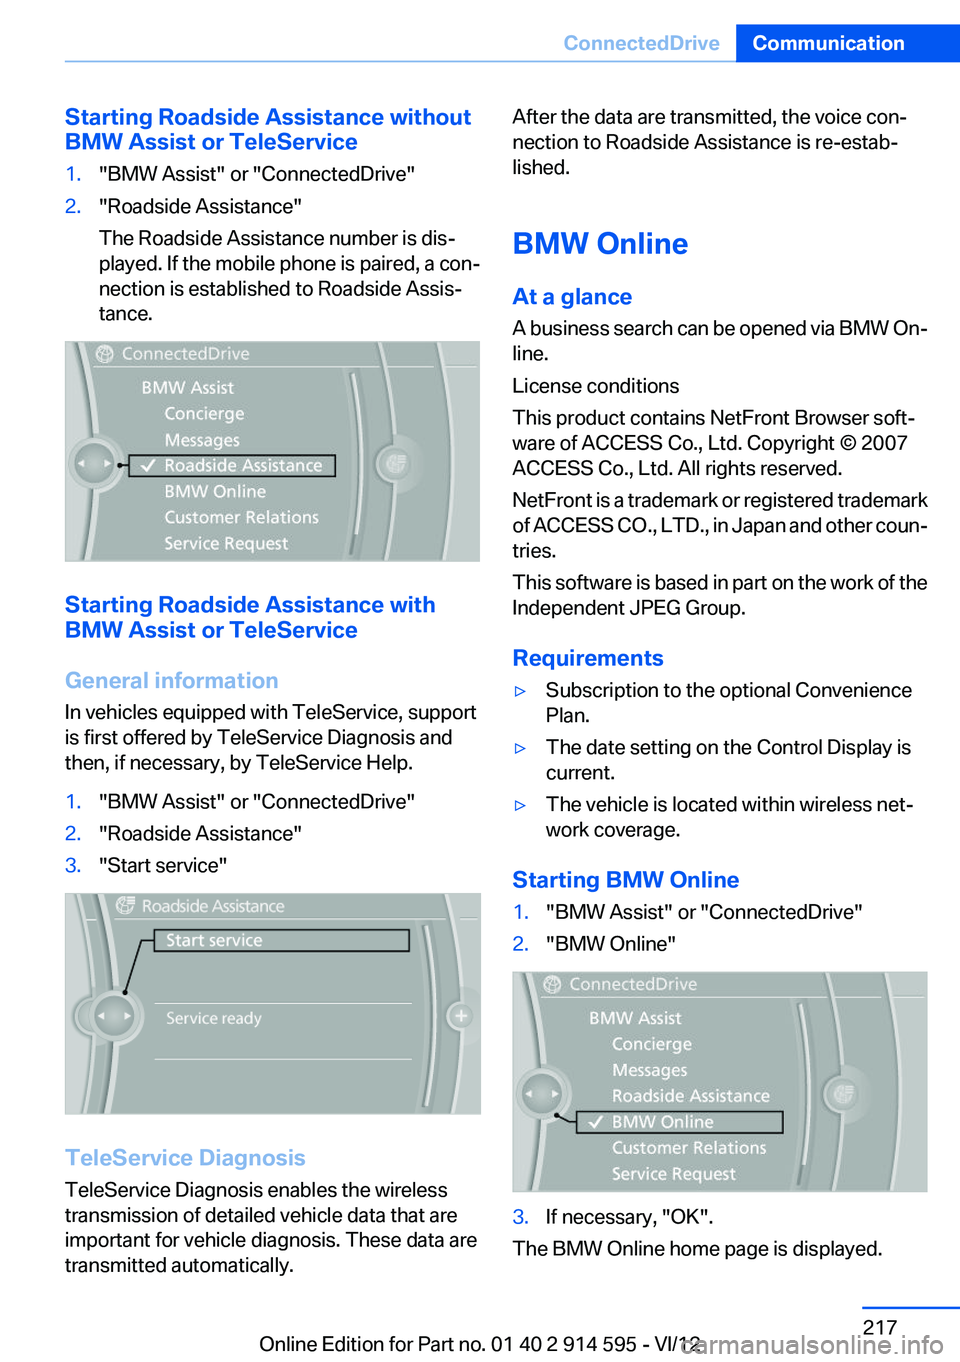
Starting Roadside Assistance without
BMW Assist or TeleService1."BMW Assist" or "ConnectedDrive"2."Roadside Assistance"
The Roadside Assistance number is dis‐
played. If the mobile phone is paired, a con‐
nection is established to Roadside Assis‐
tance.
Starting Roadside Assistance with
BMW Assist or TeleService
General information
In vehicles equipped with TeleService, support
is first offered by TeleService Diagnosis and
then, if necessary, by TeleService Help.
1."BMW Assist" or "ConnectedDrive"2."Roadside Assistance"3."Start service"
TeleService Diagnosis
TeleService Diagnosis enables the wireless
transmission of detailed vehicle data that are
important for vehicle diagnosis. These data are
transmitted automatically.
After the data are transmitted, the voice con‐
nection to Roadside Assistance is re-estab‐
lished.
BMW Online
At a glance
A business search can be opened via BMW On‐
line.
License conditions
This product contains NetFront Browser soft‐
ware of ACCESS Co., Ltd. Copyright © 2007
ACCESS Co., Ltd. All rights reserved.
NetFront is a trademark or registered trademark
of ACCESS CO., LTD., in Japan and other coun‐
tries.
This software is based in part on the work of the
Independent JPEG Group.
Requirements▷Subscription to the optional Convenience
Plan.▷The date setting on the Control Display is
current.▷The vehicle is located within wireless net‐
work coverage.
Starting BMW Online
1."BMW Assist" or "ConnectedDrive"2."BMW Online"3.If necessary, "OK".
The BMW Online home page is displayed.
Seite 217ConnectedDriveCommunication217
Online Edition for Part no. 01 40 2 914 595 - VI/12
Page 256 of 291
sponding engine or body ground of the ve‐
hicle to be started.
Starting the engine
Never use spray fluids to start the engine.
1.Start the engine of the assisting vehicle and
let it run for several minutes at an increased
idle speed.
If the vehicle being started has a diesel en‐
gine: let the engine of the assisting vehicle
run for approx. 10 minutes.2.Start the engine of the vehicle being started
in the usual way.
If the first starting attempt is not successful,
wait a few minutes before making another
attempt in order to allow the discharged bat‐
tery to recharge.3.Let both engines run for several minutes.4.Disconnect the jumper cables in the reverse
order.
Check the battery and recharge if necessary.
Tow-starting and towing Observe applicable laws and regulations
Observe applicable laws and regulations
for tow-starting and towing.◀
No additional passengers
Do not transport any passengers other
than the driver in a vehicle that is being towed. ◀
Automatic transmission, 8-gear:
transporting your vehicle
Note
Your vehicle is not permitted to be towed.
Therefore, contact a service center in the event
of a breakdown.
Do not have the vehicle towed
Have your vehicle transported on a loading
platform only; otherwise, damage may occur.◀
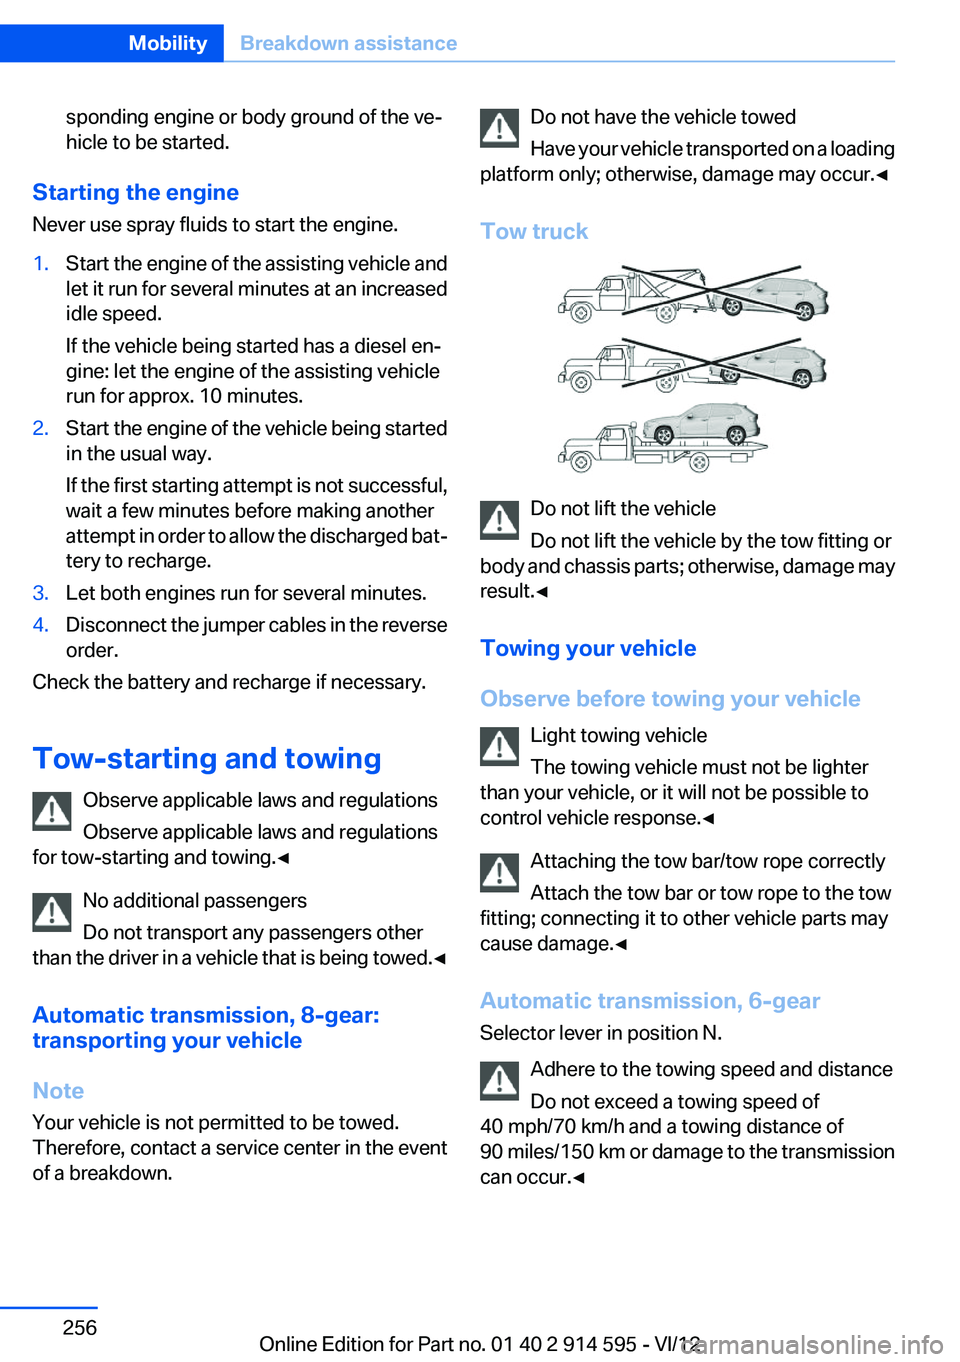
Tow truck
Do not lift the vehicle
Do not lift the vehicle by the tow fitting or
body and chassis parts; otherwise, damage may
result.◀
Towing your vehicle
Observe before towing your vehicle Light towing vehicle
The towing vehicle must not be lighter
than your vehicle, or it will not be possible to
control vehicle response.◀
Attaching the tow bar/tow rope correctly
Attach the tow bar or tow rope to the tow
fitting; connecting it to other vehicle parts may
cause damage.◀
Automatic transmission, 6-gear
Selector lever in position N.
Adhere to the towing speed and distance
Do not exceed a towing speed of
40 mph/70 km/h and a towing distance of
90 miles/150 km or damage to the transmission
can occur.◀
Seite 256MobilityBreakdown assistance256
Online Edition for Part no. 01 40 2 914 595 - VI/12
Page 257 of 291
Being towedFollow the towing instructions
Follow all towing instructions, or vehicle
damage or accidents may occur.◀▷Make sure that the ignition is switched on;
otherwise, the low beams, tail lamps, turn
signals, and windshield wipers may be un‐
available.▷Do not tow the vehicle with the rear axle
tilted, as the front wheels could turn.▷When the engine is stopped, there is no
power assist. Consequently, more force
needs to be applied when braking and steer‐
ing.▷Larger steering wheel movements are re‐
quired.▷Switch on the hazard warning system, de‐
pending on local regulations.▷If the electrical system has failed, clearly
identify the vehicle being towed by placing
a sign or a warning triangle in the rear win‐
dow.
Towing other vehicles
General information Light towing vehicle
Your vehicle must not be lighter than the
vehicle being towed; otherwise, it will not be
possible to control vehicle response.◀
Attaching the tow bar/tow rope correctly
Attach the tow bar or tow rope to the tow
fitting; connecting it to other vehicle parts may
cause damage.◀
▷Switch on the hazard warning system, de‐
pending on local regulations.▷If the electrical system has failed, clearly
identify the vehicle being towed by placing
a sign or a warning triangle in the rear win‐
dow.Towing methods
Do not lift the vehicle
Do not lift the vehicle by the tow fitting or
body and chassis parts; otherwise, damage may
result.◀
Tow bar
The tow fittings used should be on the same
side on both vehicles.
Should it prove impossible to avoid mounting
the tow bar at an offset angle, please observe
the following:▷Clearance and maneuvering capability will
be sharply limited during cornering.▷The tow bar will generate lateral forces if it
is attached offset.
Tow rope
When starting to tow the vehicle, make sure that
the tow rope is taut.
To avoid jerking and the associated stresses on
the vehicle components when towing, always
use nylon ropes or nylon straps.
Attaching the tow rope correctly
Only secure the tow rope on the tow fit‐
ting; otherwise, damage can occur when it is se‐
cured on other parts of the vehicle.◀
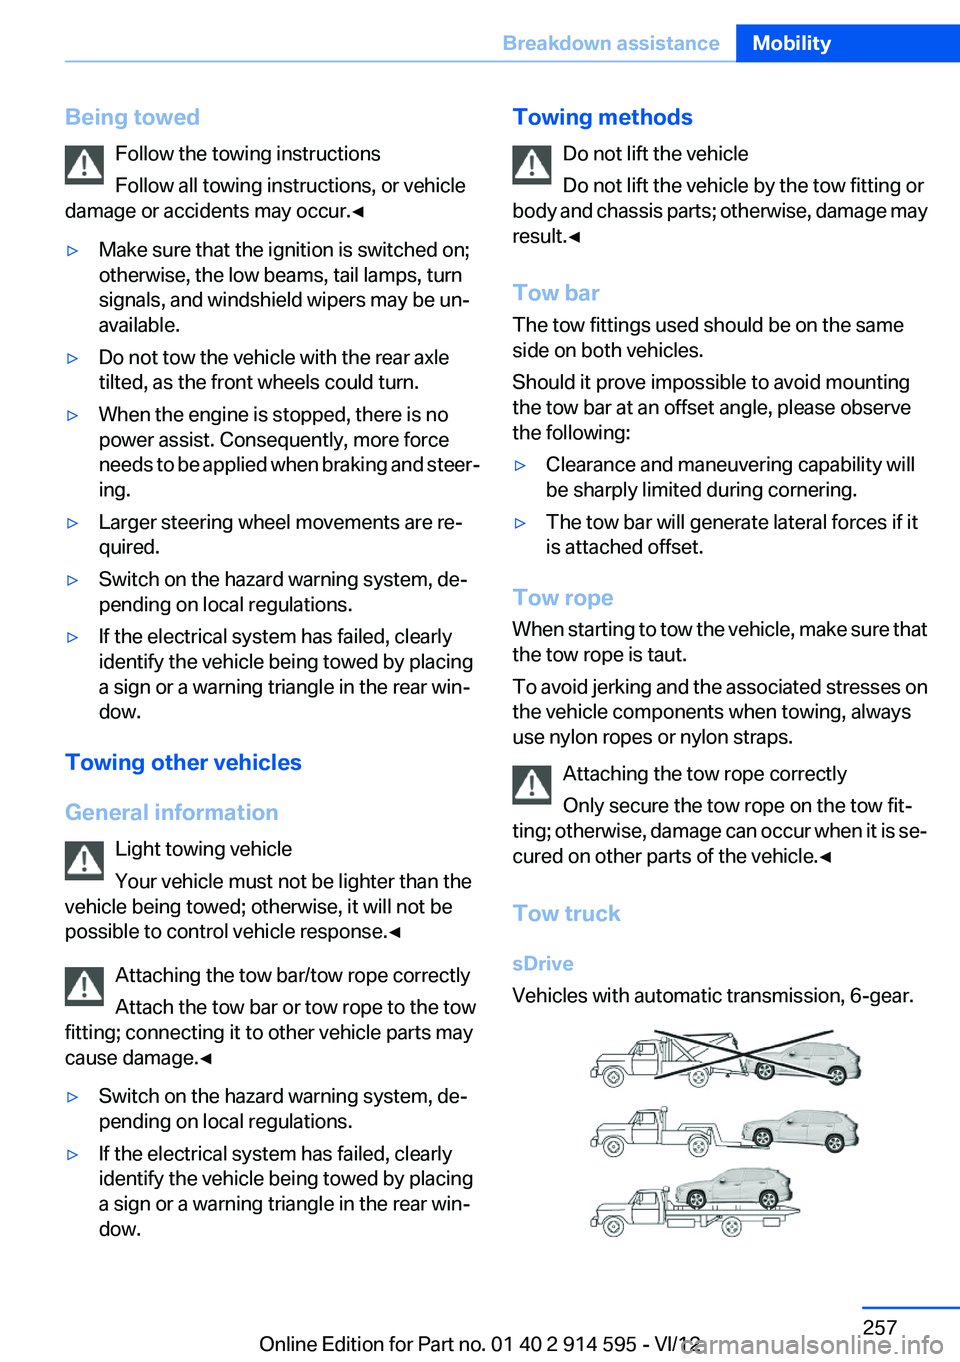
Tow truck
sDrive
Vehicles with automatic transmission, 6-gear.
Seite 257Breakdown assistanceMobility257
Online Edition for Part no. 01 40 2 914 595 - VI/12
Page 258 of 291
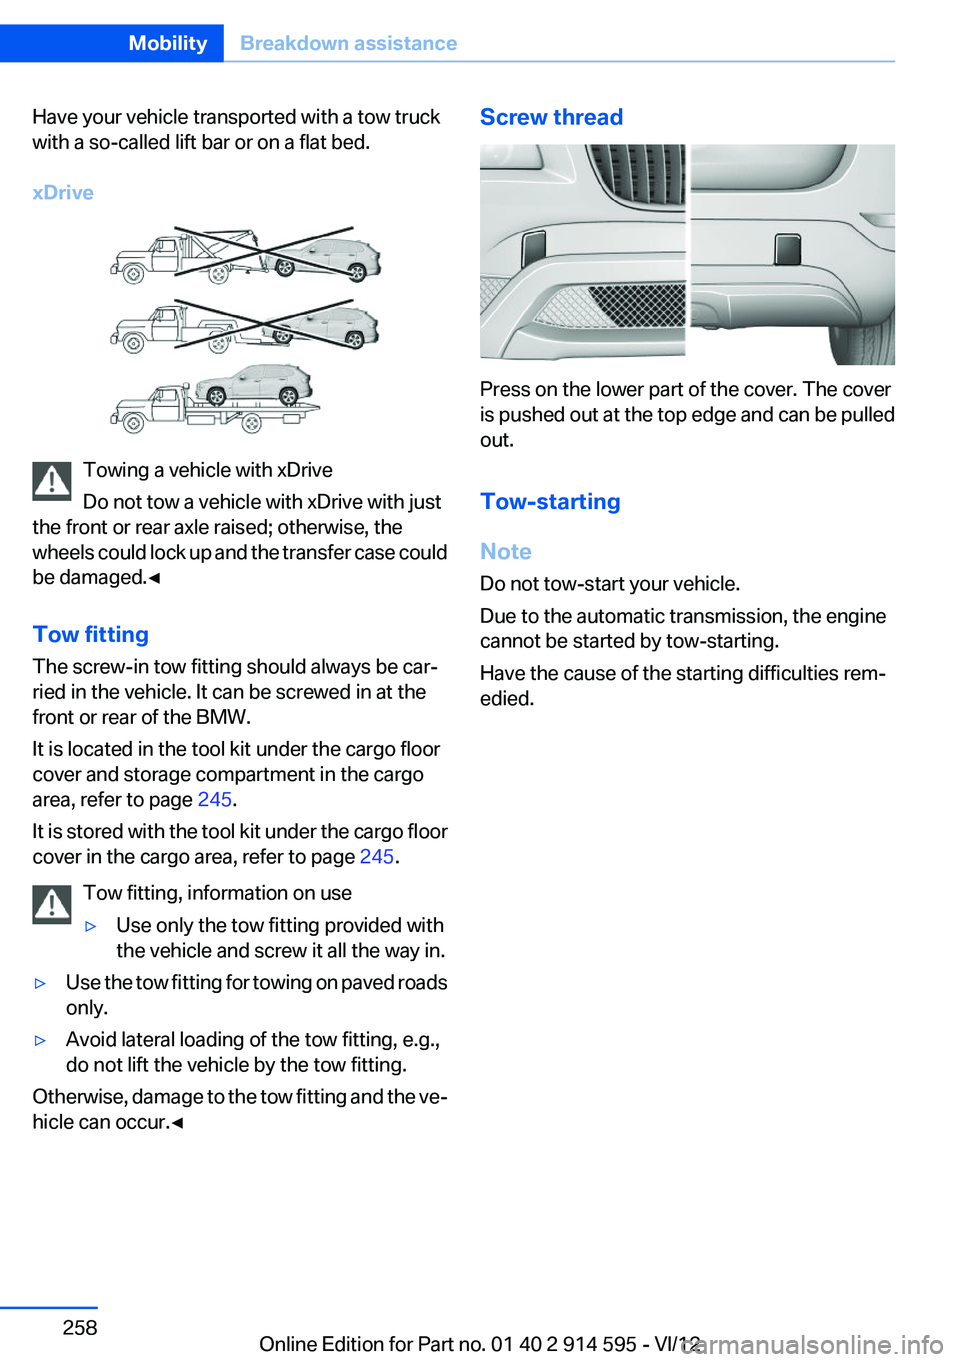
Have your vehicle transported with a tow truck
with a so-called lift bar or on a flat bed.
xDrive
Towing a vehicle with xDrive
Do not tow a vehicle with xDrive with just
the front or rear axle raised; otherwise, the
wheels could lock up and the transfer case could
be damaged.◀
Tow fitting
The screw-in tow fitting should always be car‐
ried in the vehicle. It can be screwed in at the
front or rear of the BMW.
It is located in the tool kit under the cargo floor
cover and storage compartment in the cargo
area, refer to page 245.
It is stored with the tool kit under the cargo floor
cover in the cargo area, refer to page 245.
Tow fitting, information on use
▷Use only the tow fitting provided with
the vehicle and screw it all the way in.▷Use the tow fitting for towing on paved roads
only.▷Avoid lateral loading of the tow fitting, e.g.,
do not lift the vehicle by the tow fitting.
Otherwise, damage to the tow fitting and the ve‐
hicle can occur.◀
Screw thread
Press on the lower part of the cover. The cover
is pushed out at the top edge and can be pulled
out.
Tow-starting
Note
Do not tow-start your vehicle.
Due to the automatic transmission, the engine
cannot be started by tow-starting.
Have the cause of the starting difficulties rem‐
edied.
Seite 258MobilityBreakdown assistance258
Online Edition for Part no. 01 40 2 914 595 - VI/12
Page 259 of 291
CareVehicle equipment
This chapter describes all series equipment as
well as country-specific and special equipment
offered for this model series.Therefore, it also
describes equipment that may not be found in
your vehicle, for instance due to the selected
special equipment or the country version. This
also applies to safety-related functions and sys‐
tems.
Car washes
Notes Steam jets or high-pressure washers
When using steam jets or high-pressure
washers, hold them a sufficient distance away
and use a maximum temperature of
140 ℉/60 ℃.
Holding them too close or using excessively
high pressures or temperatures can cause dam‐
age or preliminary damage that may then lead to
long-term damage.
Follow the operating instructions for the high-
pressure washer.◀
Cleaning sensors/cameras with high-
pressure washers
When using high-pressure washers, do not
spray the exterior sensors and cameras, for Park
Distance Control or the backup camera, for in‐
stance, for extended periods of time and only
from a distance of at least 12 in/30 cm.◀
Wash your vehicle frequently, particularly in win‐
ter.
Intense soiling and road salt can damage the ve‐
hicle.Washing in automatic car washes
Give preference to cloth car washes or those
that use soft brushes in order to avoid paint
damage.
Notes
Note the following:▷Make sure that the wheels and tires are not
damaged by the transport mechanisms.▷Fold in the exterior mirrors; otherwise, they
may be damaged, depending on the width of
the vehicle.▷Deactivate the rain sensor, refer to page 60,
to avoid unintentional wiper activation.▷Move the rear window wiper to its resting
position, deactivate it, and protect it against
damage. Ask the car wash operator about
any necessary protective measures.▷Remove additional attachments, for in‐
stance a spoiler or telephone antenna, if
there is a risk that these may be damaged.
Guide rails in car washes
Avoid car washes with guide rails higher
than 4 in/10 cm; otherwise, the vehicle body
could be damaged.◀
Before driving into a car wash
The vehicle is able to roll if the following steps
are taken.
Automatic transmission
1.Insert the remote control into the ignition
lock, even with Comfort Access.2.Engage the selector lever or transmission
position N.3.Release the handbrake, refer to page 58.4.Switch the engine off.5.Leave the remote control in the ignition lock
so that the vehicle can roll.Seite 259CareMobility259
Online Edition for Part no. 01 40 2 914 595 - VI/12