2013 BMW X1 XDRIVE 28I lock
[x] Cancel search: lockPage 250 of 291
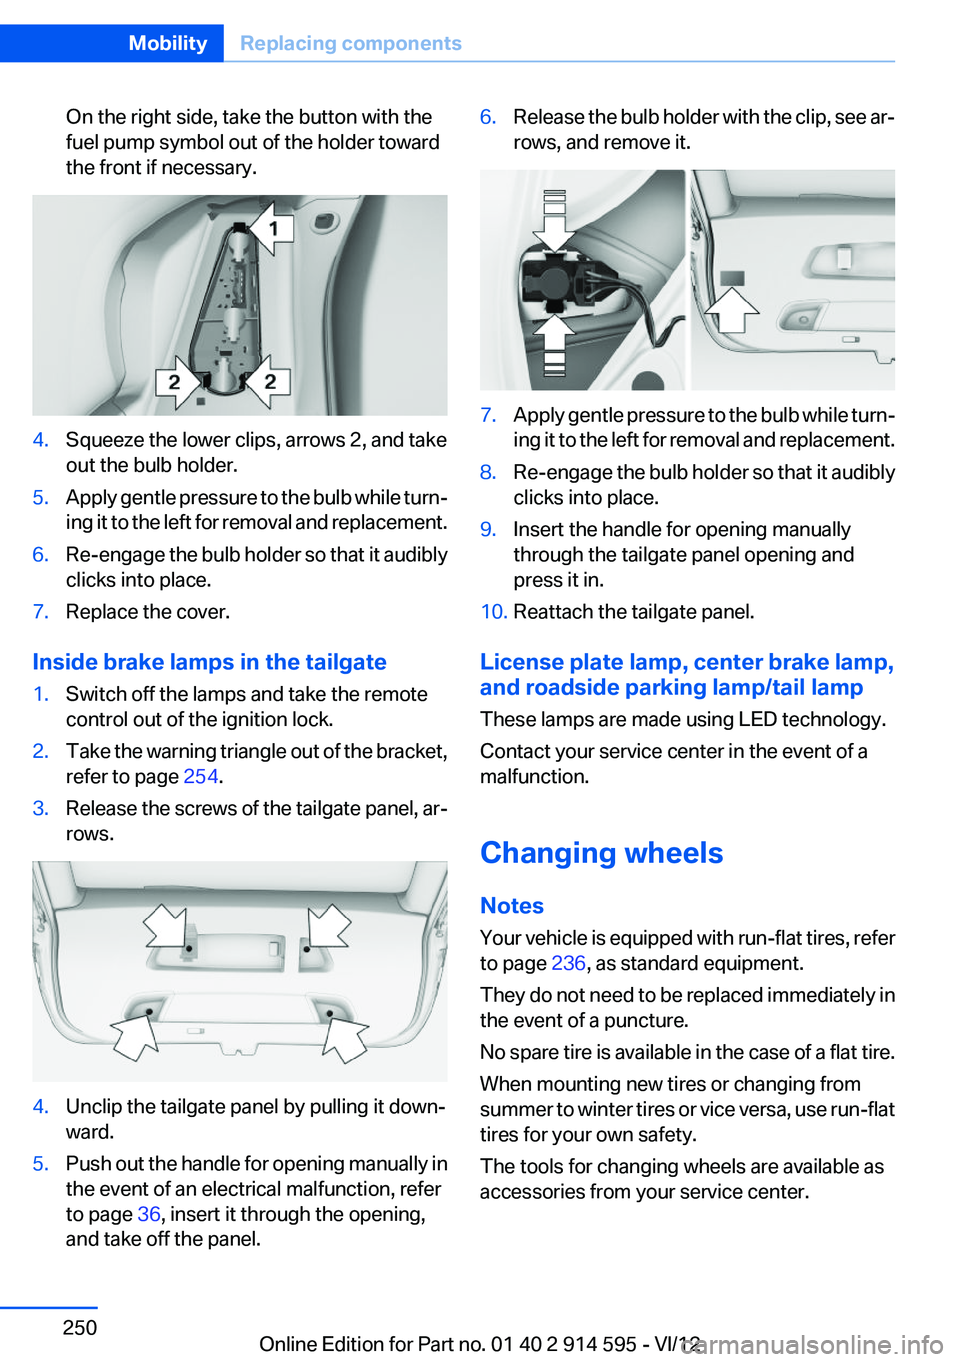
On the right side, take the button with the
fuel pump symbol out of the holder toward
the front if necessary.4.Squeeze the lower clips, arrows 2, and take
out the bulb holder.5.Apply gentle pressure to the bulb while turn‐
ing it to the left for removal and replacement.6.Re-engage the bulb holder so that it audibly
clicks into place.7.Replace the cover.
Inside brake lamps in the tailgate
1.Switch off the lamps and take the remote
control out of the ignition lock.2.Take the warning triangle out of the bracket,
refer to page 254.3.Release the screws of the tailgate panel, ar‐
rows.4.Unclip the tailgate panel by pulling it down‐
ward.5.Push out the handle for opening manually in
the event of an electrical malfunction, refer
to page 36, insert it through the opening,
and take off the panel.6.Release the bulb holder with the clip, see ar‐
rows, and remove it.7.Apply gentle pressure to the bulb while turn‐
ing it to the left for removal and replacement.8.Re-engage the bulb holder so that it audibly
clicks into place.9.Insert the handle for opening manually
through the tailgate panel opening and
press it in.10.Reattach the tailgate panel.
License plate lamp, center brake lamp,
and roadside parking lamp/tail lamp
These lamps are made using LED technology.
Contact your service center in the event of a
malfunction.
Changing wheels
Notes
Your vehicle is equipped with run-flat tires, refer
to page 236, as standard equipment.
They do not need to be replaced immediately in
the event of a puncture.
No spare tire is available in the case of a flat tire.
When mounting new tires or changing from
summer to winter tires or vice versa, use run-flat
tires for your own safety.
The tools for changing wheels are available as
accessories from your service center.
Seite 250MobilityReplacing components250
Online Edition for Part no. 01 40 2 914 595 - VI/12
Page 252 of 291
Maintain the battery in an upright position for
transport and storage. Secure the battery so
that it does not tip over during transport.
Fuses Replacing fuses
Never attempt to repair a blown fuse and
do not replace a defective fuse with a substitute
of another color or amperage rating; this could
lead to a circuit overload, ultimately resulting in
a fire in the vehicle.◀
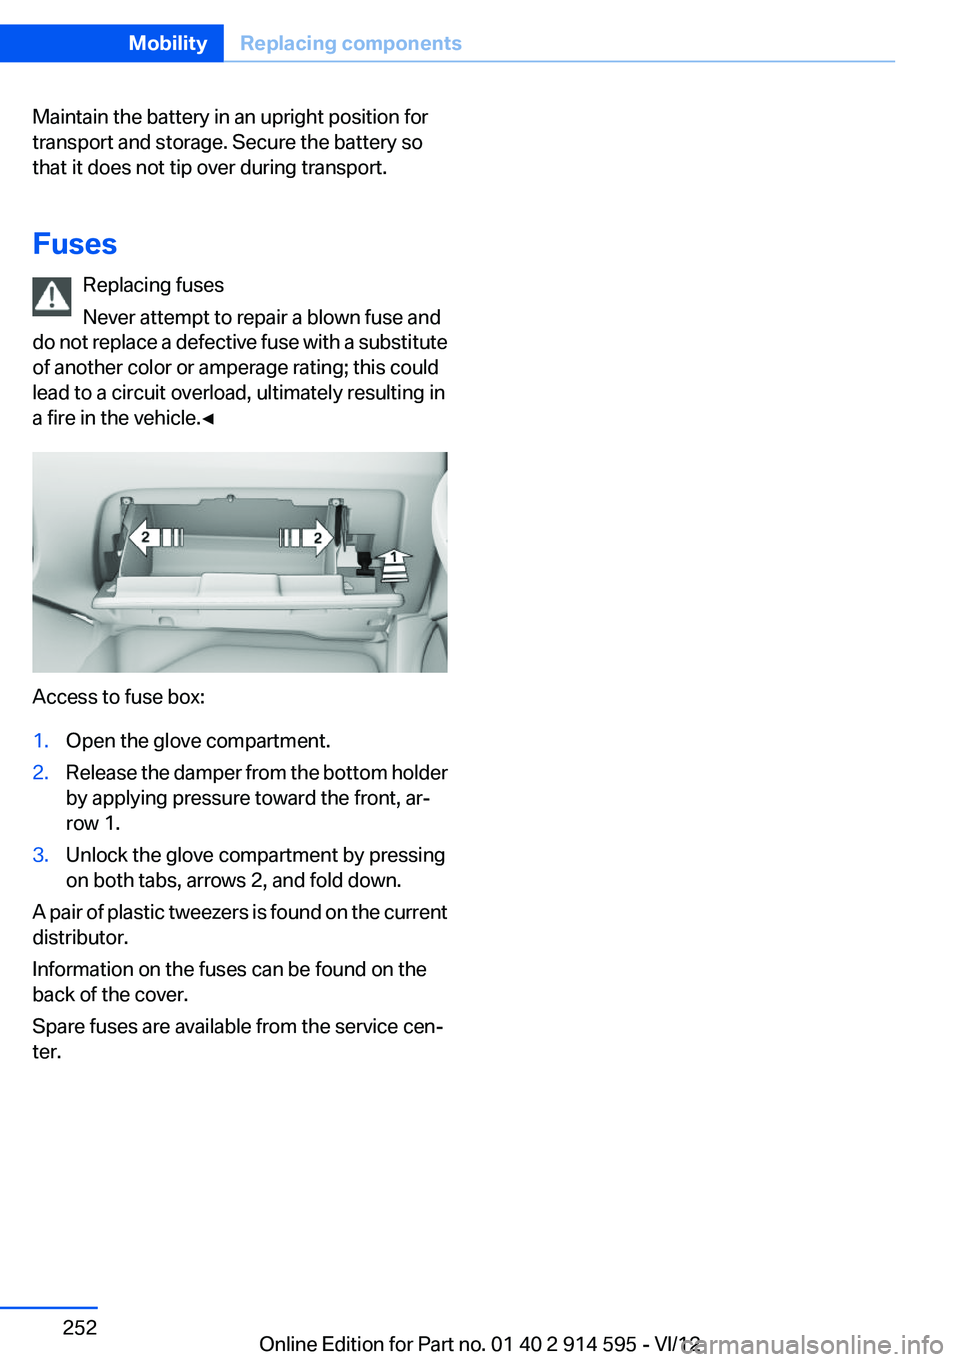
Access to fuse box:
1.Open the glove compartment.2.Release the damper from the bottom holder
by applying pressure toward the front, ar‐
row 1.3.Unlock the glove compartment by pressing
on both tabs, arrows 2, and fold down.
A pair of plastic tweezers is found on the current
distributor.
Information on the fuses can be found on the
back of the cover.
Spare fuses are available from the service cen‐
ter.
Seite 252MobilityReplacing components252
Online Edition for Part no. 01 40 2 914 595 - VI/12
Page 254 of 291
▷The LED lights up: an Emergency Request
was initiated.
If the circumstances allow this, remain in the
vehicle until the connection has been estab‐
lished.▷The LED flashes if the connection to the
BMW Assist Response Center has been es‐
tablished.
Once the BMW Assist Response Center has
received your Emergency Request, the
BMW Assist Response Center contacts you
and takes further steps to help you.
Even if you are unable to respond, the BMW
Assist Response Center can take further
steps to help you under certain circumstan‐
ces.
For this purpose, data that are used to de‐
termine the necessary rescue measures,
such as the current position of the vehicle if
it can be established, are transmitted to the
BMW Assist Response Center.▷If the LED is flashing but the BMW Assist
Response Center cannot be heard on the
hands-free system, the hands-free system
may be malfunctioning. However, the BMW
Assist Response Center may still be able to
hear you.
Initiating an Emergency Request
automatically
Under certain conditions, an Emergency Re‐
quest is automatically initiated immediately after
a severe accident. Automatic Collision Notifica‐
tion is not affected by pressing the SOS button.
Roadside Assistance
Service availability
Roadside Assistance can be reached around the
clock in many countries. You can obtain assis‐
tance there in the event of a vehicle breakdown.
Roadside Assistance
The Roadside Assistance, refer to page 216,
phone number can be viewed on the iDrive or a
connection to Roadside Assistance can be es‐
tablished directly.
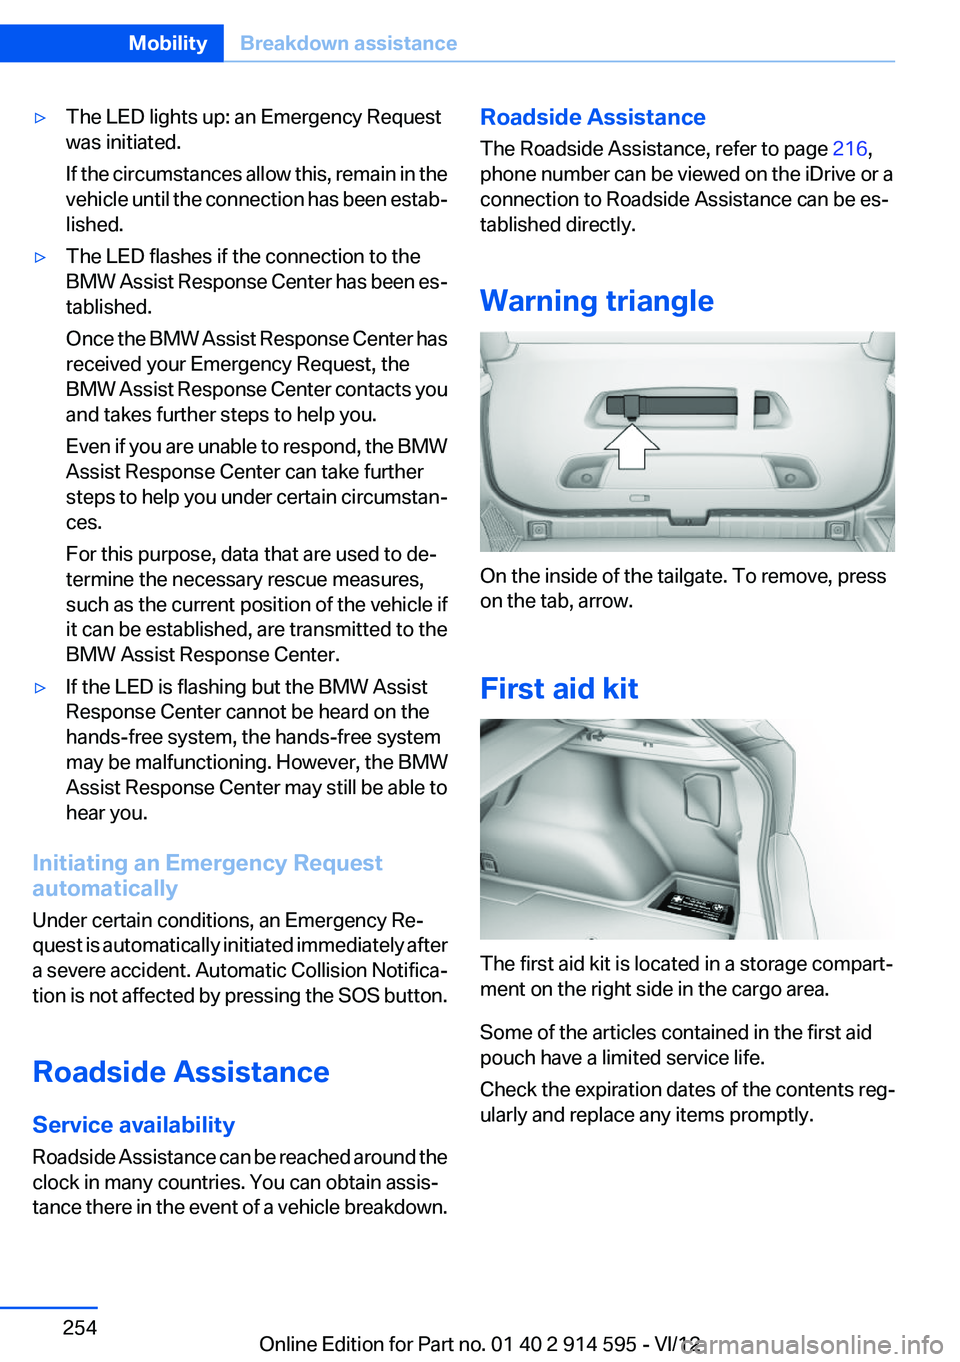
Warning triangle
On the inside of the tailgate. To remove, press
on the tab, arrow.
First aid kit
The first aid kit is located in a storage compart‐
ment on the right side in the cargo area.
Some of the articles contained in the first aid
pouch have a limited service life.
Check the expiration dates of the contents reg‐
ularly and replace any items promptly.
Seite 254MobilityBreakdown assistance254
Online Edition for Part no. 01 40 2 914 595 - VI/12
Page 258 of 291
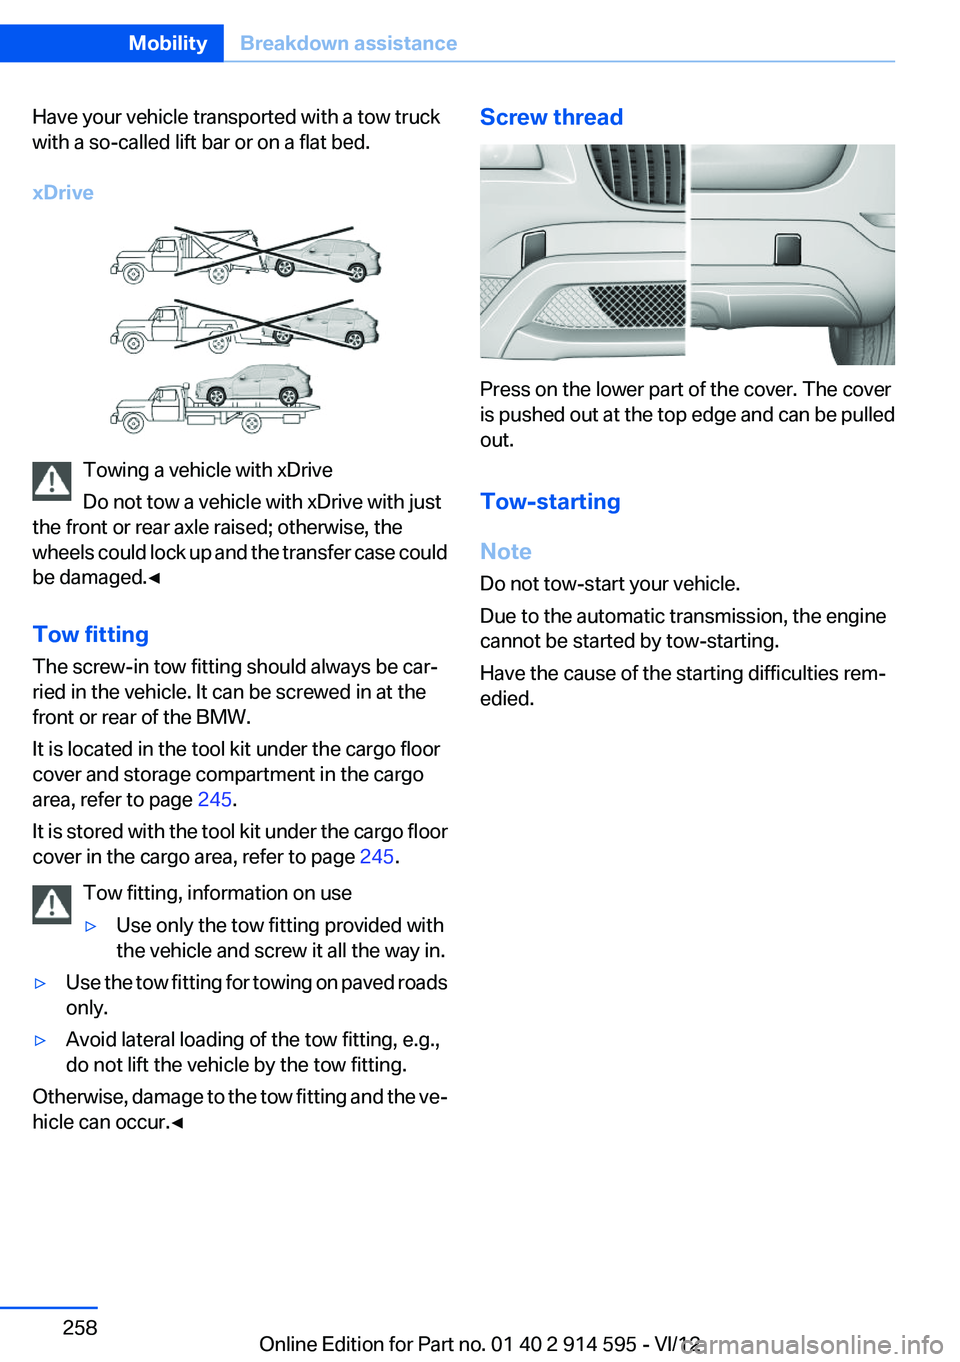
Have your vehicle transported with a tow truck
with a so-called lift bar or on a flat bed.
xDrive
Towing a vehicle with xDrive
Do not tow a vehicle with xDrive with just
the front or rear axle raised; otherwise, the
wheels could lock up and the transfer case could
be damaged.◀
Tow fitting
The screw-in tow fitting should always be car‐
ried in the vehicle. It can be screwed in at the
front or rear of the BMW.
It is located in the tool kit under the cargo floor
cover and storage compartment in the cargo
area, refer to page 245.
It is stored with the tool kit under the cargo floor
cover in the cargo area, refer to page 245.
Tow fitting, information on use
▷Use only the tow fitting provided with
the vehicle and screw it all the way in.▷Use the tow fitting for towing on paved roads
only.▷Avoid lateral loading of the tow fitting, e.g.,
do not lift the vehicle by the tow fitting.
Otherwise, damage to the tow fitting and the ve‐
hicle can occur.◀
Screw thread
Press on the lower part of the cover. The cover
is pushed out at the top edge and can be pulled
out.
Tow-starting
Note
Do not tow-start your vehicle.
Due to the automatic transmission, the engine
cannot be started by tow-starting.
Have the cause of the starting difficulties rem‐
edied.
Seite 258MobilityBreakdown assistance258
Online Edition for Part no. 01 40 2 914 595 - VI/12
Page 259 of 291

CareVehicle equipment
This chapter describes all series equipment as
well as country-specific and special equipment
offered for this model series.Therefore, it also
describes equipment that may not be found in
your vehicle, for instance due to the selected
special equipment or the country version. This
also applies to safety-related functions and sys‐
tems.
Car washes
Notes Steam jets or high-pressure washers
When using steam jets or high-pressure
washers, hold them a sufficient distance away
and use a maximum temperature of
140 ℉/60 ℃.
Holding them too close or using excessively
high pressures or temperatures can cause dam‐
age or preliminary damage that may then lead to
long-term damage.
Follow the operating instructions for the high-
pressure washer.◀
Cleaning sensors/cameras with high-
pressure washers
When using high-pressure washers, do not
spray the exterior sensors and cameras, for Park
Distance Control or the backup camera, for in‐
stance, for extended periods of time and only
from a distance of at least 12 in/30 cm.◀
Wash your vehicle frequently, particularly in win‐
ter.
Intense soiling and road salt can damage the ve‐
hicle.Washing in automatic car washes
Give preference to cloth car washes or those
that use soft brushes in order to avoid paint
damage.
Notes
Note the following:▷Make sure that the wheels and tires are not
damaged by the transport mechanisms.▷Fold in the exterior mirrors; otherwise, they
may be damaged, depending on the width of
the vehicle.▷Deactivate the rain sensor, refer to page 60,
to avoid unintentional wiper activation.▷Move the rear window wiper to its resting
position, deactivate it, and protect it against
damage. Ask the car wash operator about
any necessary protective measures.▷Remove additional attachments, for in‐
stance a spoiler or telephone antenna, if
there is a risk that these may be damaged.
Guide rails in car washes
Avoid car washes with guide rails higher
than 4 in/10 cm; otherwise, the vehicle body
could be damaged.◀
Before driving into a car wash
The vehicle is able to roll if the following steps
are taken.
Automatic transmission
1.Insert the remote control into the ignition
lock, even with Comfort Access.2.Engage the selector lever or transmission
position N.3.Release the handbrake, refer to page 58.4.Switch the engine off.5.Leave the remote control in the ignition lock
so that the vehicle can roll.Seite 259CareMobility259
Online Edition for Part no. 01 40 2 914 595 - VI/12
Page 260 of 291
In 8-gear automatic transmissions, transmis‐
sion position P is engaged automatically.▷Automatically after approx. 30 minutes.▷When the remote control is removed from
the ignition lock.
Headlamps
▷Do not rub dry and do not use abrasive or
caustic cleansers.▷Soak areas that have been soiled e.g. due to
insects, with shampoo and wash off with
water.▷Thaw ice with de-icing spray; do not use an
ice scraper.
After washing the vehicle
After washing the vehicle, apply the brakes
briefly to dry them; otherwise, braking action can
be reduced and corrosion of the brake discs can
occur.
Fully remove an residue from the windows; oth‐
erwise, streaking may occur when the wind‐
shield wipers are activated, impairing your view
and causing wiper noise.
Vehicle care
Car care products
BMW recommends using cleaning and care
products from BMW, since these have been
tested and approved.
Car care and cleaning products
Follow the instructions on the container.
When cleaning the interior, open the doors or
windows.
Only use products intended for cleaning vehi‐
cles.
Cleansers can contain substances that are dan‐
gerous and harmful to your health.◀
Vehicle paint
Regular care contributes to driving safety and
value retention. Environmental influences in
areas with high air pollution or natural contami‐
nants, such as tree resin or pollen, can have an
impact on the vehicle paint. Tailor the frequency
and extent of your car care to these influences.
Immediately remove aggressive substances,
such as spilled fuel, oil, grease, or bird drop‐
pings, to prevent damage to or discoloration of
the paintwork.
Leather care
Remove dust from the leather often, using a
cloth or vacuum cleaner.
Otherwise, particles of dust and road grime
chafe in pores and folds, and lead to increased
wear and premature degradation of the leather
surface.
To guard against discoloration, such as from
clothing, provide leather care roughly every two
months.
Clean light-colored leather more frequently as
dust and dirt are more noticeable.
Use leather care products; otherwise, dirt and
grease will gradually break down the protective
layer of the leather surface.
Suitable care products are available from the
service center.
Upholstery material care
Vacuum regularly with a vacuum cleaner.
If they are very dirty, e.g., beverage stains, use a
soft sponge or microfiber cloth with a suitable
interior cleaner.
Clean the upholstery down to the seams using
large sweeping motions. Avoid rubbing the ma‐
terial vigorously.
Damage from Velcro® fasteners
Open Velcro® fasteners on pants or other
articles of clothing can damage the seat covers.
Ensure that any Velcro® fasteners are closed. ◀Seite 260MobilityCare260
Online Edition for Part no. 01 40 2 914 595 - VI/12
Page 268 of 291
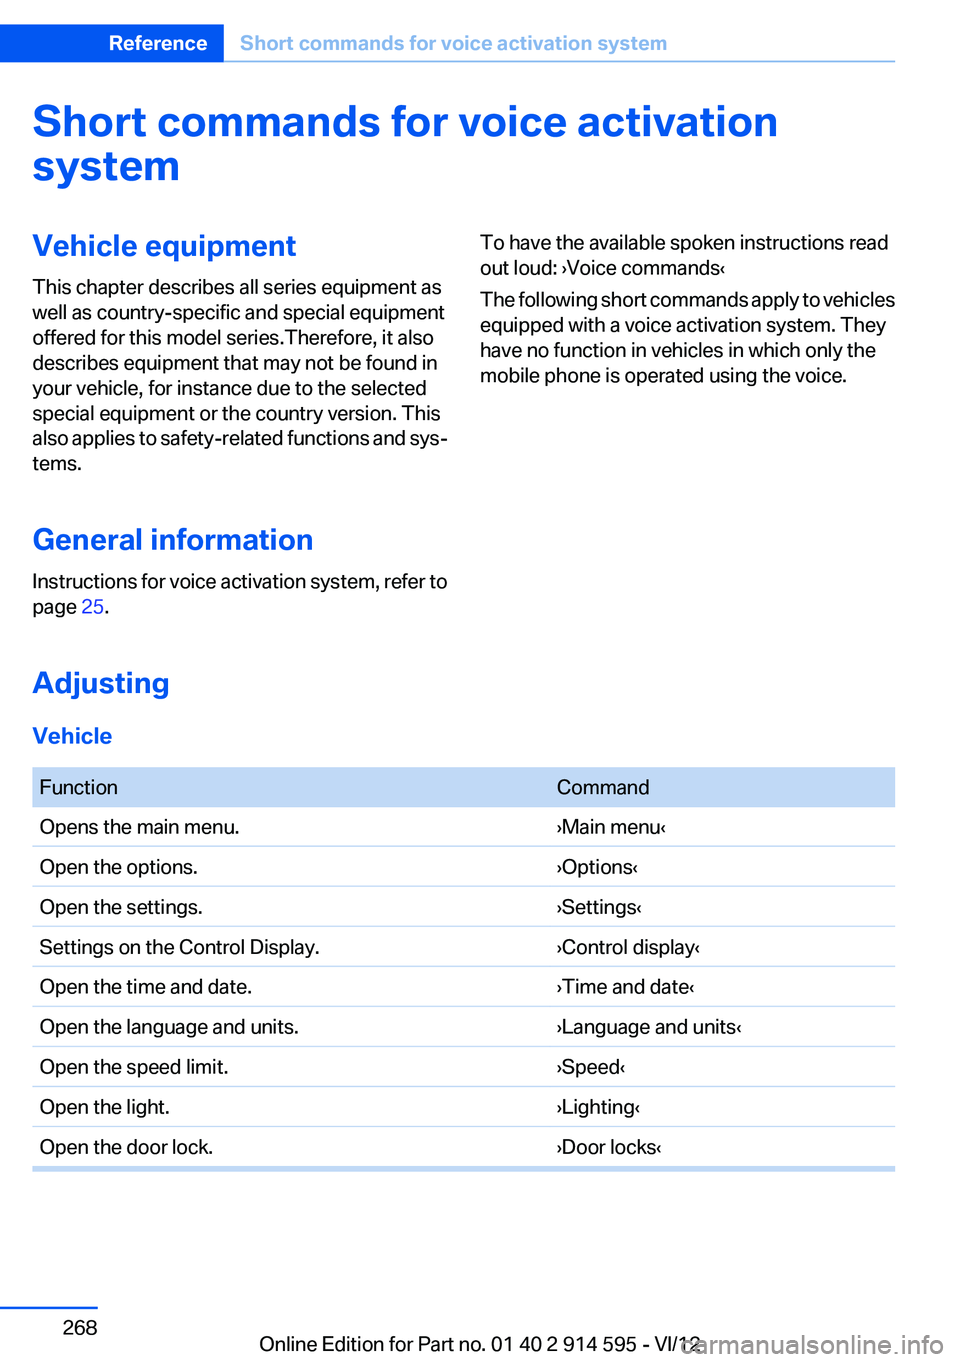
Short commands for voice activation
systemVehicle equipment
This chapter describes all series equipment as
well as country-specific and special equipment
offered for this model series.Therefore, it also
describes equipment that may not be found in
your vehicle, for instance due to the selected
special equipment or the country version. This
also applies to safety-related functions and sys‐
tems.
General information
Instructions for voice activation system, refer to
page 25.To have the available spoken instructions read
out loud: ›Voice commands‹
The following short commands apply to vehicles
equipped with a voice activation system. They
have no function in vehicles in which only the
mobile phone is operated using the voice.
Adjusting
Vehicle
FunctionCommandOpens the main menu.›Main menu‹Open the options.›Options‹Open the settings.›Settings‹Settings on the Control Display.›Control display‹Open the time and date.›Time and date‹Open the language and units.›Language and units‹Open the speed limit.›Speed‹Open the light.›Lighting‹Open the door lock.›Door locks‹Seite 268ReferenceShort commands for voice activation system268
Online Edition for Part no. 01 40 2 914 595 - VI/12
Page 276 of 291

Everything from A to Z
IndexA
ABS, Antilock Brake Sys‐ tem 94
Accident, refer to Emergency Request, initiating 253
Acoustic signal, refer to Check Control 77
Activated charcoal filter with automatic climate con‐
trol 108
Adaptive brake lights, refer to Brake force display 93
Adaptive light control 81
Additional telephone 192
Additives, coolant 242
Additives, engine oil 241
After washing vehicle 260
Airbags 85
Airbags, indicator/warning light 88
Air circulation, refer to Recir‐ culated air mode 107
Air conditioning mode– Automatic climate con‐
trol 105– Ventilation 108
Air distribution
– Automatic 106– Manual 106
Air drying, refer to Cooling
function 107
Air flow rate 106
Airing, refer to Ventilation 108
Air pressure, refer to Tire infla‐ tion pressure 228
Air supply
– Automatic climate con‐
trol 105– Ventilation 108
Air vents
– Refer to Ventilation 108Alarm system 38
Alarm system– Avoiding unintentional
alarms 39– Ending an alarm 39– Interior motion sensor 39– Tilt alarm sensor 39
All around the headliner 17
ALL program 107
All-season tires, refer to Win‐ ter tires 236
All-wheel drive, refer to
xDrive 96
Alternating-code hand-held transmitter 111
AM/FM station 162
Announcement, navigation, refer to Spoken instruc‐
tions 151
Antifreeze, coolant 242
Antifreeze, washer fluid 61
Antilock Brake System, ABS 94
Anti-slip control, refer to Dy‐ namic Stability Control
DSC 94
Anti-theft protection 32
Appointments 209
Approved axle loads, refer to Weights 267
Approved engine oils 241
Approved gross vehicle weight, refer to Weights 267
Armrest, refer to Center arm‐ rest 120
Arrival time, refer to Com‐ puter 70
Ashtray 114
Assist 215
Assistance, Roadside Assis‐ tance 254
Assistance with driving off, re‐
fer to Drive-off assistant 97
Assistance with starting en‐ gine, refer to Jump-start‐
ing 255
Audio device, external 121
Audio playback 171
Audio playback, Blue‐ tooth 185
Automatic– Air distribution 106– Air flow rate 106
Automatic car wash 259
Automatic climate control
– Automatic air distribu‐
tion 106
Automatic, cruise control 98
Automatic Curb Monitor 48
Automatic Engine Start/Stop Function 56
Automatic headlamp con‐ trol 80, 81
Automatic recirculated air control 107
Automatic transmission with Steptronic 62, 64
Automatic transmission with
Steptronic
– Interlock 62– Kickdown 63, 64– Overriding selector lever
lock 64
AUTO program with automatic
climate control 106
AUX-IN port 121, 181
Average fuel consumption 70
Average fuel consumption
– Setting the units 72
Average speed 70
Average speed, refer to Com‐ puter 70
Seite 276ReferenceEverything from A to Z276
Online Edition for Part no. 01 40 2 914 595 - VI/12