2013 BMW X1 XDRIVE 28I CD player
[x] Cancel search: CD playerPage 22 of 291
6.Turn the controller to set the hours and
press the controller.7.Turn the controller to set the minutes and
press the controller.
Status information
Status field
The following information is displayed in the sta‐
tus field at the top right:
▷Time.▷Current entertainment source.▷Sound output, on/off.▷Wireless network reception strength.▷Telephone status.▷Traffic bulletin reception.
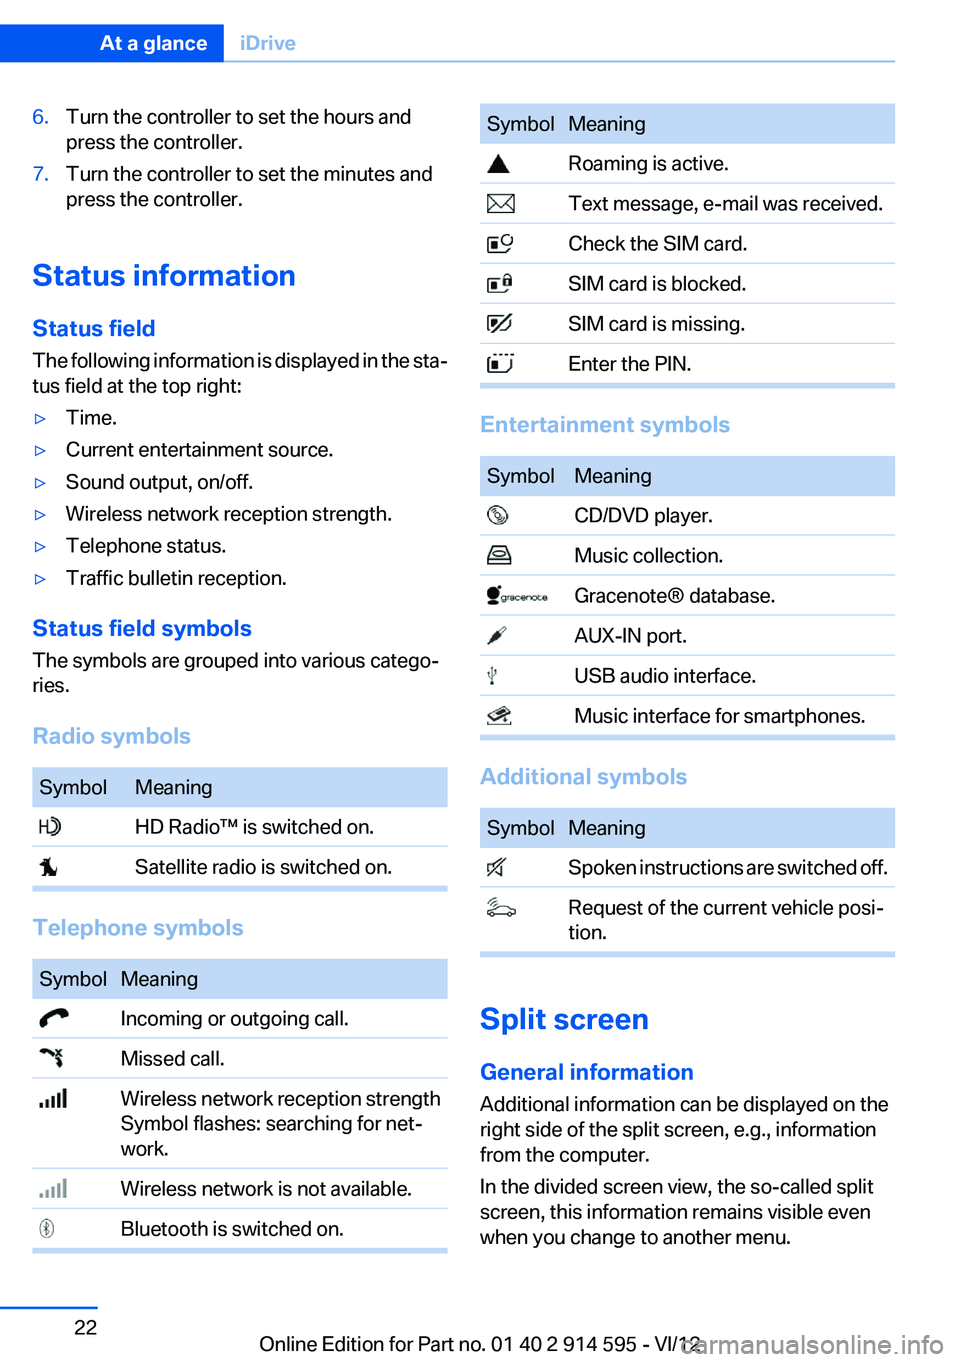
Status field symbols
The symbols are grouped into various catego‐
ries.
Radio symbols
SymbolMeaning HD Radio™ is switched on. Satellite radio is switched on.
Telephone symbols
SymbolMeaning Incoming or outgoing call. Missed call. Wireless network reception strength
Symbol flashes: searching for net‐
work. Wireless network is not available. Bluetooth is switched on.SymbolMeaning Roaming is active. Text message, e-mail was received. Check the SIM card. SIM card is blocked. SIM card is missing. Enter the PIN.
Entertainment symbols
SymbolMeaning CD/DVD player. Music collection. Gracenote® database. AUX-IN port. USB audio interface. Music interface for smartphones.
Additional symbols
SymbolMeaning Spoken instructions are switched off. Request of the current vehicle posi‐
tion.
Split screen
General information
Additional information can be displayed on the
right side of the split screen, e.g., information
from the computer.
In the divided screen view, the so-called split
screen, this information remains visible even
when you change to another menu.
Seite 22At a glanceiDrive22
Online Edition for Part no. 01 40 2 914 595 - VI/12
Page 121 of 291
cover for the snap-in adapter, depending on the
version.
Details on this mobile phone cradle, refer to
page 202.
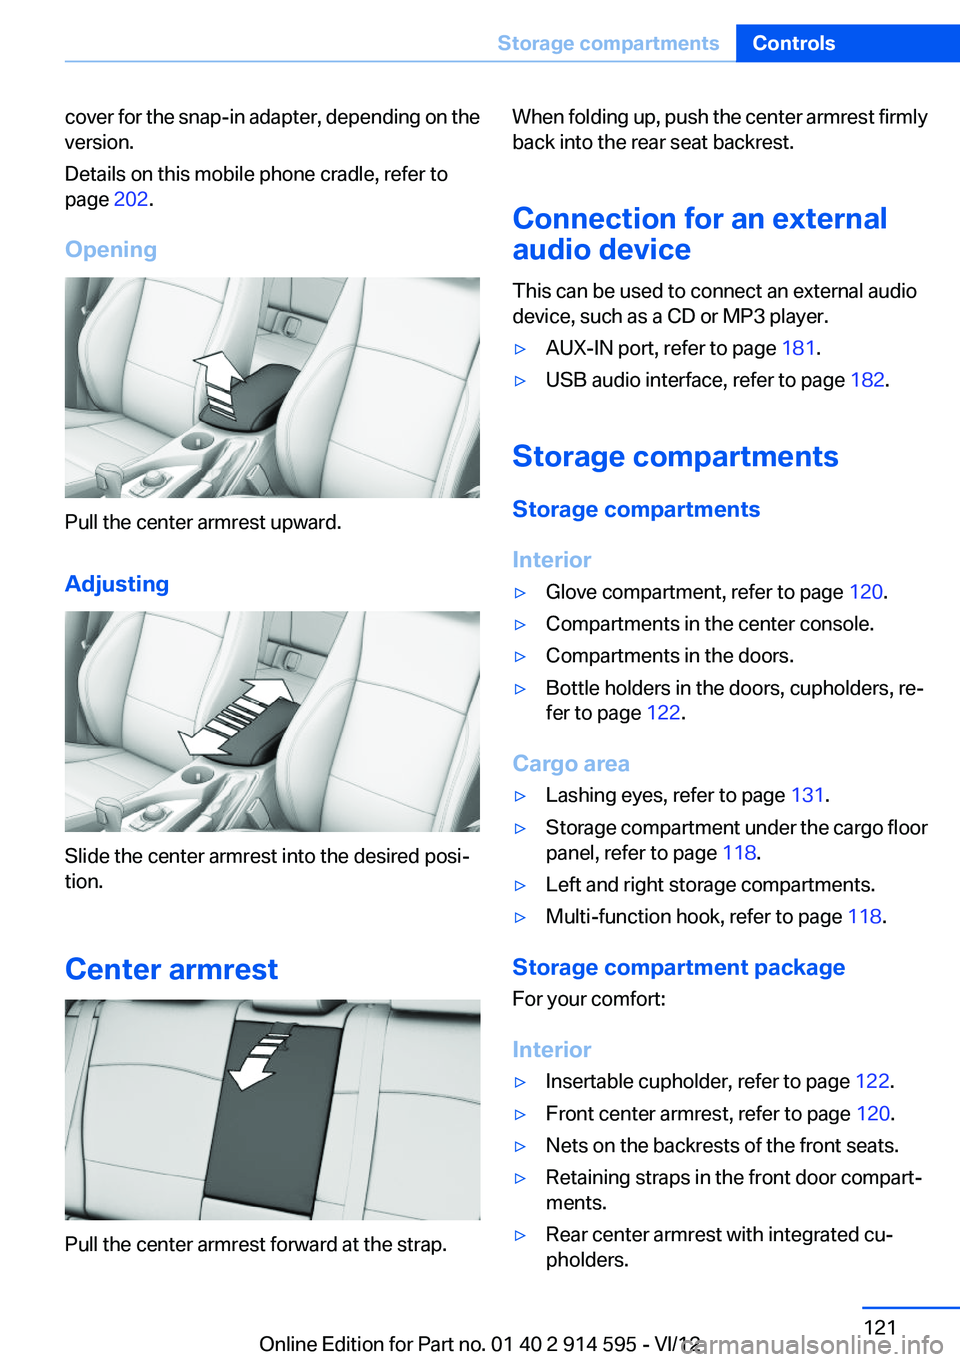
Opening
Pull the center armrest upward.
Adjusting
Slide the center armrest into the desired posi‐
tion.
Center armrest
Pull the center armrest forward at the strap.
When folding up, push the center armrest firmly
back into the rear seat backrest.
Connection for an external
audio device
This can be used to connect an external audio
device, such as a CD or MP3 player.▷AUX-IN port, refer to page 181.▷USB audio interface, refer to page 182.
Storage compartments
Storage compartments
Interior
▷Glove compartment, refer to page 120.▷Compartments in the center console.▷Compartments in the doors.▷Bottle holders in the doors, cupholders, re‐
fer to page 122.
Cargo area
▷Lashing eyes, refer to page 131.▷Storage compartment under the cargo floor
panel, refer to page 118.▷Left and right storage compartments.▷Multi-function hook, refer to page 118.
Storage compartment package
For your comfort:
Interior
▷Insertable cupholder, refer to page 122.▷Front center armrest, refer to page 120.▷Nets on the backrests of the front seats.▷Retaining straps in the front door compart‐
ments.▷Rear center armrest with integrated cu‐
pholders.Seite 121Storage compartmentsControls121
Online Edition for Part no. 01 40 2 914 595 - VI/12
Page 138 of 291

Navigation systemVehicle equipment
This chapter describes all series equipment as
well as country-specific and special equipment
offered for this model series.Therefore, it also
describes equipment that may not be found in
your vehicle, for instance due to the selected
special equipment or the country version. This
also applies to safety-related functions and sys‐
tems.
General information
The navigation system can determine the pre‐
cise position of the vehicle, with the aid of sat‐
ellites and vehicle sensors, and can reliably
guide you to every entered destination.
Entries in stationary vehicle
Enter data only when the vehicle is sta‐
tionary, and always give priority to the applicable
traffic regulations in the event of any contradic‐
tion between traffic and road conditions and the
instructions issued by the navigation system.
Failure to take to this precaution can place you
in violation of the law and put vehicle occupants
and other road users in danger.◀
Opening the navigation system1. Press the button on the controller.2."Navigation"
The navigation system can also be called
up directly using the button on the con‐
troller.
Navigation data
Information on navigation data
1."Navigation"2.Open "Options".3."Navigation system version"
Information is displayed on the data version.
Updating the navigation data
General information
Navigation data are stored in the vehicle and can
be updated.
Current navigation data and the authorization
code are available from your service center.
▷Depending on the data volume, a data up‐
date may take several hours.▷Update during the trip to preserve battery.▷During the update, only the basic functions
of the navigation system are available.▷The status of the update can be viewed.▷After the updating process is complete, the
system restarts.▷Remove the medium with the navigation
data after the update.
Performing an update
1.Insert the navigation DVD into the DVD
player with the labeled side facing up.2.Follow the instructions on the Control Dis‐
play.3.Enter the authorization code of the naviga‐
tion DVD.4.Change the DVD if necessary.
After the trip is interrupted, follow the instruc‐
tions on the Control Display.
Viewing the status
1.Open "Options".2."Navigation update"Seite 138NavigationNavigation system138
Online Edition for Part no. 01 40 2 914 595 - VI/12
Page 170 of 291

CD/multimediaVehicle equipment
This chapter describes all series equipment as
well as country-specific and special equipment
offered for this model series.Therefore, it also
describes equipment that may not be found in
your vehicle, for instance due to the selected
special equipment or the country version. This
also applies to safety-related functions and sys‐
tems.
Controls1Volume, on/off2Eject CD/DVD3CD/DVD drive4Change the entertainment source5Change station/track6Programmable memory buttons
Sound output
Switching on/off
When the ignition is switched off: press ON/OFF
button on the radio.
Muting
When the ignition is switched on or the engine
is running: press the ON/OFF button on the
radio.
CD/DVD
Playback
Loading the CD/DVD player
Insert the CD/DVD with the printed side up.
Playback begins automatically.
Reading can take a few minutes with com‐
pressed audio files.
Starting playback
A CD/DVD is located in the CD/DVD player or a
CD is located in the CD changer.1."CD/Multimedia"2."CD/DVD"3.Select the desired CD or DVD.SymbolMeaning CD/DVD player ... CD changer
Playable formats
▷DVD: DVD-ROM, DVD-R, DVD+R, DVD-
RW, DVD+RW, DVD-R DL, DVD+R DL, DVD
audio (video part only), DVD video.▷CD: CD-ROM, CD-R, CD-RW, CD-DA.▷Compressed audio files: MP3, WMA, AAC,
M4A.Seite 170EntertainmentCD/multimedia170
Online Edition for Part no. 01 40 2 914 595 - VI/12
Page 175 of 291
The CD magazine is ejected.
Wait at least 2 seconds before sliding the mag‐
azine back in to ensure that the inserted CDs can
be read in.
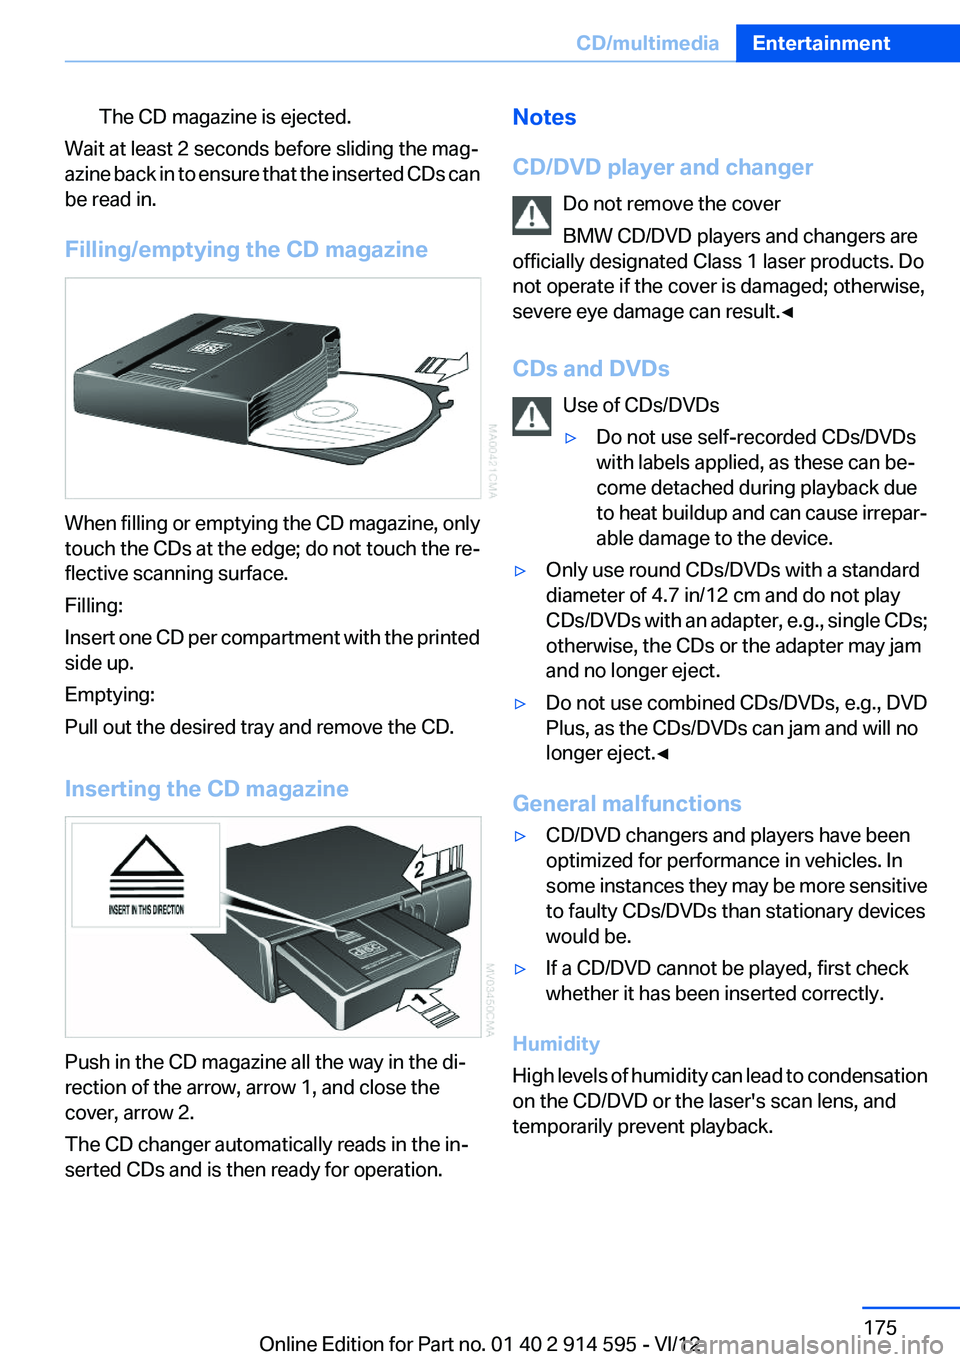
Filling/emptying the CD magazine
When filling or emptying the CD magazine, only
touch the CDs at the edge; do not touch the re‐
flective scanning surface.
Filling:
Insert one CD per compartment with the printed
side up.
Emptying:
Pull out the desired tray and remove the CD.
Inserting the CD magazine
Push in the CD magazine all the way in the di‐
rection of the arrow, arrow 1, and close the
cover, arrow 2.
The CD changer automatically reads in the in‐
serted CDs and is then ready for operation.
Notes
CD/DVD player and changer Do not remove the cover
BMW CD/DVD players and changers are
officially designated Class 1 laser products. Do
not operate if the cover is damaged; otherwise,
severe eye damage can result.◀
CDs and DVDs Use of CDs/DVDs▷Do not use self-recorded CDs/DVDs
with labels applied, as these can be‐
come detached during playback due
to heat buildup and can cause irrepar‐
able damage to the device.▷Only use round CDs/DVDs with a standard
diameter of 4.7 in/12 cm and do not play
CDs/DVDs with an adapter, e.g., single CDs;
otherwise, the CDs or the adapter may jam
and no longer eject.▷Do not use combined CDs/DVDs, e.g., DVD
Plus, as the CDs/DVDs can jam and will no
longer eject.◀
General malfunctions
▷CD/DVD changers and players have been
optimized for performance in vehicles. In
some instances they may be more sensitive
to faulty CDs/DVDs than stationary devices
would be.▷If a CD/DVD cannot be played, first check
whether it has been inserted correctly.
Humidity
High levels of humidity can lead to condensation
on the CD/DVD or the laser's scan lens, and
temporarily prevent playback.
Seite 175CD/multimediaEntertainment175
Online Edition for Part no. 01 40 2 914 595 - VI/12
Page 177 of 291
#6,230,192, #6,230,207, #6,240,459,
#6,330,593, and other patents issued or pend‐
ing. Some services supplied under license from
Open Globe, Inc. for U.S. Patent: #6,304,523.
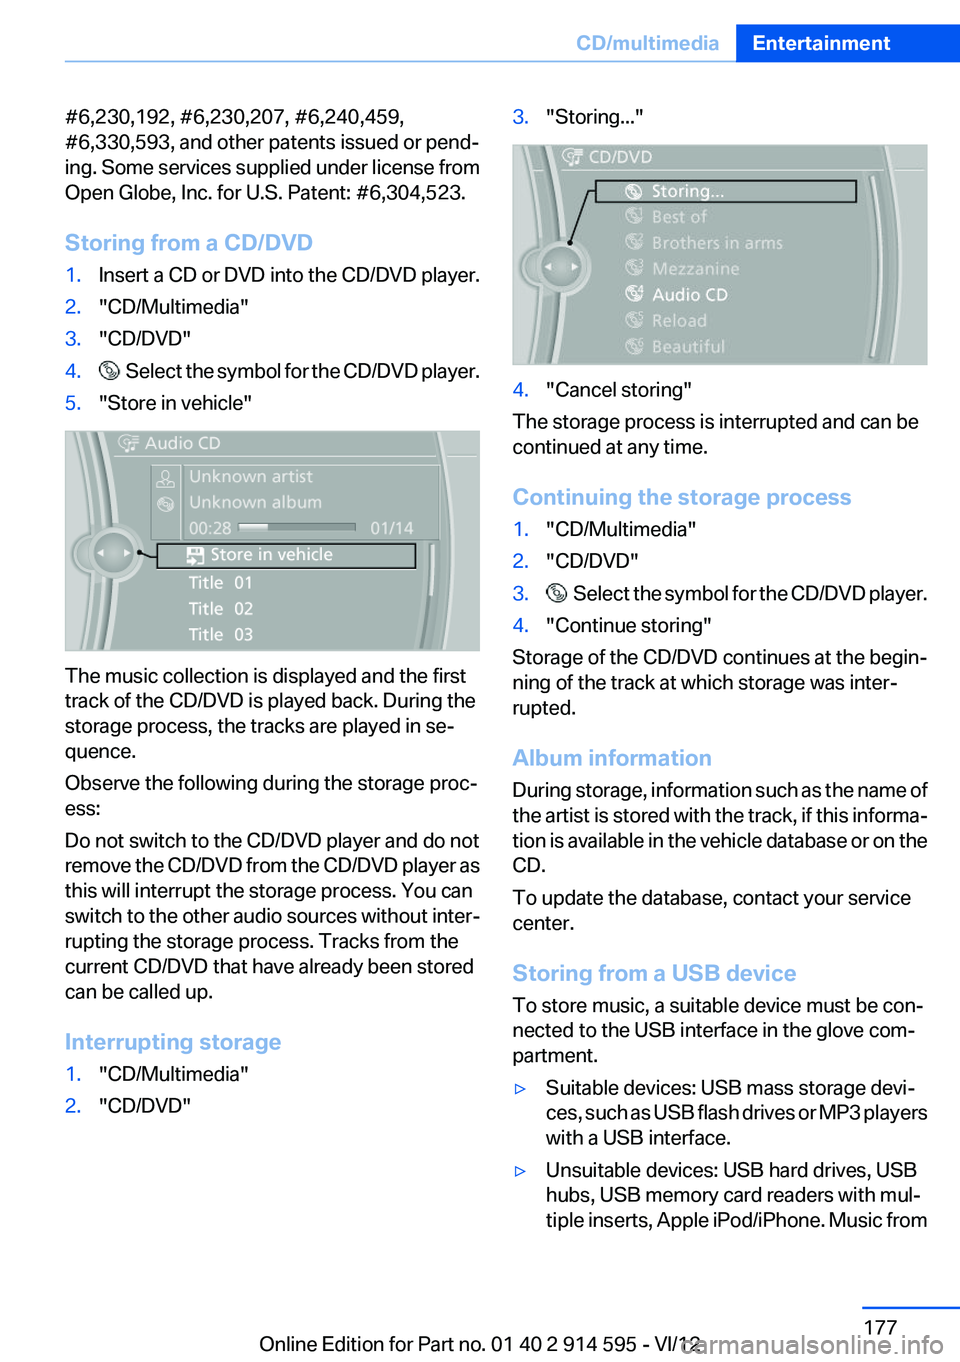
Storing from a CD/DVD1.Insert a CD or DVD into the CD/DVD player.2."CD/Multimedia"3."CD/DVD"4. Select the symbol for the CD/DVD player.5."Store in vehicle"
The music collection is displayed and the first
track of the CD/DVD is played back. During the
storage process, the tracks are played in se‐
quence.
Observe the following during the storage proc‐
ess:
Do not switch to the CD/DVD player and do not
remove the CD/DVD from the CD/DVD player as
this will interrupt the storage process. You can
switch to the other audio sources without inter‐
rupting the storage process. Tracks from the
current CD/DVD that have already been stored
can be called up.
Interrupting storage
1."CD/Multimedia"2."CD/DVD"3."Storing..."4."Cancel storing"
The storage process is interrupted and can be
continued at any time.
Continuing the storage process
1."CD/Multimedia"2."CD/DVD"3. Select the symbol for the CD/DVD player.4."Continue storing"
Storage of the CD/DVD continues at the begin‐
ning of the track at which storage was inter‐
rupted.
Album information
During storage, information such as the name of
the artist is stored with the track, if this informa‐
tion is available in the vehicle database or on the
CD.
To update the database, contact your service
center.
Storing from a USB device
To store music, a suitable device must be con‐
nected to the USB interface in the glove com‐
partment.
▷Suitable devices: USB mass storage devi‐
ces, such as USB flash drives or MP3 players
with a USB interface.▷Unsuitable devices: USB hard drives, USB
hubs, USB memory card readers with mul‐
tiple inserts, Apple iPod/iPhone. Music fromSeite 177CD/multimediaEntertainment177
Online Edition for Part no. 01 40 2 914 595 - VI/12
Page 181 of 291
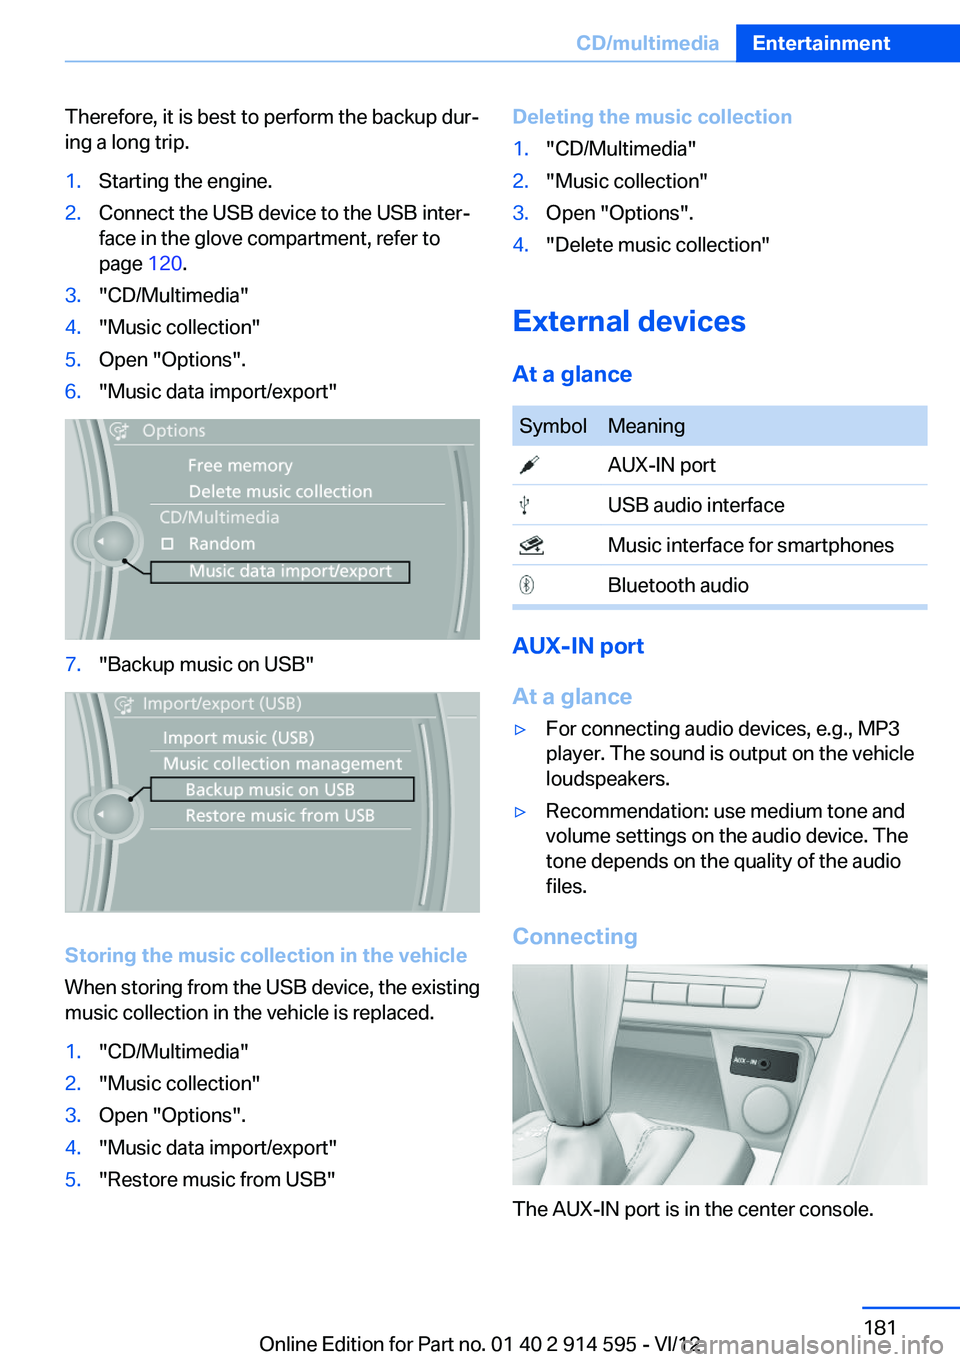
Therefore, it is best to perform the backup dur‐
ing a long trip.1.Starting the engine.2.Connect the USB device to the USB inter‐
face in the glove compartment, refer to
page 120.3."CD/Multimedia"4."Music collection"5.Open "Options".6."Music data import/export"7."Backup music on USB"
Storing the music collection in the vehicle
When storing from the USB device, the existing
music collection in the vehicle is replaced.
1."CD/Multimedia"2."Music collection"3.Open "Options".4."Music data import/export"5."Restore music from USB"Deleting the music collection1."CD/Multimedia"2."Music collection"3.Open "Options".4."Delete music collection"
External devices
At a glance
SymbolMeaning AUX-IN port USB audio interface Music interface for smartphones Bluetooth audio
AUX-IN port
At a glance
▷For connecting audio devices, e.g., MP3
player. The sound is output on the vehicle
loudspeakers.▷Recommendation: use medium tone and
volume settings on the audio device. The
tone depends on the quality of the audio
files.
Connecting
The AUX-IN port is in the center console.
Seite 181CD/multimediaEntertainment181
Online Edition for Part no. 01 40 2 914 595 - VI/12
Page 192 of 291
TelephoneVehicle equipment
This chapter describes all series equipment as
well as country-specific and special equipment
offered for this model series.Therefore, it also
describes equipment that may not be found in
your vehicle, for instance due to the selected
special equipment or the country version. This
also applies to safety-related functions and sys‐
tems.
At a glance
The concept
Mobile phones or other external devices such as
audio players can be connected to the vehicle
via Bluetooth.
Bluetooth® is a registered trademark of Blue‐
tooth® SIG, Inc.
After these devices are paired once, they are
recognized automatically when the ignition is
switched on as soon as they are in the vehicle
and can then be operated via iDrive, the buttons
on the steering wheel, and via voice activation.
Depending on their functionality, external devi‐
ces can be used via the vehicle as a telephone
or as an audio source. The telephone functions
are described in the following. Operating the au‐
dio functions, refer to page 185.
Up to four external devices can be paired.
Certain functions may need to be enabled by the
mobile phone provider or service provider.
Using the mobile phone while driving
Make entries only when traffic and road
conditions allow. Do not hold the mobile phone
in your hand while you are driving; use the
hands-free system instead. If you do not ob‐
serve this precaution, you can endanger the ve‐
hicle occupants and other road users.◀Snap-in adapter
The snap-in adapter is used to:▷Hold the mobile phone.▷Recharge the battery.▷Connect the mobile phone to an outside an‐
tenna of the vehicle.
This provides for better network reception
and consistent sound quality.
Approved mobile phones
Details on which mobile phones and external
devices with a Bluetooth interface are sup‐
ported by the mobile phone preparation pack‐
age can be obtained at www.bmwusa.com/blue‐
tooth.
Displaying the vehicle identification
number and software part number
The vehicle identification number and software
part number are needed to determine which mo‐
bile phones are supported by the mobile phone
preparation package. The software version of
the mobile phone may also be required.
1."Telephone"2.Open "Options".3."Bluetooth® info"4."Display system information"
These approved mobile phones with a certain
software version, support the vehicle functions
described below.
Malfunctions may occur with other mobile
phones or software versions.
Do not operate a mobile phone that is connected
to the vehicle on the mobile phone keypad, as
this may lead to a malfunction.
A software update, refer to page 188, can be
performed if necessary.
Seite 192CommunicationTelephone192
Online Edition for Part no. 01 40 2 914 595 - VI/12