2013 BMW 640I GRAN COUPE manual transmission
[x] Cancel search: manual transmissionPage 53 of 305
Estimating distances correctly
Objects reflected in the mirror are closer
than they appear. Do not estimate the distance
to the traffic behind you based on what you see
in the mirror, as this will increase your risk of an
accident.◀
Depending on how the vehicle is equipped, the
mirror setting is stored for the remote control in
use. When the vehicle is unlocked via the remote
control, the position is automatically retrieved if
the setting for this function is active.
Selecting a mirror To change over to the other mirror:
Slide the mirror changeover switch.
Adjusting electrically The setting corresponds to the direction
in which the button is pressed.
Storing positions
Seat, mirror, and steering wheel memory, refer
to page 52.
Adjusting manually
If an electrical malfunction occurs, for example,
press the edges of the mirror glass.
Automatic Curb Monitor
When the reverse gear is engaged, the mirror
glass tilts downward slightly on the front pas‐
senger side. This improves your view of the curb
and other low-lying obstacles when parking, for
example.
Activating1. Slide the mirror changeover switch
to the driver's side mirror position.2.Engage transmission position R.Deactivating
Slide the mirror changeover switch to the pas‐
senger's side mirror position.
Fold in and out Press the button.
Possible up to approx. 15 mph/20 km/h.
For example, this is advantageous▷In car washes.▷In narrow streets.▷For folding back mirrors that were folded
away manually.
Mirrors that were folded in are folded out auto‐
matically at a speed of approx. 25 mph/40 km/h.
Fold in the mirror in a car wash
Before entering an automatic car wash,
fold in the exterior mirrors by hand or with the
button; otherwise, they could be damaged, de‐
pending on the width of the vehicle.◀
Automatic heating
Both exterior mirrors are automatically heated
whenever the engine is running.
Automatic dimming feature
Both exterior mirrors are automatically dimmed.
Photocells are used for control in the Interior rear
view mirror, refer to page 54.
Seite 53AdjustingControls53
Online Edition for Part no. 01 40 2 900 405 - 03 12 490
Page 61 of 305
Preventing an automatic engine stop
with automatic transmission
The concept
To make it possible to drive away very quickly,
such as at an intersection, the automatic engine
stop can be actively prevented.
Preventing an engine stop using the
brake pedal
The engine stop can be actively prevented
within one second after the vehicle comes to a
standstill.▷Immediately after the vehicle comes to a
standstill, briefly press the brake pedal
forcefully.▷Then press the brake pedal with normal
braking force.
Activating/deactivating the system
manually
Using the button
Press the button.
▷LED comes on: Auto Start Stop function is
deactivated.
The engine is started during an automatic
engine stop.
The engine can only be stopped or started
via the Start/Stop button.▷LED goes out: Auto Start Stop function is
activated.Switching off the vehicle during an
automatic engine stop
During an automatic engine stop, the vehicle
can be switched off permanently, e.g., when
leaving it.1.Press the Start/Stop button. The ignition is
switched off. The Auto Start/Stop function
is deactivated.
Transmission position P is engaged auto‐
matically.2.Set the parking brake.
Engine start as usual via Start/Stop button.
Automatic deactivation
In certain situations, the Automatic Engine Start/
Stop Function is deactivated automatically for
safety reasons, such as when the driver is de‐
tected to be absent.
Malfunction
The automatic engine start/stop function no lon‐
ger switches of the engine automatically. A
Check Control message is displayed. It is pos‐
sible to continue driving. Have the system
checked.
Parking brake
The concept
The parking brake is primarily intended to pre‐
vent the vehicle from rolling while parked; it
brakes the rear wheels.
Seite 61DrivingControls61
Online Edition for Part no. 01 40 2 900 405 - 03 12 490
Page 68 of 305
Engaging P
Press button P.
Sport program DS and manual mode M/
S
Activating sport program DS
Push the selector lever to the left out of trans‐
mission position D.
DS is displayed in the instrument cluster.
The sport program of the transmission is acti‐
vated.
Activating the M/S manual mode
Push the selector lever to the left out of trans‐
mission position D.
Push the selector lever forward or backward.
Manual mode becomes active and the gear is
changed.
The engaged gear is displayed in the instrument
cluster, e.g., M1.
▷To shift down: press the selector lever for‐
ward.▷To shift up: pull the selector lever rearwards.The vehicle only shifts up or down at appropriate
engine and road speeds, e.g., it does not shift
down if the engine speed is too high.
The selected gear is briefly displayed in the in‐
strument cluster, followed by the current gear.
Manual mode M/S: prevent automatic
upshifting
Once maximum engine speed is attained, M/S
manual mode is automatically upshifted as
needed.
For vehicles with Sport automatic transmis‐
sions, automatic shift operations are not per‐
formed if one of the following conditions is met:▷DSC deactivated.▷TRACTION activated.▷SPORT+ activated.
In addition, the kickdown is deactivated.
Ending the sport program/manual
mode
Push the selector lever to the right.
D is displayed in the instrument cluster.
Shift paddles for Sport automatic
transmission
The shift paddles on the steering wheel allow
you to shift gears quickly while keeping both
hands on the steering wheel.
If the shift paddles on the steering wheel are
used to shift gears in automatic mode, the trans‐
mission temporarily switches to manual mode.
If the shift paddles are not used and the vehicle
is not accelerated for a certain time, the system
Seite 68ControlsDriving68
Online Edition for Part no. 01 40 2 900 405 - 03 12 490
Page 116 of 305
▷In large buildings with right angles and
smooth walls, e.g., in underground garages.▷In heavy exhaust.▷Due to other ultrasound sources, e.g.,
sweeping machines, high pressure steam
cleaners or neon lights.
Switching on automatically
Select transmission position R with the engine
running.
Automatic deactivation during forward
travel
The system switches off when a certain driving
distance or speed is exceeded.
Switch the system back on if necessary.
Switching on/off manually
Press the button.
▷On: the LED lights up.▷Off: the LED goes out.
Signal tones
When approaching an object, an intermittent
tone is sounded that indicates the position of the
object. For example, if an object is detected to
the left rear of the vehicle, a signal tone sounds
from the left rear speaker.
The shorter the distance to the object becomes,
the shorter the intervals.
If the distance to a detected object is less than
approx. 12 in/30 cm, a continuous tone is
sounded.
If objects are located both in front of and behind
the vehicle, an alternating continuous signal is
sounded.
The intermittent tone is interrupted after approx.
3 seconds:▷If the vehicle stops in front of an object that
is detected by only one of the corner sen‐
sors.▷If moving parallel to a wall.
The signal tone is switched off:
▷When the vehicle moves away from an ob‐
ject by more than approx. 4 in/10 cm.▷When transmission position P is engaged.
Volume
You can set the volume of the PDC signal tone,
refer to page 181.
The setting is stored for the remote control cur‐
rently in use.
Visual warning
The approach of the vehicle to an object can be
shown on the Control Display. Objects that are
farther away are displayed on the Control Dis‐
play before a signal tone sounds.
A display appears as soon as Park Distance
Control (PDC) is activated.
If the backup camera image was selected last, it
again appears on the display. To switch to PDC:
1. "Rear view camera" Select the symbol
on the Control Display.2.Press the controller.
The setting is stored for the remote control cur‐
rently in use.
Zoom view
On the left part of the display screen, the vehicle
is shown enlarged.
Seite 116ControlsDriving comfort116
Online Edition for Part no. 01 40 2 900 405 - 03 12 490
Page 118 of 305
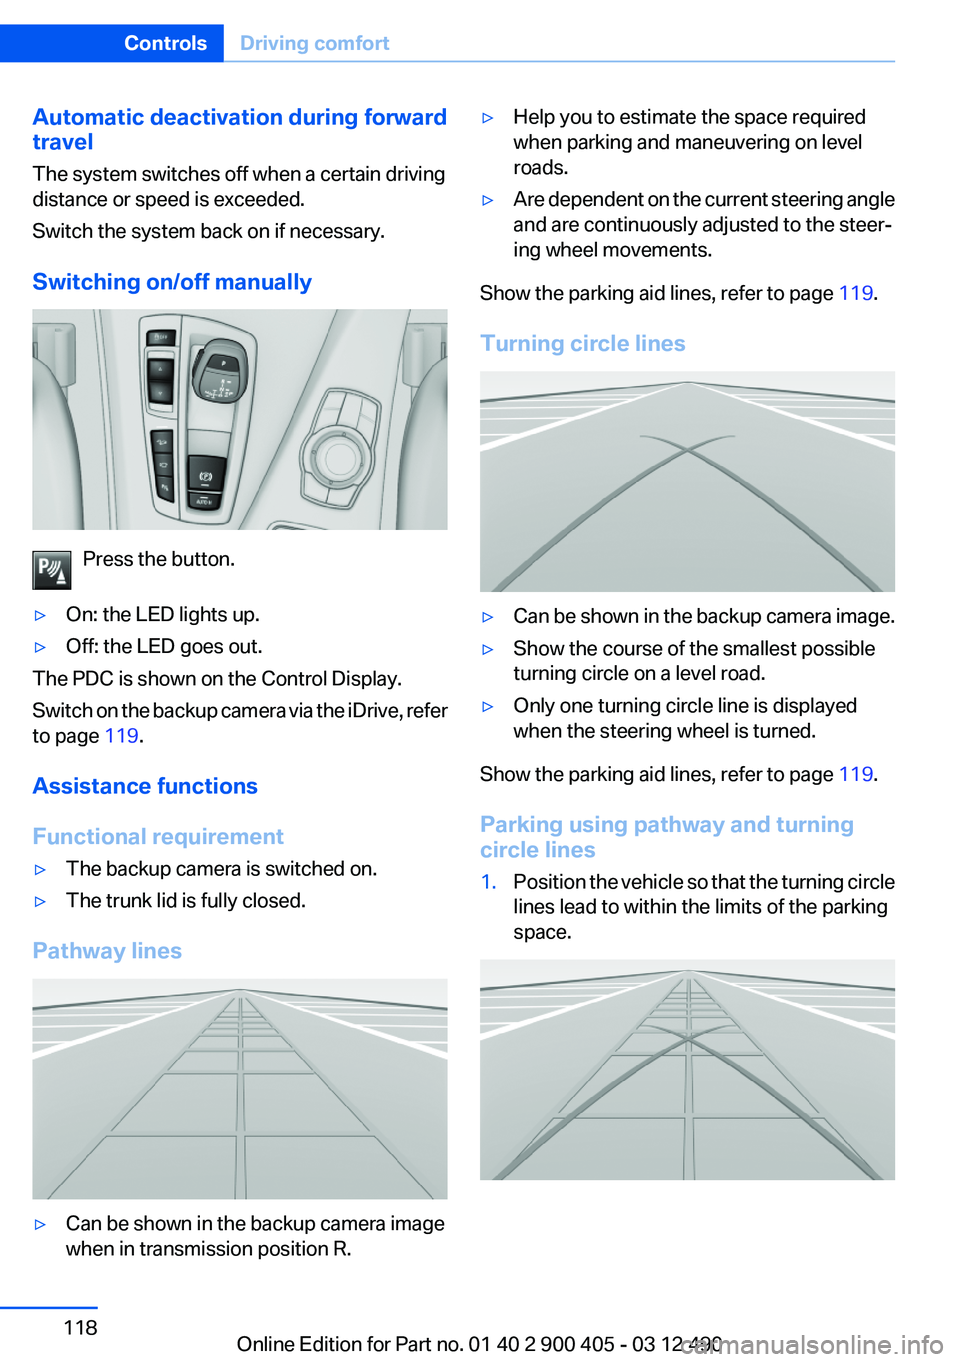
Automatic deactivation during forward
travel
The system switches off when a certain driving
distance or speed is exceeded.
Switch the system back on if necessary.
Switching on/off manually
Press the button.
▷On: the LED lights up.▷Off: the LED goes out.
The PDC is shown on the Control Display.
Switch on the backup camera via the iDrive, refer
to page 119.
Assistance functions
Functional requirement
▷The backup camera is switched on.▷The trunk lid is fully closed.
Pathway lines
▷Can be shown in the backup camera image
when in transmission position R.▷Help you to estimate the space required
when parking and maneuvering on level
roads.▷Are dependent on the current steering angle
and are continuously adjusted to the steer‐
ing wheel movements.
Show the parking aid lines, refer to page 119.
Turning circle lines
▷Can be shown in the backup camera image.▷Show the course of the smallest possible
turning circle on a level road.▷Only one turning circle line is displayed
when the steering wheel is turned.
Show the parking aid lines, refer to page 119.
Parking using pathway and turning
circle lines
1.Position the vehicle so that the turning circle
lines lead to within the limits of the parking
space.Seite 118ControlsDriving comfort118
Online Edition for Part no. 01 40 2 900 405 - 03 12 490
Page 120 of 305
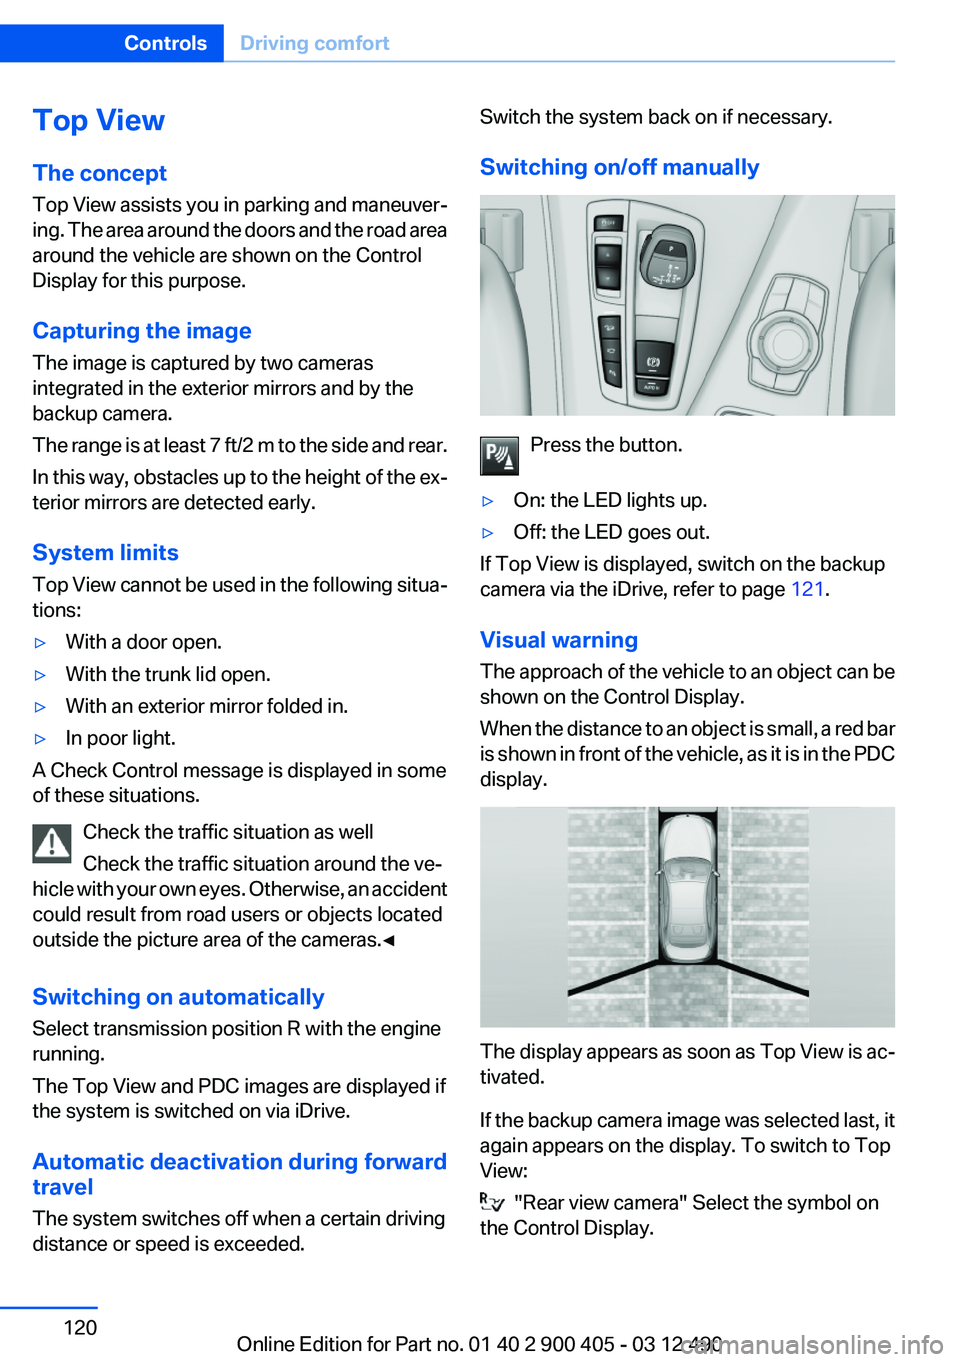
Top View
The concept
Top View assists you in parking and maneuver‐
ing. The area around the doors and the road area
around the vehicle are shown on the Control
Display for this purpose.
Capturing the image
The image is captured by two cameras
integrated in the exterior mirrors and by the
backup camera.
The range is at least 7 ft/2 m to the side and rear.
In this way, obstacles up to the height of the ex‐
terior mirrors are detected early.
System limits
Top View cannot be used in the following situa‐
tions:▷With a door open.▷With the trunk lid open.▷With an exterior mirror folded in.▷In poor light.
A Check Control message is displayed in some
of these situations.
Check the traffic situation as well
Check the traffic situation around the ve‐
hicle with your own eyes. Otherwise, an accident
could result from road users or objects located
outside the picture area of the cameras.◀
Switching on automatically
Select transmission position R with the engine
running.
The Top View and PDC images are displayed if
the system is switched on via iDrive.
Automatic deactivation during forward
travel
The system switches off when a certain driving
distance or speed is exceeded.
Switch the system back on if necessary.
Switching on/off manually
Press the button.
▷On: the LED lights up.▷Off: the LED goes out.
If Top View is displayed, switch on the backup
camera via the iDrive, refer to page 121.
Visual warning
The approach of the vehicle to an object can be
shown on the Control Display.
When the distance to an object is small, a red bar
is shown in front of the vehicle, as it is in the PDC
display.
The display appears as soon as Top View is ac‐
tivated.
If the backup camera image was selected last, it
again appears on the display. To switch to Top
View:
"Rear view camera" Select the symbol on
the Control Display.
Seite 120ControlsDriving comfort120
Online Edition for Part no. 01 40 2 900 405 - 03 12 490
Page 152 of 305
Only use floor mats that have been approved for
the vehicle and can be properly fixed in place.
Ensure that the floor mats are securely fastened
again after they were removed for cleaning, for
example.◀
Driving in wet conditions
When roads are wet or there is heavy rain, briefly
exert gentle pressure on the brake pedal every
few miles.
Ensure that this action does not endanger other
road users.
The heat generated in this process helps dry the
brake discs and pads.
In this way braking efficiency will be available
when you need it.
Hills
Drive long or steep downhill gradients in the gear
in which the least braking is required. Otherwise,
the brake system may overheat, resulting in a
reduction in the brake system efficiency.
You can increase the engine's braking effect by
shifting down in the manual mode of the auto‐
matic transmission.
Avoid load on the brakes
Avoid placing excessive load on the brake
system. Light but consistent brake pressure can
lead to high temperatures, brake wear and pos‐
sibly even brake failure.◀
Do not drive in neutral
Do not drive in neutral or with the engine
stopped, as doing so disables engine braking. In
addition, steering and brake assist is unavailable
with the engine stopped.◀
Brake disc corrosion
Corrosion on the brake discs and contamination
on the brake pads are furthered by:▷Low mileage.▷Extended periods when the vehicle is not
used at all.▷Infrequent use of the brakes.
Corrosion occurs when the minimum pressure
that must be exerted by the pads during brake
applications to clean the discs is not reached.
Should corrosion form on the brake discs, the
brakes will tend to respond with a pulsating ef‐
fect that generally cannot be corrected.
Condensation under the parked vehicle
When using the automatic climate control, con‐
densation water develops that exits underneath
the vehicle.
Therefore, traces of condensed water under the
vehicle are normal.
Seite 152Driving tipsThings to remember when driving152
Online Edition for Part no. 01 40 2 900 405 - 03 12 490
Page 294 of 305
Everything from A to Z
IndexA
ABS, Antilock Brake Sys‐ tem 99
ACC, Active Cruise Control with Stop & Go 105
Activated-charcoal filter 134
Active Blind Spot Detec‐ tion 97
Active Cruise Control with Stop & Go, ACC 105
Active seat, front 48
Active seat ventilation, front 49
Active Steering, integral 101
Adaptive brake assistant 99
Adaptive brake lights, refer to Brake force display 98
Adaptive drive 101
Adaptive light control 84
Additional telephone 214
Additives, oil 260
Adjustments, seats/head re‐ straints 46
After washing vehicle 276
Airbags 87
Airbags, indicator/warning light 88
Air circulation, refer to Recir‐ culated-air mode 133
Air, dehumidifying, refer to Cooling function 133
Air distribution, manual 132
Air pressure, tires 249
Air vents, refer to Ventila‐ tion 134
Air volume, automatic climate control 132
Alarm system 40
Alarm, unintentional 41 All around the center con‐
sole 14
All around the interior rearview mirror 15
All around the steering wheel 12
ALL program, automatic cli‐ mate control 133
All-season tires, refer to Win‐ ter tires 254
Alternating-code hand-held transmitter 137
Alternative oil types 260
AM/FM station 183
Announcement, navigation, refer to Spoken instruc‐
tions 170
Antifreeze, washer fluid 66
Antilock Brake System, ABS 99
Anti-slip control, refer to DSC 99
Applications 241
Appointments 231
Approved axle load 283
Approved engine oils 260
Apps 241
Apps, video playback 206
Armrest, refer to Front center armrest 144
Armrest, refer to Rear center armrest 144
Arrival time 78
Ashtray 138
Ashtray, rear 138
Assistance, Roadside Assis‐ tance 271
Assistance when driving off 99
Assist, BMW 237
Audio playback 192 Audio playback, Blue‐
tooth 206
AUTO H button, refer to Auto‐ matic Hold 62
AUTO intensity 132
Automatic car wash 275
Automatic Cruise Control with Stop & Go 105
Automatic Curb Monitor 53
Automatic deactivation, front passenger airbags 89
Automatic headlamp con‐ trol 83
Automatic Hold 62
Automatic locking 37
Automatic recirculated-air control 133
Automatic Soft Closing, doors 38
Automatic transmission with Steptronic 67
AUTO program, automatic cli‐ mate control 132
AUTO program, intensity 132
Auto Start/Stop function 59
AUX-IN port 203
Average fuel consumption 78
Average speed 78
Axle loads, weights 283
B
Backrest curvature, refer to Lumbar support 47
Backrest, seats 46
Backrest, width 47
Backup camera 117
Balance 180
Band-Aids, refer to First aid kit 271
Bang & Olufsen 181 Seite 294ReferenceEverything from A to Z294
Online Edition for Part no. 01 40 2 900 405 - 03 12 490